![]() Installation and Instruction Manual
Installation and Instruction Manual
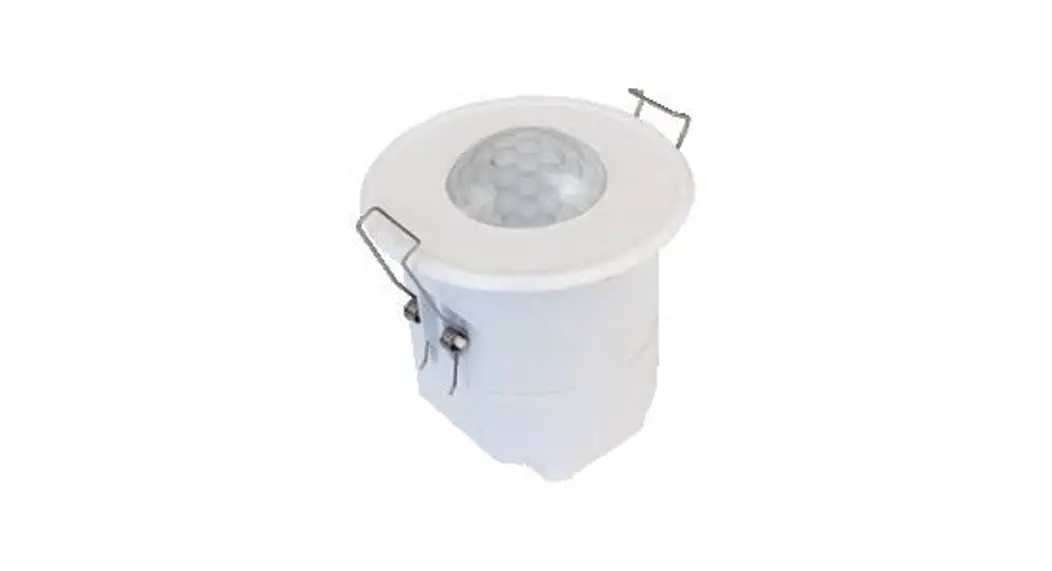
PIR Standalone Motion SensorWith![]()
Mesh One DALI Channel Output
Technical Specifications
| Operation frequency | 2.4 GHz – 2.483 GHz |
| Transmission power | 4 dBm |
| Range (Typical indoor) | 10~30m |
| Protocol | |
| Stand-by power | <0.65W (Empty load) |
| Operating voltage | 220~240VAC 50/60Hz |
| Switched power | 5s |
| Warming-up | Max. 40 devices, 80mA |
| Sensor principle | PIR detection |
| Detection range (Max.)* | Installation height: 20m (forklift) 12m (person) |
| HBIR29/SV/RH | Detection range (Ø): 40m |
| Detection angle | 360º |
| Operation tempera | Ta:-20ºC~+50ºC |
| IP rating | IP20 |
| Standard compliance | EN300328, EN301489-1, EN301489-17, EN62479, EN55015, EN61547, EN60669-1, EN60669-2-1, EN62493 |
| Certification | CE |
Download the App

The access to Silvair apps mobile app: Silvair on the App Store web app: platform.silvair.com
Installation
Mechanical Structure & Dimensions
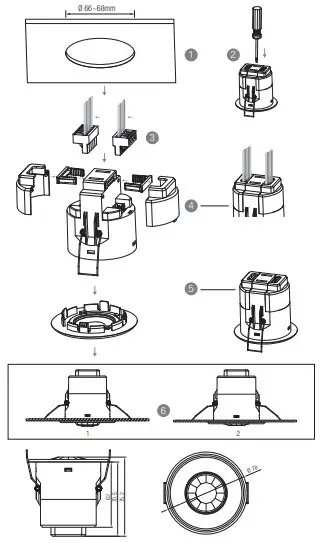
- Ceiling (drill hole φ66~68mm)
- Carefully prise off the cable clamps.
- Make connections to the pluggable terminal blocks.
- Insert plug connectors and secure using the provided cable clamps, then clip terminal covers to the base.
- Fit detection blind (if required) and desired lens.
- Clip fascia to body.
- Bend back springs and insert into ceiling.
Wire Preparation
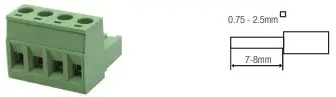
Pluggable screw terminal. It is recommended to make connections to the terminal before fitting to the sensor.
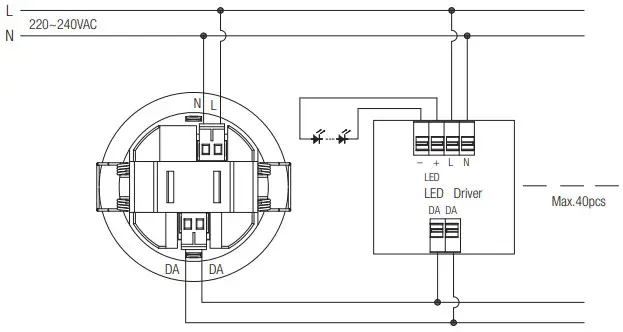
Wiring Diagram
 Mesh Factory Reset
 Mesh Factory Reset
The device HBIR29/SV/RH can be reset by placing a strong magnet (e.g. N38 neodymium magnet, d=10mm*h=4mm) near the sensor lens for 5 seconds. Once the factory reset is done successfully, the luminaire flashes and then permanent on, then the device is being able to be re-commissioned by SILVAIR app.
To Reprovision
Place a strong magnet on the site of the Reset/Hall effect sensor (see diagram 4 below). To trigger the reset the magnet must be held in position for 5 seconds.
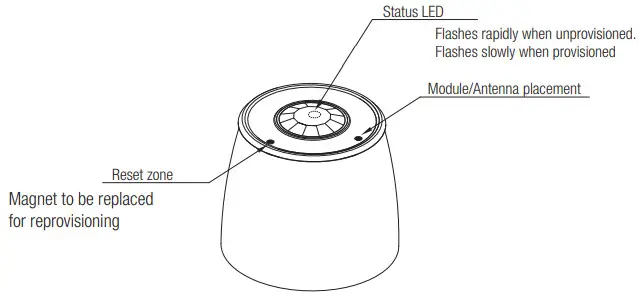
Note: When change the lens part of HBIR29/SV/RH, please kindly make sure that the lens fits the right location, where the “Reset dot” and “BLE dot”matches with the physical location on the PCB.
Status LED blinking Sequence
| HBIR29/SV/RH Unprovisioned | 30ms ON | 300ms OFF |
| HBIR29/SV/RH Provisioned | 15ms ON | 2,000ms OFF |
| Factory reset | 500ms ON | 1,000ms OFF |
| Factory reset (initial burst) | 100ms ON | 1,000ms OFF |
| MESH package received | 30ms ON | 50ms OFF |
| Attention (from network) | 500ms ON | 500ms OFF |
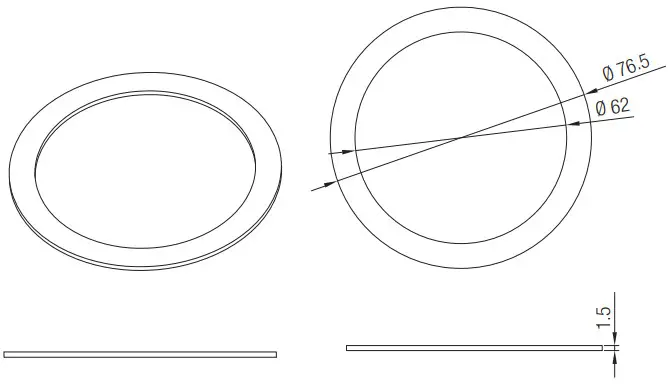
Big and small silicon gasket used to make IP65 degree protection when mounted into HA03 housing for ceiling mount
| Small silicon water-proof gasket dimension(size:mm) | Big silicon water-proof gasket dimension(size:mm) |
 |  |
Detection Pattern & Optional Accessories
HBIR29/SV/RH (Reinforced High-bay with 3-Pyro) HBIR29/SV/RH: Reinforced high-bay lens detection pattern for forklift @ Ta = 20ºC (Recommended ceiling mount installation height 10m-15m)
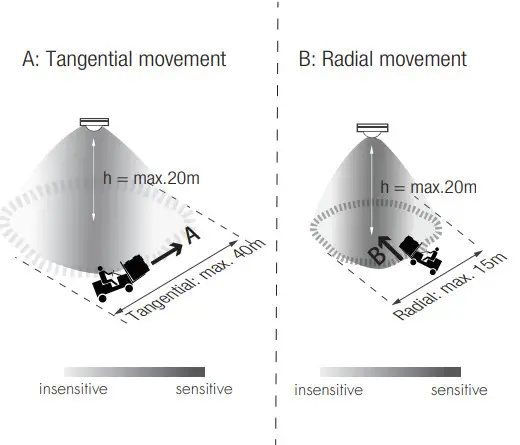
| Mount height | Tangential (A) | Radial (B) |
| 10m | max 346m²(Ø = 21m) | max 177m²(Ø = 15m) |
| 11m | max 660m²(Ø = 29m) | max 177m²(Ø = 15m) |
| 12m | max 907m²(Ø = 34m) | max 154m²(Ø = 14m) |
| 13m | max 962m²(Ø = 35m) | max 154m²(Ø = 14m) |
| 14m | max 1075m²(Ø = 37m) | max 113m²(Ø = 12m) |
| 15m | max 1256m²(Ø = 40m) | max 113m²(Ø = 12m) |
| 20m | max 707m2 (Ø = 30m) | max 113m2 (Ø = 12m) |
HBIR29/SV/RH: Reinforced high-bay lens detection pattern for single person @ Ta = 20OC (Recommended ceiling mount installation height 2.5m-12m)
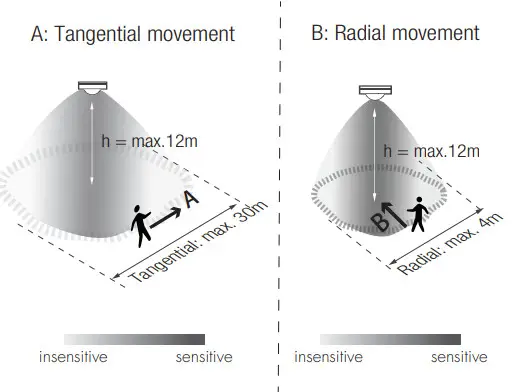
| Mount height | Tangential (A) | Radial (B) |
| 2.5m | max 38m² (Ø = 7m) | max 7m² (Ø = 3m) |
| 6m | max 154m² (Ø = 14m) | max 7m² (Ø = 3m) |
| 8m | max 314m² (Ø = 20m) | max 7m² (Ø = 3m) |
| 10m | max 531m² (Ø = 26m) | max 13m² (Ø = 4m) |
| 11m | max 615m² (Ø = 28m) | max 13m² (Ø = 4m) |
| 12m | max 707m² (Ø = 30m) | max 13m² (Ø = 4m) |
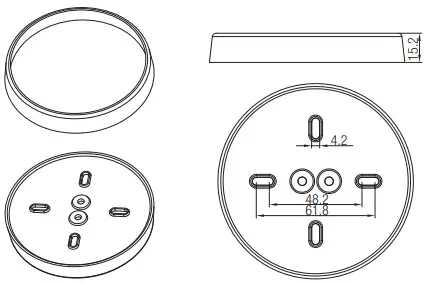
Optional Accessory — Ceiling/Surface Mount Box: HA03

Additional Information / Documents
- Regarding precautions for PIR Sensors installation and operation, please kindly refer to www.hytronik.com/download ->knowledge ->PIR Sensors – Precautions for Product Installation and Operation
- Data sheet is subject to change without notice. Please always refer to the most recent release on www.hytronik.com/products/bluetooth technology ->Partnership
- Regarding Hytronik standard guarantee policy, please refer to www.hytronik.com/download ->knowledge ->Hytronik Standard Guarantee Policy
![]() Subject to change without notice.
Subject to change without notice.
WWW.HYTRONIK.COM
HBIR29/SV/RH-20201012-A0


