![]() Microphone
Microphone
BY-M1LV-U-RX,BY-M1LV-D-RX
BY-M1LVS-U-RX,BY-M1LVS-D- RX
SKM-S1-RXD,SKM-S1-RXU
SKM-S2-RXD,SKM-S2-RXU
MIC-L1-RXD,MIC-L1-RXU
MIC-L2-RXD,MIC-L2-RXU
User Manual
1F0300300465
General Introduction
Thanks for choosing BOYA!
The BOYA BY-M1LV is an incredibly lightweight, ultracompact, and easy-to-use 2.4Ghz wireless microphone system for mobile devices, delivering detailed, exceptional-quality sound.
The BY-M1LV-U-RX receiver features a USB-C output, allowing it to work with Android phones, tablets, and other devices with a USB-C port. The BY-M1LV-TX clip-on transmitter has a high-quality built-in mic. It is small and light enough to clip to shirts and clothing. With gain control, headphone volume control, and mute function, you are in total control of your sound. The BOYA BY-M1LV system provides a great solution for live streaming, content creation, mobile journalism, and more.
Available Kits
| Model | In the box |
| BY-M1LV-D | 1 × BY-M1LV-D-RX |
| 1 × BY-M1LV-TX | |
| BY-M1LV-U | 1 × BY-M1LV-U-RX |
| 1 × BY-M1LV-TX |
Product Structure
BY-M1LV-TX: Clip-on Transmitter with Built-in Microphone
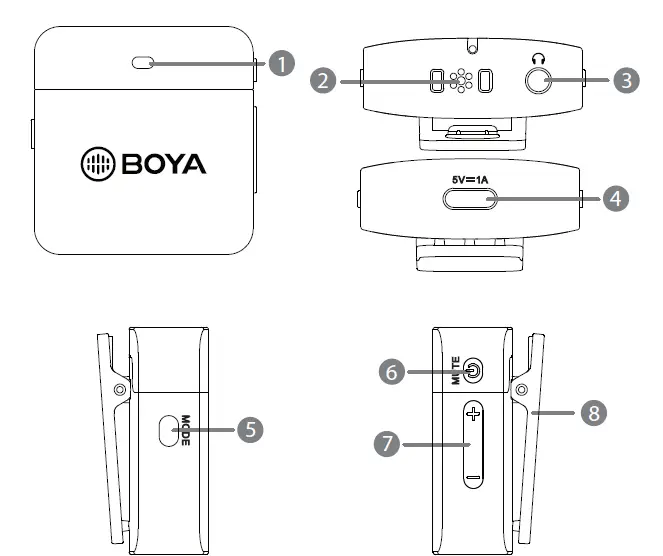
- Status indicator
Mode Indicator Unpaired Flashing blue light Pairing Blue and red lights flash alternately Paired Successfully Slow flashing blue light Mute ON Solid green light Microphone Monitor ON (Supports Direct & Playback Monitoring)
Slow flashing green light Microphone Monitor OFF (Only Supports Playback Monitoring)
Green light off Low Battery Flashing red light Charging Solid red light Fully Charged Light off - Built-in microphone
- 3.5mm headphone jack
– Connect headphones for audio monitoring. - USB-C charging port
- Mode button
Function Operation Gain adjustment Short press the button to adjust mic gain. (There are 3 steps for gain setting) Enable microphone monitor function Double-click the button to enter microphone monitor mode. Then, press the +/-button to adjust headphone volume. Double-click the button again to exit the microphone monitor mode. - Power/Mute button
Function Operation Power ON/OFF Press and hold for 3 seconds Mute ON/OFF Short press Pairing Double-click - Volume control (+-button)
– Press the +/- button to adjust headphone volume. - Belt clip
Voice Prompt
| Power ON | “Power ON” |
| Power OFF | “Power OFF” |
| Connected | “Bluetooth Connected” |
| Disconnected | “Bluetooth Disconnected” |
| Class One (Gain Setting) | “Class One” |
| Class Two (Gain Setting) | “Class Two” |
| Class Three (Gain Setting) | “Class Three” |
| Microphone Monitor Function Enabled | “Microphone Monitor ON” |
| Microphone Monitor Function Disabled | “Microphone Monitor OFF” |
| Low Battery | “Battery Low” |
| Mute OFF | “Microphone ON” |
| Mute ON | “Microphone OFF” |
BY-M1LV-U-RX: Compact Receiver with USB-C Connector

- USB-C Connector
– It can be connected to an Android smartphone, tablet, or other USB-C devices. - Pairing Indicator
Mode Indicator Unpaired Flashing blue light Pairing Quick fashing blue light Paired Successfully Slow fashing blue light - Pair Pinhole
Operation Guide
- Press and hold the power button for 3 seconds to turn on the transmitter.
- Plug the BY-M1LV-D-RX into an iOS device or the BY-M1LV-U-RX into a USB-C device.
- Transmitter and receiver pairing
Before leaving the factory, the system is pre-paired. Therefore, the connection will be established once they are powered on. If they are disconnected, please follow the steps below:
① Double-click the power button of the transmitter. The indicator flashes blue and red alternately.
② When the transmitter indicator flashes blue and red alternately, insert the supplied pairing pin into the small pinhole on the receiver. The indicator of the receiver flashes blue rapidly.
③ Transmitter and receiver will be paired within 10 seconds. Indicators of both will flash blue slowly. - You are ready to record.
![]() Note:
Note:
Due to 2.4GHz wireless frequency, a signal can be easily attenuated. Please try to avoid obstacles, such as walls and buildings, and avoid close proximity to devices with 2.4GHz signals, such as high-power wifi antennas, smartphones with wifi in use, radios, etc.
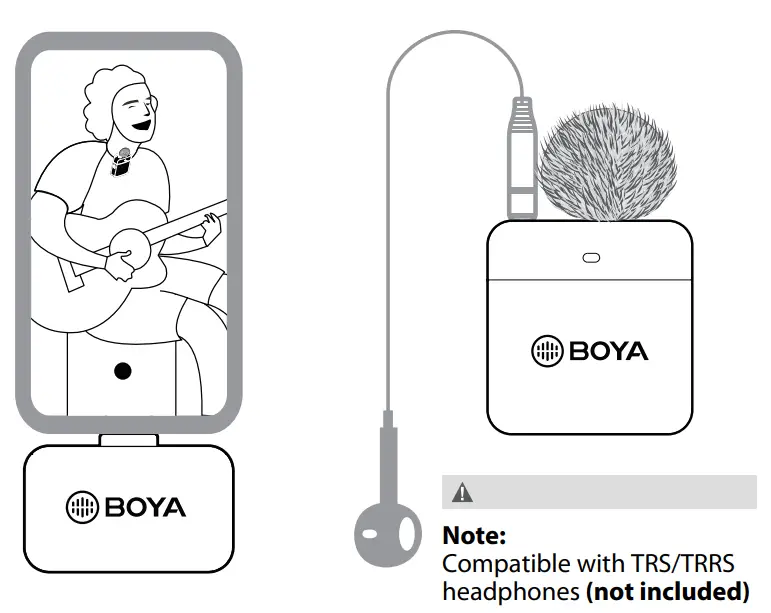
Connection Example
Specifications
BY-M1LV-TX
| Transmission Type | 2.4GHz |
| Modulation | GFSK |
| Operating Range | Up to 328′ (100m) (without obstacles) |
| RF Output Power | -3.190dBm |
| Microphone Polar Pattern | Built-in Microphone: Omnidirectional |
| Frequency Response | 50Hz-8.5KHz |
| SNR | > 70dB |
| Maximum SPL | Built-in Microphone: 110dB SPL |
| Sensitivity | Built-in Microphone: -39dB±2dB |
| (0dB=1V/Pa@1kHz) | |
| Power Requirement | Built-in Li-ion Battery or USB-C DC 5V |
| Antenna | PIFA Antenna |
| Battery Life | Approx. 6 hours |
| Audio Output | 3.5mm Jack |
| Weight | Approx. 18g |
| Dimensions | 40×38.2×14mm |
| Operating Temperature | -10°C to 50°C |
| Storage Temperature | –20°C to 55°C |
BY-M1LV-U-RX
| Transmission Type | 2.4GHz |
| Modulation | GFSK |
| Operating Range | Up to 328′ (100m) (without obstacles) |
| RF Output Power | 2.014dBm |
| Audio Output | USB-C Connector |
| Power Requirements | Supplied by USB-C Devices |
| Antenna | PIFA Antenna |
| Noise Reduction | Yes |
| Weight | Approx. 10g |
| Dimensions | 23×38.2×14mm |
| Operating Temperature | -10°C to 50°C |
| Storage Temperature | –20°C to 55°C |
Packing List
BY-M1LV-U (BY-M1LV-TX+ BY-M1LV-U-RX)
1 × BY-M1LV-TX Transmitter
1 × BY-M1LV-U-RX Receiver
1 × USB-C Charging Cable
1 × Fur Windshield
1 × Pairing Pin
FCC Warning
This device complies with part 15 of the FCC Rules. Operation is subject to the following two conditions: (1) This device may not cause harmful interference, and (2) this device must accept any interference received, including interference that may cause undesired operation.
Any changes or modifications not expressly approved by the party responsible for compliance could void the user’s authority to operate the equipment.
This equipment has been tested and found to comply with the limits for a Class B digital device, pursuant to part 15 of the FCC Rules. These limits are designed to provide reasonable protection against harmful interference in a residential installation.
This equipment generates uses and can radiate radio frequency energy and, if not installed and used in accordance with the instructions, may cause harmful interference to radio communications. However, there is no guarantee that interference will not occur in a particular installation. If this equipment does cause harmful interference to radio or television reception, which can be determined by turning the equipment off and on, the user is encouraged to try to correct the interference by one or more of the following measures:
- Reorient or relocate the receiving antenna.
- Increase the separation between the equipment and receiver.
- Connect the equipment into an outlet on a circuit different from that to which the receiver is connected.
- Consult the dealer or an experienced radio/TV technician for help.
The device has been evaluated to meet general RF exposure requirements. The device can be used in portable exposure conditions without restriction.


