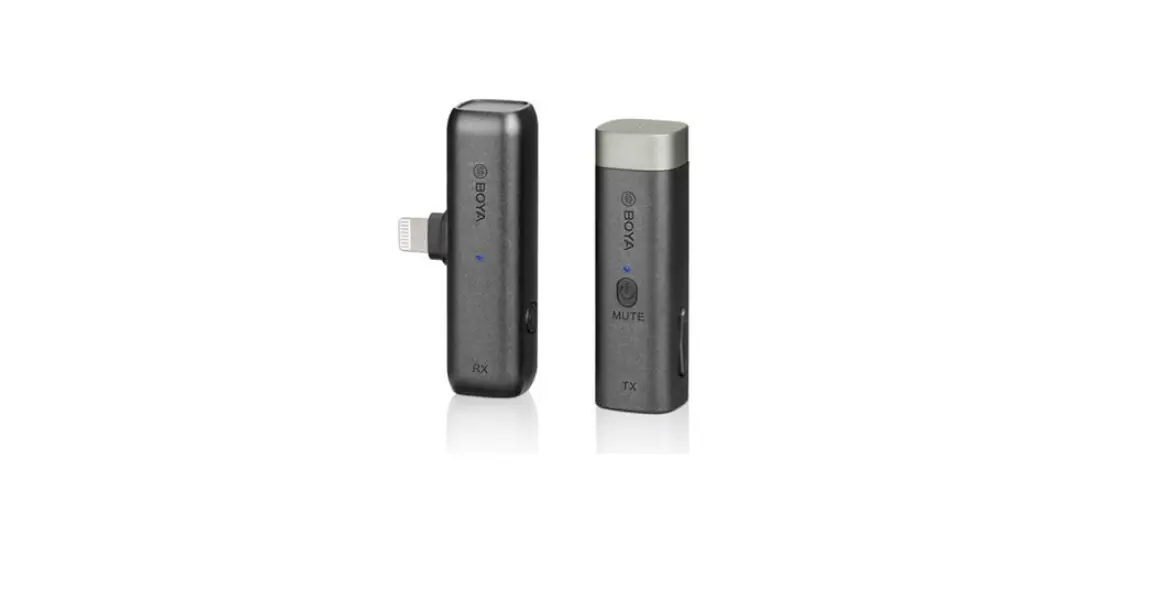
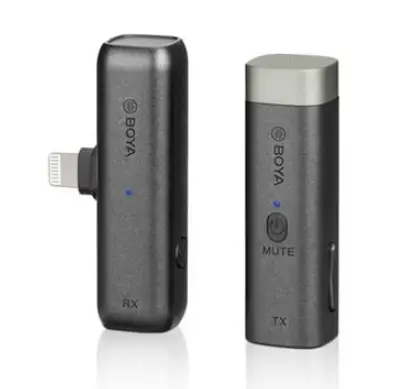
BOYA BY-WM3D Wireless Microphone
Thank you for purchasing BOYA!
BY-WM3 is a 2.4GHz wireless microphone system, all-inclusive solution for making it ideal for capturing audio clear, intelligible audio fidelity to your smartphones, tablets, DSLR cameras, consumer camcorders, PCs etc.
What’s special about it is that instead of charging the device via a cable, like devices normally do, miniature itself can neatly be placed into the inside of the charging case with a quick recharging for a longer working time. The case provides 1000mAh of charging power, and it’s rechargeable via a USB-C port when it’s out of power. The easy-to-carry feature is designed for videographers, content creator, video hobbyists, avid vlogger. When you are plugged in and powered on, it’s set and ready so your focus can stay on your content.
Packing Lists
BY-WM3D
- Charging Case
- Clip-on Minature Transmitter
- Professional Compact Receiver
- MFi Certified Lightning Adapter
- 3.5mm TRS Adapter
- 3.5mm TRRS Adapter
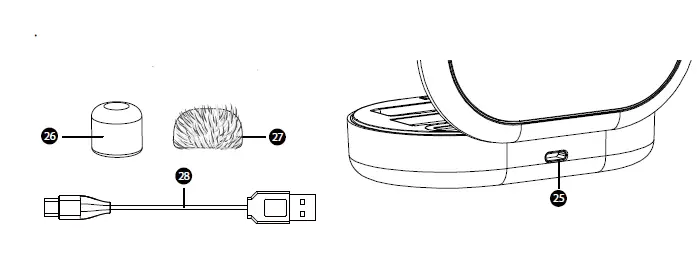
- Foam Windshield
- Fur windscreen
- 30cm (11.8′) Type-C to USB-A Charging Cable
BY-WM3U
- Charging Case
- Clip-on Minature Transmitter
- Professional Compact Receiver
- Type-C Adapter
- 3.5mm TRS Adapter
- 3.5mm TRRS Adapter
- Foam Windshield
- Fur windscreen
- 30cm (11.8”) Type-C to USB-A Charging Cable
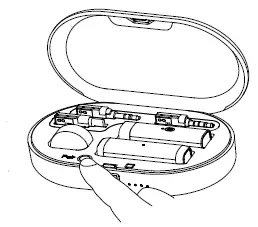
BY-WM3D consists of one clip-on transmitter, a portable receiver, charging case and their accessories as following: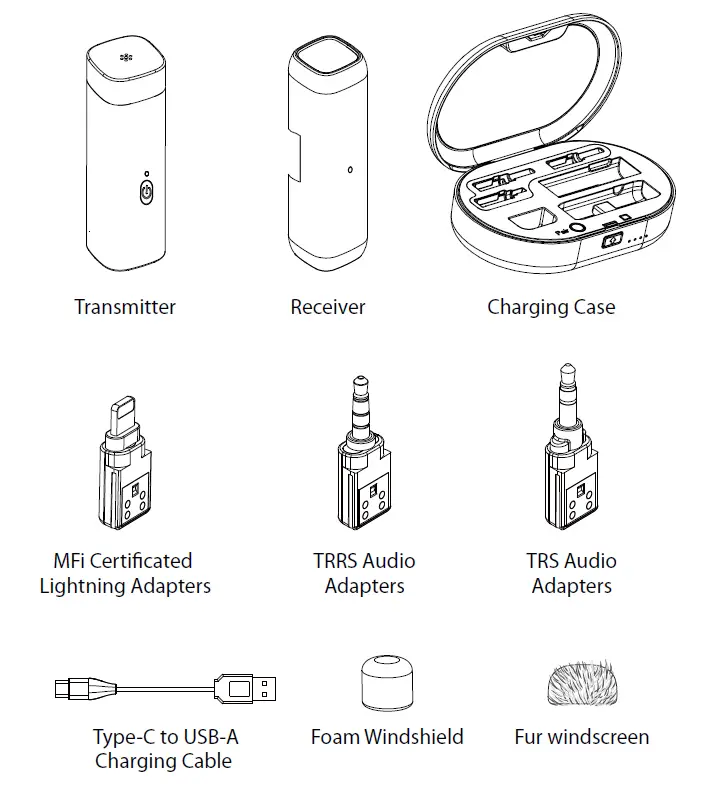
BY-WM3U consists of one clip-on transmitter, a portable receiver, charging case and their accessories as following: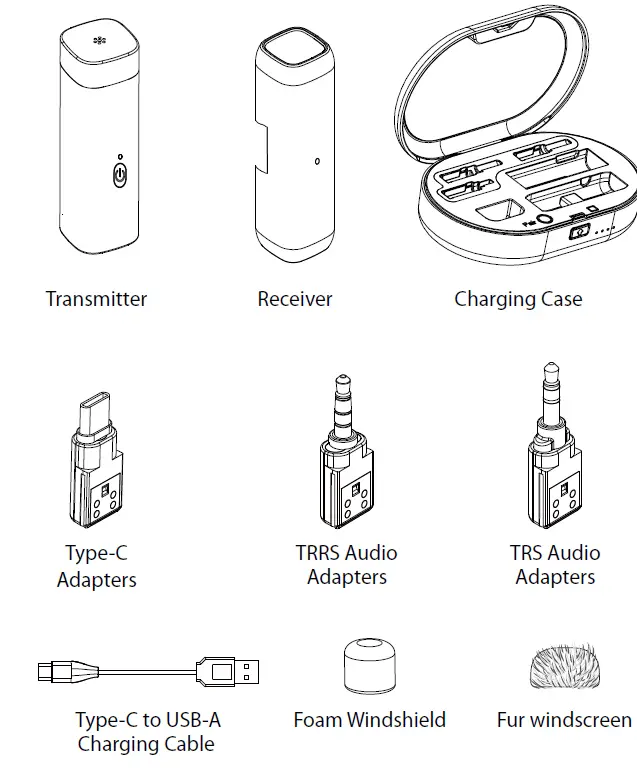
Product Structure
BY-WM3D
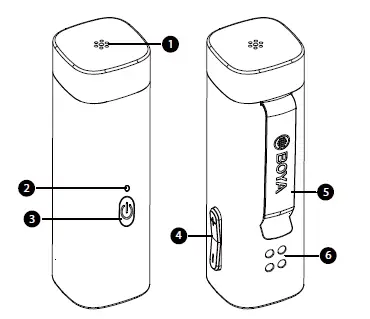
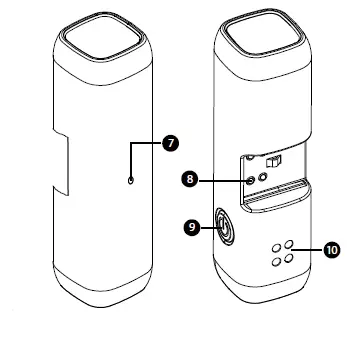
Transmitter
- Built-in Microphone
NOTE:
For optimal sound detection, do not hold your hand against the microphone head. - Power&Pairing Indicator
- Power Button
- +/- Button
- Mic Clip
- Charging Contacts
 Receiver
 - Power&Pairing Indicator
- Contacts
- Power Button
- Charging Contacts
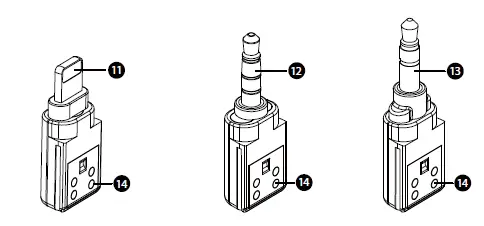
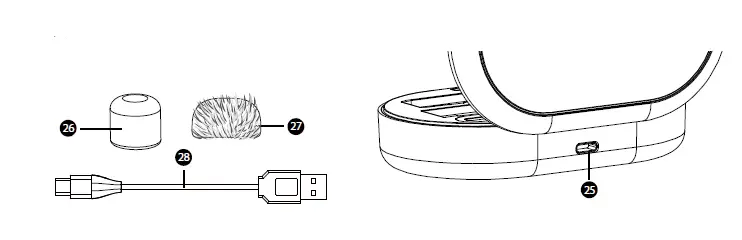
- Mfi Certificated Lightning Adapters
- For iPhone, iPad, iPod
- TRRS Audio Adapters
- For smartphone, laptop, tablet and others
- TRS Audio Adapters
- For DSLR, camcorder, recorder
- Contacts

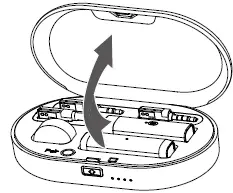
 Charging Case
 - Groove for TRS Audio Adapters
- Groove for Mfi Certificated Lightning Adapters
- Groove for TRRS Audio Adapters
- Groove for Foam Windfoam
- Groove for Transmmitter

- Groove for Receiver
- Pair Button
- Open Button
- Battery Capacity Indicator
- Catch
- Charging Port (DC 5V)
- Foam Windshield
- Fur windscreen
- (11.8”) 30cm Type-C to USB-A Charging Cable

 Receiver
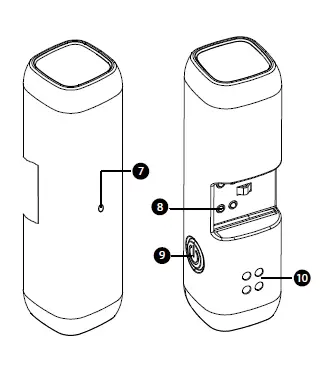
 Charging Case
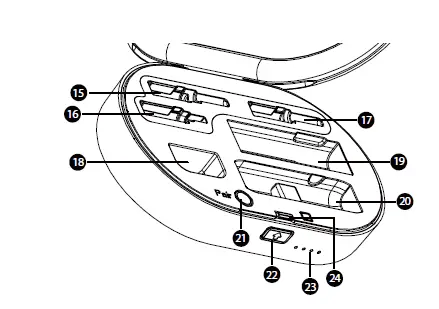
BY-WM3U
Transmitter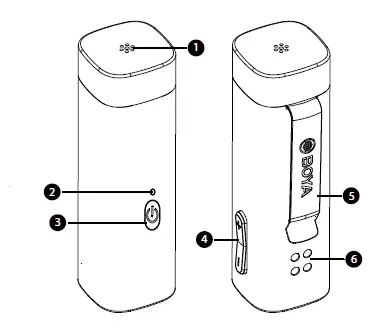
- Built-in Microphone
NOTE:
For optimal sound detection, do not hold your hand against the microphone head. - Power&Pairing Indicator
- Power Button
- +/- Button
- Mic Clip
- Charging Contacts
 Receiver
 - Power&Pairing Indicator
- Contacts
- Power Button
- Charging Contacts
- Type-C Adapters
- Contacts
- TRRS Audio Adapters
- For smartphone, laptop, tablet and others
- TRS Audio Adapters
- For DSLR, camcorder, recorder
 Charging Case
- For DSLR, camcorder, recorder
- Groove for TRS Audio Adapters
- Groove for Type-C Adapters
- Groove for TRRS Audio Adapters
- Groove for Foam Windfoam
- Groove for Transmitter
- Groove for Receiver

- Pair Button
- Open Button
- Battery Capacity Indicator
- Catch
- Charging Port (DC 5V)
- Foam Windshield
- Fur windscreen
- (11.8”) 30cm Type-C to USB-A Charging Cable

 Receiver
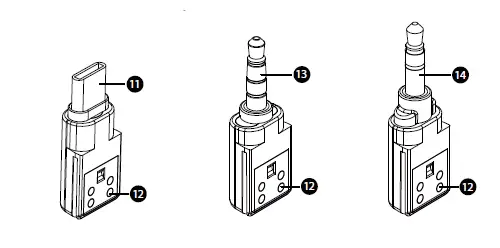 Charging Case
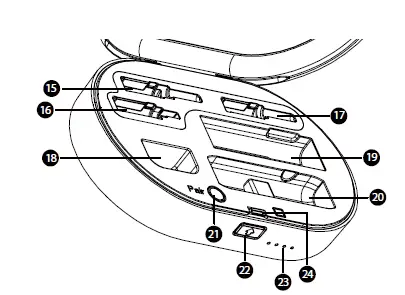
Transmitter & Receivers’ LED Status
| Status | Operation | Indicator |
| Power On | 1) Open the cover of case. 2) Long press the power button of transmitter and receiver until they turn on. | Lights On |
|
Power Off | 1) Replace the device to the case, and close the cover. 2) Long press the power button of transmitter and receiver until they turn off. |
Lights Off |
| Entering Pairing Mode | Quick short press the power button of transmitter and receiver twice. | Quick Flashing in Blue Light |
| Paired Successfully | / | Solid Blue Light |
| Disconnected/ | ||
| Out of Connection Mode | / | Slow Flashing in Blue Light |
| Low-battery Warning | / | Flashes Red Light |
| Mute On (TX Only) | Short press the power button of transmitter | Slow Flashing Red Light |
| Charging | / | Solid Red Light |
| Fully Charged | Red Lights Off |
| Status | Indicator |
| Open/Closed | Current Battery’s Capacity |
| Low-battery Warning | Flashes White Light |
| Charging | Flashes White Light in Cycle |
| Fully Charged | Lights Off |
Charging Indicator (Charging Case)
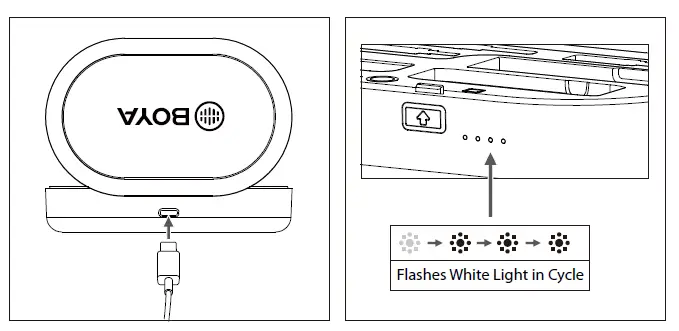
Charging Indicator
(Transmitter & Receiver Charging) 
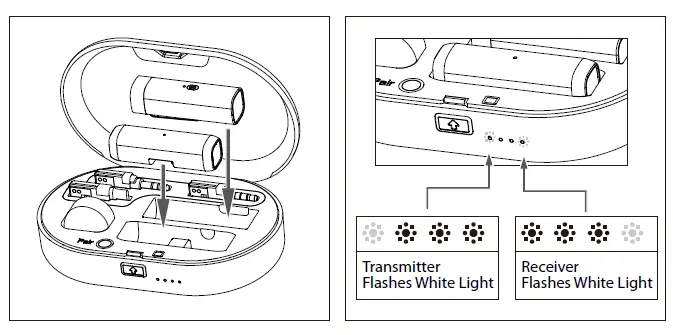
NOTE:
Make sure that transmitter and receiver place on the right position and direction for charging successfully as shown above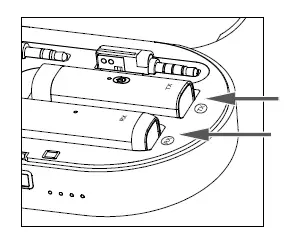
How to use it?
Receiver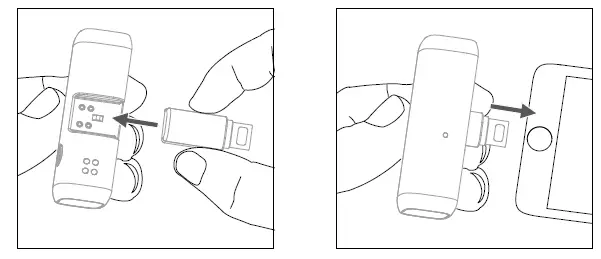
Transmitter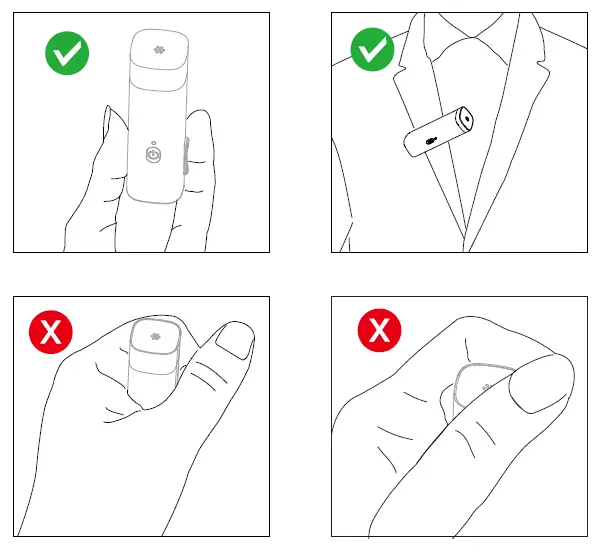
How do pairing?
Pairing Transmitter and Reciver by the Charging Case
- Auto Pairing
- Replace the transmitter and receiver to the case and close it.
- Open the cover of the charging case again, the transmitter and receiver are activated.
- When they paired successfully, their indicators are in solid blue light.
- touch pairing
 Open the charging case, the transmitter and receiver are activated.
- Press the Pair button twice to enter into the pairing mode.
- When they are paired successfully, their indicators are in solid blue light.
 Open the charging case, the transmitter and receiver are activated.
Pairing Transmitter and Receiver by Manually Matching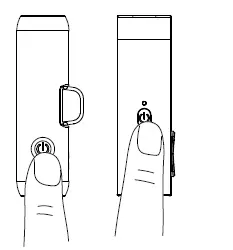
- Manually matching
- Open the charging case, the transmitter and receiver are activated.
- Press the Pair button entering into the pairing mode.
- When they paired successfully, their indicators are in solid blue light. When paired successfully, please follow the steps below:
- Select a corresponding adapter and push it into the receiver.
- Connect the receiver to your audio devices, such as cameras, camcorders, smartphone and more.
- You are ready to record.
Features
- 2.4 GHz Wireless Transmission Technology
- One-touch Pairing, Fast Focus on Recording Subject
- Lightweight and Low-Profile Design
- Fast-charging with Charging Case, Longer Continuous Time for Recording
- Alternative Types of Adapter
- Muting Function
Specification
| Transmission Type | 2.4GHz |
| Frequency Response | 20-20kHz |
| Distortion | <0.1% |
| Sampling Rates | 48 kHz |
| Bit Depth | 16 Bit |
| Signal-to-noise ratio | 83 dB |
| Sensitivity | -42 dB |
| Operating Distance | 20m (without obstacle) |
| Continuous Time | TX: 4.5 hrs |
| RX: 9 hrs | |
| Charging Time | TX: 2 hrs |
| RX: 2 hrs | |
| Charging Case: 2 hrs | |
| Charging Port (Charging Case) | Type-C |
| Battery Capacity | TX: 100mA |
| RX: 100mA | |
| Charging Case: 1000mA | |
| Size | Charging Case: 120*77*30.5mm (4.7*3*1.2”) |
| TX: 51.8*15.6*18mm (2*0.6*0.7) | |
| RX: 54*15.6*15.6mm (2*0.6*0.6) | |
| Weight | 129g (4.5 oz) |
CAUTION
- Please use our original audio signal cable which is equipped, it’s more compatible with the wireless microphone, and make the sound better.
- The figure given is only the approximate value that applies when there are no obstructions between the transmitter and receiver. This distance will vary depending on metal objects, people and other obstructions and on the signal strength.
- Battery life may vary depending on the type of battery used.
IMPORTANT
- If you do not intend to use the wireless microphone for a long period time, please remove the batteries from both the transmitter and receiver.
- Do not touch the lavalier/lapel microphone, transmitter and receiver while recording, as this will cause noise to be recorded.
- Do not let the transmitter close to high-voltage equipment or to devices that emit strong electrom-agnetic fields, otherwise, it may cause the noise to be recorded.
- Do not use or leave the transmitter and receiver in hot, humid places.
- Do not leave the receiver attached to the camera when storing the camera in a case.
- Do not mix up to use the transmitter and receiver.
WARNING
- Keep the wireless microphone out of the reach of children.
- Never use leaking batteries and never expose batteries to excessive heat or fire.
MAINTENANCE
- Do not operate the device with wet hands or feet.
- Clean the equipment only in the way described in the instructions for use.
- Take care to prevent the equipment from dropping down.
Make sure that the device is properly fastened and reliably mounted. If the device has dropped down on the floor have
it inspected by a skilled electrician before you switch it on again. - Should the equipment be damaged or defective,or if you notice a scorching smell:
Interrupt the electric power supply immediately by removing the batteries.Do not operate the device with a damaged housing,do not repair the device yourself. Have the device only repaired by a skilled electrician. - Always keep your device in good condition,as specified in these in-structions for use.
- Do not open the device.
FCC STATEMENT
This device complies with Part 15 of the FCC Rules. Operation is subject to the following two conditions:
(1) This device may not cause harmful interference, and
(2) This device must accept any interference received, including interference that may cause undesired operation.
Any changes or modifications not expressly approved by the party responsible for compliance could void the user’s authority to operate the equipment.
Note: This equipment has been tested and found to comply with the limits for a Class B digital device, pursuant to part 15 of the FCC Rules. These limits are designed to provide reasonable protection against harmful interference in a residential installation. This equipment generates, uses and can radiate radio frequency energy and, if not installed and used in accordance with the instructions, may cause harmful interference to radio communications. However, there
is no guarantee that interference will not occur in a particular installation. If this equipment does cause harmful interference to radio or television reception, which can be determined by turningthe equipment off and on, the user is encouraged to try to correct the interference by one or more of the following measures:
- Reorient or relocate the receiving antenna.
- Increase the separation between the equipment and receiver.
- Connect the equipment into an outlet on a circuit different from that to which the receiver is connected.
- Consult the dealer or an experienced radio/TV technician for help.
FCC Radiation Exposure Statement:
This equipment complies with FCC radiation exposure limits set forth for an uncontrolled environment.


