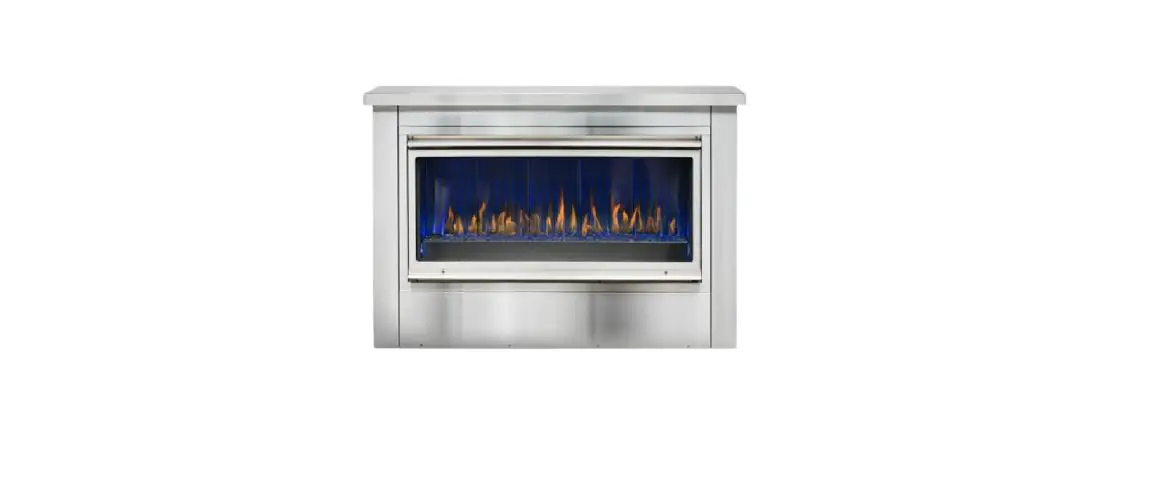
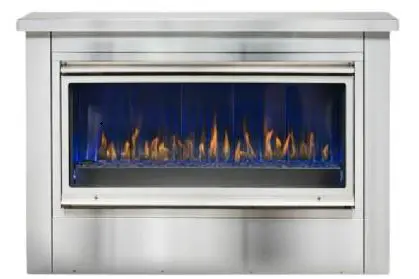
MONTEGO PL42VOBE Cabana Outdoor Fireplace
Product Information
The product is an enclosure for a fireplace, available in two sizes: PL42VOBE and PL60VOBE. The enclosure is made with materials that may expose the user to Benzene, which is known to cause cancer and birth defects or other reproductive harm. The enclosure includes a base, a front panel, side panels, a top panel, a door-side panel, and a brace. The enclosure also has gas and electrical ports for connecting to the fireplace.
Product Usage Instructions
- Before assembly, ensure that all protective film from metal parts is removed.
- For PL42VOBE assembly, remove the (8) standoffs from the fireplace and discard them. Place the unit on PART 6 Base and align to cutouts to position.
- Level out the unit with the attached Hex bolts PART HW2302 and Nuts PART HW2145 on the bottom of the pedestal.
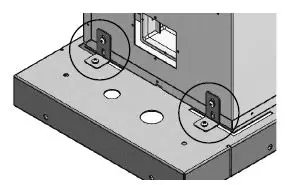
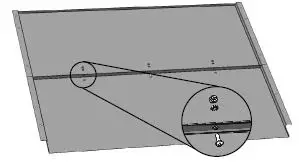
- Anchor pedestal to structure using the 4 holes shown. (Hardware not included, use shims on bolts to prevent warping the steel).
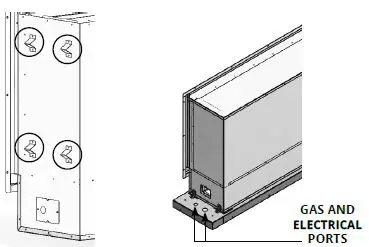
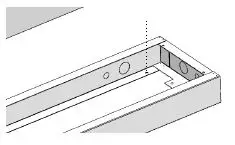
- Knock out gas and electrical access ports in the base if necessary, inset bushing PART HW6006, and electrical clamp connector PART EC1220. Run gas and electrical lines through the ports.
- Attach the front panel underneath the base.
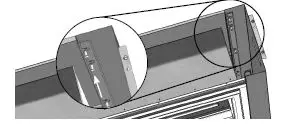
- Slide the brace over the back and side panel and secure it with (4) screws.
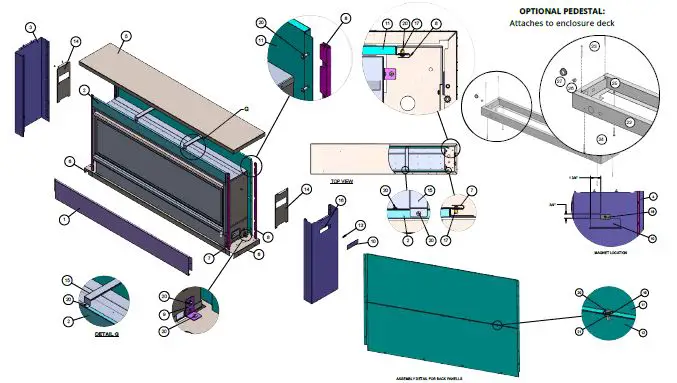
- For PL60VOBE assembly, attach the enclosure deck to the optional pedestal using four Hex bolts PART HW1203.
- Attach PART 9 Bracket (4) to the fireplace and base using electrical lines thru the larger holes in the base.
- Attach PART 11 Panel Top Back and PART 12 Panel screws for PL60VO).
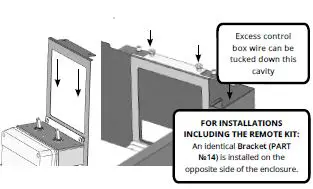
- For PL42VOBE brace installations, only one bracket is supplied. For installations including the remote kit, an identical bracket (PART 14) is installed on the opposite side of the enclosure.
- Excess control box wire can be tucked down the cavity.
- Install PART 10 Door Side Panel into the unit (install on an angle and rotate down).
- Test all gas and electrical connections.
WARNING Some materials used in the manufacturing process of this product can expose you to Benzene which is known in the State of California to cause cancer and birth defects or other reproductive harm. For more information go to www.P65warnings.ca.gov.
- The installation of this fireplace must be done by a qualified and certified gas appliance installer.
- Check local codes and read all instructions prior to installation.
- Route gas and electrical lines before construction and installation of the enclosure
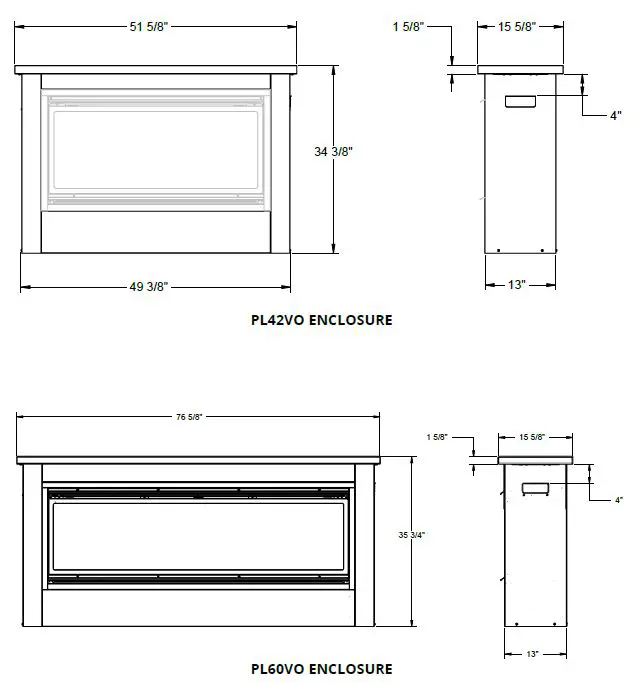
FINISHED DIMENSIONS
Assembly INSTALLATION
WARNING: ENSURE THAT ALL PROTECTIVE FILM FROM METAL PARTS IS REMOVED BEFORE ASSEMBLY
- See the installation manual for instructions on how to route gas lines and power supply
- See the installation manual for clearances to combustible materials
- Minimum clearance from the ground is 3″
- Plan a proper drainage system before installation of the enclosure
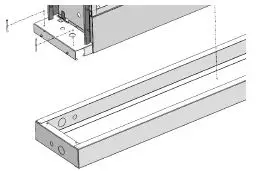
- Remove the (8) standoffs from the fireplace and discard Place the unit on PART №6 Base and align to cutouts to position.

- Secure PART №9 Bracket (4) to fireplace and base using (8) ¼-20 x ½” long Pan Head Screws. Secure base to desired location with mounting holes and plum gas line thru and electrical lines thru the larger holes in the base

- Level out the unit with the attached Hex bolts PART №HW2302 and Nuts PART №HW2145 on the bottom of the pedestal.

- Anchor pedestal to structure using the 4 holes shown. (Hardware not included, use shims on bolts to prevent warping the steel)

- Knock out gas and electrical access ports in the base if necessary, inset bushing PART № HW6006, and electrical clamp connector PART № EC1220. Run gas and electrical lines through the ports

- Pedestal attaches to the Mahana enclosure base with four Hex bolts PART №HW1203. Test all gas and electrical connections.

- Level out the unit with the attached Hex bolts PART №HW2302 and Nuts PART №HW2145 on the bottom of the pedestal.
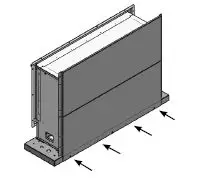
- Fasten PART №11 Panel Top Back and PART №12 Panel Low Back with ¼-20 x ½” long Pan Head Screws, ¼-20 nuts and Star washers as shown (3 screws for PL42VO, 5 screws for PL60VO)

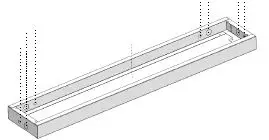
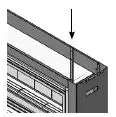
- Place rear panel assembly on base and secure 4 with ¼-20 x ½” long Pan Head Screws. The panel should sit in notches

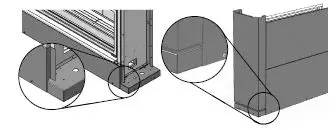
- Slide PART №1 Front Panel underneath the base. The panel should sit in notches. Slide PART №4 Right Panel into notches in the base and secure with (2) ¼-20 x ½” long Pan Head Screws. Slide PART №4 Right Panel into notches in base and secure with (2) ¼-20 x ½” long Pan Head Screws

- Slide PART №7 Brace over the back and side panel and secure with (4) ¼-20 x ½” long Pan Head Screws as shown. Repeat on the other side with PART №8 Brace and (4) screws.

- Slide PART №7 Brace over the front and side panel and secure with (4) ¼-20 x ½” long Pan Head Screws asshown. Repeat on the other side with PART №8 Brace and (4) screws.

- Fasten PART №15 Braces to the rear panel assembly and Panel Top front with (2) ¼-20 x ½” long Pan Head Screws.

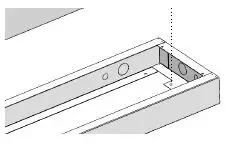
- Fasten the Electrical Box to PART №14 Electrical Box Bracket with (2) ¼-20 x 3/8” long Pan Head Screws Secure Electrical Box Bracket to the enclosure with (2) ¼-20 x ½” long Pan Head Screws, (2) ¼-20 nuts and (2) Star washers as shown

- Place PART №5 Top Cover on top, ensure clearance holes are over fasteners from the control box bracket, and secure the top with (4) ¼-20 x ½” long Pan Head Screws. Install PART №10 Door Side Panel into the unit (install on an angle and rotate down) Ensure Electrical and gas are connected properly before fastening the top. See Manual.


INSTALLATION
| PL42VOBE PARTS | PL60VOBE PARTS | |||||||
| № | PART ID# | DESCRIPTION | QUANT. | № | PART ID# | DESCRIPTION | QUANT. | |
| 1 | P42VF405SS-20 | PANEL, BOTTOM FRONT, 42in ENCLOSURE | 1 | 1 | P60VF405SS-20 | PANEL, BOTTOM FRONT, 60in ENCLOSURE | 1 | |
| 2 | P42VF406SS-20 | PANEL, TOP FRONT, 42in ENCLOSURE, SS | 1 | 2 | P60VF406SS-20 | PANEL, TOP FRONT, 60in ENCLOSURE, SS | 1 | |
| 3 | P42VF414SS-20 | PANEL, LEFT SIDE, 42in ENCL. | 1 | 3 | P60VF414SS-20 | PANEL, LEFT SIDE, 60in ENCL. | 1 | |
| 4 | P42VF415SS-20 | PANEL, RIGHT SIDE, NARROW, 42in | 1 | 4 | P60VF415SS-20 | PANEL, RIGHT SIDE, NARROW, 60in | 1 | |
| 5 | P42VF416SS-20 | COVER, TOP, NARROW, 42in ENCL | 1 | 5 | P60VF416SS-20 | COVER, TOP, NARROW, 60in ENCL | 1 | |
| 6 | P42VF417SS-20 | BASE, NARROW, 42in ENCL | 1 | 6 | P60VF417SS-20 | BASE, NARROW, 60in ENCL | 1 | |
| 7 | P42VF419SS-20 | BRACE, 42in ENCL. | 2 | 7 | P60VF419SS-20 | BRACE, 60in ENCL. | 2 | |
| 8 | P42VF420SS-20 | BRACE, 42in ENCL. | 2 | 8 | P60VF420SS-20 | BRACE, 60in ENCL. | 2 | |
| 9 | P42VF423SS-20 | BRACKET, 42in ENCL. | 4 | 9 | P42VF423SS-20 | BRACKET, 60in ENCL. | 4 | |
| 10 | P42VF424SS-20 | DOOR, SIDE PANEL, NARROW, 42in | 1 | 10 | P42VF424SS-20 | DOOR, SIDE PANEL, NARROW, 60in | 1 | |
| 11 | P42VF426SS-20 | PANEL, TOP BACK, 42in ENCLOSURE | 1 | 11 | P60VF426SS-20 | PANEL, TOP BACK, 60in ENCLOSURE | 1 | |
| 12 | P42VF427SS-20 | PANEL, LOW BACK, 42in ENCLOSURE | 1 | 12 | P60VF427SS-20 | PANEL, LOW BACK, 60in ENCLOSURE | 1 | |
| 13 | P42VF428-10 | PLATE FOR MAGNET | 1 | 13 | P42VF428-10 | PLATE FOR MAGNET | 1 | |
| 14 | P42VF429SS-20 | BRACKET, SUPPORT, EL BOX, 42in ENCLOSURE | 2 | 14 | P42VF429SS-20 | BRACKET, SUPPORT, EL BOX, 60in ENCLOSURE | 2 | |
| 15 | P42VF430SS-20 | BRACE, ENCLOSURE | 1 | 15 | P42VF430SS-20 | BRACE, ENCLOSURE | 2 | |
| 16 | HW1103 | Magnet plate 40mm x 20mm x 6mm | 1 | 16 | HW1103 | Magnet plate 40mm x 20mm x 6mm | 1 | |
| 17 | HW1161 | #10 Nutsert | 38 | 17 | HW1161 | #10 Nutsert | 46 | |
| 18 | HW1245 | SCREW, PAN, #10-24 X 3/8″, PHIL, SS | 4 | 18 | HW1245 | SCREW, PAN, #10-24 X 3/8″, PHIL, SS | 4 | |
| 19 | HW2102 | WASHER, LOCK, #10, EXT TOOTH, SS | 7 | 19 | HW2102 | WASHER, LOCK, #10, EXT TOOTH, SS | 9 | |
| 20 | HW2105 | SCREW, PAN, #10-24 X 1/2″, PHIL, SS | 45 | 20 | HW2105 | SCREW, PAN, #10-24 X 1/2″, PHIL, SS | 55 | |
| 21 | HW2174 | 10-24 Stainless Steel Nut | 7 | 21 | HW2174 | 10-24 Stainless Steel Nut | 9 | |
| MAHANA PL42VO 4″ PEDESTAL PARTS MAHANA PL60VO 4″ PEDESTAL PARTS | ||||||||
| № | PART ID# | DESCRIPTION | QUANT. | № | PART ID# | DESCRIPTION | QUANT. | |
| 22 | P42VF435/36-20 | PEDESTAL | 1 | 22 | P60VF437/38-20 | PEDESTAL | 1 | |
| 23 | HW1203 | 10-24 X 3 BOLT | 4 | 23 | HW1203 | 10-24 X 3 BOLT | 4 | |
| 24 | HW2302 | ¼ – 20 X 1½ BOLT | 4 | 24 | HW2302 | ¼ – 20 X 1½ BOLT | 4 | |
| 25 | HW2145 | ¼ – 20 NUT | 4 | 25 | HW2145 | ¼ – 20 NUT | 4 | |
| 26 | EC1220 | STRAIN CLAMP | 1 | 26 | EC1220 | STRAIN CLAMP | 1 | |


