BEOK TDS21 Glass Screen Thermostat User Guide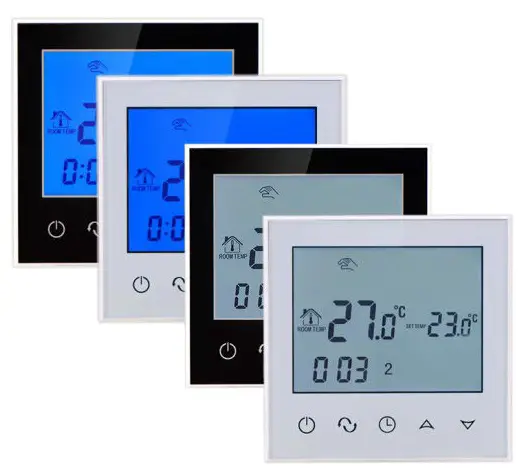
Product Summary
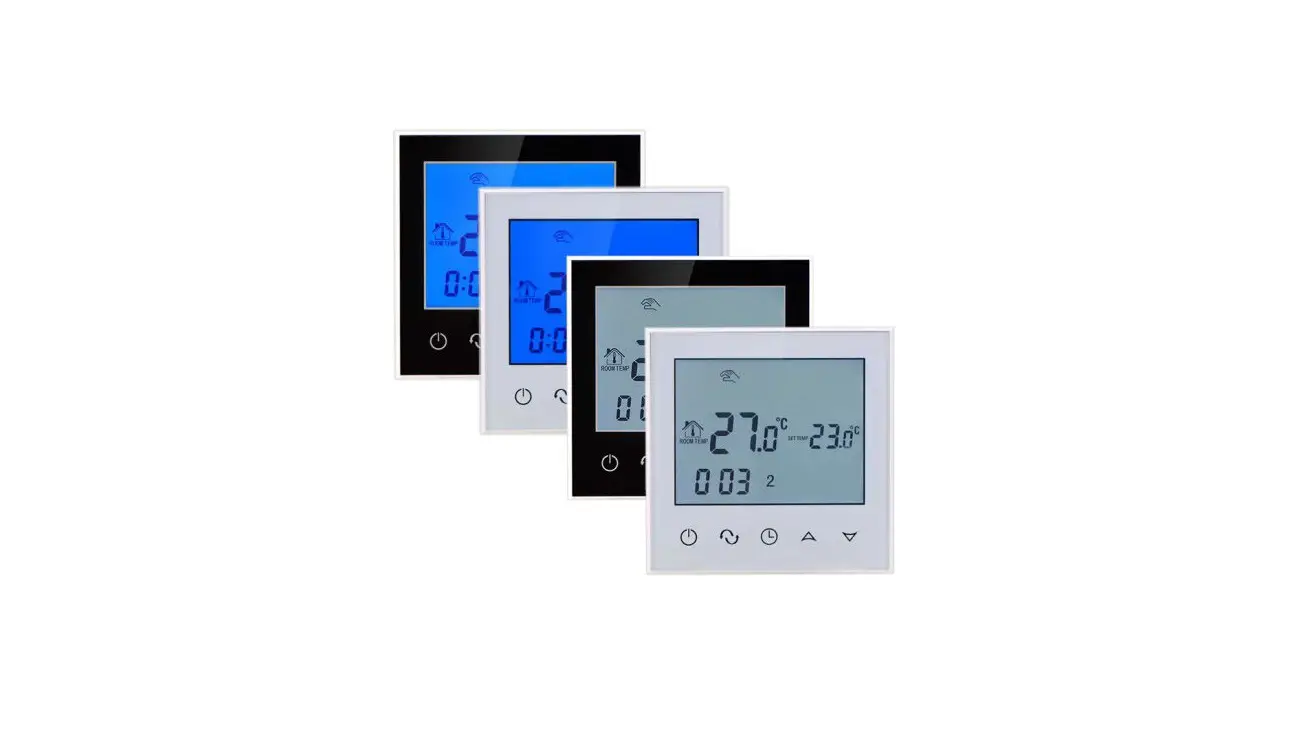
TDS21 series thermostats are luxurious programmable thermostat with large screen display. It is applied to temperature control of industrial, commercial and domestic room, and start of control heating applicance, especially used in the floor-heating systems.
Technical Parameter
| Power Supply | 200 — 240V 50 —60Hz |
| Current Load | ‘.3A (water heating) –.-516A(electric heating) |
| Power Consumption | <0.3W |
| External Material | PC+ABS (flame retardant) |
| Sensing Element | NTC |
| Set Temp. Range | 5-99°C |
| Floor Set Temp. Range | 5-99°C |
| Accuracy | *1 t |
| Dimension | 86x86x13.3mm |
| Ambient Temp. | 0-45°C,5-95%RH(Non-condensing) |
| Storage Temp. | -5-55t |
| Timing Error | <1% |
Main Functions and Characteristics
- Large screen display and touch button.
- Power-off memory function.
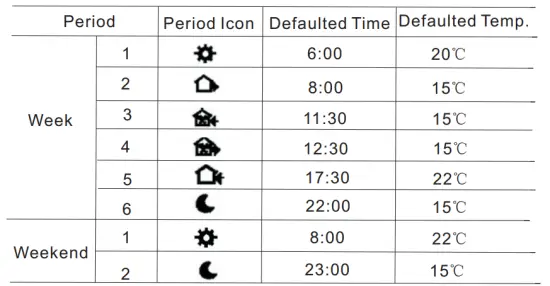
- 5+2 or 6+1 or 7days six periods program schedule.
- Selectable 80mmx8Omm European hidden box.
- Precise comfort control keeps temperature within1°C of the level you set.
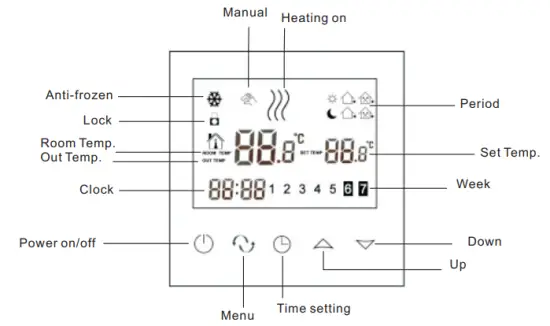
User Interface Explanation
Model Definition
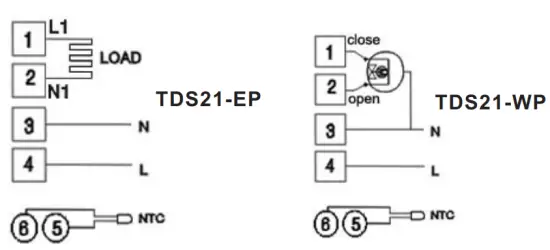
WP: For Water Heating System, 3A
EP: For Electric Floor Heating System, 16A
For example: TDS21-EP TDS21-WP
Model Spec
| Model | Current Loading | External Sensor | Week Programmable | Child Lock | Drop up |
| IDS21-EP | 16A | ✓ | ✓ | ✓ | Optional |
| 1DS21-WP | 3A | ✓ | ✓ | Optional |
Wiring Diagram
Operation Instruction
- Setting Power on/off
Press to turn on/off the power.
 - Setting Temperature
Press to set the temperature.
 - Setting the Clock
Press to set minute, hour and week. Press for adjusting.
 - Setting the Manual Mode.
Manual mode means non-programmable mode.
Press then
then  . will display in the screen, it is in manual mode.
Press to set the temperature.
Press to set minute, hour and week. - Setting the Child Lock
Long press to enter into child lock mode.  will display.
Long press again, the child lock will be disappeared. - Setting the Programmable Mode.
Press and hold into programmable mode. LOOP and 12345 will display.
Press to select the control way: 5+2 or 6+1 or 7 days programmable.
12345 display in the position of week means 5+2;
123456 display in the position of week means 6+1;
1234567 display in the position of week means 7 days programmable.
Press to select the periods.
Press to change the temperature;
Press to do time adjustment.
Press to change the time;
Press again to select the weekend’s temp.
If you want to make temporary adjustment in any period, press then will flash. When finish the setting, all will confirm automatically.
Press ![]() to switch operation between manual mode and programmable mode.
to switch operation between manual mode and programmable mode.
Remark
- The defaulted temperature of period3 and period4 is the same as period2. Please change it according to the request.
- When setting temperature is 00, this period is power off.
- How to check floor temp?
During power on, press and hold then press the button of power to check floor temp.. OUT TEMP will display.
Press again to display room temp.
Advanced Setting
In the state of power-off, long press and hold ![]() then press
then press ![]() into advanced setting mode. Then press to set relative item.
into advanced setting mode. Then press to set relative item.
| Display Code | Function | Setting And Options | Factory Default |
| SEN | Sensor mode | 0:Internal sensor 1:Floor sensor 2:Both internal sensor and floor sensor | 0 |
| OSV | Set temp. range for floor sensor | 5-99℃ | 42℃ |
| DIF | Precision for floor temp. | 1-9℃ | 2℃ |
| SVH | High limit temp. for internal sensor | 5-99℃ | 35℃ |
| SVL | Low limit temp. for internal sensor | 5-99℃ | 5℃ |
| ADJ | Measure temp. | Check and calibrate the actual room temp. | 0.5℃accuracy calibrate |
| FRE | Anti-frozen | 00:Close anti-frozen 01:Open anti-frozen | 00 |
| PON | Power memory | 00:Power memory off 01:Power memory on | 00 |
| DFI | Precision for room temp. | 0.5-3℃ | 1℃ |
| FAC | Factory setting | 00:Return to factory setting 08:Just display | 08 |
Remark:
Deadzone for floor temp.: i.e. the setting deadzone for floor sensor is 2, OSV is 42℃, when actual temp. reach 44℃, the relay will stop working; when actual temp. is back to 40℃, the relay starts working again. It works when room temp. is lower than set temp.
Sensor error:
Please select the right sensor mode. If select the different mode or there is error of sensor, Err will display on the LCD screen, the thermostat will stop heating till the problem is solved.
Installation Instruction
This product is suitable for standard 80*80mm wall box and 60 mm European round box.
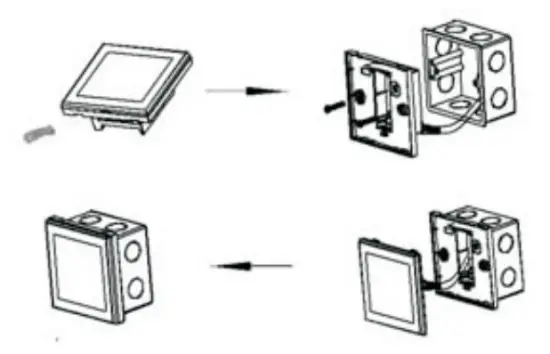
- Connect the line of power and valve into the terminals. Fix the wall plate into the wall box by a screwdrive.
- Connect the lines with the LCD board.
- Connect the LCD board into the wall plate.
NOTICE: The installation wire should be 1.5-2.5mm2.
ATT
Thank you for buying this product!
Please read this manual for complete instructions on installing and operating your thermostat. If you require further assistance, please feel free to contact us.
In the box you will find:
| Model | TDS21-EP | TDS21-WP |
| Thermostat | √ | √ |
| User Manual | √ | √ |
| Screws | √ | √ |
| Dryer | √ | √ |
| External sensor | √ |
Our Service:
We offer the warranty of 24 months from the sales day.
During the warranty, if it is belong to the quality issue, we will fix or replace them for you by free after test them.
If it is not quality problem or beyond the warranty time, we will charge for the after-sales service.
Warning:
![]() The symbol means the unit is being installed, it may cause electrical shock hazard during maintaining, so please make sure it is operated by the professional technical worker.
The symbol means the unit is being installed, it may cause electrical shock hazard during maintaining, so please make sure it is operated by the professional technical worker.