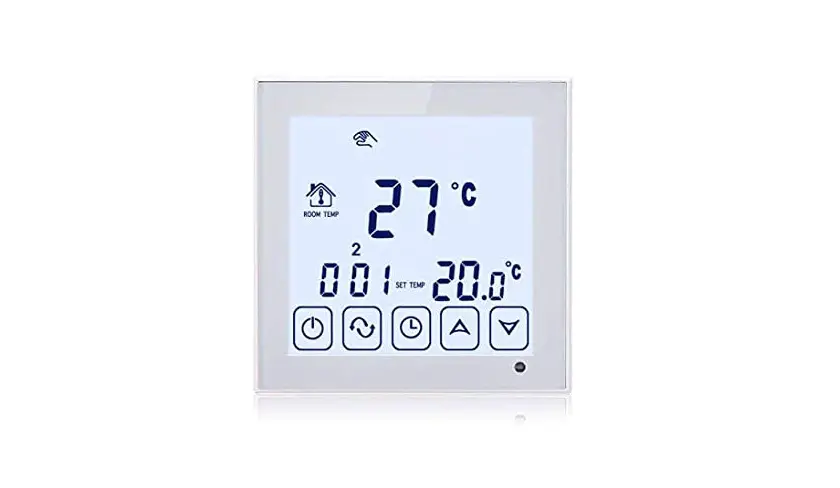
BEOK TDS23-AC Touch Screen Thermostat Instruction Manual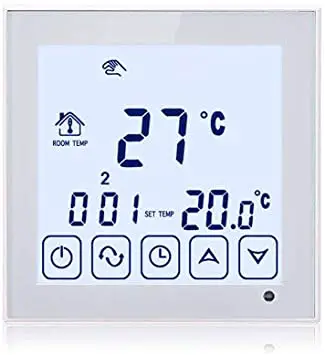
Product Summary
TDS23-AC Series thermostats are designed to control the fans and valves in air conditioner applications via comparison of the room temperature and setting temperature as reaching the aim of comfort and saving energy.
Technical Parameter
| Power Supply | AC200-240V, 50/60HZ |
| Current Load | 3A-5A |
| Power Consumption | <0.5W |
| External Material | PC+ABS (flame retardant) |
| Sensing Element | NTC |
| Set Temp. Range | 10°C – 40°C |
| Accuracy | ±1°C |
| Dimension | 86x86x13.3mm |
| Ambient Temp. | 0-45°C,5-95WoRH(Non-condensing) -5-55t |
| Storage Temp. | |
| Installation Box | 80x8Omm |
Main Functions and Characteristics
- Modern design similar as a cell phone.
- Large glass screen display with White/Blue backlight.
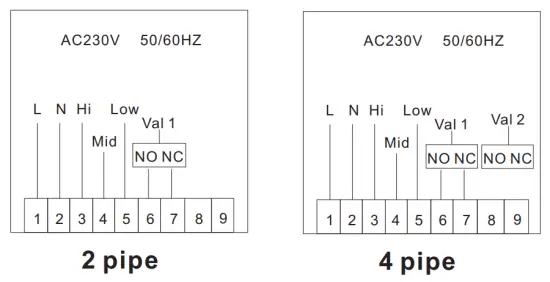
- 2-pipe and 4- pipe for choose.
- 3 Fan speed +auto timer switch for daily or week.
- Timer on/off function for daily or week.
- Room temp calibration function.
- Selectable 80mmx8Omm hidden box.
- Precise comfort control keeps temperature within1°C of the level you set.
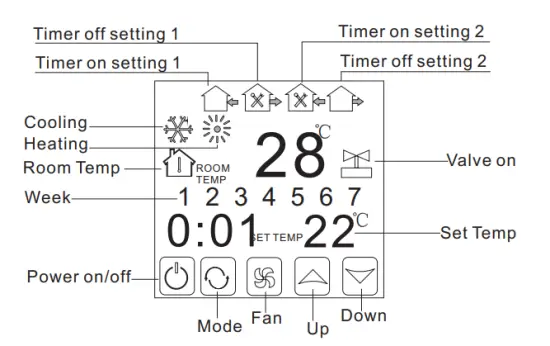
User Interface Explanation
Model Definition
- AC 2: Two pipe, for air conditioning
- AC 4: Four pipe, for air conditioning
For example: TDS23-AC2
TDS23-AC4
Model Spec
| Spec | Fan Speed | Timer Switch | Fan coil controllable | |
| TDS23-AC2 | 2 Pipe | 3 Fan speed+ Auto | √ | √ |
| TDS23-AC4 | 4 Pipe | 3 Fan speed+ Auto | √ |
Wiring Diagram
Operation Instruction
- Setting Power on/off
Press to turn on/off the power.
 - Setting Temperature
Press to set the temperature.
 - Setting the System Mode
Press to select
 heating,
  cooling or
  ventilation.
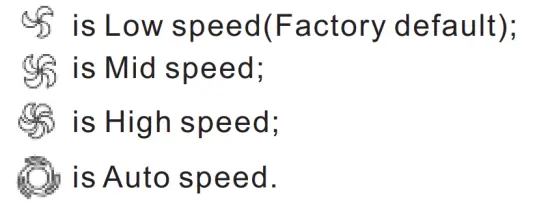
Factory Default is ventilation. - Setting the Fan Speed
Press to select the fan speed.
In auto mode, the fan will run according to the comparison of room temperature and set temperature. - Setting the Real Time.
Press and hold for 3 sec., hh will flash in the position of hh: mm.
Press to adjust the current hour.
Press, mm will flash in the position of hh: mm.
Press to adjust the current minute.
Press, 1 will flash in the position of week: 1234567.
Pressto adjust the current week.
Setting the Time-on(Regular Boot
Press ![]() for more than 3 seconds, after setting the time, continue to press
for more than 3 seconds, after setting the time, continue to press![]() until
until ![]() and “hh” twinkling. Press
and “hh” twinkling. Press ![]() to adjust the hours.
to adjust the hours.
After the adjustment of hours, press ![]() until the “mm” twinkling, press
until the “mm” twinkling, press ![]() to adjust the minutes.
to adjust the minutes.
After the completion of all adjustments ,press ![]() to confirm,
to confirm, ![]() then does not twinkle, Regular boot setup is complete
then does not twinkle, Regular boot setup is complete
The operation of canceling Regular boot is the same, press ![]() to the state of
to the state of
Regular boot, then pressing ![]() ,the
,the ![]() is twinkling, Regular boot has been canceled.
is twinkling, Regular boot has been canceled.
Setting the Timer off
After the setting of Regular boot, press ![]() again, until
again, until ![]() and “hh” twinkling,
and “hh” twinkling,
press ![]() to adjust the hours.
to adjust the hours.
After the adjustment of hours is completed ,press![]() until the “mm” twinkling,
until the “mm” twinkling,
press ![]() to adjust the minutes.
to adjust the minutes.
After the completion of all adjustment, press ![]() to confirm, then
to confirm, then ![]() does
does
not twinkling, Off timer setup is completed.
The operation of canceling Off timer is the same, press ![]() to the state of Off timer, then pressing
to the state of Off timer, then pressing![]() , the
, the ![]() is twinkling, Off timer has been canceled.
is twinkling, Off timer has been canceled.
The setting of the third period and forth period are same with the first and second period, the icons are![]()
![]() (on, off/into the house, out of the house)
(on, off/into the house, out of the house)
Setting the Circulation of Timer Switch
After setting the time of timer switch, continue to press the ![]() ,there will be “LooP”, then press
,there will be “LooP”, then press![]() ,week display area will displays the day of the week, or the transformation of “12345″ “123456″,or “1234567″.
,week display area will displays the day of the week, or the transformation of “12345″ “123456″,or “1234567″.
If the screen only displays the day of the week, then the timer switch setting is valid only for the day.(= “Execute once” in App interface) If it displays “12345″,then the timer switch is valid from Monday ~ Friday, and Saturday and Sunday will be invalid.
If it displays “123456″,then the timer switch is valid from Monday ~Saturday, and Sunday will be invalid.
If it displays “1234567″,then the timer switch is valid from Monday ~ Sunday.
Advanced Setting Mode
Temperature Adjustment
(Attn: Only when your room temperature is different with actual temperature, you do this operation.)
In power-on status, press ![]() about 7 seconds, then “XX X” will display on the bottom of the screen. For Example: “26 5” means temp is 26.5℃ then you can press
about 7 seconds, then “XX X” will display on the bottom of the screen. For Example: “26 5” means temp is 26.5℃ then you can press ![]() to modify the temperature.
to modify the temperature.
It will confirm automatically after correct temp twinkling 7 seconds.
Fan Coil Controlling Mode Setting(Only for 2 pipe)
(You can select the fan coil In control & Out of control.)
In power-on status, press ![]() about 7 seconds, “XX X” will display on the bottom
about 7 seconds, “XX X” will display on the bottom
of the screen, then continue to press ![]() again, “F00” or “F01” will display.
again, “F00” or “F01” will display.
Press to choose “F00” or “F01”
In “F00” mode, when room temperature reaches to the settled temp, the fan coil stops working
In “F01” mode, when room temperature reaches to the settled temp, the fan coil goes on working.
Installation Instruction
- Connect the line of power and valve into the terminals. Fix the wall plate into the wall box by a screwdriver
This product is suitable for standard 80*80mm wall box.
- Connect the lines with the LCD board.
- Connect the LCD board into the wall plate
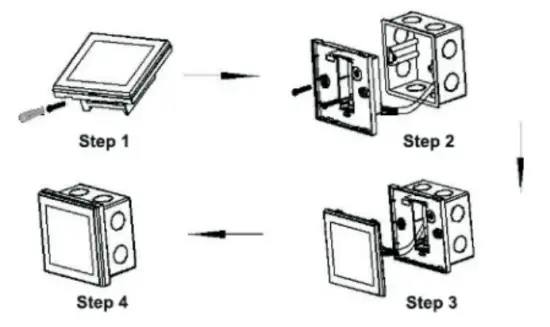
NOTICE: The installation wire should be 1.5-2.5mm .
ATT
Thank you for buying this product!
Please read this manual for complete instructions on installing and operating your thermostat. If you require further assistance, please feel free to contact us.
In the box you will find:
| Model | TDS23-AC |
| Thermostat | √ |
| User Manual | √ |
| Screws | √ |
| Dryer |
Our Service
We offer the warranty of 24 months from the sales day.
During the warranty, if it is belong to the quality issue, we will fix or replace them for you by free after test them.
If it is not quality problem or beyond the warranty time, we will charge for the after-sales service.
Warning:
![]() The symbol means the unit is being installed, it may cause electrical shock hazard during maintaining, so please make sure it is operated by the professional technical worker.
The symbol means the unit is being installed, it may cause electrical shock hazard during maintaining, so please make sure it is operated by the professional technical worker.


