![]() TOUGHDESK 500L RGB
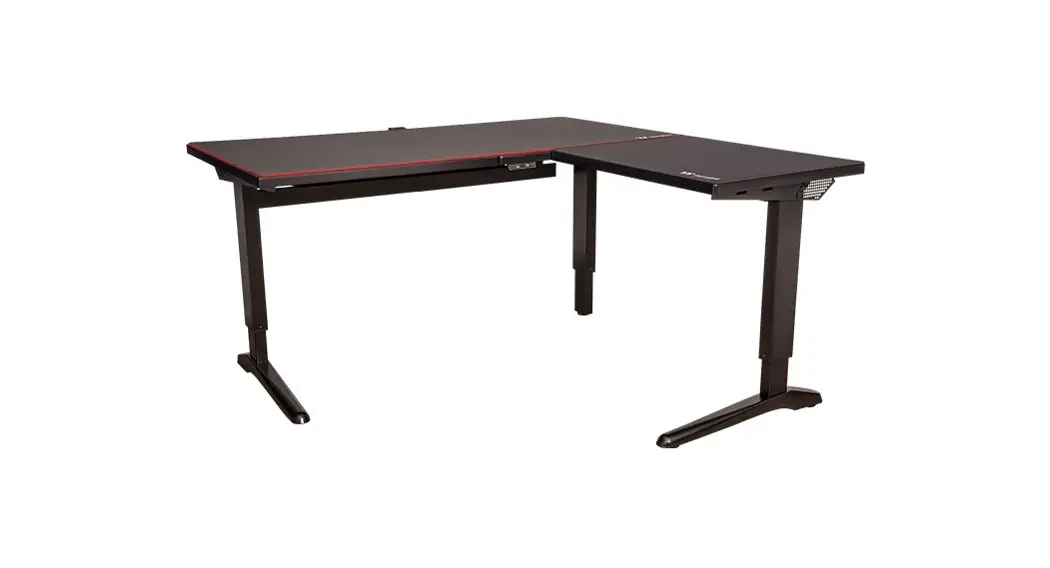
TOUGHDESK 500L RGB
BATTLESTATION GAMING DESK
Assembly & User Manual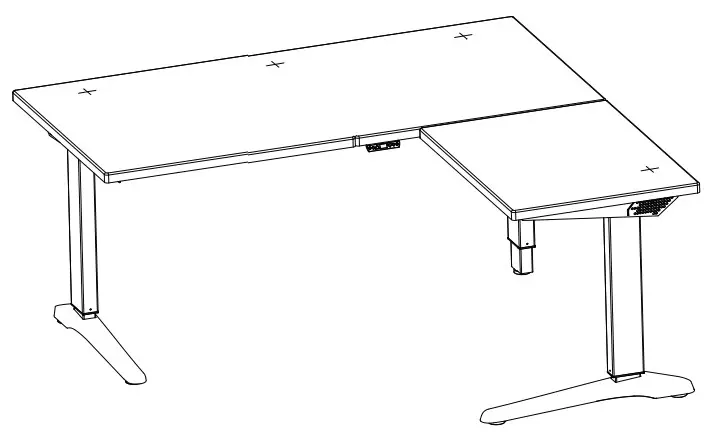
 WARNING: FAILURE TO COMPLY WITH OR OBSERVE ALL ASSEMBLY, SAFETY, AND OPERATION INSTRUCTIONS AND WARNINGS REGARDING THE USE OF THIS PRODUCT MAY RESULT IN SERIOUS INJURY.
Important information Please operate and Before assembly, really understand the relevant regulations- SPECIFICATIONS
- This document contains all relevant safety regulations. Any nonconforming use may result in personal injury or mechanical damage.
- Please read this operation manual carefully before use. The manual provides a lot of important information about the safety, use, assembly, and subsequent maintenance of the lifting table; it can avoid many unnecessary injuries.
- If this desk is sold, please provide this manual to the buyer.
- Do not sit or stand on the desk. Do not crawl or lie under the desk.
- Failure to comply with or ignore any safety requirements, assembly instructions, user operations, and related warnings may result In serious personal injury or mechanical damage. Please operate and Before assembly, I really understand the relevant regulations. This product is not a toy. Please be careful.
- Ensure that you have received all parts according to the component checklist prior to Installation. If any parts are missing or faulty, telephone your local distributor for a replacement.
- This product is not intended for use by young children without supervision.
- This product contains small items that could be a choking hazard if swallowed. Keep these items away from children.
- This product is intended for indoor use only. Using this product outdoors could lead to product failure and personal injury.
- This product can be used by children from 8 years old (supervised) to Adults. Users with disabilities or lack of experience and operating knowledge should be supervised and given careful Instruction prior to using this product. The desktop should never be sat on and children should be prohibited from having unsupervised contact with the product.
- Cleaning and user maintenance shall not be made by children without supervision.
Important information: Do not over tIgMen screws during Installation.
CAUTION
Please place the product away from corrosive gas, water, and dusty environments. Alteration or modding of any factory components outlined In the checklist will automatically void your warranty.
USE & LIABILITY
This product is intended for indoor use only. Using this product outdoors could lead to product failure and Personal injury.
The height-adjustable desk is designed for indoor use and dry work areas only. The desk height is adjustable so that it can be positioned at the most suitable height. Any other use Is at the user’s risk. Under no circumstances does the manufacturer accept warranty claims or liability claims for damages caused by improper use or handling of the desk.
SPECIFICATIONS
| Motor | |
| Voltage | Input 110-240V, 50/60Hz, 4,0A Output 32V, 10A |
| Speed | 156 RPM (+1-5%) |
| Motor | 3 |
| Duty Cycle | 10%. Max 1 mins on/ 9 mins off. |
| Torque | 7.2 Nm |
| Safety certifications | Moto: UL 508/CE Motor Controller: UL 508/CE |
| Controller | Standard 2-Button and Memory 4-Button |
| Anti-collision safety sensor | Allows the desk to safely stop when colliding with unwanted objects during operation. |
| Structure | |
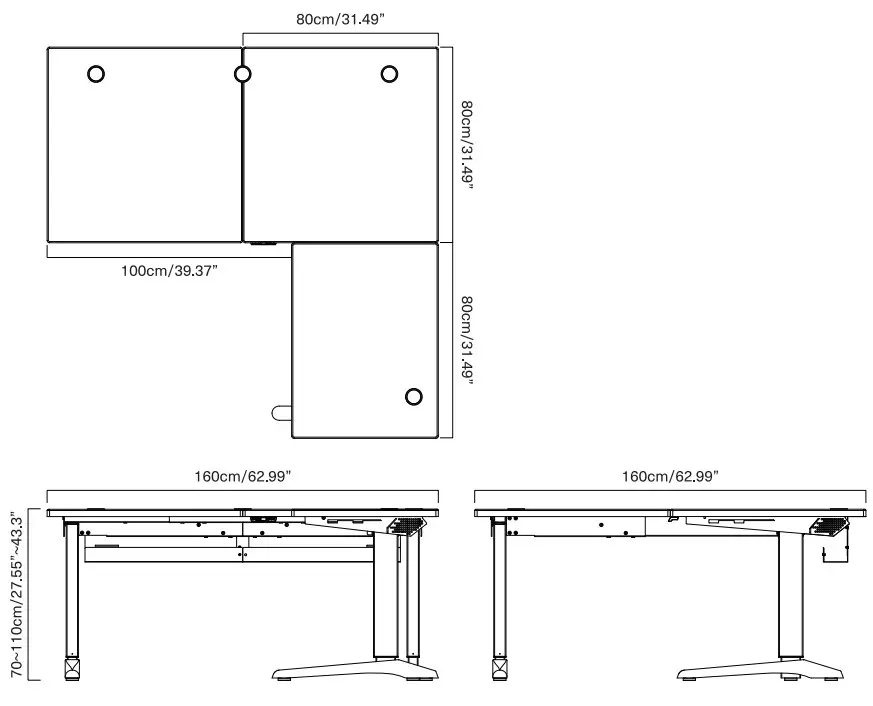
| Size | Main table:160cm(L)x 80cm(W) Side table:80cm(L)x 60cm(W) Main table:62.99′(L)x 31.49″(W) Side table:31.4910x 2 |
| Height range | 70cm-110cm 27.6″-43.3″ |
| Foot size | Long:67.2cm(L)x 10cm(W)x 5cm(H) 26.46-Mx 3.94″(W)x 1.97-(H) Short:63.4cm(L)x 10cm(W)x Scm(H) 24.96″(L)x 3.94′(W)x 1.97″(H) |
| Structure | |
| Max Load | 150 kg/330 lb |
| Material | Steel-constructed frame for max stability |
| Cable management | Yes |
| Desktop | |
| Size | Main table:160cm(L)x 80cm(W) Side table:80cm(L)x 60cm(W) Main table:62.99″(L)x 31.49″(W) Side table:31A9″(L)x 23.62″(W) |
| Desktop thickness | 3.0cm/ 1.18s |
| Max desktop support | Up to super a tower chassis (dimensions:27.2″/69cm x 13.5″/34.2cm x 25.4″/64.5cm) |
| Material MDF desktop – premium material with anti-scratch / high-pressure Laminate P2 | |
| Scratch coating | Yes |
| Table feet material | Iron |
| Others | |
| Top finish | Black |
| Frame color | Black |
| Included extra large black mousepad | RGB Mouse pad 160cm(L)x 80cm(W)x 4mm(H) 62.99″(L)x 31.49″(W)x 0.157-(H) Side mouse pad 80cm(L)x 60cm(W)x 4mm(H) 31.49″(L)x 23.62*(W)x 0.157-(H) |
| Shipping dimensions | 93.5(L)x 93.5(W)x 41(H)cm 36.81″(L)x 36.81″(W)x 16.14-(H) G.W.:91.8kg/ 202.38Ib N.W.:76.9kg/169.53Ib |
| Warranty | 2-year warranty(desktop, motor, frame, control box) |
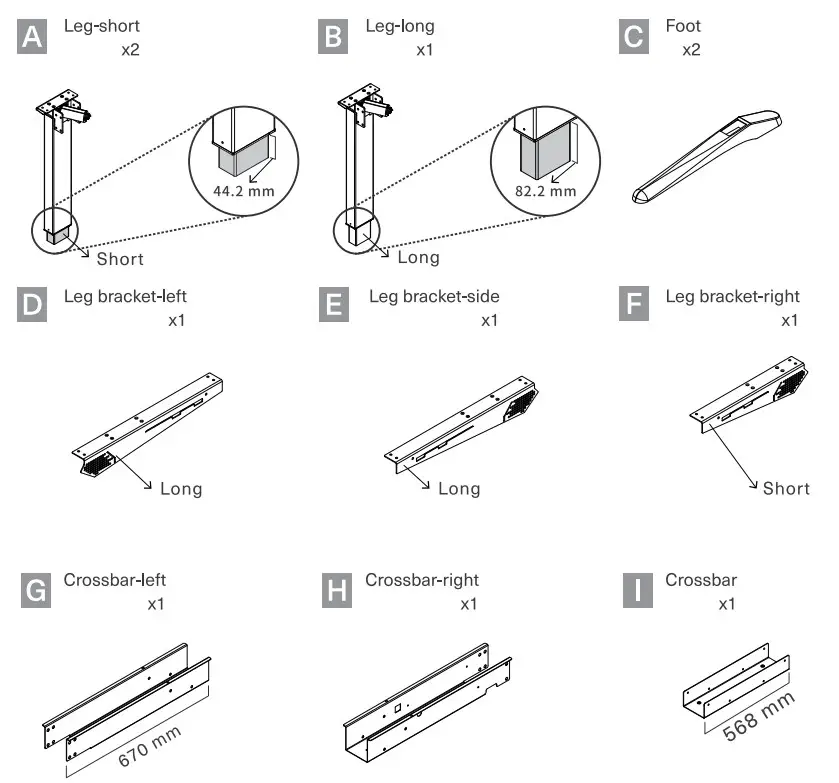
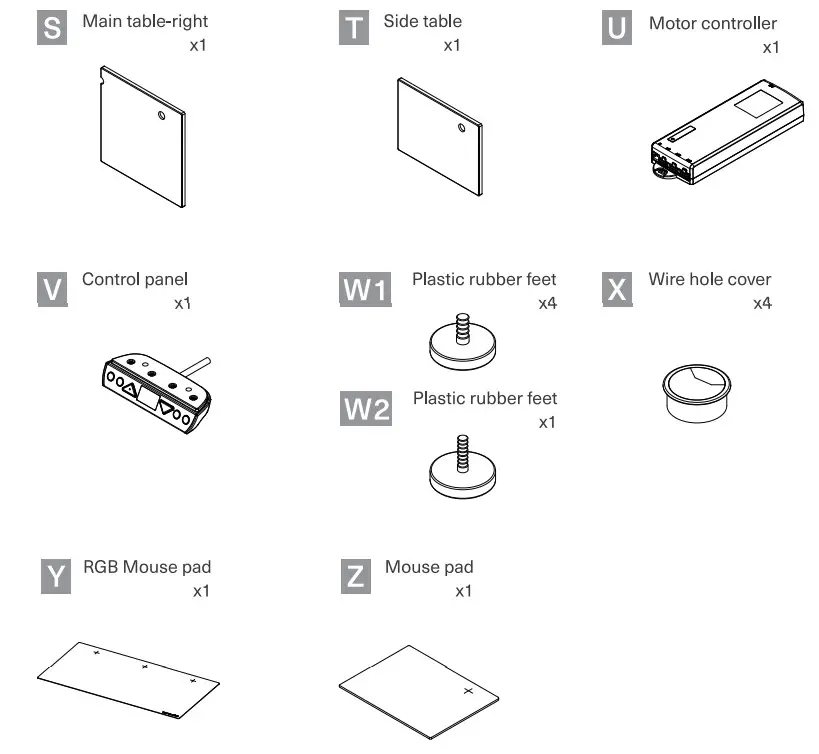
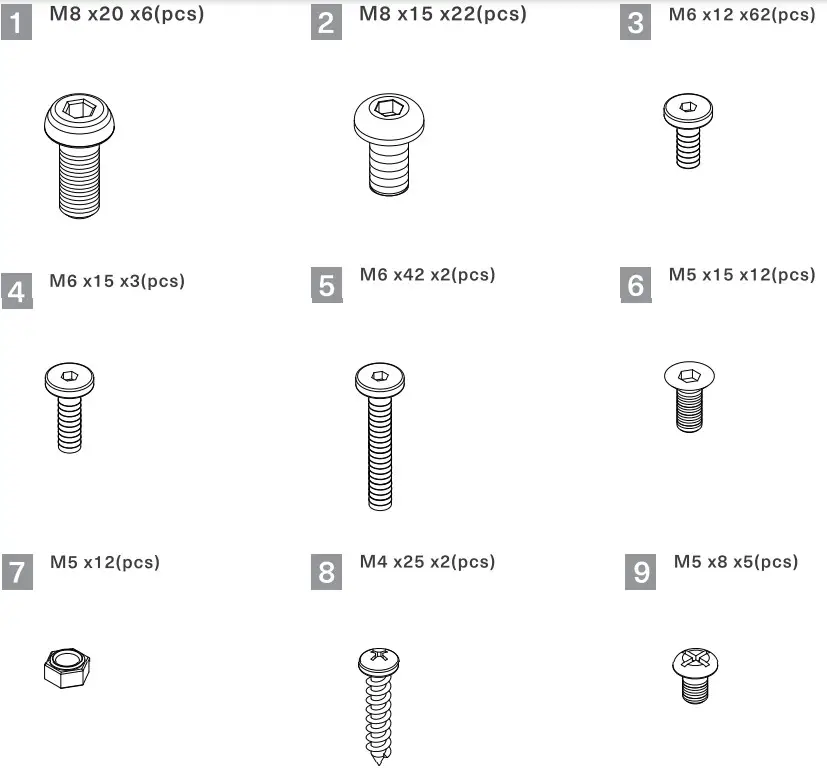
PARTS LIST


SCREWS
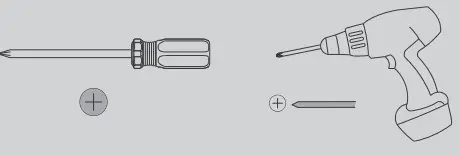
 TOOLS
TOOLS

 TOOLS
TOOLS
It is recommended to use hand tools & electric hand tools / no inclusion
DESK DIMENSIONS
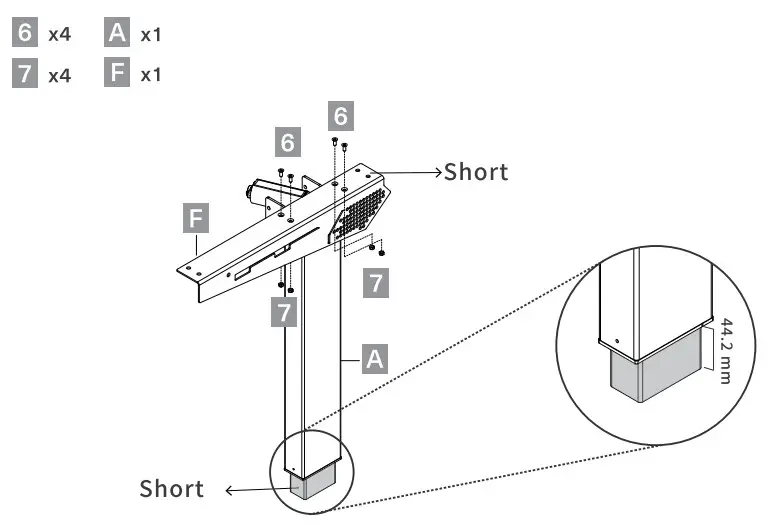
Assembling Left Leg
Assemble the leg – shorts and leg bracket – Left
Assembling Right Leg
Assemble the leg – shorts and leg bracket -right
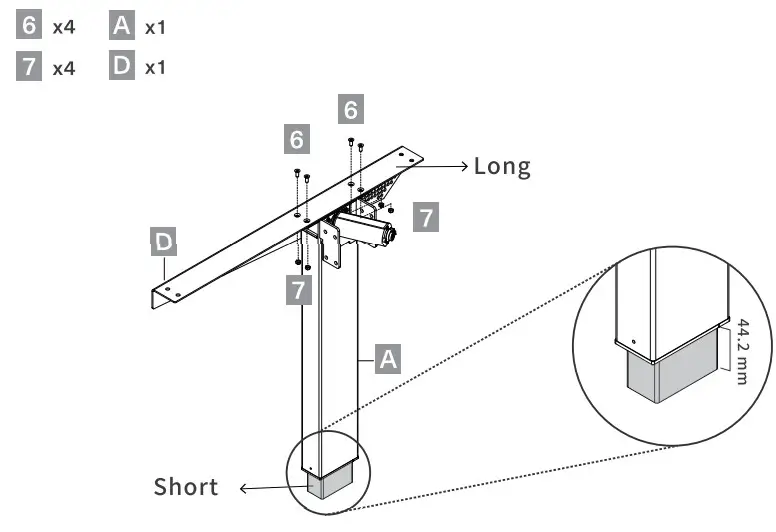
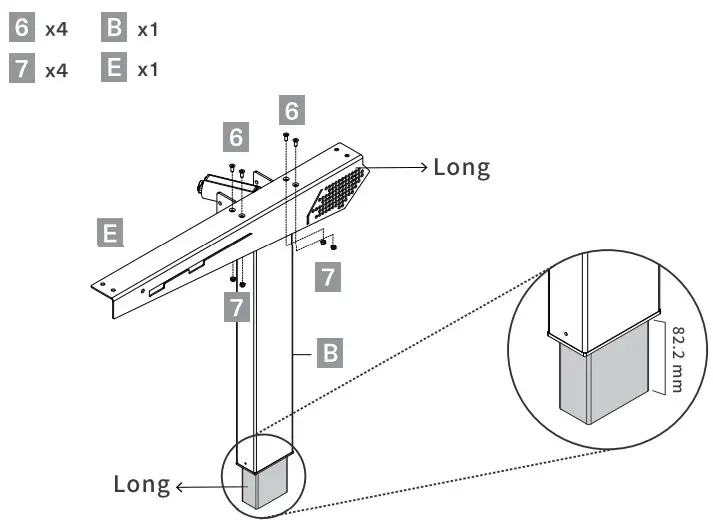
Assembling Sight Leg
Assemble the leg – long and leg bracket -side
Assembling Plastic Rubber Feet
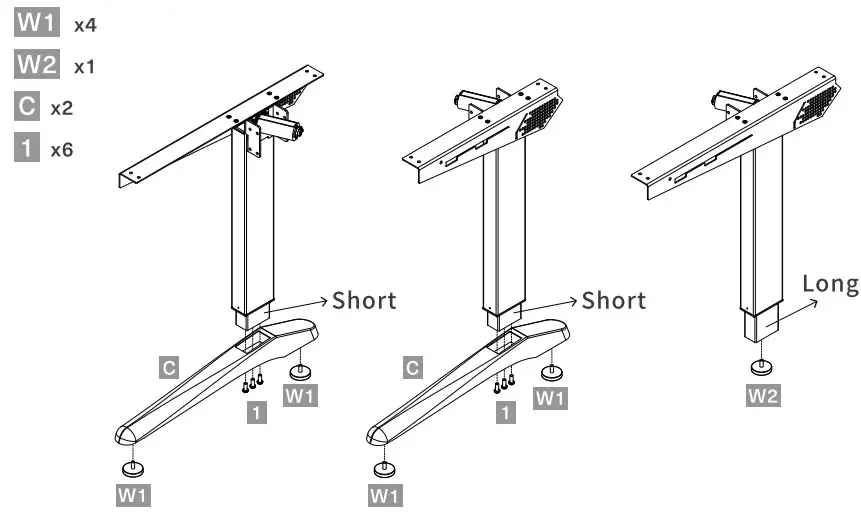
Assemble plastic rubber feet and legs.
Assembling Crossbars
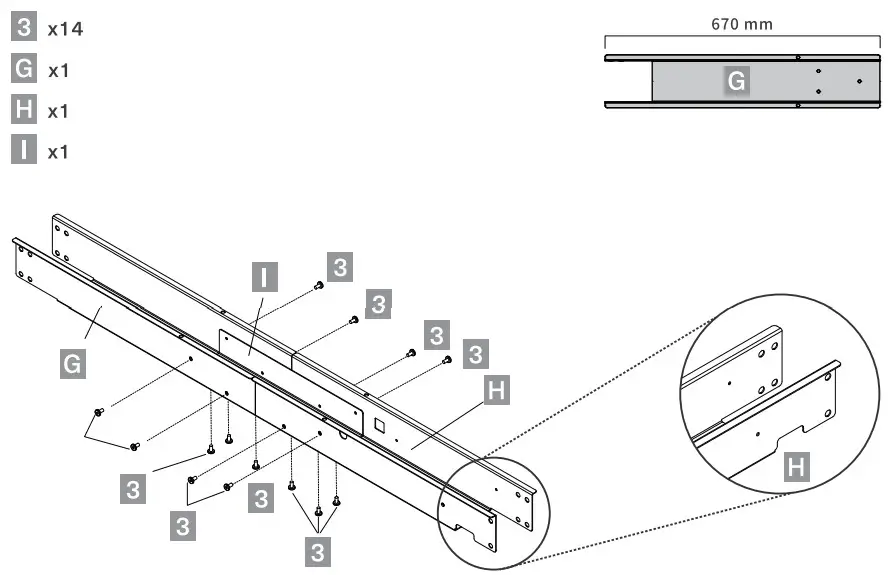
Assembling Crossbar, Crossbar-left and Corssbar-right.
Note: Do not fully tighten screws until completely assembled.
Assembling Crossbars and table feet
 Assemble crossbar and table feet according to the icon.
Note: Do not fully tighten screws until completely assembled.
Assembling Crossbars – Side table
 Assembling Crossbar-short-side table and Crossbar-long-side table.
Note: Do not fully tighten screws until completely assembled.
Assembling Crossbars – Side table and Sight Leg
 Assemble crossbars-side and side leg with other table legs.
Note: Do not fully tighten screws until completely assembled.
Assembling Brackets

Assemble the Bracket cover, Bracket-short, Bracket-long, and Bracket-side table.
Note: Do not fully tighten screws until completely assembled.
Assembling side Brackets
Assemble bracket cover and bracket-side table
Note: Do not fully tighten screws until completely assembled.
Assembling Brackets
Assembly the brackets to the main body.
Note: Do not fully tighten screws until completely assembled.
Assembling Motor Controller & Panel Controller
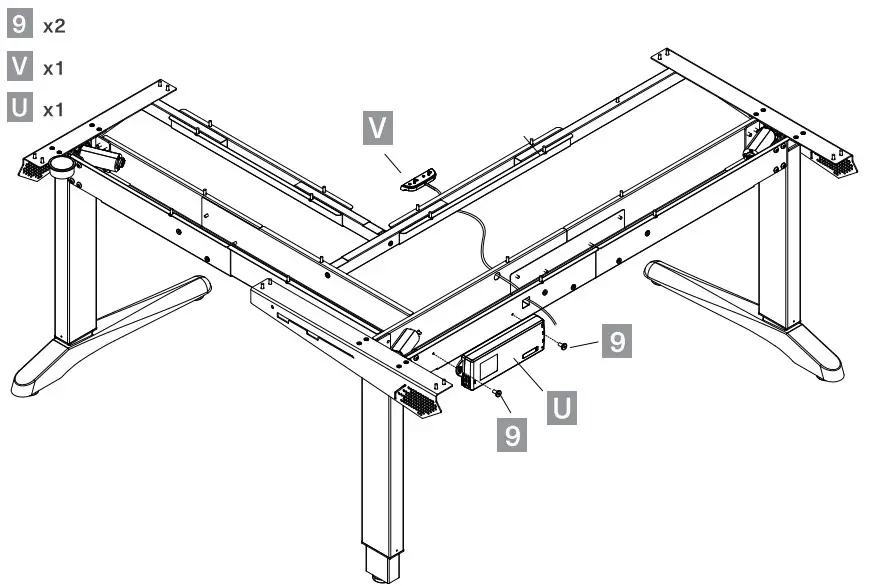
Screw-in the Motor Controller, Assemble the Panel Controller.
Assembling Motor Set
Assemble the motor controller and panel controller.
NOTE: After completing this step, you can go to step 20 and install the controller to test the lifting function.
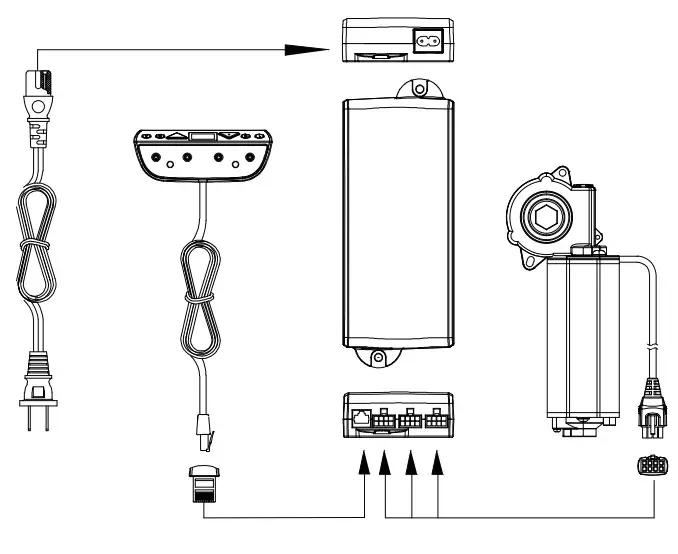
Assembling Control Panel and Legs
 Assembly control panel and main body to the table.
Note: Do not fully tighten screws until completely assembled.
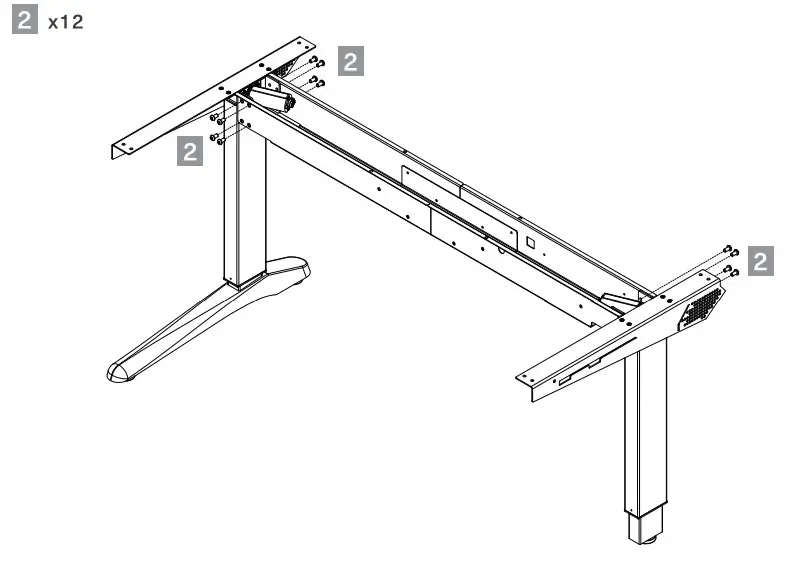
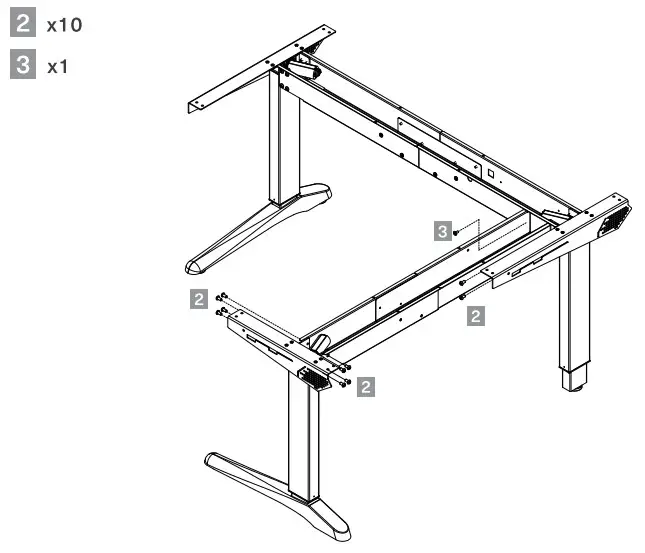
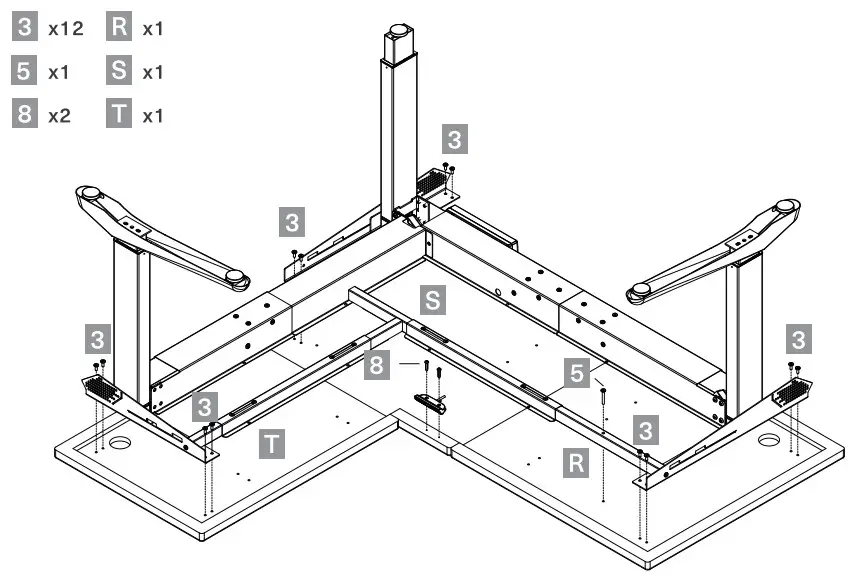
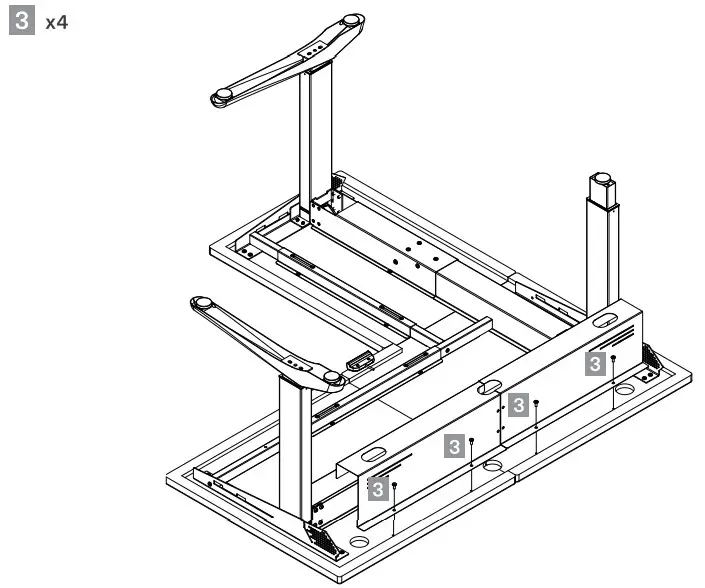
Assembling Crossbars and Brackets

Screw the crossbars and brackets into the table.
Note: Do not fully tighten screws until completely assembled.
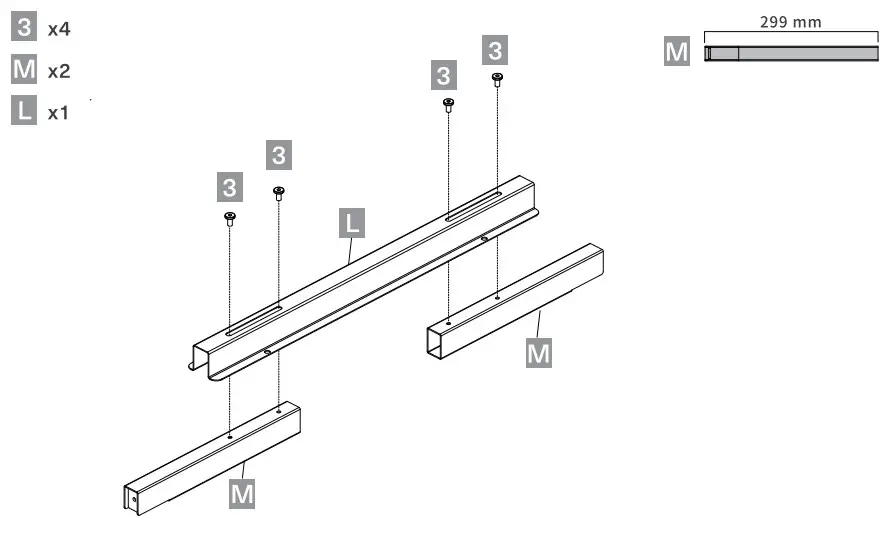
Assembling Cable Slot
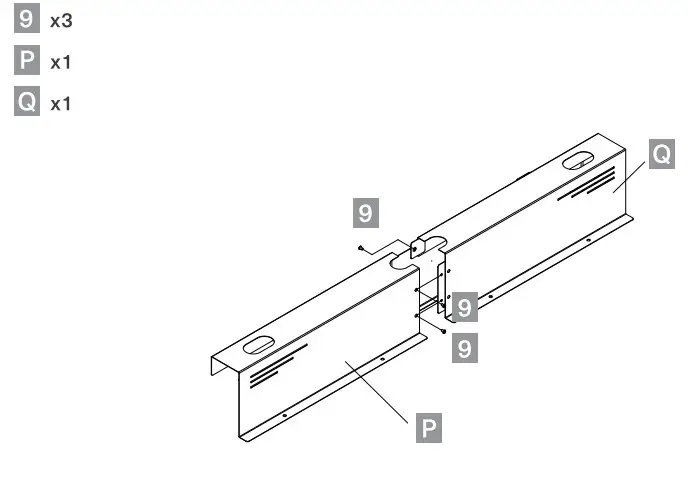
Assemble the cable slot.
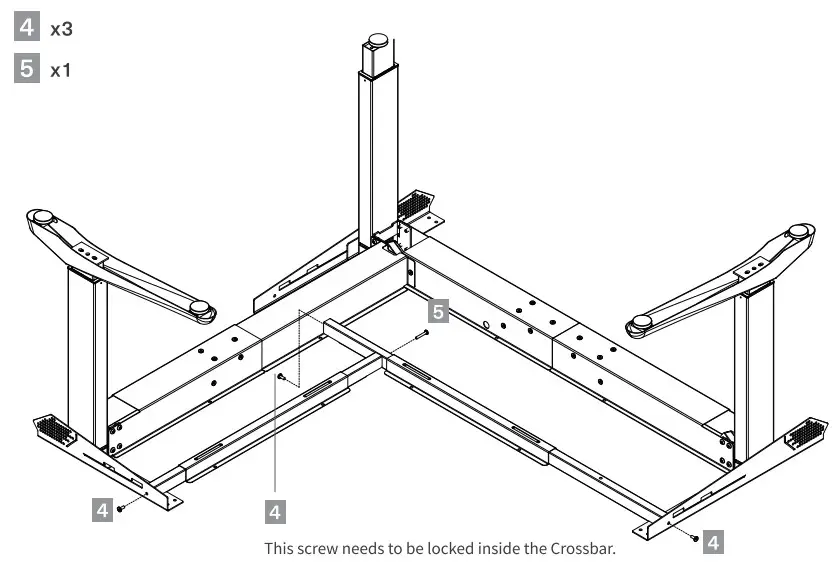
Assembling Cable Slot and Table
Screw the cable slot into the table.
Fixing the Wire Hole Cover.
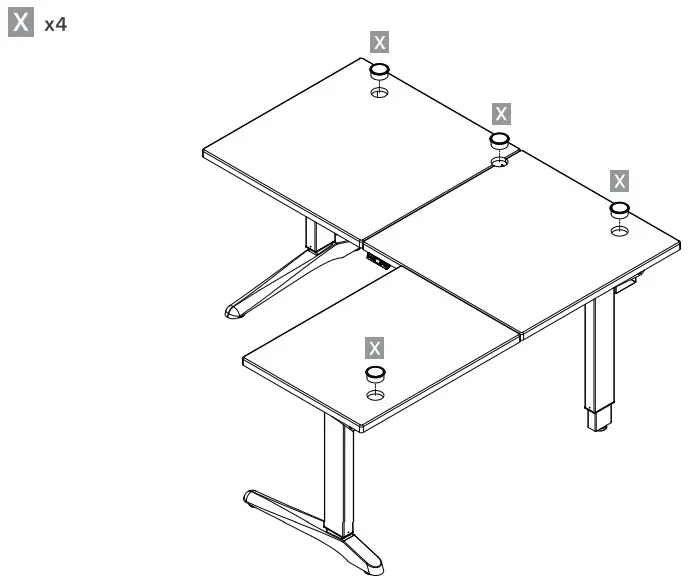 Fix the wire hole cover.
Mouse Pad
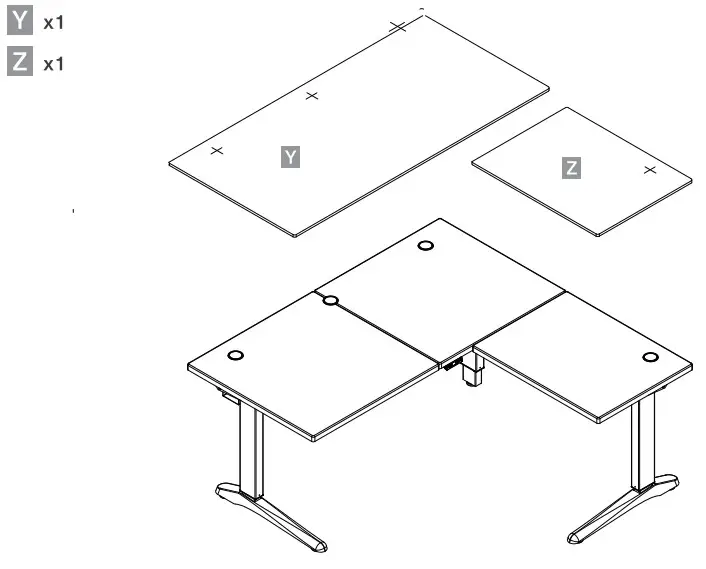
Place down the included Mousepads.
NOTE: Please refer to the RGB mouse pad manual for detailed instructions.
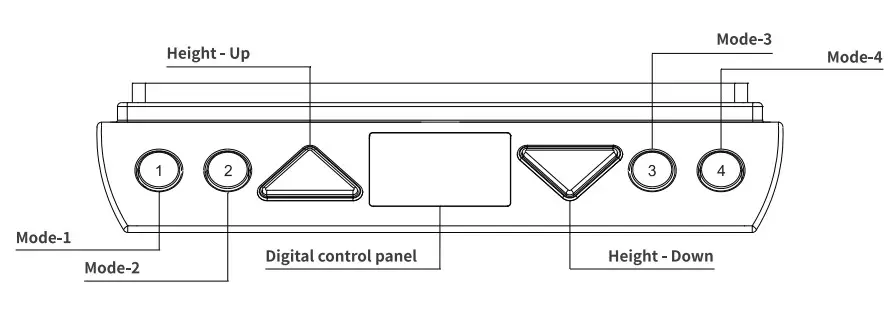
Panel Controller Instructions
IMPORTANT: You must reset the desk prior to use. Make sure no obstacles are in the desk’s path and the desk is clear of walls. Verify all cables are the appropriate length to accommodate the max height.
Control panel
- Press and hold
 to raise height level.
 - Press and hold
 to a lower height level.
 - Adjust to your preferred height with the ability to save 4 presets.
- The display will turn off after 10 seconds Press any button to activate the display
Reset
- Press both and buttons at the same time for 3 seconds to reset the desk to the default position. The control box will ‘beep’ to confirm a successful reset. Pressed buttons can now be released.
- When conducting a reset, the display will show “E00” at the last 100mm. When finished resetting, the display will indicate the default starting height.
- If and buttons are released before reset is completed, the desk will not function. The display will indicate “E00” if any button is pressed. The user must complete the reset procedure to revert to normal operation.
- Reset is necessary for the first operation of the desk.
Starting Height Display change
- The default starting height is 70cm.
- To adjust the starting height, press the button to go to the lowest position of the desk. At the lowest position, press the V button again for at least 5 seconds, display starts flashing for 10 seconds.
- During the 10 seconds, press or buttons to adjust the starting height number. After 10 seconds, the display stops flashing and the preferred starting height is shown and has been stored.
Storing Memory Profiles
- Supports 4 memory positions.
- 0perate the desk to the preferred height.
- Press any of I 2 00 together with or for 2 seconds to store the current height. The display shows P1/P2/P3/P4 when the position has been stored.
- When there is already a position stored, hold the button until the desk reaches the stored height.
- A stored position can only be overwritten but not to be cleared.
Setting Upper Limit
- 0perate the system and stop at the preferred upper height limit.
- Press + together, and release Within 3 seconds (before it goes to reset mode)
- Hold down and press the button 3 times continuously.
- 0ne ‘beep’ sound will indicate successful completion of setting.
- A stored position can only be overwritten but not to be cleared.
Setting Lower Limit
- 0perate the system and stop at the preferred lower limit height.
- Press + together, and release within 3 seconds (before it goes to reset mode)
- Keep holding and press the button 3 times continuously.
- 0ne ‘beep’ sound will indicate successful completion of setting.
Clearing Upper Limit
- Go to set the upper limit.
- Press + together, and release Within 3 seconds (before it goes to reset mode)
- Hold down and press the button 3 times continuously.
- 0ne ‘beep’ sound will indicate successful completion of setting.
Clean Lower Limit
- Go the set lower limit.
- Press + together, and release within 3 seconds (before it goes to reset mode)
- Hold down and press the button continuously 3 times.
- 0ne ‘beep’ sound will indicate successful completion of setting.
RESET (Reset Limitation)
- Using the reset function will reduce the desktop height to the lowest default height setting of 70cm.
- Using the reset function will result in the desk exceeding the preset lower height limit if one has been set.
- After resetting, the desk will only be able to move up until the preset lower height limit has been passed.
- After reset, when height exceeds the new lower limit, a ‘beep’ will sound as confirmation.
TROUBLESHOOTING
- If your desk is not functioning properly it may need to be reset. Unplug the power cord for 20 seconds. Plug the power cord back in and follow the RESET procedure.
- Reset may be needed from time to time in events like non-movement, uneven movement, sudden power outage, over-load, overheat and etc.
ERROR CODE FOR DESK WITH MEMORY CONTROLLER
| Error Code | E00 | E01 |
| Protection | Incomplete reset | Overuse protection (10% duty cycle) |
| Situation | Reset incomplete. ex. release of any button while retracting | The protection will be activated release of any button while after operating continuous use retracting more than 5mins. |
| Buzzer Alert | None | E01 flashes for 5 secs. Long 3 beeps. |
| Solution | Keep pressing the UP&DOWN buttons at the same time till you hear 1 Beep from the control box(TC). | Stop using the desk for at least 3 mins, it needs time to reset after working too hard. |
| Error Code | E04 | E11 |
| Protection | Anti-collision (Basic function in the control box for specific software) | Motor overcurrent Overload protection |
| Situation | Collision detection during operation. 1. Collision detection during operation. 2. Motor controller is not fixed well. | 1. Desk overload. 2. Internal transmission of the column is jammed |
| Buzzer Alert | E04 flashes for 5 secs. No beeps. | Ell flashes for 5 secs. 5 beeps. |
| Solution | Remove the obstacle. The desk can be operated again after it stops reversing. Remove the obstacle or fix the motor controller well. The desk can be operated again after it stops reversing. | Check the load on the desk and see if it’s overloaded. If not, please contact the supplier for mechanism inspection. |
| Error Code | E12 | E13 |
| Protection | Anti-collision (Basic function in the control box for specific software) | Motor overcurrent Overload protection |
| Situation | Collision detection during operation. 1. Collision detection during operation. 2. Motor controller is not fixed well. | 1. Desk overload. 2. Internal transmission of the column is jammed |
| Buzzer Alert | E04 flashes for 5 secs. No beeps. | E11 flashes for 5 secs. 5 beeps. |
| Solution | Remove the obstacle. The desk can be operated again after it stops reversing. Remove the obstacle or fix the motor controller well. The desk can be operated again after it stops reversing. | Check the load on the desk and see if it’s overloaded. If not, please contact the supplier for mechanism inspection. |
| Error Code | E21 | E31 |
| Protection | Motor no Hall sensor signal | Motor No current |
| Situation | .Desk is not allowed to operate. | The desk is not allowed to operate. |
| Buzzer Alert | E21 flashes for 5 secs. Long 1 beep. | E31 flashes for 5 secs. 4 beeps. |
| Solution | Check the cable status if any damage, reset before operating. Contact supplier for motor or motor cable replacement. | Check if all the plugs are connected well. It is recommended to re-plug all the plugs. |
For the latest User Installation Guide, please visit: www.thermaltake.com
©2020 Thermaltake Technology Co., Ltd. All Rights Reserved.


