![]() Installation manual
Installation manual
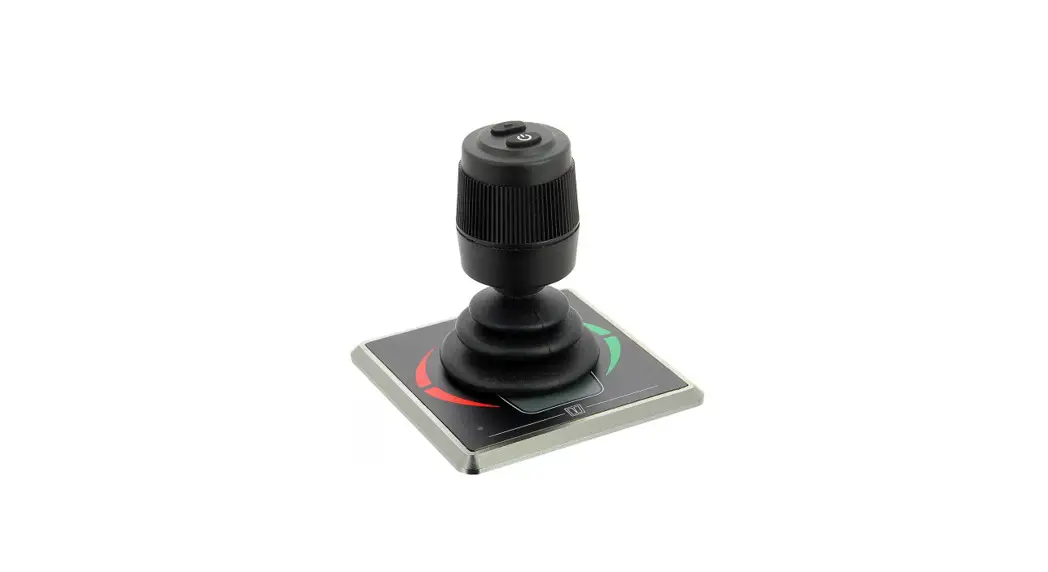
Proportional panel for bow and stern thruster
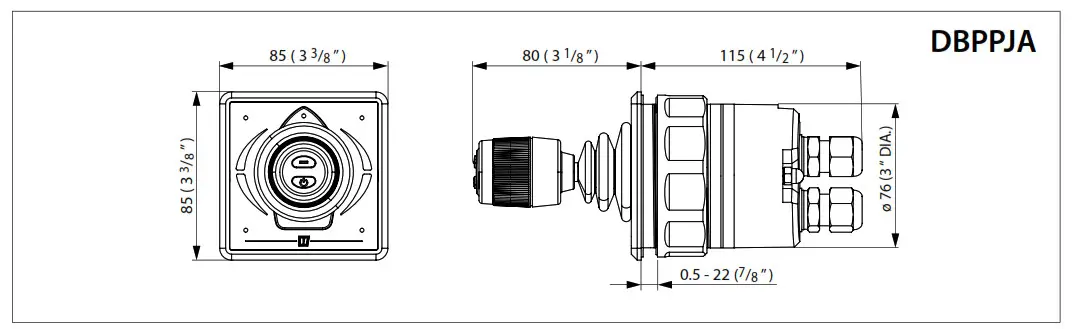
DBPPJA
Safety
Warning indications
The following warning indications are used in this manual in the context of safety:![]() Danger
Danger
Indicates that great potential danger exists that can lead to serious injury or death.![]() Warning
Warning
Indicates that a potential danger that can lead to injury exists.![]() Caution
Caution
Indicates that the usage procedures, actions etc. concerned can result in serious damage to or destruction of the engine. Some CAUTION indications also advise that a potential danger exists that can lead to serious injury or death.![]() Note
Note
Emphasizes important procedures, circumstances etc.
Symbols![]() Indicates that the relevant procedure must be carried out.
Indicates that the relevant procedure must be carried out.![]() Indicates that a particular action is forbidden.
Indicates that a particular action is forbidden.
Share these safety instructions with all users.
General rules and laws concerning safety and accident prevention must always be observed.
Introduction
This manual gives guidelines for installing the VETUS DBPPJA control panel.
For operation, refer to the user manual.
The quality of installation will determine how reliably the bow and/or stern thruster performs. Almost all faults can be traced back to errors or inaccuracies during installation. It is therefore imperative that the steps given in the installation instructions are followed in full during the installation process and checked afterward.
Alterations made to the bow thruster by the user will void any liability on the part of the manufacturer for any damages that may result.
- During use ensure the correct battery voltage is available.
![]() Warning
Warning
Changing over the plus (+) and minus (-) connections will cause irreparable damage to the installation .![]() Warning
Warning
Never work on the electrical system while it is energized .
Installation
- Mount the control panel at the helm position. There must be 150 mm of free space behind the panel.
- Make a hole of the correct size and fit the panel. See principal dimensions page 61
3 .1 Connecting CAN bus cables
See chapter 6, page 62 for the connection diagrams.![]() Note
Note
The CAN bus power supply must always be connected to 12 Volt
Consult the relevant Bow and/or Stern Thruster installation manual for the detailed CAN-BUS diagrams.
Checking/test running and configuring the control panels
4 .1 General
The control panel (DBPPJA) is intended to be used in combination with a BOWPRO bow and stern thruster. You can expand the number of control panels to a maximum of four.
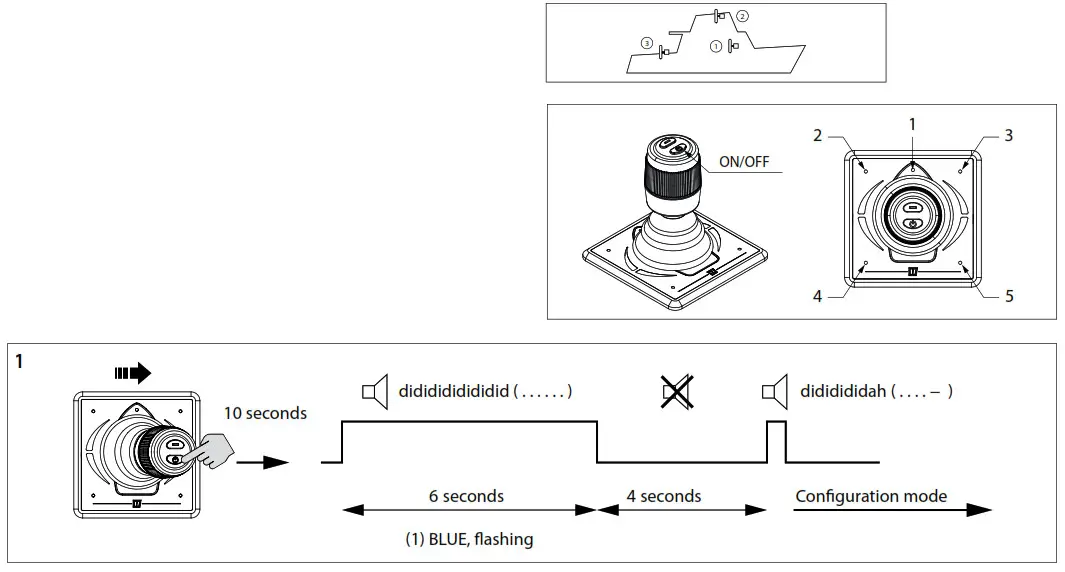
4 .2 Switching on a panel
Switch on the main switch. The system is now in ‘stand-by’.
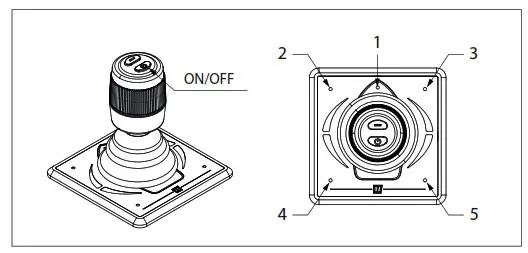
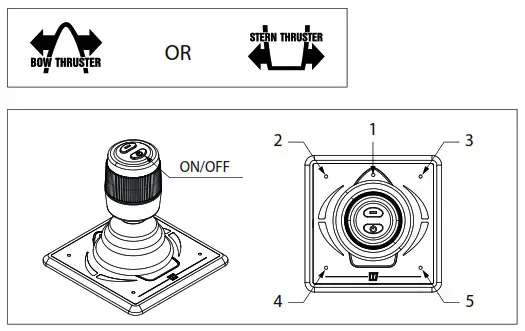
- Press the “ON / OFF” button.
LED (1) (blue) will flash and you hear a repeating signal, DI-di-di (…). The “ON / OFF” button must be pressed a second time within 6 seconds. The LED (1) will stay on and the buzzer will confirm that the panel is ready for use by giving the signal dahlia (- . -).
If multiple panels are connected, LED (1) on the panels which have not been switched ON will flash (every second two short blue flashes, heartbeat)
To take over the control to another control panel, perform the above operations on the panel you want to activate.
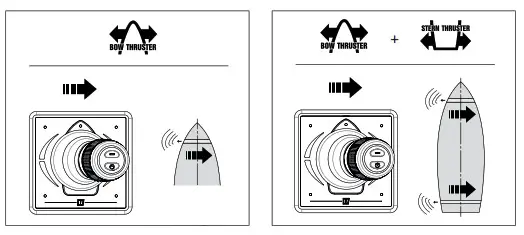
4 .4 Check thrust direction
The direction of movement of the boat must match the direction of movement of the joystick. You must check this! Do this carefully and in a safe location.
- If the movement of the boot is opposite to the direction the joystick is moved in, this must be modified as indicated in4.6.
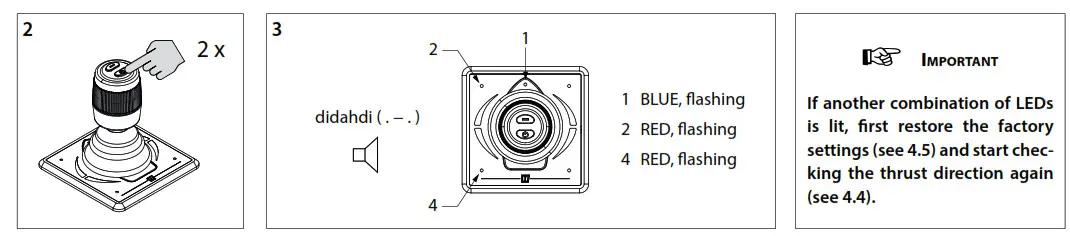
![]() Important
Important
Before using the system, perform the following:
- Check the thrust direction (see 4 .4)
- Only with multiple steering positions: configure a control panel for each steering position (see 4 .7)
4 .3 Switching OFF a panel
Keep pressing the “ON / OFF” button until all LEDs are off and you hear the signal, DI-DI-di-dah-dah (… – -). The control panel is switched off.
- Turn off the battery main switch when leaving the boat.
4 .5 Restore factory settings
Switch off all control panels (see 4.3) and perform the following actions on the control panel to restore the factory settings of the relevant panel:
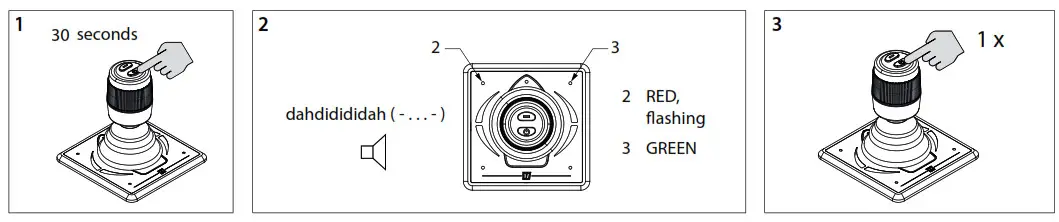
- Press and hold the “ON / OFF” button for 30 seconds.
- After 30 seconds LED (2) flashes red and LED (3) is green. You hear the signal, dah-di-di-di-dah (-… -). Now release the “ON / OFF” button.
- Press the “ON / OFF” button once. All LEDs are off and you hear the signal, dah (-). The factory settings of this control panel have been restored.
4 .6 Configuring thrust direction
Carry out the following actions on one panel in the order indicated:
Switch off the panel, see 4.3, and wait 5 seconds before starting the configuration procedure below.
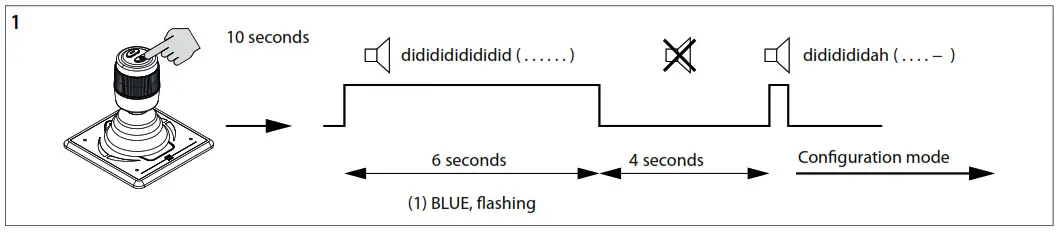
- Place the panel in configuration mode
• Press and hold the “ON / OFF” button for 10 seconds.
During the first 6 seconds, LED (1) flashes blue and the buzzer will continuously signal a didgeridoo ….. (. . . .). Keep pressing the “ON / OFF” button. After 10 seconds the buzzer sounds the signal dididididah (. . . – -).
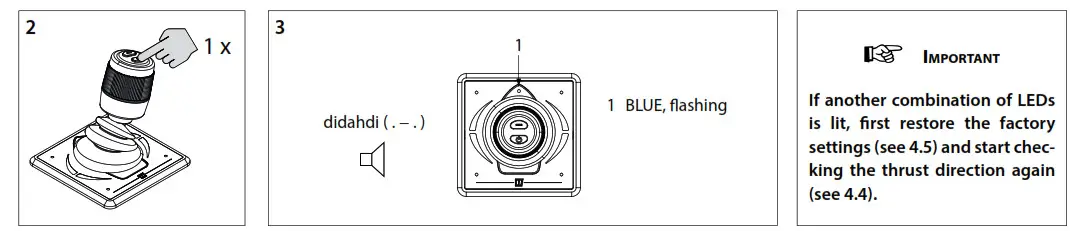
- Press the On/Off button twice.
- LED (1) (blue) (2) (red) and (4) (red) flash and you hear the signal, di-dah-di (. -.) Now the panel is in configuration mode.
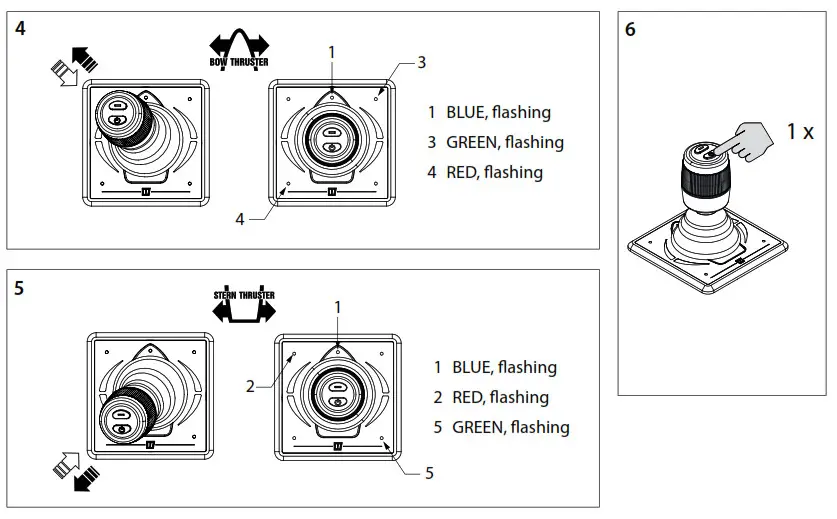
- Configuring thrust direction for a bow thruster:
Move the joystick to the upper left corner and back until LEDs (1) (blue), (3) (green) and (4) (red) flash. Repeat if necessary.
- Configuring thrust direction for a stern thruster: Move the joystick to the bottom left corner and back until LEDs (1) (blue), (2) (red) and (5) (green) flash. Repeat if necessary.
- Press the “ON / OFF” button once to confirm the setting.
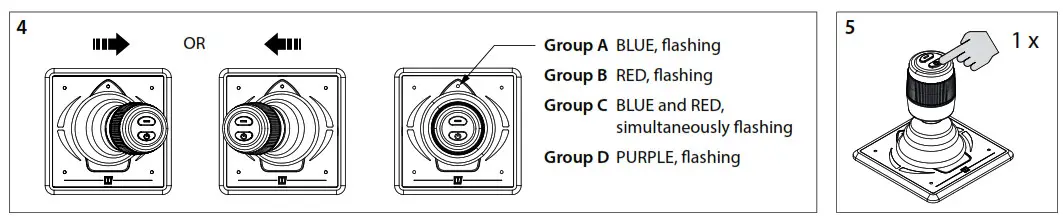
4 .7 Configuration of multiple control panels
Carry out the following actions on EACH panel in the order indicated:
Switch off the panel, see 4.3, and wait 5 seconds before starting the configuration procedure below. Set up multiple control panels
You can configure four control panels (Group code A, B, C or D). Use one group code per control panel.
- Place the panel in configuration mode
• Push the joystick to the right, press and hold the “ON / OFF” button for 10 seconds.
During the first 6 seconds, LED (1) flashes blue and the buzzer will continuously signal a didgeridoo ….. (. . . .). Keep pressing the “ON / OFF” button. After 10 seconds the buzzer sounds the signal didactically (. . . – -).
- Press the On/Off button once.
- LED (1) flashes blue and you hear the signal, DI-dah-di (. -.) Now the panel is in configuration mode.

- Move the joystick to the left or right to set the control panel code. The color of the LED indicates the control panel group code.
- Press the On/Off button once to confirm the setting.
4 .8 Meaning LED indicator lights
| BLUE LED | RED LED | BUZZER | LEFT LED Top | RIGHT LED Top | LEFT LED Bottom | RIGHT LED Bottom | |
| Blinks (for 6s) | (•) (for 6s) | Childlock after the first push | |||||
| ON | lx (-.-) | Device is enabled, Bow and Stem thrusters are ready | |||||
| Blinks double | Device is inactive, thruster is active | ||||||
| ON | ON | Device enabled and joystick moved to left | |||||
| ON | ON | Device enabled and joystick moved to right | |||||
| ON | Device enabled and joystick moved to left (full forward) | ||||||
| ON | Device enabled and joystick moved to right (full forward) | ||||||
| ON | Device enabled and joystick moved to left (full reverse) | ||||||
| ON | Device enabled and joystick moved to right (full reverse) | ||||||
| Blinks fast | I x (.-_-) | Blinks faster | Blinks faster | Bow Thruster is overheated | |||
| OFF | I x (..) | OFF | OFF | Bow Thruster was overheated | |||
| Blinks fast | l x (.-_-) | Blinks faster | Blinks faster | Stem Thruster is overheated | |||
| OFF | 1 x (..) | OFF | OFF | Stem Thruster was overheated | |||
| Blinks | l x (.-_-) | Blinks faster | Blinks faster | Bow Thruster is overloaded | |||
| OFF | lx (..) | OFF | OFF | Bow Thruster was overloaded | |||
| Blinks | Ix (.-_-) | Blinks faster | Blinks faster | Stem Thruster is overloaded | |||
| OFF | I x (..) | OFF | OFF | Stem Thruster was overloaded | |||
| Blinks double | l x (.-_-) | Blinks faster | Blinks faster | Bow Thruster is limiting | |||
| OFF | 1 x (..) | OFF | OFF | Bow Thruster was limiting | |||
| Blinks double | I x (.-_-) | Blinks faster | Blinks faster | Stem Thruster is limiting | |||
| OFF | lx (..) | OFF | OFF | Stem Thruster was limiting | |||
| Blinks fast | Blinks | l x (.-_-) | Blinks faster | Blinks faster | Bow Thruster supply is low | ||
| Blinks fast | Blinks | l x (.-_-) | Blinks faster | Blinks faster | Stem Thruster supply is low | ||
| Blinks fast | Blinks fast | Panel supply is low | |||||
| Blinks double | Blinks double | Blinks double | Blinks double | Joystick is broken | |||
| Ix (.) | Joystick button is pushed | ||||||
| ON | Disconnected from the network |
Principal dimension
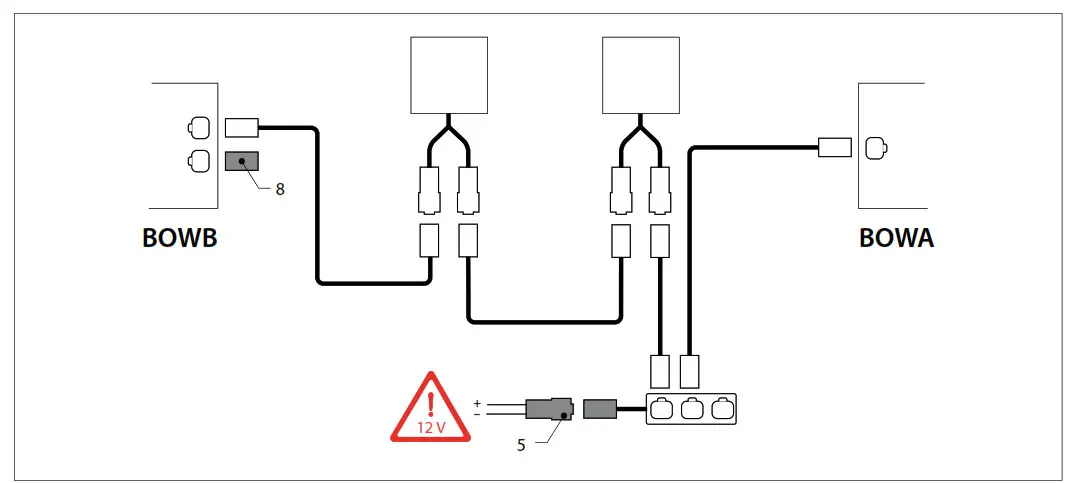
Wiring diagrams

![]() Note
Note
The CAN bus is a chain to which the bow thruster and the panels are connected.
At one end of the chain, the power supply (5) must be connected and the terminator (8) must be connected at the other end!
![]()
Masterstroke 571 – 3125 BD Schedar – The Netherlands
Tel.: +31 (0)88 4884700
[email protected]
www.vetus.com
Printed in the Netherlands
020813.11 2022-07
Copyright © 2022 VETOES B.V. Schedar Holland
020813.11


