![]()

The SharkBite® Connection System
Introduction
The purpose of this guide is to familiarize plumbing professionals with the SharkBite connection system and the recommended method of installing the SharkBite PEX pipe. SharkBite PEX can be used with other SharkBite products: push-to-connect fittings, barbed fittings, manifolds, and valves. SharkBite PEX is an excellent pipe product for plumbing, radiant and hydronic systems, offering many more advantages than rigid pipe. The combination of SharkBite push-to-connect fittings, manifolds, valves, and PEX pipe is the fastest way to plumb any residential or commercial project. If the cost of material takes priority, SharkBite barb fittings may be used with clamp or crimp rings. In addition, a variety of valves and manifolds with SharkBite barb connectors are included in the SharkBite connection system line, making it the only total rough-in solution.
Push-to-Connect Fittings
Instant connection for increased ease of use
- No soldering, clamps, unions, or glue is required.
Fittings certified to 200 psi and 200˚F (93˚C) - Proven durability and quality.
Fits copper pipe, CTS, CPVC, and PEX pipe - Connects all three types in any combination.
Integral pipe liner for PEX installations - No loose components ensure a secure, reliable connection.
Design certified and agency listed - Provides peace of mind that it passes inspection.
Compact, robust DZR brass body - Foundation of a strong, corrosion-resistant, durable fitting.
Design certified to NSF/ANSI 61 and ASSE 1061 product standard for use in potable water and hydronic heating water distribution
- Quality engineered and manufactured.
Approved to be used underground and behind walls without access panels. Designed for radiant and hydronic heating as well as potable water distribution.
Barb Fittings
Wide range of line of fittings and manifolds - A typical barb system offers the lowest material cost.
Valves
The line includes a ball, regulator, and thermostatic mixing valves - Push-to-connect (integral & union type) or barb connectors.
PEX Pipe
Flexible - Easy to install and service.
Quieter - Minimizes noise caused by water hammers.
Resists corrosion and scale buildup - Improves the performance of the plumbing system.
Fewer fittings required - Reduces total installation cost.
Fewer joints - Reduces the chances of callbacks.
Pressure test immediately
No waiting for glue to dry or joints to cool.
PEX Tools
Clamp Ring Tool (one clamping tool for all size clamp rings) - Reduces equipment cost and saves installation time.
- One-hand operation (leaves a hand free to position the clamp ring).
Crimp Ring System (Heavy-duty components with adjustment tools and case) - Includes 5 interchangeable jaws and go/no-go gauge.
Plumbing Systems
The SharkBite® connection system offers the only total rough-in solution, including a full line of valves, push-to-connect fittings, PEX pipe, and traditional PEX components and tools. The SharkBite system offers three options for a PEX pipe installation – Trunk & Branch, Manifold, or a Combination system – as described in the diagrams below.
The Trunk and Branch System 
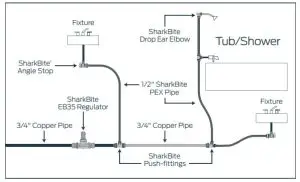
This system uses SharkBite PEX pipe and pushes fittings. It offers the absolute fastest and easiest way to get from meter to fixtures.
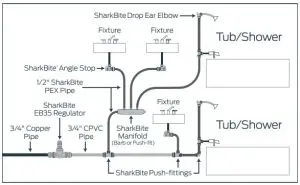
The Manifold System 
This system uses traditional PEX components (manifolds, barbed fittings, clamp rings, etc.) and offers the total lowest material cost. When you need special configuration fittings, such as drop ear elbows, SharkBite push-fittings offer greater speed and efficiency than traditional barbed fittings while costing about the same.
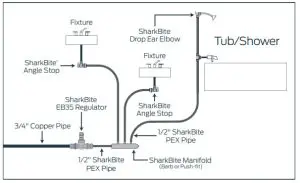
The Combination System 
This system uses SharkBite push-fittings and manifolds to offer additional versatility. When you need special-configuration fittings, such as drop ear elbows, SharkBite push- fittings offer greater speed and efficiency than traditional barbed fittings while costing about the same.
The Home-Run System 
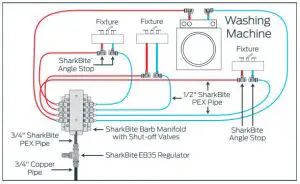
This system uses a central manifold to distribute water to fixtures and appliances. One dedicated plumbing line is run to each fixture/appliance for both hot and cold supply lines.
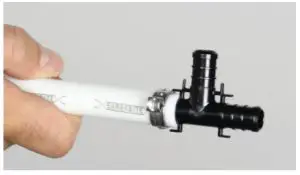
Making a SharkBite®
Connection
The combination of SharkBite push-to-connect fittings and PEX pipe offers the fastest, easiest installation from meter to fixture.
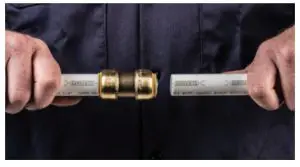
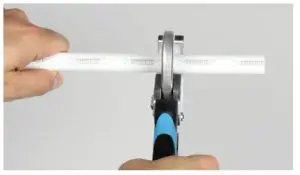
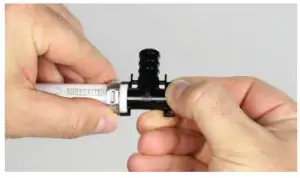
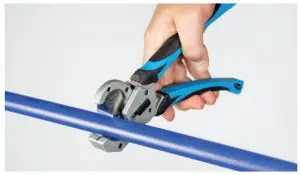
 | Step 1 Use pipe cutters to cut the pipe between the pointed ends of the repeating 1-inch SharkBite imprint pattern. The pattern provides a visual aid to determine if the pipe has been inserted all the way into the fitting. Ensure the pipe is cut square to allow it to be inserted all the way into the fitting. Ensure the pipe has no rough edges, cuts, or abrasions, which can damage the o-ring and cause the fitting to leak. | 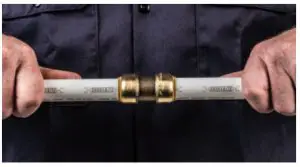 | Step 3 Insert the pipe into the fitting until the pipe reaches the pipe stop. Make sure the pointed end of the SharkBite pattern is even with the end of the release collar. Only when the pipe reaches the pipe stop has a secure joint been created. |
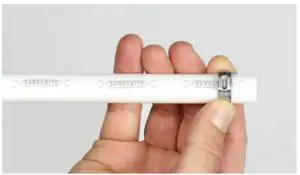
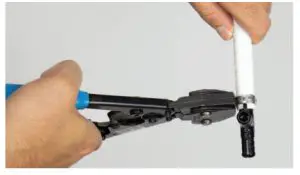
 | Step 2 Ensure the support liner inside the fitting is in place. The liner reinforces the wall of the PEX pipe to help prevent the collapse of the pipe wall. | 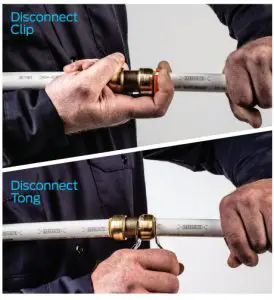 | Step 4 Place the SharkBite disconnect clip around the pipe with the non-branded face against the release collar. If using the SharkBite disconnect tongs, place the teeth around the fitting assembly. The fork end with the SharkBite brand logo should be positioned around the pipe and the other end around the neck of the fitting. Push the clip against the release collar and pull the pipe with a twisting action to release the pipe. If using the SharkBite disconnect tongs, squeeze the tool with one hand and pull the pipe with a twisting action to release the pipe. Check the fitting and pipe end for damage. The fitting and pipe should be free of damage, foreign objects, and marks on the outside diameter. If the pipe is damaged or marked, then cut and use a new section of pipe. |
Note: Install SharkBite fittings at least 1 inch apart to enable disassembly of the joint.
Making a SharkBite®
Clamp/Barb Connection
The use of traditional PEX components (manifolds, barbed fittings, clamp or crimp rings, etc.) offers the total lowest material cost.
 | Step 1 Use pipe cutters to make a square cut of the pipe to length. A rough or uneven cut can result in a weakened joint. |
 | Step 2 Slide the appropriate clamp ring size over the pipe to about 2 inches from the end of the pipe. |
 | Step 3 Push the pipe onto the barbed fitting until it touches the fitting shoulder. Position the clamp ring 1/8 to 1/4 inch from the end of the pipe. This distance ensures that the clamp ring is positioned directly over the barbs on the fitting. |
 | Step 4 Position the open jaws of the clamp tool over the raised tabs of the clamp ring and squeeze. One clamp tool fits all-size clamp rings. It can be operated with one hand, leaving the other hand free to hold the clamp ring in position. The tool cannot be removed until the clamp ring is fully compressed. A properly calibrated clamp tool eliminates the need to check each fitting ring with a go/no-go gauge. |
 | Step 5 Verify the connection is secure by visually checking the clamp tab. |
Calibration of the SharkBite
Clamp Tool
Check Calibration of the Clamp Tool
Always check the clamp tool with the calibration gauge before you begin installations and after performing the last crimp.
| Step 1 Close the clamp tool handles to the stop point and insert the gauge into the jaw gap. | Step 2 Gauge must stop at the NOGO line in order to make proper connections. |
Calibrating the Clamp Tool
If the gauge goes into the jaws beyond the GO portion, the clamp tool should be recalibrated using the following steps.
 | 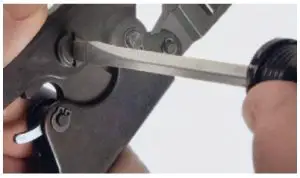 | 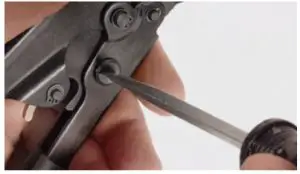 |
| Step 1 Place GO portion of gage into jaw gap. | Step 2 Loosen locking nut. | Step 3 Adjust clamp tool jaws by rotating the eccentric stud counterclockwise until jaws contact gauge. Re-tighten the locking nut. |
Warning: Tools out of calibration may not make good long-term connections and can result in leaks developing over time.
Removal of Clamp or Complete Connection
Place a flat-bladed screwdriver under the clamp tab and pry up to unlock. Then, using a clamp removal tool or pliers, grab onto the tab and pull free.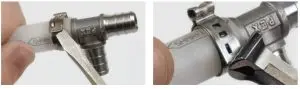
Note: The previously clamped section of the SharkBite PEX pipe should be cut off before making a new connection.
Making a SharkBite®
Crimp/Barb Connection
The use of traditional PEX components (manifolds, barbed fittings, clamp or crimp rings, etc.) offers the total lowest material cost.
 | Step 1 Use pipe cutters to make a square cut of the pipe to length. A rough or uneven cut can result in a weakened joint. |
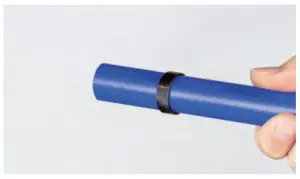 | Step 2 Slide the appropriate clamp ring size over the pipe to about 2 inches from the end of the pipe. |
 | Step 3 Push the pipe onto the barbed fitting until it touches the fitting shoulder. Position the clamp ring 1/8 to 1/4 inch from the end of the pipe. This distance ensures that the clamp ring is positioned directly over the barbs on the fitting. |
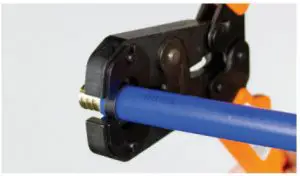 | Step 4 Position the open jaws of the crimp tool over the crimp ring and squeeze. The jaws are interchangeable and include sizes for 3/8-, 1/2-, 5/8-, 3/4- and 1 in. crimp rings. |
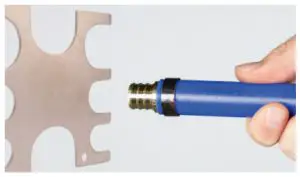 | Step 5 Verify that the connection is secure by using the go/no-go gauge. The gauge slot that corresponds to the crimp ring size should easily slide onto the compressed crimp ring. |
Guidelines
For potable water and hydronic distribution
What to do:
- Do install SharkBite PEX pipe to the appropriate plumbing code.
- Do use SharkBite PEX pipe for hot and cold water distribution only.
- Do keep hot and cold lines separate.
- Do use only fittings and accessories that have been tested and approved for the SharkBite PEX connection system.
- Do leave extra pipe at both ends of the run to make connections easier.
- To ensure the pipe is supported properly to prevent undue stress, strain, thermal expansion, and contraction.
What not to do:
- Do not use sharp instruments to open the SharkBite PEX packaging. You may damage the pipe.
- Do not use natural gas, propane, fuel oil, or any other fluid, chemical, or product. SharkBite PEX pipe (non-oxygen barrier) is for use with potable water only and is not approved or intended for any other use.
- Do not freeze. SharkBite pipe is freeze-resistant, but not freezeproof. Pipe embedded in concrete that is subjected to freezing conditions will likely damage both the concrete and the pipe. The pipe that is frozen and not embedded may damage joints or manifolds. Be sure to carefully pressure test, inspect and repair systems that have been subjected to a freeze before returning them to normal operation.
- Do not pressure test with water in freezing conditions.
- Do not store or install where the pipe will be exposed to direct or indirect ultraviolet light (i.e. sunlight).
- Do not expose the pipe to direct flame. Do not install pipe near extreme heat.
- Do not use in excessive operating conditions inconsistent with pressure ratings that appear on the pipe and applicable standards.
- Do not subject pipe to prolonged exposure to free chlorine concentrations greater than 4 ppm.
- Do not use in contaminated soils.
- Do not expose to materials that affect the basic properties of cross-linked PEX, brass, or copper. Avoid contact with adhesives.
- Do not use with other fitting systems.
- Do not install through metal studs or concrete without using a protective sleeve.
- Do not install pipe that has defects such as gouges, cuts, deep scratches, kinks, evidence of grease, tar or any chemical, exposure fading or discoloration.
- Do protect SharkBite PEX pipe from damage, both before and during the construction process.
- Do use SharkBite pipe liner with SharkBite fittings and SharkBite PEX joint. (exception – 1/4 in. fittings)
- Do use the following types of products when sealing between PEX tubing/fittings and slab penetration protection devices.
– Latex caulk
– Latex foam
– Silicone sealant
– Polyurethane expanding foam
Note: Do Not Use petroleum-based sealants on PEX tubing. - Do a pressure test the system upon completion.
- Do not use SharkBite brass or poly crimp fittings with stainless steel clamps when using PE-RT pipe in ambient temperature conditions of 32F or less. If using SharkBite brass or poly crimp fittings with PE-RT pipe when conditions are 32F or less, copper crimp rings should be used.
- Do not use defective fittings with the pipe.
- Do not use supports that may collapse or cut the pipe. Supports should not have sharp edges, which could damage the pipe.
- Do not use metal hangers with sharp or abrasive edges or hangers that may pinch or penetrate the pipe. Proper hangers, clamps, and straps are available from your SharkBite supplier.
- Do not pull pipe tight at connections. Prevent unnecessary strain on the pipe, fittings, and connections with straps or clamps.
- Do not drag the pipe over rough terrain, rocks, or any other surface that could abrade, cut, puncture, or damage the pipe wall in any way.
- Do not crush or kink the pipe.
- Do not heat kinked pipe to repair/reform. Inspect all pipes before and after installation. Damaged or kinked sections should be cut out and replaced. Keep the PEX pipe a minimum of 12 inches vertically and 6 inches horizontally from sources of high heat such as recessed light fixtures, gas flue vents, heating appliances, or electric motors. Forced air heating ducts are not generally considered sources of high heat. These areas of installation should be rechecked after further construction and other mechanical systems have been installed. PEX can be run in return for air plenums. Bend pipe 2 inches away from fitting. This prevents the fitting from being used as an anchor point.
- Do not exceed the minimum bend radius of the pipe. (see illustration on p.10)
Proper Support of
SharkBite® PEX Pipe
SharkBite PEX must be properly supported to protect against excessive strain. For both vertical and horizontal applications, we recommend the pipe be supported every 32 inches between supports, leaving a little slack (1/8-1/4 inch) in the pipe to allow for normal expansion and contraction. Always use approved PEX supports, and never use support that has sharp edges.
Installing SharkBite PEX Pipe in Concrete
The SharkBite PEX pipe can be submerged in concrete, but we recommend following these guidelines to ensure a long-lasting, maintenance-free installation.
|
|
Cross-Linking Methods
Cross-linking is a process that changes the chemical structure of high-density polyethylene used to make PEX pipes so that the polymer chains are connected to each other in a three-dimensional net by chemical bonds. PEX A, B, C, and D are terms used to describe the different manufacturing methods used to produce PEX pipes.
Regardless of which manufacturing method is used, all PEX pipe meets the same standards for commercial and residential plumbing applications.
| Typology | Method | Symbol | |
| A | Chemical | Peroxide cross-linking | PEX-a |
| B | Chemical | Silane cross-linking | PEX-b |
| C | Physical-Chemical | Radiation cross-linking (beta) | PEX-c |
| D | Chemical | Azocomponets cross-linking | PEX-d |
Technical Data for SharkBite PEX
SharkBite PEX Pipe Marking. All SharkBite PEX Pipe is marked with:
Technical Data for
SharkBite PEX
Certifications
The SharkBite PEX pipe is design certified to ASTM F-876, F-877, CSA B137.5 standards and is listed to the NSF/ANSI 14 and CSA B137.5 standards for use in potable water systems.
Maximum Working Pressure
160 psi @ 73.4°F (23°C)
100 psi @ 180°F (80°C)
80 psi @ 200°F (93°C)
Thermal Expansion
Since SharkBite PEX pipe will expand and contract during temperature changes, please allow slack when running the pipe through the building. SharkBite PEX will expand and contract at a rate of approximately 1 inch per 100 feet of pipe for each 10°F change in temperature (see equation below). We recommend that offsets and expansion loops be used as ways to compensate for expansion and contraction. The change of pipe length due to temperature increase can be calculated as follows:
ΔL = α(L • ΔT)
where: ΔL = change of length (inches)
ΔT = change of temperature (°F)
L = original pipe length (feet)
α = coefficient of linear expansion = (8 x 10⁻⁵ @ 68°F)
Example:
ΔT = 10°F L = 100’ Δ L = 0.08″
SharkBite PEX Pipe Dimensions, Bend Radius and Fluid Capacity
| Nominal Diameter | OD inches | ID inches | Bend Radius | Fluid Cap 100’/Gals |
| 3/8″ | 0.5 | 0.35 | 4″ | 0.53 |
| 1/2″ | 0.625 | 0.475 | 5″ | 0.96 |
| 3/4″ | 0.875 | 0.671 | 7″ | 1.9 |
| 1″ | 1.125 | 0.885 | 10″ | 3.1 |
Pressure Loss Data
| Flow Rate GPM | Pressure Loss psi/100 ft of pipe | |||
| 3/8″ | 1/2″ | 3/4″1 | 1 | |
| 0.2 | 0.427 | 0.099 | 0.019 | 0.006 |
| 0.3 | 0.880 | 0.204 | 0.039 | 0.012 |
| 0.4 | 1.470 | 0.341 | 0.065 | 0.019 |
| 0.5 | 2.189 | 0.508 | 0.097 | 0.029 |
| 0.6 | 3.032 | 0.703 | 0.135 | 0.040 |
| 0.7 | 3.993 | 0.926 | 0.177 | 0.053 |
| 0.8 | 5.069 | 1.175 | 0.225 | 0.067 |
| 0.9 | 6.258 | 1.450 | 0.278 | 0.082 |
| 1 | 7.555 | 1.751 | 0.335 | 0.099 |
| 1.1 | 8.960 | 2.076 | 0.397 | 0.118 |
| 1.2 | 10.470 | 2.425 | 0.464 | 0.138 |
| 1.31 | 312.08 | 2.799 | 0.535 | 0.159 |
| 1.4 | 13.80 | 3.195 | 0.611 | 0.181 |
| 1.5 | 15.610 | 3.615 | 0.691 | 0.205 |
| 1.61 | 617.520 | 4.058 | 0.776 | 0.230 |
| 1.7 | 19.530 | 4.523 | 0.865 | 0.256 |
| 1.82 | 821.64 | 5.010 | 0.958 | 0.284 |
| 1.92 | 923.840 | 5.519 | 1.055 | 0.313 |
| 2 | 26.140 | 6.050 | 1.157 | 0.343 |
| 2.5 | 39.000 | 9.024 | 1.724 | 0.511 |
| 3 | 54.100 | 12.51 | 2.390 | 0.708 |
| 3.5 | 71.360 | 16.500 | 3.150 | 0.933 |
| 42 | 420.970 | 4.002 | 1.185 | |
| 4.5 | 25.900 | 4.9431 | 0.463 | |
| 5 | 31.300 | 5.972 | 1.768 | |
| 6 | 43.440 | 8.284 | 2.451 | |
| 7 | 10.930 | 3.232 | ||
| 8 | 13.890 | 4.108 | ||
| 9 | 7.170 | 5.076 | ||
| 10 | 20.750 | 6.134 | ||
| 11 | 24.630 | 7.281 | ||
| 12 | 28.810 | 8.514 | ||
| 13 | 9.832 | |||
| 14 | 11.240 | |||
| 15 | 12.720 | |||
![]() For more information, visit
For more information, visit
shark bite. connect with us![]()
Reliance Worldwide Corporation
2300 Defoor Hills Rd NW,
Atlanta, GA 30318
Phone: 1-877-700-4242 • Fax: 1-877-700-4280 rwc.com
Reliance Worldwide Corporation (Canada) Inc.74 Alex Avenue Vaughan, Ontario, L4L 5X1
Phone: 1-888-820-0120Sales Inquiries: [email protected]
Orders: [email protected] Certifications
The most up-to-date certifications can be found at sharkbite.com.
Manufactured & Distributed by Reliance Worldwide Corporation® .
SB_ PEX_InstallationInstructions _02_2021
Tel: 1-800-321-0316 | Fax: 760-744-0507


