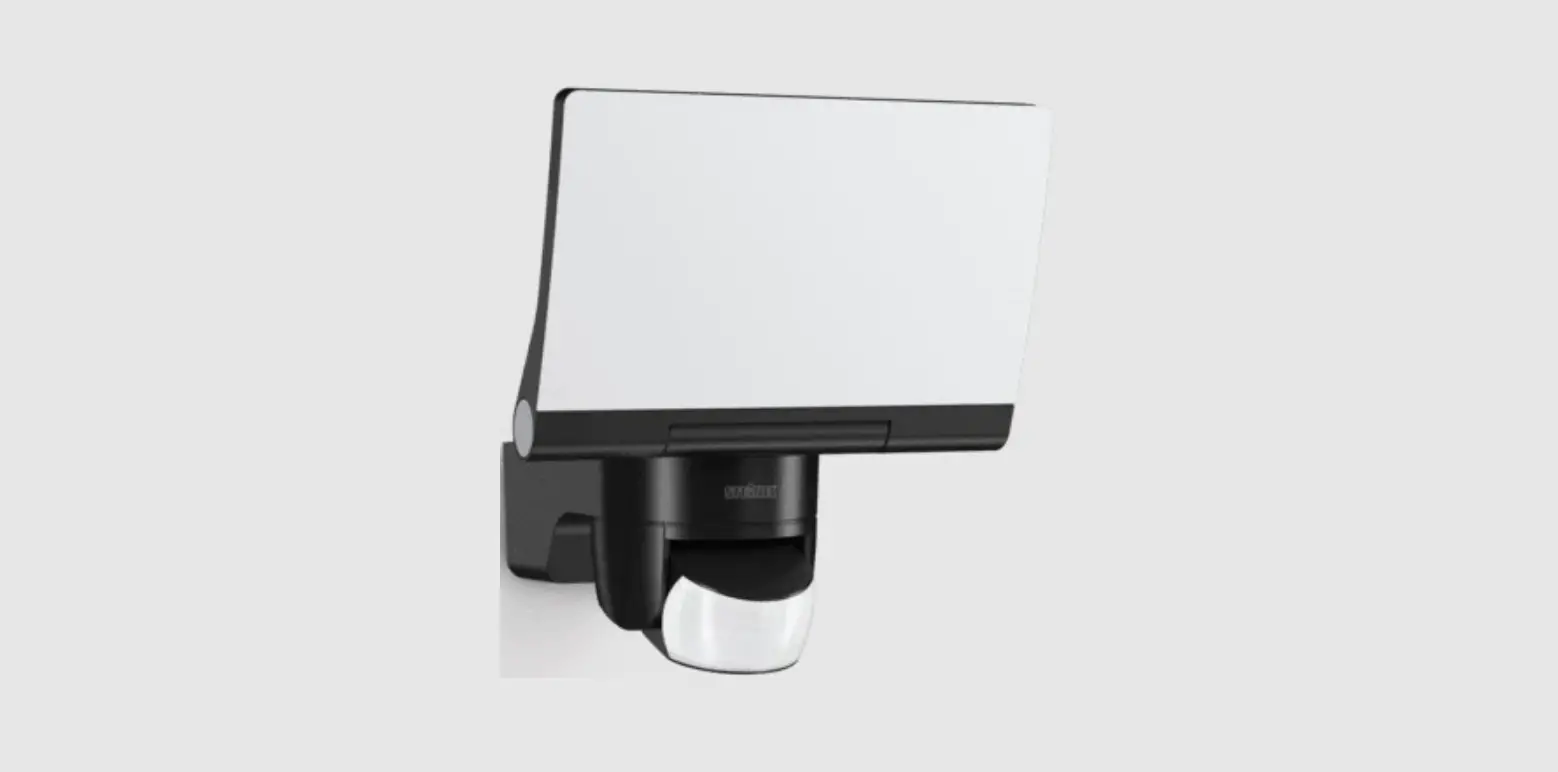
steinel XLED home 2 Connect Security Sensor Floodlight Instruction Manual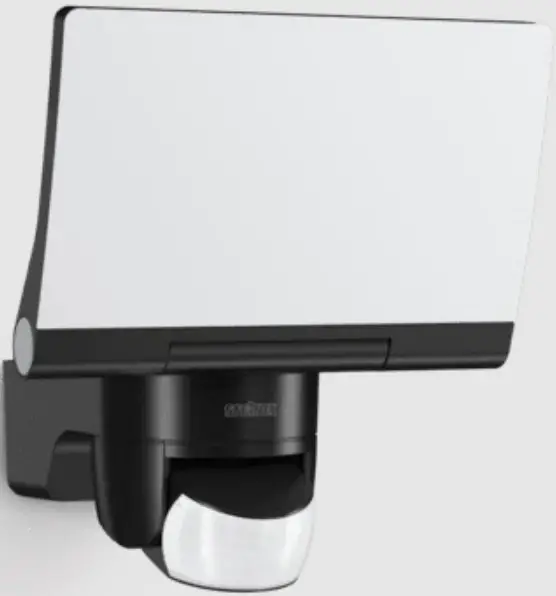
About this document
Please read carefully and keep in a safe place.
- Under copyright. Reproduction either in whole or in part only with our consent.
- Subject to change in the interest of technical progress.
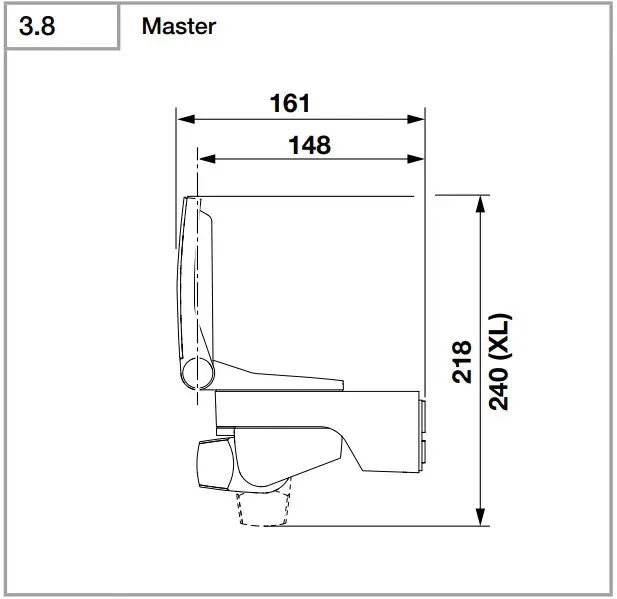
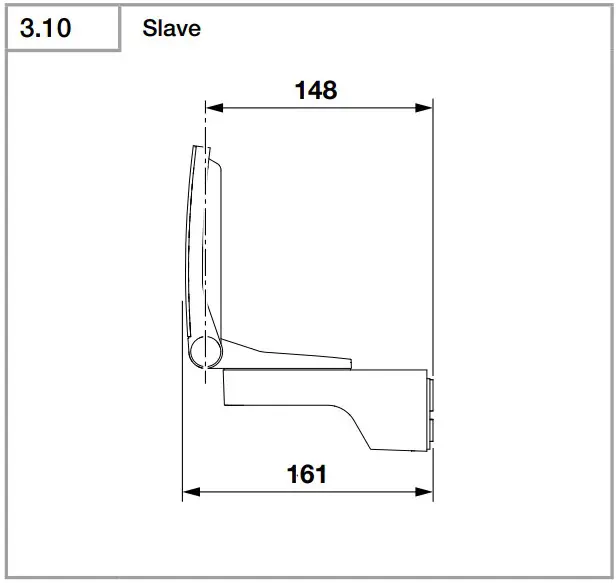
- All product dimensions in mm.
Symbols
![]()
Hazard warning!
![]()
Reference to other information in the document.
Note:
Diagrams without captions apply to all versions.
General safety precautions
![]()
Disconnect the power supply before attempting any work on the unit.
- Installing the LED floodlight involves work on the mains voltage supply; installation must therefore be carried out professionally in accordance with the applicable national wiring regulations and electrical operating conditions (DE-VDE 0100, AT-ÖVE/ÖNORM E 8001-1, CH-SEV 1000).
- The LED floodlight must be positioned so that it is not expected that anybody can stare into the light for any prolonged period from a distance of less than 0.3 m.
- The floodlight enclosure heats up when the light is on. Only adjust the angle of the LED panel once it has cooled down.
- Do not install the LED floodlight on (normally) flammable surfaces.
XLED home 2/XLED home 2 XL XLED home 2 SL XLED home 2 Connect
Proper use
- LED floodlight suitable for wall mounting outdoors.
- Fully swivelling LED panel.
- Can be used on its own or interconnected with other floodlights.
XLED home 2/XLED home 2 XL
- Wired interconnection.
- Operation via control dial.
XLED home 2 Connect
- Wireless interconnection (<100 m).
- Operation via Smart Remote app.
Master versions
- The sensor-switched LED floodlight contains an infrared motion detector.
Movement triggers lights, alarms and many other devices. With the fully swivelling panel, the LED floodlight can be used at home to provide perfect illumination for lighting up property, or commercially for lighting up business premises. In conjunction with the opal cover, this extremely efficient technology provides wide-area lighting.
Models
- XLED home 2/XLED home 2 XL
- XLED home 2 SL
- XLED home 2 Connect
Package contents for master versions (Fig. 3.1)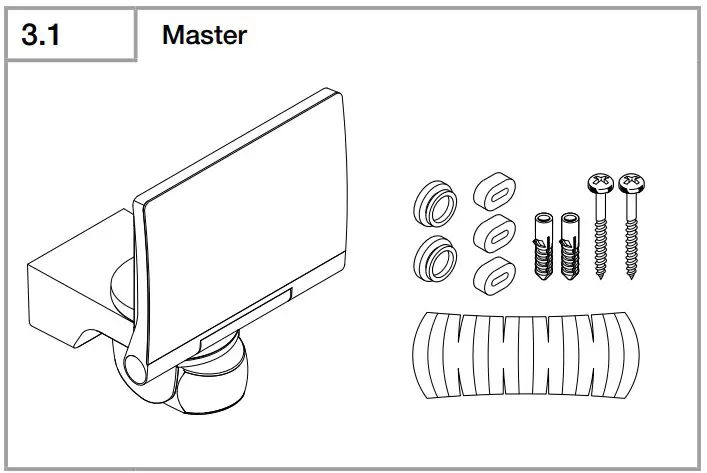
Package contents for slave version (Fig. 3.2)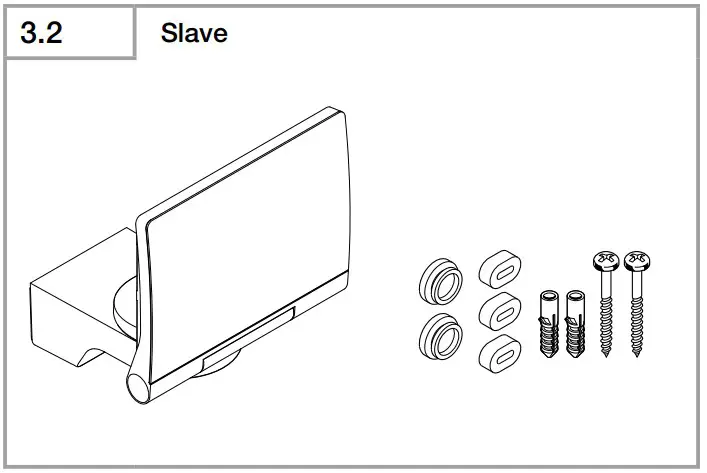
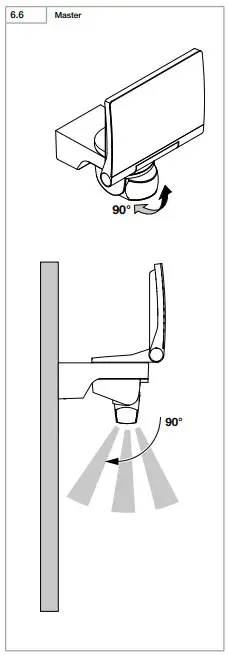
Adjustment range for floodlight head and sensor-switched master (Fig. 3.3/3.4/6.2/6.3/6.6)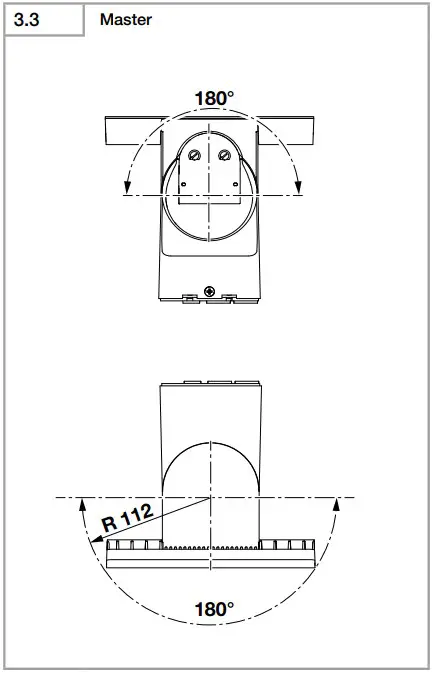

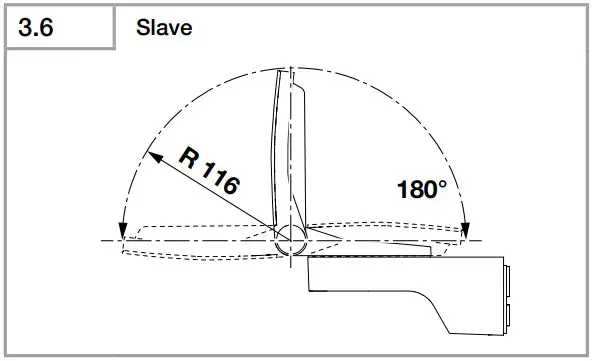
Adjustment range for slave floodlight head (Fig. 3.5/3.6/6.2)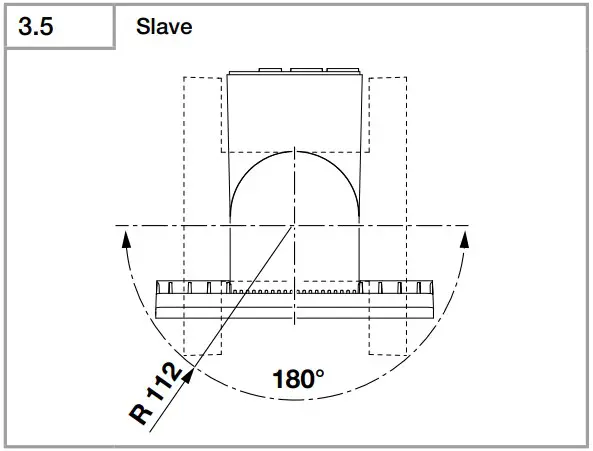
Product dimensions, master (Fig. 3.7/3.8)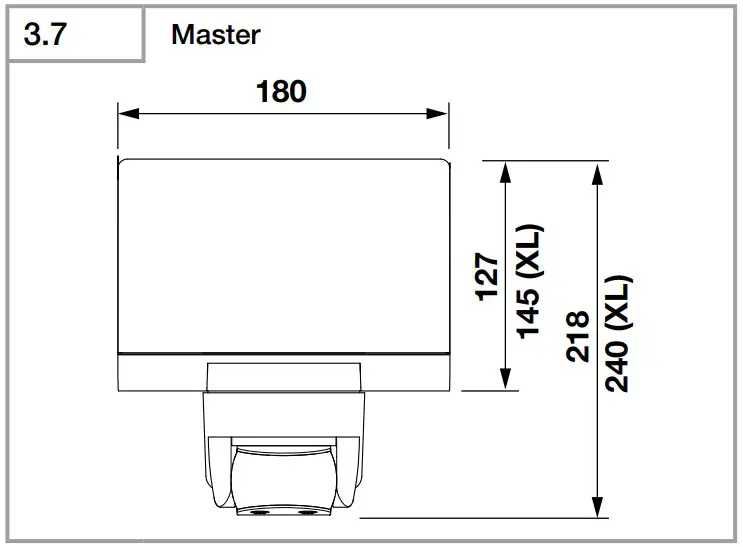
Product dimensions, slave (Fig. 3.9/3.10)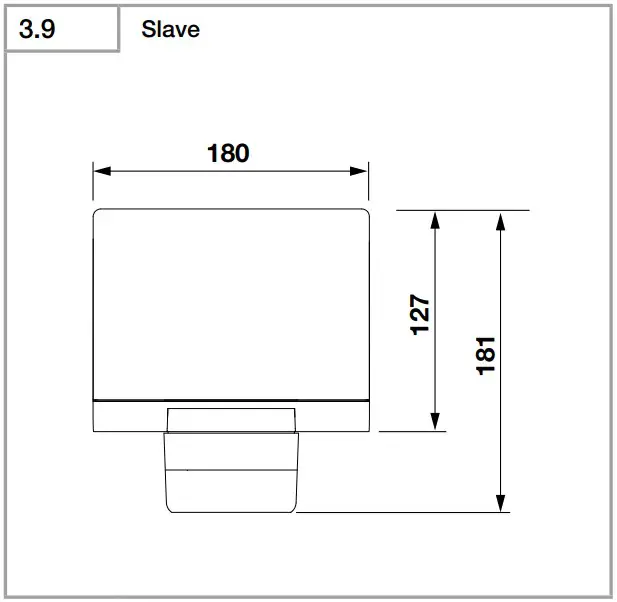
Product components, master (Fig. 3.11)
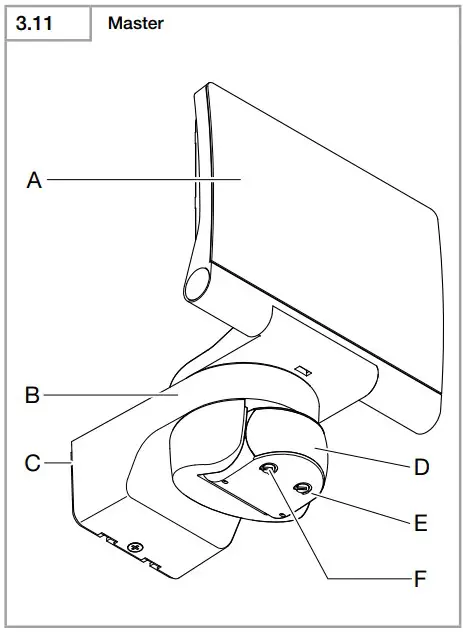
A LED panel
B Enclosure
C Wall mount
D Sensor unit
E Time setting (XLED home 2/XLED home 2 XL)
F Twilight setting (XLED home 2/XLED Home 2 XL)
Product components, slave (Fig. 3.12)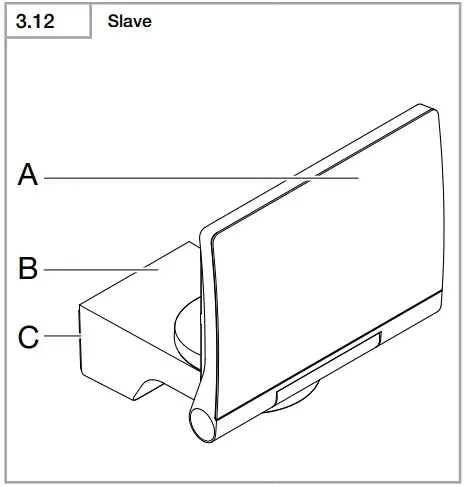
A LED panel
B Enclosure
C Wall mount
Electrical installation
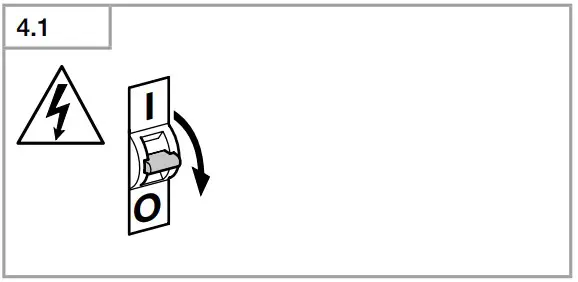
Switch OFF power supply. (Fig. 4.1)
Connecting the mains power supply lead
The supply lead is a 2 or 3-core cable:
- L = phase conductor (usually black, brown or grey)
- L’ or = phase conductor (usually black, brown or grey), in master/master or master/slave mode only. Mains supply lead is used as connection lead for switching output.
- N = neutral conductor (usually blue)
- PE = protective-earth conductor (green/ yellow)
Note:
The protective-earth conductor need not be connected for this product.
Wiring diagram, master/slave (Fig. 4.2)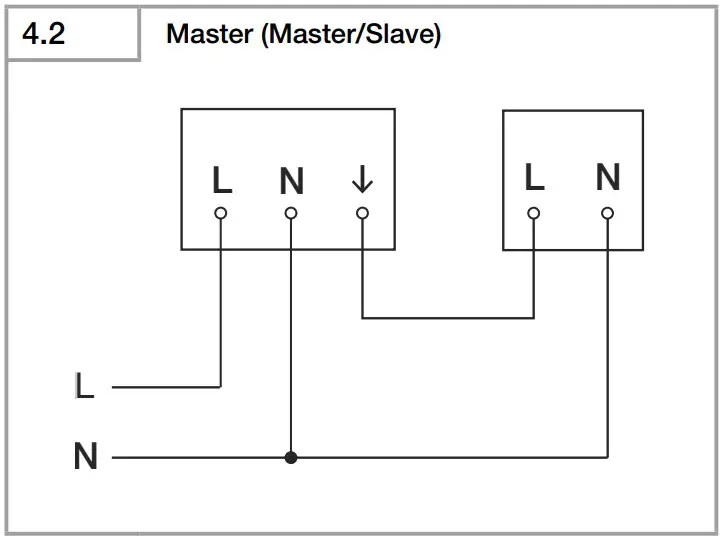
Wiring diagram, master/master (Fig. 4.3)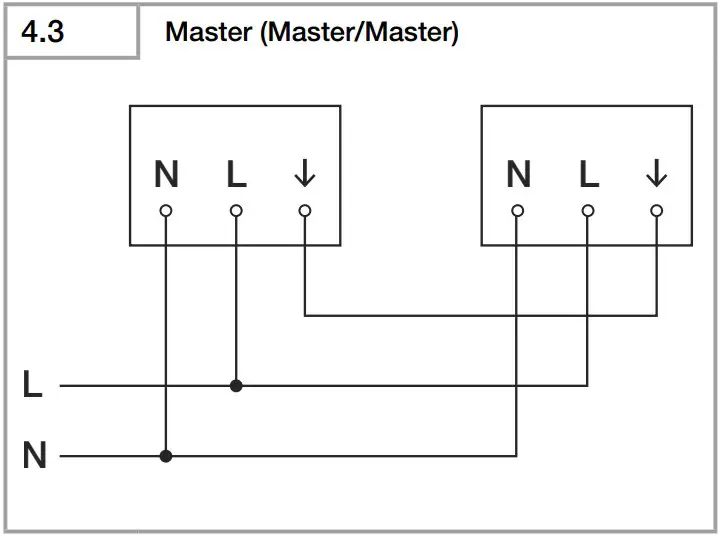
Wiring diagrams, slave (Fig. 4.4)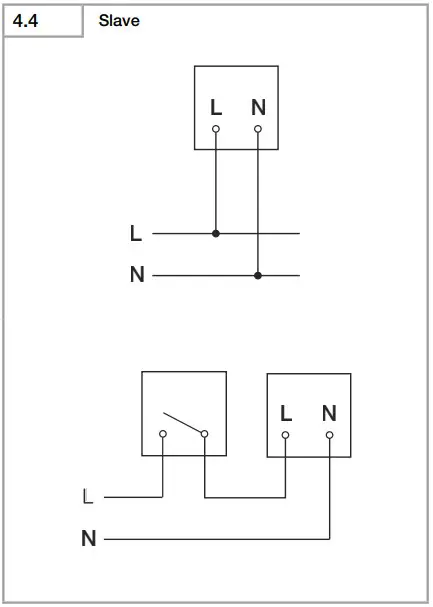
Wiring diagram, XLED home 2 Connect (Fig. 4.5)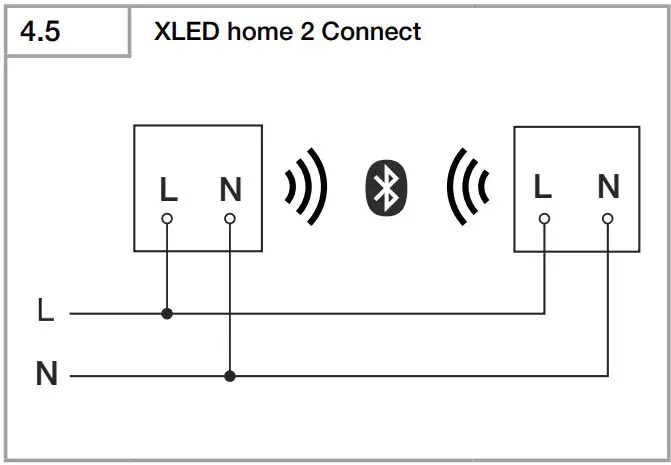
Important:
Incorrectly wired connections will produce a short circuit later on in the LED floodlight or your fuse box. In this case, you must identify the individual conductors once again and reconnect them. The light source of this LED floodlight cannot be replaced. If the light source needs to be replaced (e.g. at the end of its service life), the complete LED floodlight must be replaced.
Installation
- Check all components for damage.
- Do not use the product if the LED floodlight is damaged.
- Select an appropriate mounting location, taking the reach and motion detection into consideration. (Fig. 5.1/5.2/5.3)


- Align the LED floodlight. (Fig. 5.4)

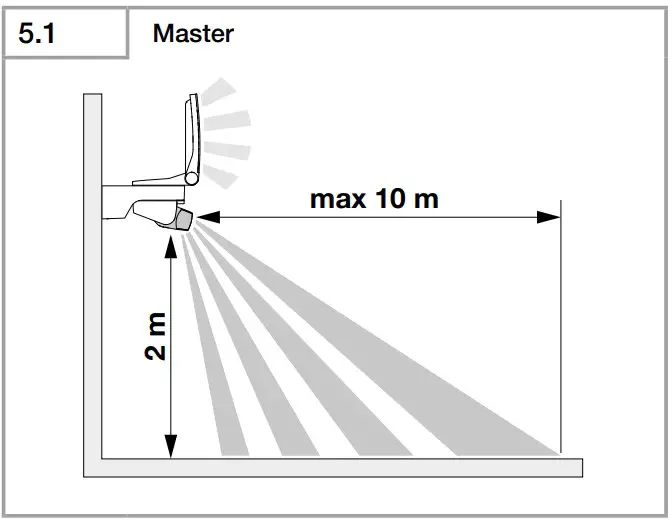
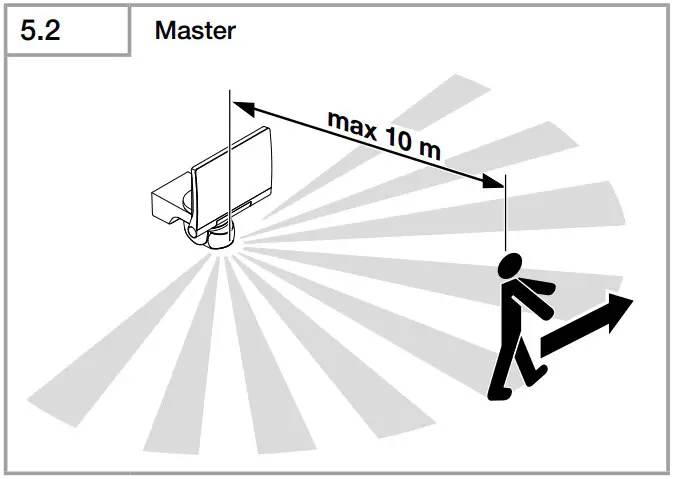
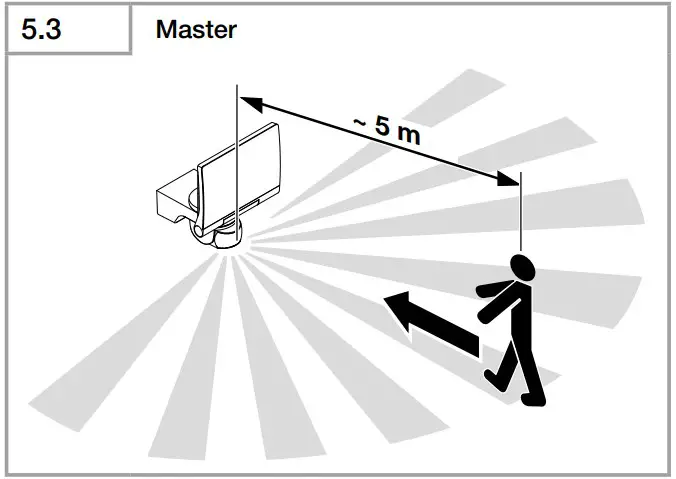
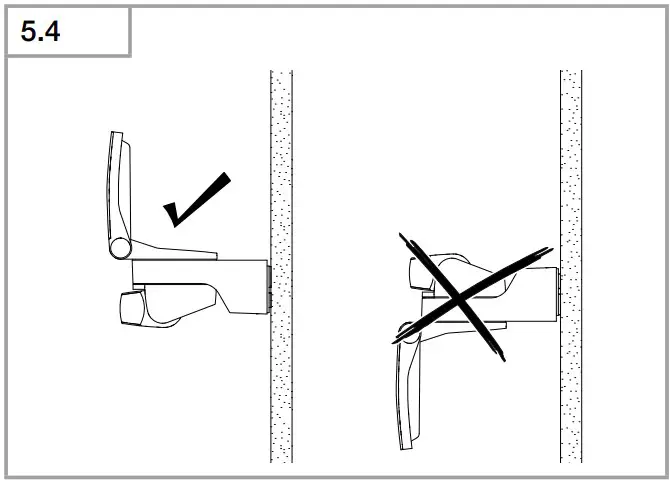
The most reliable way to detect movement is given by mounting the LED floodlight to point across the direction in which people walk and by making sure no obstacles (e.g. trees, walls etc.) interrupt the line of sensor vision. (Fig. 5.2/5.3)
Mounting procedure
- Switch OFF power supply. (Fig. 4.1)
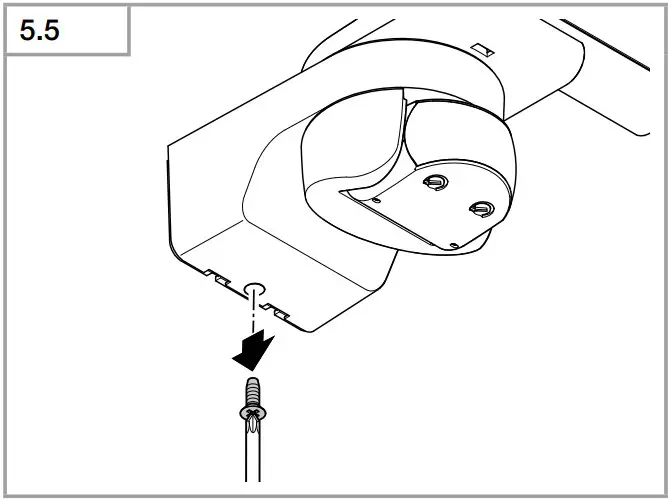
- Undo retaining screw. (Fig. 5.5)

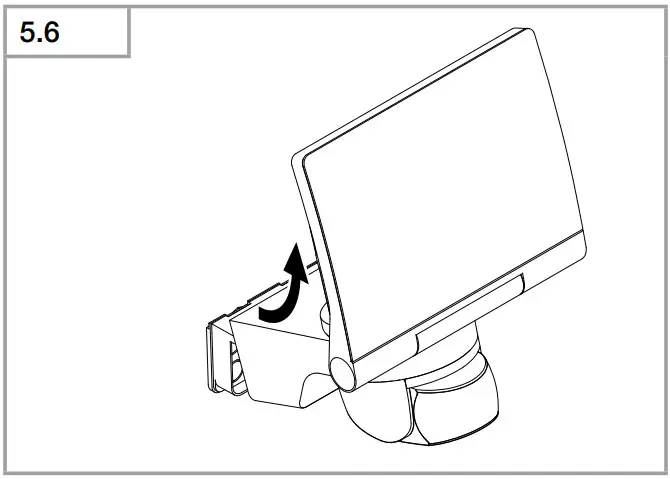
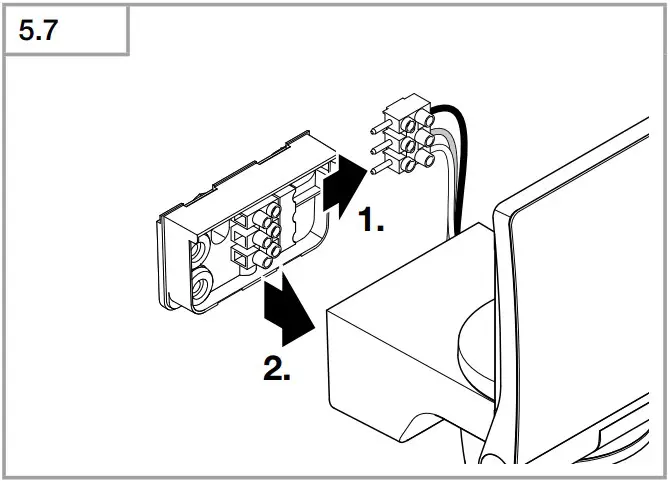
- Detach enclosure (B) from wall mount (C). (Fig. 5.6)

- Detach plug-in terminal from wall mount. (Fig. 5.7)

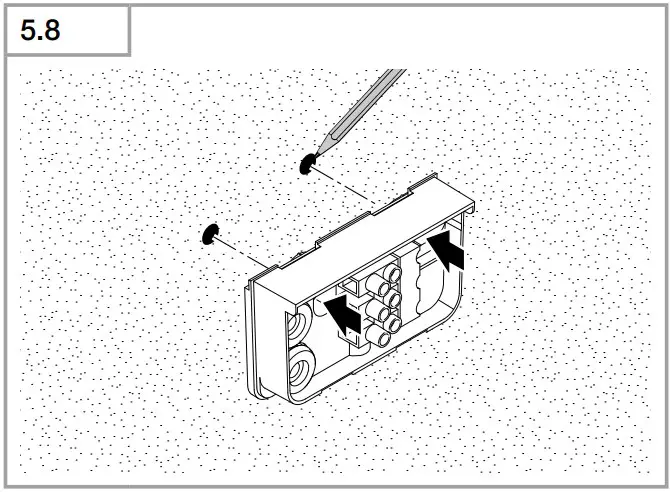
- Mark drill holes. (Fig. 5.8)

- Drill holes and fit ground plugs. (Fig. 5.9)

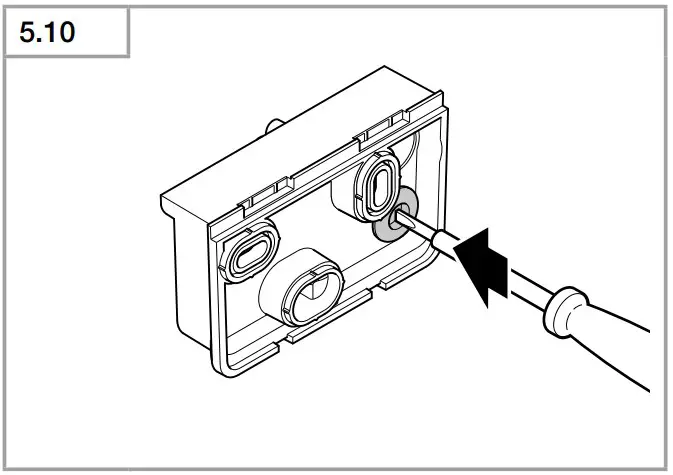
- Fit sealing plug. (Fig. 5.10)

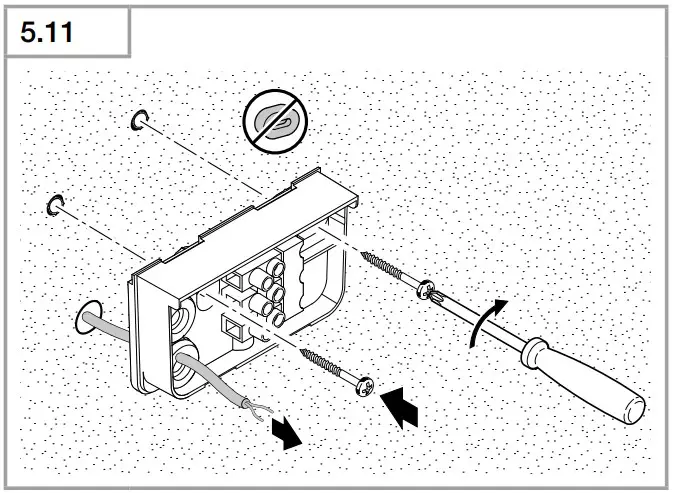
- Power supply lead, concealed (Fig. 5.11)

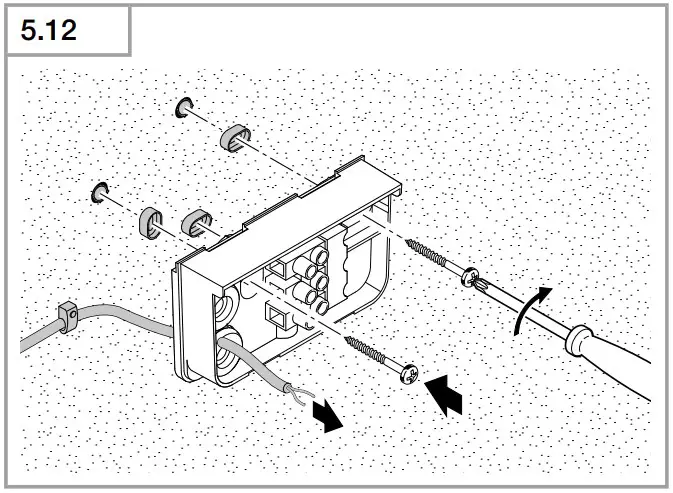
- Power supply lead, surface-mounted, with spacers (Fig. 5.12)
- Power supply lead, concealed (Fig. 5.11)
- Connect conductors.
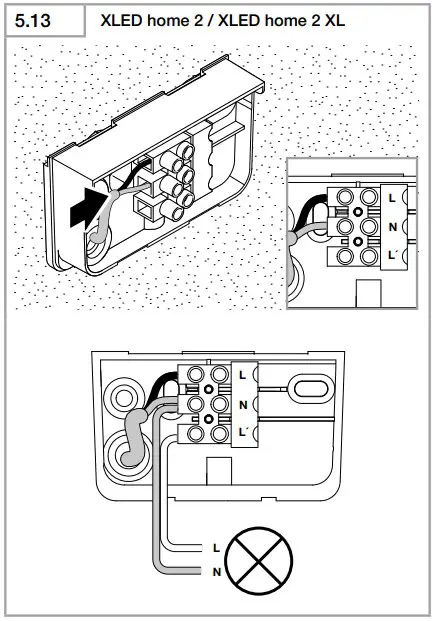
- XLED home 2/XLED home 2 XL (Fig. 5.13) An additional external load can be connected to N und L’/.

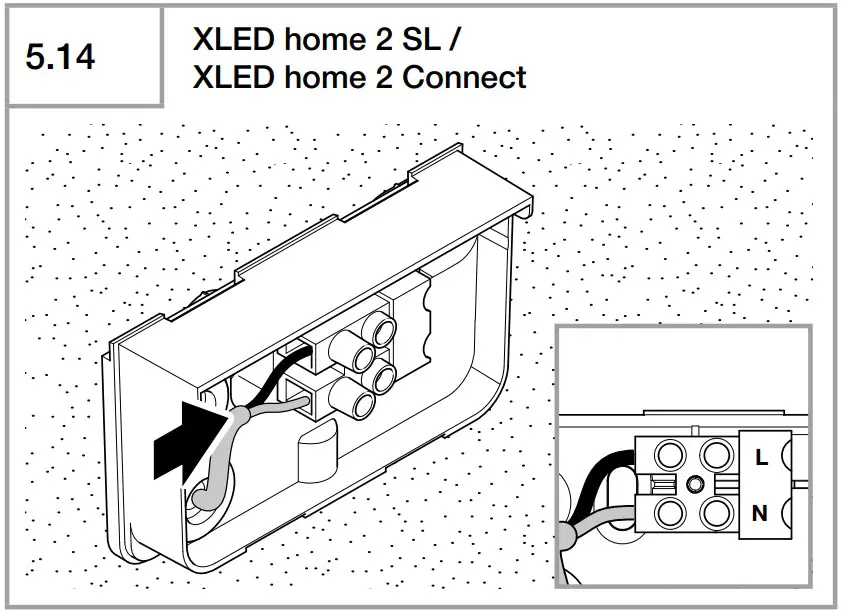
- XLED home 2 Connect/XLED home 2 SL (Fig. 5.14)

- XLED home 2/XLED home 2 XL (Fig. 5.13) An additional external load can be connected to N und L’/.
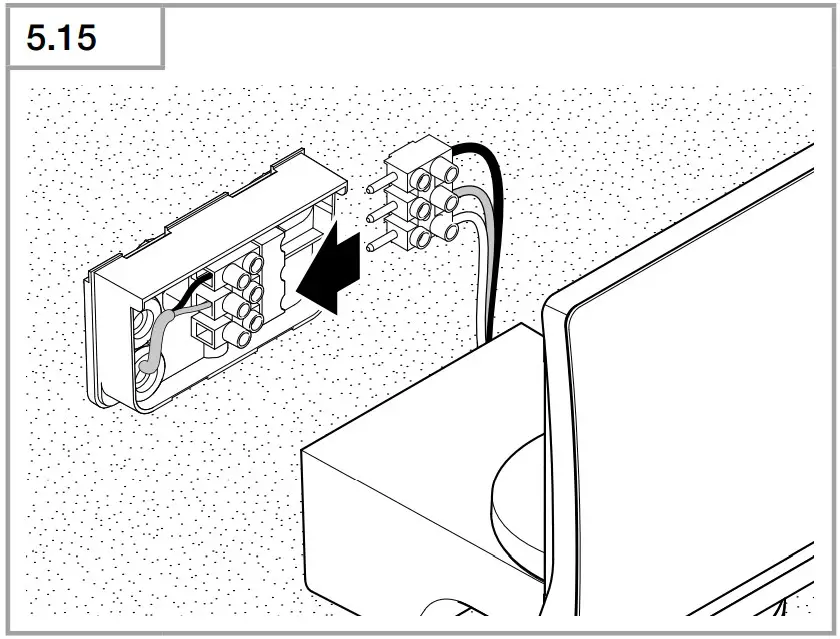
- Connect plug-in terminal. (Fig. 5.15)

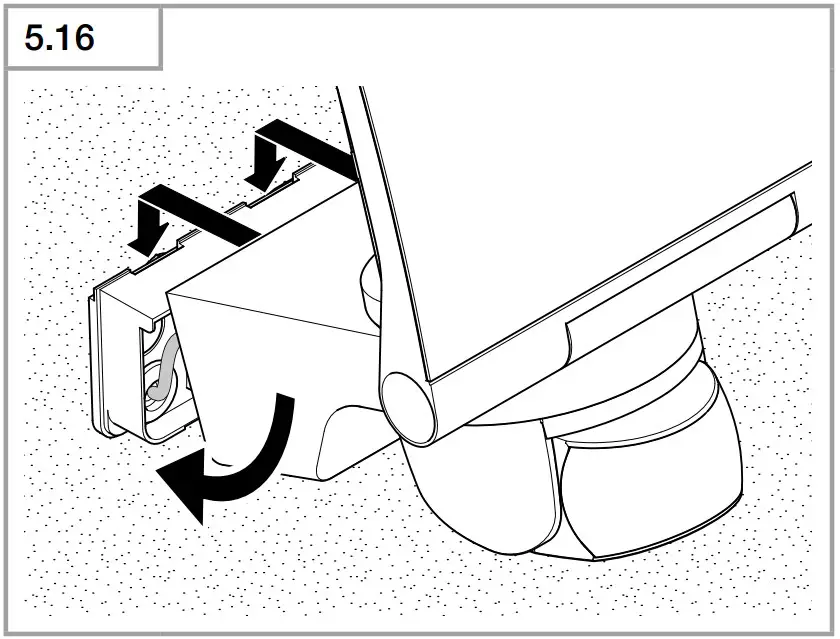
- Fit enclosure onto wall mount. (Fig. 5.16)
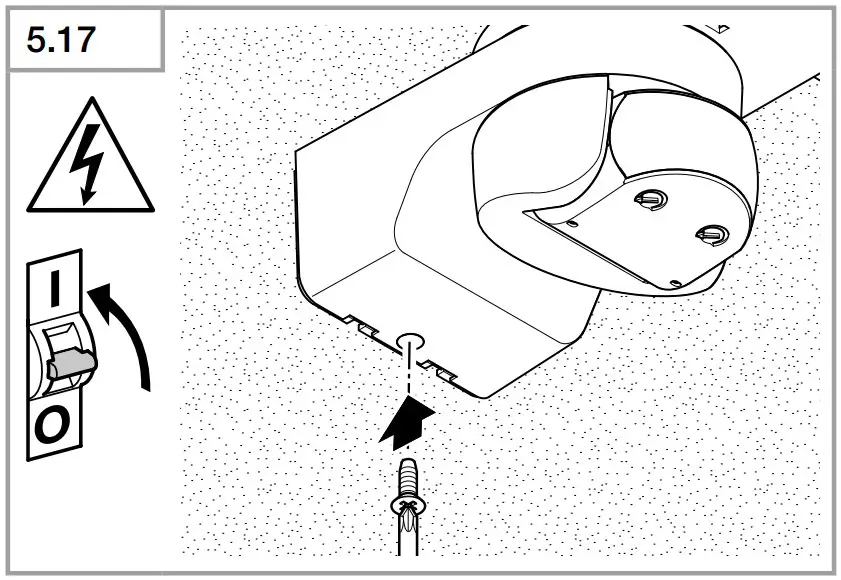
- Screw in locking screw. (Fig. 5.17)
- Switch ON power supply. (Fig. 5.17)

- Make settings ➜ “6. Function“

Function
XLED home 2/XLED home 2 XL
XLED home 2 SL
Factory settings
Time setting (E): 8 seconds
Twilight setting (F): 2000 lux, (daytime mode)
Time setting (Fig. 6.1/E)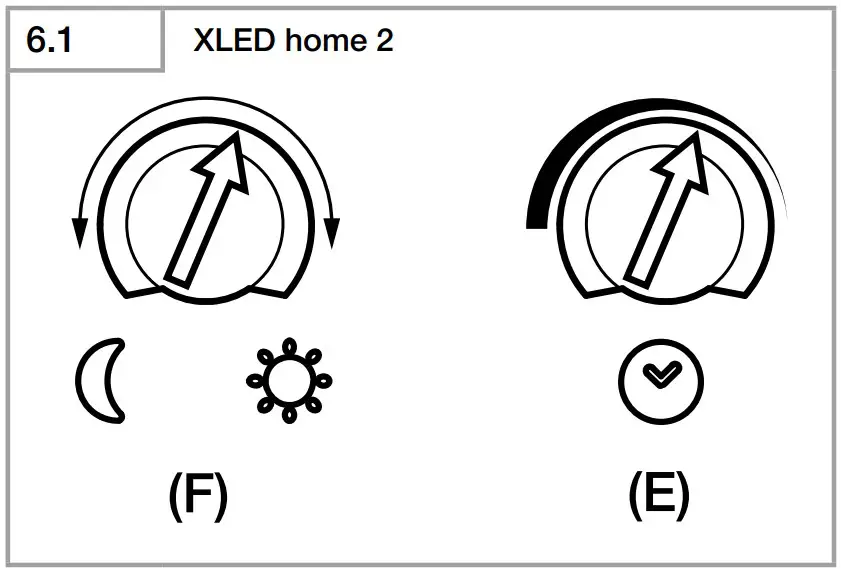
The time you want the LED floodlight to stay on for (main light) is infinitely adjustable from approx. 8 seconds to a maximum of 35 minutes. Any movement detected before this time elapses will restart the timer.
- Control dial set to + = longest time, approx. 35 minutes
- Control dial set to – = approx. 8 seconds
Twilight setting (Fig. 6.1/F)
The LED floodlight’s chosen response threshold can be infinitely varied from approx. 2 to 1000 lux
- Control dial set to
 = daylight operation (independent of ambient brightness)
 - Control dial set to
 = night-time operation (approx. 2 lux)
The control dial must be turned to ![]() when adjusting the detection zone and performing the functional test in daylight.
when adjusting the detection zone and performing the functional test in daylight.
Note:
When setting the detection zone, we recommend selecting the shortest time.
Note:
After the LED floodlight switches OFF, it takes approx. 1 second before it is able to start detecting movement again. The LED floodlight will only switch ON in response to movement once this period has elapsed.
XLED home 2 Connect
Factory settings
Twilight setting: 2000 lux, daytime mode, lux teach Time setting: 5 seconds
Reach setting/adjustment
The detection zone can be optimised to suit requirements.
Sensor unit
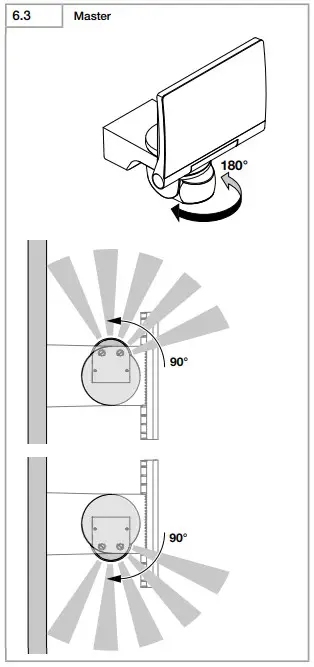
- Sensor unit swivels through 180°. (Fig. 6.3)

- Sensor unit tilts through 90°. (Fig. 6.6)

Adhesive shroud (Fig. 6.4)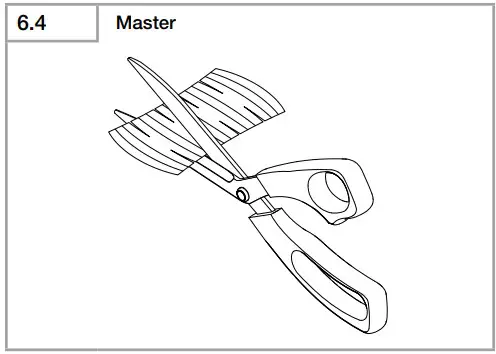
The film shroud can be used for masking out any number of lens segments to limit reach as required. Inadvertent triggering is ruled out or the sensor can be targeted to watch over danger spots (Fig. 6.5). Other information: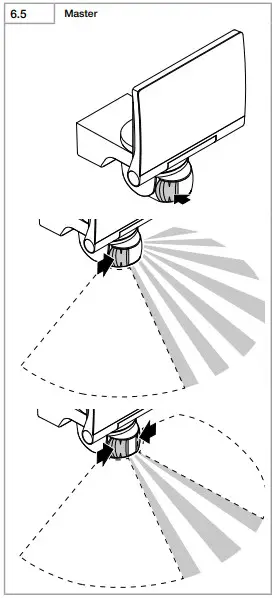
Other information:
Floodlight adjustment range (Fig. 6.2)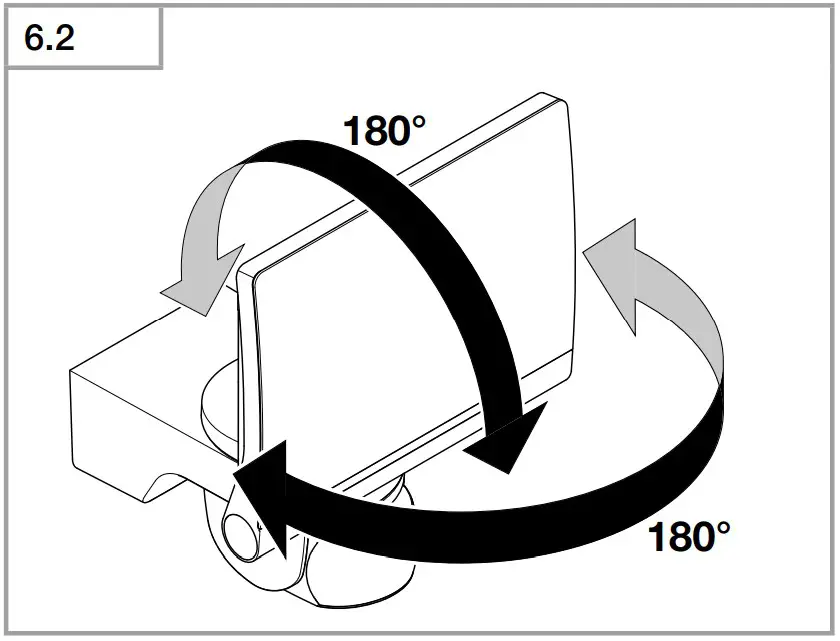
Setting functions
- Setting via control dial (XLED home 2)
- Setting via Smart Remote app (XLED home 2 Connect)
Note:
The settings last selected on the control will be used.
Smart Remote app
To configure the LED floodlight via smartphone or tablet, you must download the STEINEL Smart Remote app from your app store. You will need a Bluetooth-capable smartphone or tablet.
Additional functions only via the
Android

iOS

Smart Remote app:
- Twilight setting 2 – 2000 lux, daytime mode, lux teach, time teach
- Time setting 5 s – 60 min
- ON / OFF times based on time of day
- Night economy mode
- Reach setting based on sensitivity
- Group interconnection and naming lights / groups
- Manual override 4h ON / 4h OFF
- Password protection
The functions of the LED floodlight can be set via smartphone or tablet. Bluetooth interconnection is only possible via smartphone or tablet.
Note:
After the LED floodlight switches OFF, it takes approx. 1 second before it is able to start detecting movement again. The LED floodlight will only switch ON in response to movement once this period has elapsed.
The XLED home 2 Connect has an internal clock for time-based activation and deactivation. This automatically synchronises with the clock of the connected smartphone via the Smart Remote app each time a Bluetooth connection is established.
To ensure correct function following an interruption in the LED floodlight’s power supply, it must be re-connected via the Smart Remote app. The internal clock is re-synchronised with the smartphone clock.
Operation/maintenance
The LED floodlight is not suitable for burglar alarm systems as it is not tamperproof in the manner prescribed for such systems. Weather conditions may affect the way the LED floodlight works. Strong gusts of wind, snow, rain and hail may cause the light to come ON when it is not wanted because the sensor is unable to distinguish between sudden changes in temperature and sources of heat. The detector lens may be cleaned with a damp cloth if it gets dirty (do not use cleaning agents).
Disposal
Electrical and electronic equipment, accessories and packaging must be recycled in an environmentally compatible manner.

Do not dispose of electrical and electronic equipment as domestic waste.
EU countries only:
Under the current European Directive on Waste Electrical and Electronic Equipment and its implementation in national law, electrical and electronic equipment no longer suitable for use must be collected separately and recycled in an environmentally compatible manner.
Declaration of Conformity
STEINEL Vertrieb GmbH hereby declares that the XLED home 2 Connect radio equipment type conforms to Directive 2014/53/EU. The full wording of the EU Declaration of Conformity is available for downloading from the following Internet address: www.steinel.de
Manufacturer’s Warranty
This STEINEL product has been manufactured with utmost care, tested for proper operation and safety and then subjected to random sample inspection. Steinel guarantees that it is in perfect condition and proper working order. The warranty period is 5 years and starts on the date of sale to the consumer. We will remedy defects caused by material flaws or manufacturing faults. The warranty will be met by repair or replacement of defective parts at our own discretion. The warranty shall not cover damage to wear parts, damage or defects caused by improper treatment or maintenance. Further consequential damage to other objects shall be excluded. Claims under the warranty will only be accepted if the unit is sent fully assembled and well-packed with a brief description of the fault, a receipt or invoice (date of purchase and dealer’s stamp) to the appropriate Service Centre.
Service:
Our Customer Service Department will repair faults not covered by warranty or after the warranty period. Please send the product well-packed to your nearest Service Centre.
5 YEAR
MANUFACTURER’S
WARRANTY
Technical specifications
| XLED Home 2 | XLED Home 2 XL | XLED Home 2 Connect | XLED Home 2 SL | |
| Dimensions (H × W × D) | 218 × 180 × 161 | 240 × 180 × 161 | 218 × 180 × 161 | 181 × 180 × 161 |
| Output/efficiency | 14 W / 106 lm/W | 20 W / 106 lm/W | 13.5 W / 109 lm/W | 13 W / 111 lm/W |
| Luminous flux / brightness | 1484 lm | 2120 lm | 1472 lm | 1443 lm |
| Power consumption | 0.55 W | 0.55 W | 0.35 W | – |
| Weight | 0.575 kg | 0.620 kg | 0.575 kg | 0.480 kg |
| Area illuminated | Front view | Front view | Front view | Front view |
| 283.1 cm2 | 316.2 cm2 | 283.1 cm2 | 274.1 cm2 | |
| Side view | Side view | Side view | Side view | |
| 113 cm2 | 115 cm2 | 113 cm2 | 86.3 cm2 | |
| Mains current | 79 mA | 103 mA | 69 mA | 66 mA |
| Power factor | 0.77 | 0.85 | 0.86 | 0.86 |
| Additional swit- | Incandescent / halogen lamp load | 1000 W | ||
| ching capacity | Fluorescent-lamp electronic ballasts | 430 W | ||
| Fluorescent lamps, uncorrected | 500 VA | |||
| XLED home 2 | Fluorescent lamps, series-corrected | 900 VA | ||
| XLED home 2 XL | Fluorescent lamps, parallel-corrected | 500 VA | ||
| Low-voltage halogen lamps | 1000 VA | |||
| LED < 2 W | 16 W | |||
| 2 W < LED < 8 W | 64 W | |||
| LED > 8 W | 64 W | |||
| Capacitive load | 88 μF | |||
| Colour temperature | 3000 K (warm white) | |||
| Colour rendering index | Ra ≥ 80 | |||
| Supply voltage | 220-240 ~V / 50/60 Hz | |||
| Sensor system | Passive infrared | |||
| Reach | max. 10 m | |||
| Angle of coverage | 180° | |||
| Time setting | 8 s – 35 min (XLED home 2 Connect 5 s -60 min) | |||
| Twilight setting | 2-2000 lux | |||
| IP /protection class | IP44 / II | |||
| Bluetooth frequency | 2.4-2.48 GHz | |||
| Bluetooth trans- mitter power | 5 dBm/3 mW | |||
Troubleshooting
| Malfunction | Cause | Remedy |
LED floodlight without power
|
| |
| Sensor-switched LED floodlight will not switch ON |
|
|
| Sensor-switched LED floodlight will not switch OFF |
|
|
| Sensor-switched LED floodlight keeps switching ON and OFF |
|
|
| Sensor-switched LED floodlight switches ON when it should not |
|
|
LED floodlight is now shown
|
| |
| Forgotten password? |
| |
| App won’t start |
|
|
| Settings for LED floodlight are greyed out |
|
|
No Bluetooth LED floodlight
|
| |
No connection being set up
|
| |


 Motion Security Floodlight Sensor Instruction Manual")


