steinel XLED PRO Wide XL S Sensor Spot Floodlight
About this document
Please read carefully and keep in a safe place.
- Under copyright. Reproduction either in whole or in part only with our consent.
- Subject to change in the interest of technical progress.
Symbols
- Hazard warning!
- Reference to other information in … the document.
General safety precautions
- Disconnect the power supply before attempting any work on the unit.
- Installing these lights involves work on the mains voltage supply; installation must therefore be carried out professionally in accordance with the applicable national wiring regulations and electrical operating conditions (e.g.: DE: VDE 0100, AT: ÖVE/ÖNORM E 8001-1, CH: SEV 1000).
- The floodlight enclosure heats up when the light is on. Only adjust the angle of the LED head once it has cooled down.
- The light must be positioned so that it is not expected that anybody can look into the light for any prolonged period from a distance of less than 0.3 m.
XLED PRO Square XL S/ Wide XL S
Proper use Sensor-switched floodlight with LEDs as light source. Suitable for wall mounting outdoors. Data line (D-line, optional) for synchronous switching.
Non-intended use The sensor-switched LED floodlight cannot be dimmed.
- Not dimmable
Operating principle
The XLED PRO Square XL S and XLED PRO Wide XL S sensor-switched LED floodlights are fitted with infrared sensors. These floodlights provide a basic brightness function by means of additional light lines.
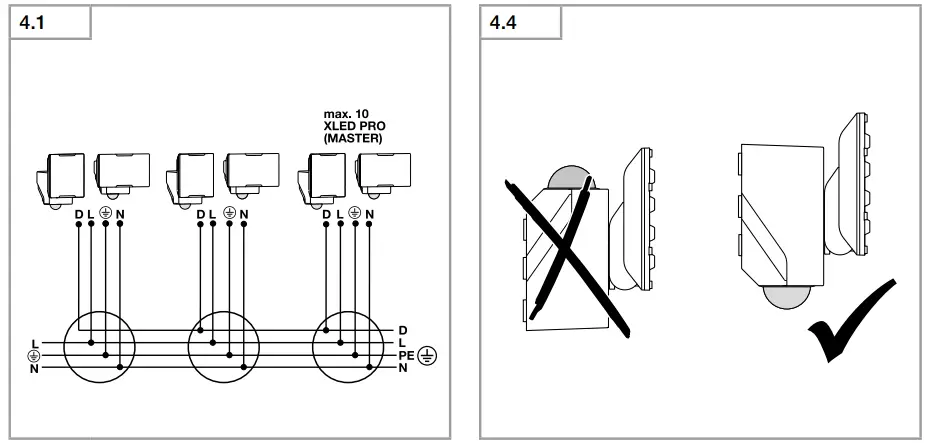
In stand-alone mode, the slave version of this LED floodlight must be switched ON and OFF via a switch/button to be provided on site. As an option, main and basic light can be switched ON and OFF in synchrony via an additional data line (D-line) between sensor-switched LED floodlights (master master) and slave LED floodlight (master-slave).
Models
- XLED PRO Square XL S
- XLED PRO Wide XL S
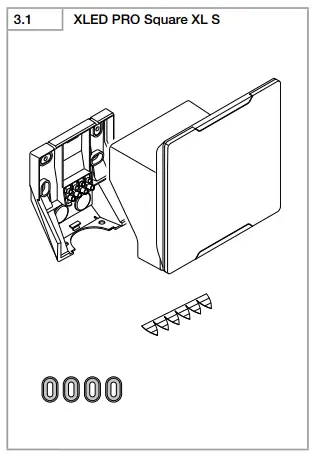
Package contents
- XLED PRO Square XL S (Fig. 3.1)
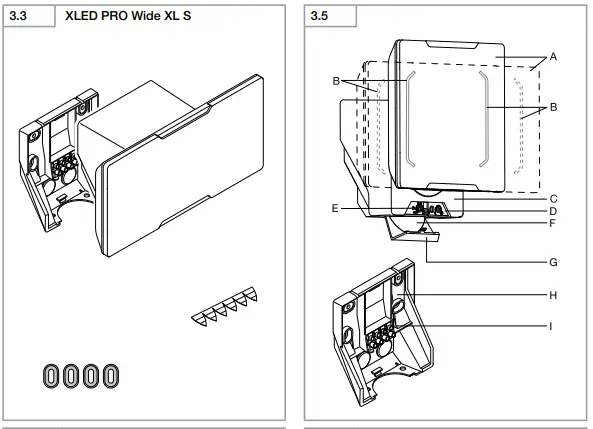
- XLED PRO Wide XL S (Fig. 3.3)
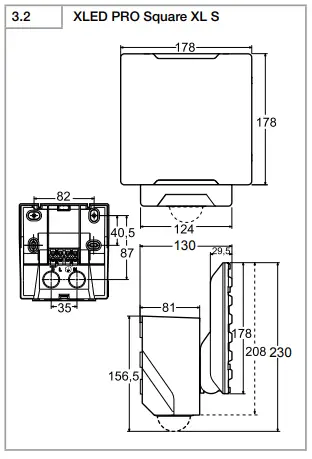
Product dimensions
- XLED PRO Square XL S (Fig. 3.2)
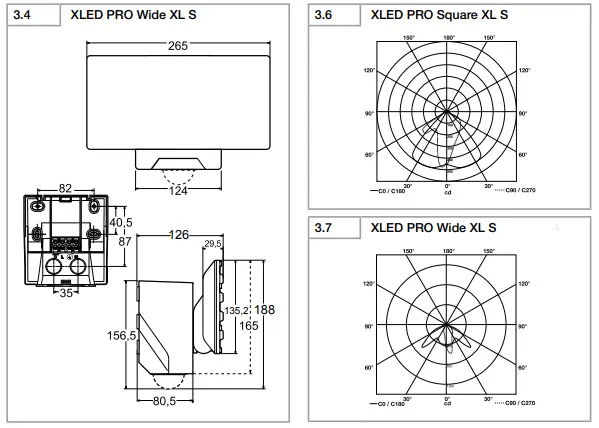
- XLED PRO Wide XL S (Fig. 3.4)
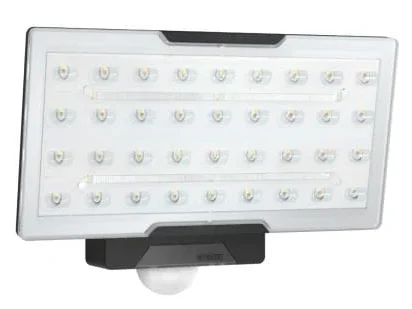
Product components (Fig. 3.5)
- A Floodlight head
- B Basic light level LED
- C Enclosure
- D Function setting
- Basic light level
- Time setting
- Twilight setting
- E Status LED
- F IR sensor
- G Cover on controls
- H Wall mount
- I Plug connection
Luminous intensity distribution (Fig. 3.6 – 3.7)
Electrical connection
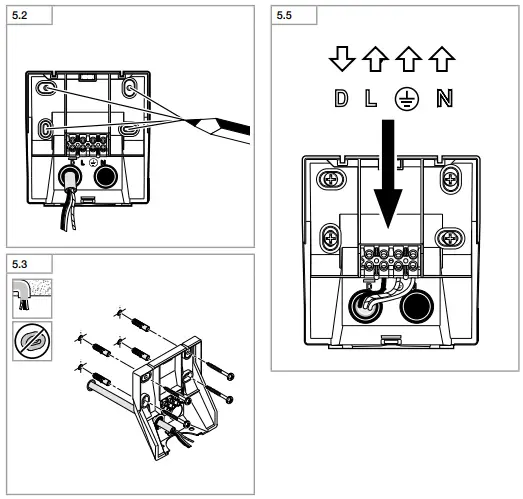
Connecting the mains power supply lead (Fig. 5.5) The mains power supply lead is a 3-core cable:
- L = phase conductor (usually black, brown or grey)
- N = neutral conductor (usually blue)
- PE = protective-earth conductor (green/yellow)
- D = D-line (data line) optional
If you are in any doubt, identify the conductors using a voltage tester; then disconnect from the power supply again. Connect phase (L) and neutral conductor (N) to the terminal block.
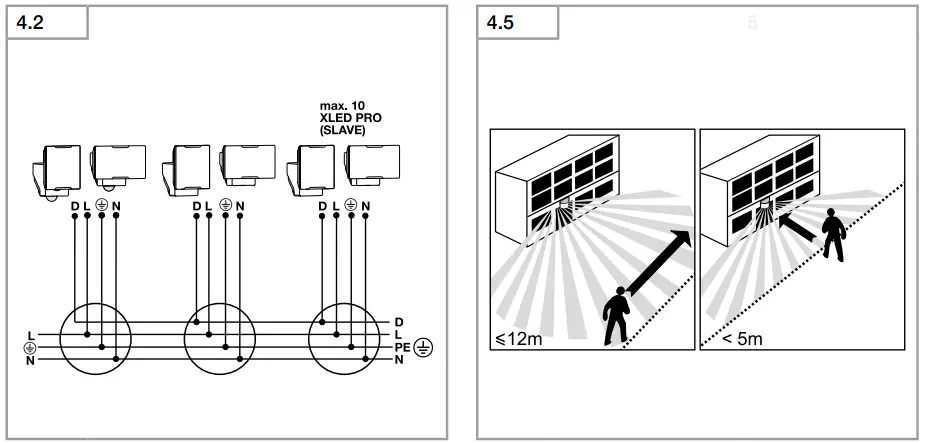
- Wiring diagram (Fig. 4.1 / 4.2)
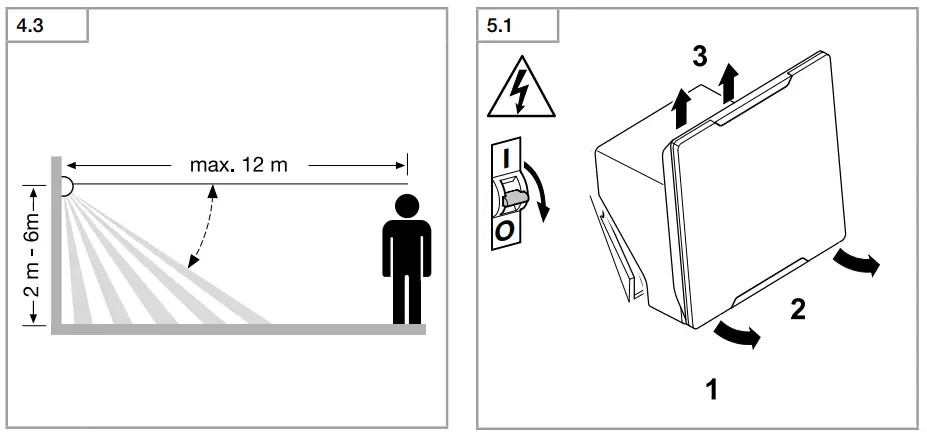
- Reach diagram (Fig. 4.3)
Note: A mains switch for switching the light ON and OFF can be installed in the mains supply lead. This is required for the manual override function “6. Functions”
Important: Mixing up the connections will produce a short circuit later on in the floodlight or your fuse box. In this case, you must identify the individual conductors once again and re-connect them.
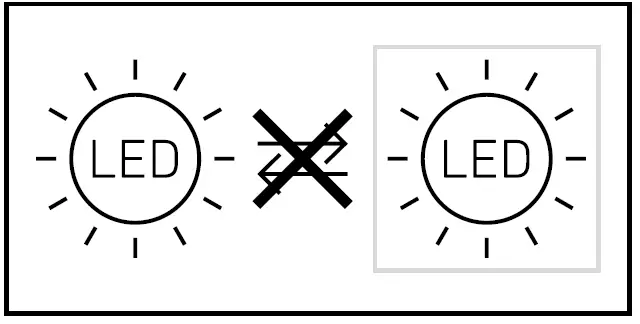
Note: the light source in this light cannot be replaced. If the light source needs to be replaced (e.g. at the end of its service life), the complete light must be replaced.
Mounting
- Check all components for damage.
- Do not use the product if it is damaged.
- Aiming the sensor (Fig. 4.4)
The most reliable way to detect movement is given by mounting the light to point across the direction in which people walk and by making sure no obstacles (e.g. trees, walls etc.) interrupt the line of sensor vision.
Mounting procedure
- Select appropriate site of installation, giving
consideration to reach and detection of movements (Fig. 4.5) - Switch OFF power supply (Fig. 5.1)
- Undo retaining screws (Fig. 5.1)
- Detach enclosure from wall mount (Fig. 5.1)
- Mark drill holes (Fig. 5.2)
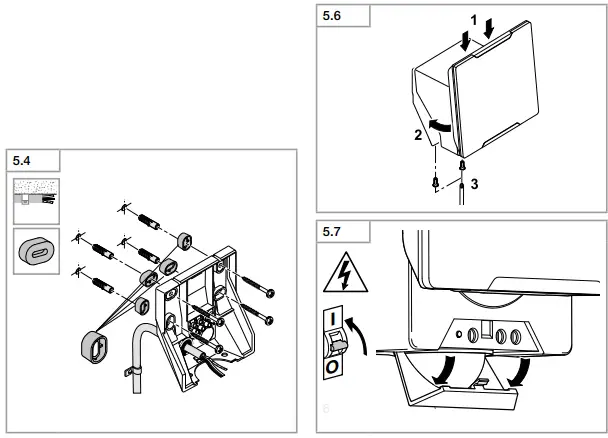
- Drill holes and insert wall plugs (Fig. 5.3) Concealed installation (Fig. 5.3) Surface-mounted installation (Fig. 5.4)
- Connect conductors (Fig. 5.5)
- Fit enclosure onto wall mount. Ensure correct plug connection (Fig. 5.6).
- Screw in retaining screws (Fig. 5.6)
- Switch ON power supply (Fig. 5.7)
- Open cover over controls (Fig. 5.7)
- Make settings “6. Function”
Function
Factory settings
- Basic brightness: OFF
- Time setting: 5 seconds
- Twilight setting: daylight mode
Once you have installed the wall mount and connected the floodlight to the power supply, it can be put into operation. If the floodlight is put into operation manually at the light switch, it will switch OFF after 40 s for the calibration phase and is then activated for sensor mode. It is not necessary to operate the light switch a second time.
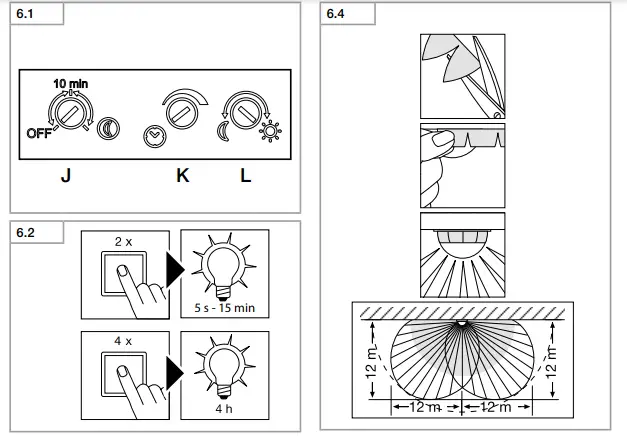
Function (Fig. 6.1)
Basic brightness (Fig. 6.1 / J) Basic brightness by means of basic light LEDs provides a low level of illumination. The main light is only switched on for the time selected when movement occurs in the detection zone. The light then switches to the selected level of basic brightness OFF = no basic light 10 min = basic light for 10 min upon expiry of
the time selected
” ” = basic light all night
Time setting / stay-ON time (Fig. 6.1 / K)
The time you want the floodlight to stay on for (main light) is infinitely adjustable from approx. 5 s to a maximum of 15 min. Any movement detected before this time elapses will restart the timer.
Note: Whenever the light switches OFF, motion detection is interrupted for approx. 2 s. The light will only switch ON in response to movement once this period has elapsed.
Twilight setting / response threshold (Fig. 6.1 / L) The floodlight’s chosen response threshold can be infinitely varied from approx. 2-1000 lux.
- Control dial set to = daylight mode (depending on ambient brightness)
- Control dial set to = twilight mode (approx. 2 lux)
Manual override function (Fig. 6.2)
If a mains switch is installed in the mains supply lead, the following functions are provided in addition to simply switching light ON and OFF:
Sensor mode: (Fig. 6.2)
- Switch light ON (when light is OFF):
- Switch OFF and ON 2×. Light stays ON for the period selected.
- Switch light OFF (when light is ON):
- Switch OFF and ON once. Light goes out or switches to sensor mode.
Manual override: (Fig. 6.2)
- Activate manual override:
- Turn switch OFF and ON 4×. The floodlight is set
to manual override for 4 hours (status LED ON).
Then it returns automatically to sensor mode (status LED OFF). - Deactivate manual override:
- Switch OFF and ON once. The floodlight goes out or switches to sensor mode.
Important: Switching must take place within 0.2 to 1 second.
Reach adjustment
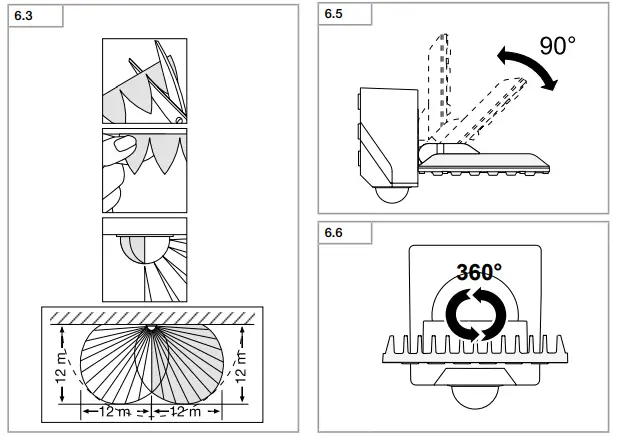
Depending on mounting height, the detection zone setting can be optimized to suit requirements. The film shroud can be used for masking out any number of lens segments to limit reach as required. Inadvertent triggering is ruled out or the sensor can be targeted to watch over danger spots.
- limited at side (Fig. 6.3)
- limiting reach (Fig. 6.4)
Other:
- Floodlight adjustment range (Fig. 6.5 / 6.6)
Accessories (optional)
Remote control RC 9 (EAN 4007841007638) The XLED PRO XL S provides additional functions by using the RC 9 remote control. The optional RC 9 remote control makes it easier to install
larger-type lighting systems as it is then no longer necessary to set each light before it is installed. Any number of floodlights can be controlled via remote control.
Remote control functions
- Brightness setting
- Daylight mode
- Night mode
- Teach mode
- Time setting
- Any chosen light ON time
- Manual override
- Install mode
- Reset
Smart remote (optional)
(EAN 4007841009151)
- Control via smartphone or tablet
- Replaces remote control
- Load appropriate app and connect by Bluetooth
Maintenance and care
This product requires no maintenance. The detector lens may be cleaned with a damp cloth (without detergents) if dirty.
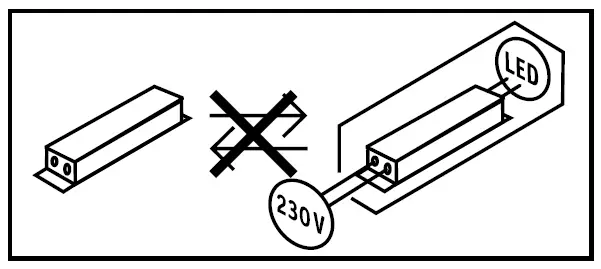
Important note: The control gear cannot be replaced.
Disposal
Electrical and electronic equipment, accessories and packaging must be recycled in an environmentally compatible manner.
Do not dispose of electrical and electronic equipment as domestic waste.
EU countries only: Under the current European Directive on Waste Electrical and Electronic Equipment and its implementation in national law, electrical and electronic equipment no longer suitable for use must be collected separately and recycled in an environmentally compatible manner.
Manufacturer’s Warranty
As purchaser, you are entitled to your statutory rights against the vendor. If these rights exist in your country, they are neither curtailed nor restricted by our Warranty Declaration. We guarantee that your STEINEL Professional sensor product will remain in perfect condition and proper working order for a period of 5 years. We guarantee that this product is free from material-, manufacturing and design flaws. In addition, we guarantee that all electronic components and cables function in the proper manner and that all materials used and their surfaces are without defects.
Making Claims
If you wish to make a claim, please send your product complete and carriage paid with the original receipt of purchase, which must show the date of purchase and product designation, either to your retailer or contact us at STEINEL (UK) Limited, 25 Manasty Road, Axis Park, Orton Southgate, Peterborough, PE2 6UP, for a returns number. For this reason, we recommend that you keep your receipt of purchase in a safe place until the warranty period expires. STEINEL shall assume no liability for the costs or risks involved in returning a product.
For information on making claims under the terms of the warranty, please go to www.steinel-professional.de/garantie
If you have a warranty claim or would like to ask any question regarding your product, you are welcome to call us at any time on our Service Hotline 01733 366700.
Further information: http://www.steinel.de
5 Y E A R MANUFACTURER’S WARRANTY
TECHNICAL DATA | |
| Dimensions (H × W × D) | XLED PRO Square XL S: 230 × 178 × 130 mm XLED PRO Wide XL S: 188 × 265 × 126 mm |
| Supply voltage | 220-240 V / 50 / 60 Hz |
| Power consumption (Pon) | XLED PRO Square XL S: 47 W XLED PRO Wide XL S: 45 W |
| Luminous flux | XLED PRO Square XL S: 3,770 lm XLED PRO Wide XL S: 3,489 lm |
| Efficiency | XLED PRO Square XL S: 80 lm/W XLED PRO Wide XL S: 78 lm/W |
| Standby sensor (Psb) | 0.27 W |
| Area illuminated | XLED PRO Square XL S: 362 cm2 XLED PRO Wide XL S: 403 cm2 |
| Colour temperature | 3,900 K (neutral white) |
| Colour rendering index | Ra = 80 |
| Colour consistency SDCM | Starting value 3 |
| Average rated life expectancy | L70B50 at 25°C: 50,000 hours |
| Luminous intensity distribution | XLED PRO Square XL S: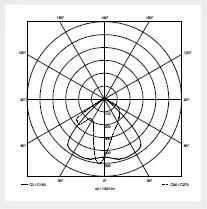 XLED PRO Wide XL S: 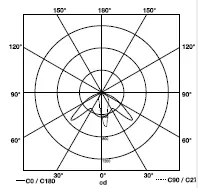 |
| Sensor technology | PIR (passive Infrared) |
| Basic light level | 10 min, 30 min (via RC 9), all night |
| Detection reach | 12 m (mounting height 2 m to max. 6 m) |
| Angle of coverage | 240° |
| Adjustment range | 0 – 90° vertically 360° horizontally |
| Time setting | 5 s – 15 min (control dial) 5 s – 60 min (Smart Remote) 10 s – 15 min (RC 9) |
| Twilight setting | 2 – 1,000 lux (potentiometer) 2 – 1,000 lux, infinitely variable (Smart Remote) 2, 10, 30, 50, 100 lux, daylight mode (RC 9) |
| Programme setting | OFF = no basic light level, 10 min, all night (potentiometer) OFF, 10 min up to 30 min, all night (Smart Remote) |
| Permanent light | 4 h, adjustable ( button, RC 9, Smart Remote) |
| IP rating | IP54 |
| Protection class | I |
| Impact resistance | IK03 |
| Ambient temperature | -20°C to +40°C |
Troubleshooting | ||
| Malfunction | Cause | Remedy |
| Sensor-switched LED floodlight without power |
|
|
| Sensor-switched LED floodlight will not switch ON |
|
|
| Sensor-switched LED floodlight will not switch OFF | Continuous movement in the detection zone | Check zone and readjust if necessary or apply shroud |
| Sensor-switched LED floodlight keeps switching ON and OFF | Animals moving in the detection zone | Fit shrouds to target sensor; adjust detection zone, or fit shrouds |
| Sensor-switched LED floodlight switches ON when it should not |
|
|
References
 STEINEL | Steinel Grupul Steinel
 Daljinsko Upravljanje d.o.o.
-
F.Fonseca - High-tech Solutions since 1978
-
Avalehele
-
Hem - En ljusare framtid med ansvarsfull belysning - KHS
 Priporočam.si - spletna trgovina za izključno najboljše stvari
-
Roliba - En moderne B2B Handelsvirksomhed med stort udvalg
-
SAOS Teknoloji STEINEL Türkiye Distribütörü | SAOS Teknoloji
-
Steinel Group | STEINEL
-
Herstellergarantie für Unternehmer | STEINEL
-
Steinel купить на steinel-russland.ru
-
【steinel 】施特朗中国官方网站
-
Steinel Group | STEINEL
-
International | STEINEL
-
STEINEL | Steinel Group
-
STEINEL | Steinel Grupul
-
Hem - En ljusare framtid med ansvarsfull belysning - KHS
 Ташев-Галвинг ООД: магазин за машини, инструменти, строителни материали, крепежи и градинска техника
-
Van Spijk | Online B2B inkoopplatform - VanSpijk.nl
-
Energieffektive løsninger - Vilan.no


