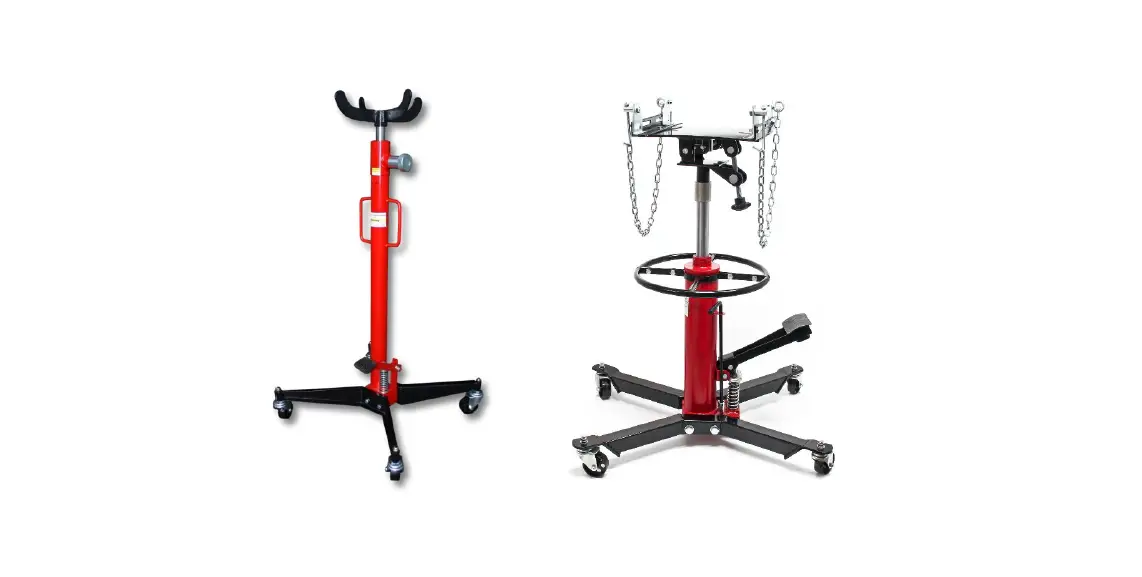
XPOtool 62420 Hydraulic Gearbox Jack 
Read and follow the operating instructions and safety information before using for the first time.Technical changes reserved! Due to further developments, illustrations, functioning steps, and technical data can differ insignificantly.Updating the documentation If you have suggestions for improvement or have found any irregularities, please contact us.The information contained in this document may alter at any time without previous notice. It is prohibited to copy or spread any parts of this document in any way without prior written allowance. All rights re-served.The WilTec Wildanger Technik GmbH cannot be held accountable for any possible mistakes in this operating manual, nor in the diagrams and figures shown.Even though, the WilTec Wildanger Technik GmbH has undergone biggest possible efforts to ensure that the operating manual is complete, faultless, and up to date, mistakes cannot be entirely avoided. If you should find a mistake or wish to make a suggestion for improvement, we look forward to hearing from you.
Introduction
Thank you for purchasing this quality product. To minimise the risk of injury we urge that our clients take some basic safety precautions when using this device. Please read the operation instructions carefully and make sure you have understood its content. Keep these operation instructions safe.
Description
The hydraulic gearbox jack with a load capacity of 500 kg and a max. lifting height of 192 cm (176 cm) is ideal for assembly work on gearboxes or undercarriages. It can also be used when replacing bearings under a lifting platform. The gearbox jack can be conveniently rolled under the vehicle and is pumped to the required height by the easy-to-operate foot pedal. The gearbox jack is lowered by turning the
| Item number | Max. load ca- pacity (㎏) | Height (㎜) | Piston diame- ter (㎜) | Wheel diame- ter (㎜) | Weight (㎏) |
| 62420 | 500 | 1100–1920 | 28 | 75 | approx. 23 |
| 62421 | 855–1760 | inner piston: 32, outer: 43 |
Safety precautions/warnings
The owner and/or user must have read and understood the operating instructions of the device before using it. Persons using the device should be cautious, competent, trained, and qualified in the safe handling of the working equipment used when working on engines and their components. Warnings should be read and understood.
- Familiarise yourself with the application control, the application process, and the warnings.
- The gearbox jack may only be used for removing and installing gearboxes (gear changing, differential gears, etc.).
- Make sure that all connection brackets are tight and secure.
- Make sure that you are familiar with the contents of the instructions for use.
- This device is not intended to be used by persons (or even children) with reduced physical, sensory, or mental abilities or persons without the appropriate experience or knowledge, unless they have previously been instructed to use the equipment by a person responsible for theirsafety and are supervised.
- Children must be supervised to ensure that they do not play with the device.
- Make sure that the load is free and no obstacles make its lifting difficult.
- The load must be centred on the carrier.
- The gearbox jack may only be pushed slowly over level ground with load when fully lowered.
- Make sure that the load cannot slide down or glide off.
- Check the loading balance after a few centimetres before going on.
- Avoid that the charge swings.
- Ensure that no one is near the charge.
- Warn the persons present before lifting the charge.
- Report to your supervisor or workshop as soon as something unforeseen happens
- Never exceed the maximum load capacity.
- ever use damaged non-functioning gearbox jacks.
- ever use bent, damaged, or worn load handling devices.
- ever lift the load if an obstacle could interfere with the lifting.
- tay concentrated and do not allow any distraction during the process.
- ever use the load receptacle to lift, help, or transport people.
- EVER LIFT LOADS OVER PERSONS’ HEADS!
- unsecured loads can result in injuries to limbs or bones, including fatal injuries.
- do not let the lifted load out of sight.
- Avoid contact between the gearbox jack and other objects.
- Never attempt to extend or repair the load handling devices.
- Do not use welding equipment near the support.
- Always ensure that your workplace is well-lit.
- Be sure to wear solid footwear.
- Use a hairnet for long hair.
- Wear tight clothing.
- Take off jewellery (rings, earrings, watches, etc.).
- Be careful not to wear loose straps or belts.
- Only use the gearbox jack when you feel physically capable of doing so.
- Long working in a standing position can lead to dizziness. Make regular breaks and drink enough.
- Do not overload the jack. Never use it as car jack. This gearbox jack is intended only for assis-tance in the installation and removal of vehicle parts.
- Only use the gearbox jack on a level and solid ground that can carry the specified loads.
- Before beginning the work on/under a vehicle, make sure that it is properly raised and secured.Never open the screw connections under pressure/load.
- Ensure that the load is centred on the carrier.
- Set the jack to the lowest position when refilling hydraulic oil. Use only high quality hydraulic oil, NEVER brake fluid, alcohol, glycerine, detergent, engine oil, water, contaminated oil or other inappropriate fluids.
- The hydraulic cylinder is under pressure and must not be opened by force
Control/inspection
- Before commissioning the gearbox jack, a visual inspection must be carried out to detect leaks, damage, loose, or missing parts, and worn parts.
- Check the oil level regularly. Set the jack to the lowest position when refilling hydraulic oil. Re-move the cap, the oil level must reach exactly to the opening. If necessary, refill with high-quality hydraulic oil. Perform a complete oil change every year.
- Each gearbox jack must be checked immediately if it has been overloaded or subject to a strong impact. The control should be carried out by a specialist. An annual inspection of the gearbox jack is recommended. Defective parts must be replaced immediately. If this is not possible, the jack must not be put into operation again.
- Regularly apply lubricants to all moving parts. Check the lifter regularly for rust, cracks, and corrosion. Clean the affected areas with an oily cloth.
- If the gearbox jack should be scrapped, the oil must be drained and disposed of properly, the rest of the gear box must be recycled
Assembly
The gearbox is delivered dismantled and must be installed before first use.
Scope of delivery:
- basket/carrier/top
- carriages/wheel holder
- jack body
- wheelsets
- Check the parts supplied before installation. The jack must not have any transport damage, the delivery must be complete.
- Attach the four wheel sets to the two carriages. Use the supplied blind nuts and washers (Fig. 1).
- Then fasten the two carriages to the underside of the pump body using the internal hexagon bolts and washers without tightening the screws.
- Before tightening the screws, check that the shaft is perfectly vertical, which is important to ensure that the gearbox is secure and that all wheels are securely touching the level ground.
- Place the basket on the shaft, loosen the screw (Fig. 2/oil filler hole) to allow the air to escape, and lift the jack without load. Operating the foot pedal when the screw is tightened will damage the hydraulic pump. The gearbox then cannot be used any longer. After the gearbox jack has been lowered, it is now ready for use.
CAUTION:
- When using the gearbox jack, always observe the specified load carrying capacity.
- Moving the load lifted with the gearbox jack is only for short distances and only with the jack at its lowest position, the shaft being fully retracted (Fig. 5). During shifting, check that the lifted load is stable and cannot fall off.
- Do not overload the device. Overloading can severely damage the gearbox jack and lead to personal injury and property damage.
- Special positioning devices must be used to move other components (e.g., rear axles, etc.).
- Make sure that the vehicle is safely supported before repair and, when the load is re-moved, that it cannot be tilted from the lift (change of the gravity point of the vehicle!).
- Make sure that the load is centred on the gearbox jack.
- Non-centred loads can cause the gearbox jack to tilt or can damage it, and might lead to prop-erty damage and personal injury.
- The gearbox has been designed for use on a level ground that can withstand the raised load. Setting up the gearbox jack on an uneven ground that sinks under the load might cause the raised load to fall and might cause strong vibrations (Fig. 5). Failure to observe these instruc-tions might cause the lifted load to fall and damage the gearbox jack, leading to property dam-age or even personal injury.
Commissioning
- Lift: Press the pedal of the cylinder pump by foot.
- Lower: Turn the side handle (Fig. 4) counter-clockwise to lower the gearbox jack.
Figures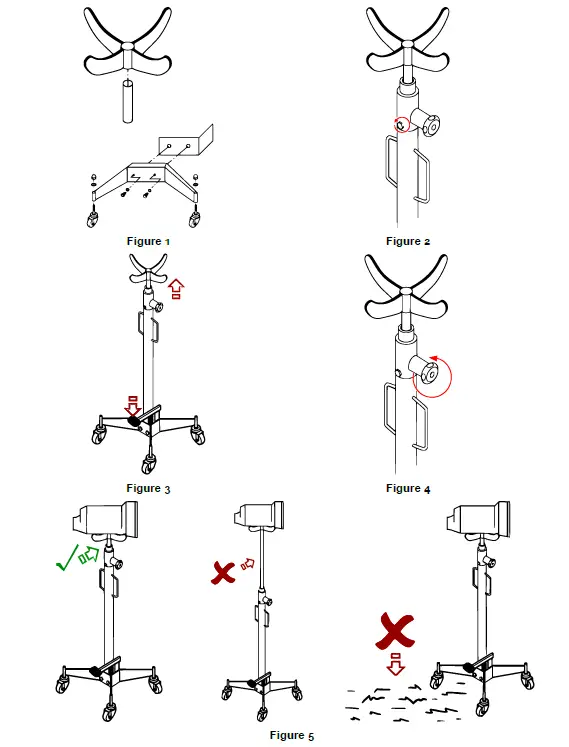
Main components
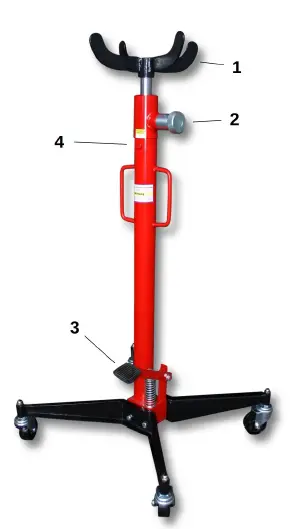
- Basket/carrier/top
- Pedal
- Handwheel
- Oil fill opening
Rapid guide
- Before commissioning, open the oil fill opening (4) for venting.
- Lifting: Push the pedal (3) several times by foot to raise the jack until it has reached to height desired.
- Lowering: Turn the handwheel (2) to the left and hold it until the height desired has been reached; then simply release it.
- The load must rest evenly on the basket (1).
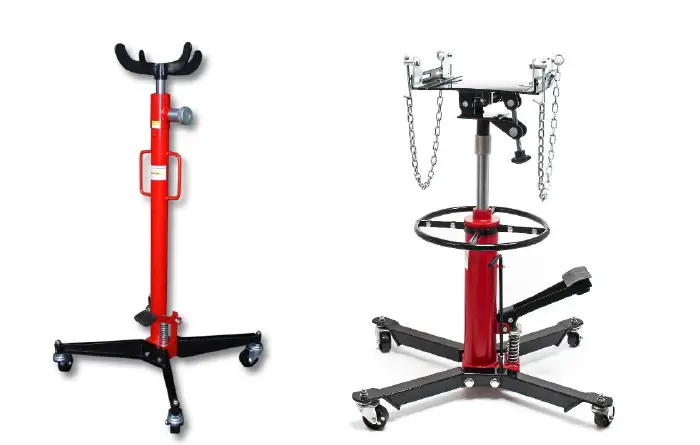
The function of different heads
The crown-shaped carrier has a rubber cushion and is therefore particularly suitable as a secure storage area for work that is carried out under a car.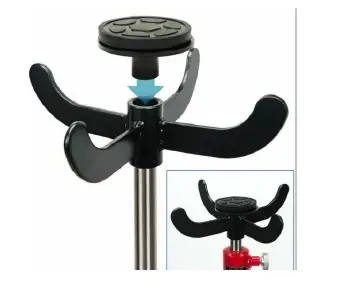
The robust carrier plate can be adapted to any type of gearbox. It can even be rotated 360° and tilted up to 60°. Safety chains ensure more safety and stability.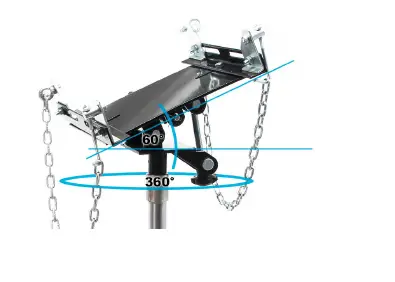
Exploded views and parts lists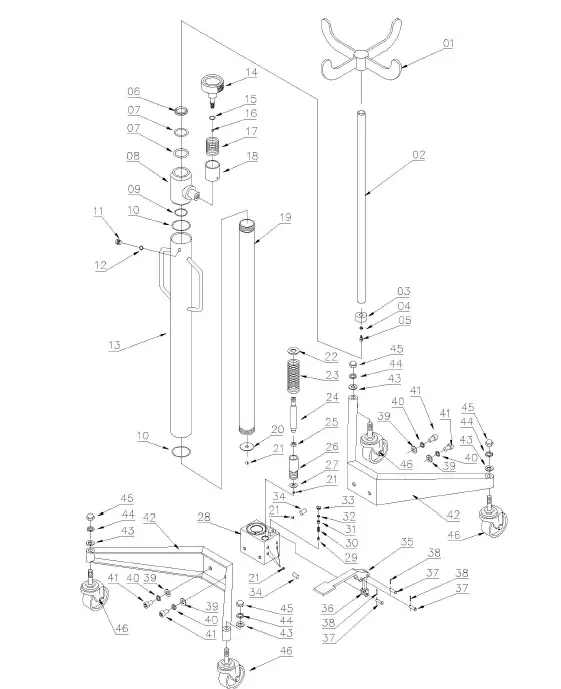
| № | Name | Qty. | № | Name | Qty. |
| 1 | Basket/carrier/top | 1 | 24 | Piston | 1 |
| 2 | Piston rod | 1 | 25 | O-ring | 1 |
| 3 | Piston head | 1 | 26 | Pump unit | 1 |
| 4 | Spring washer | 1 | 27 | Washer | 1 |
| 5 | Hexagon head screw | 1 | 28 | Socket | 1 |
| 6 | Cover ring | 1 | 29 | Sphere | 1 |
| 7 | O-ring | 2 | 30 | Spring | 1 |
| 8 | Socket | 1 | 31 | Nut | 1 |
| 9 | O-ring | 1 | 32 | Washer | 1 |
| 10 | O-ring | 1 | 33 | Screw | 1 |
| 11 | Cover | 1 | 34 | Socket | 1 |
| 12 | O-ring | 1 | 35 | Pedal | 1 |
| 13 | Main frame | 1 | 36 | Pedal support | 1 |
| 14 | Handwheel | 1 | 37 | Screw | 3 |
| 15 | O-ring | 1 | 38 | Socket | 3 |
| 16 | Sphere | 1 | 39 | Pedal | 4 |
| 17 | Torsion spring | 1 | 40 | Pedal support | 4 |
| 18 | Socket | 1 | 41 | Bolt | 4 |
| 19 | Cylinder | 1 | 42 | Base | 2 |
| 20 | Cylinder base | 1 | 43 | Washer | 4 |
| 21 | Sphere | 3 | 44 | Spring washer | 4 |
| 22 | Washer | 1 | 45 | Cover nut | 4 |
| 23 | Spring | 1 | 46 | Guide roll | 4 |
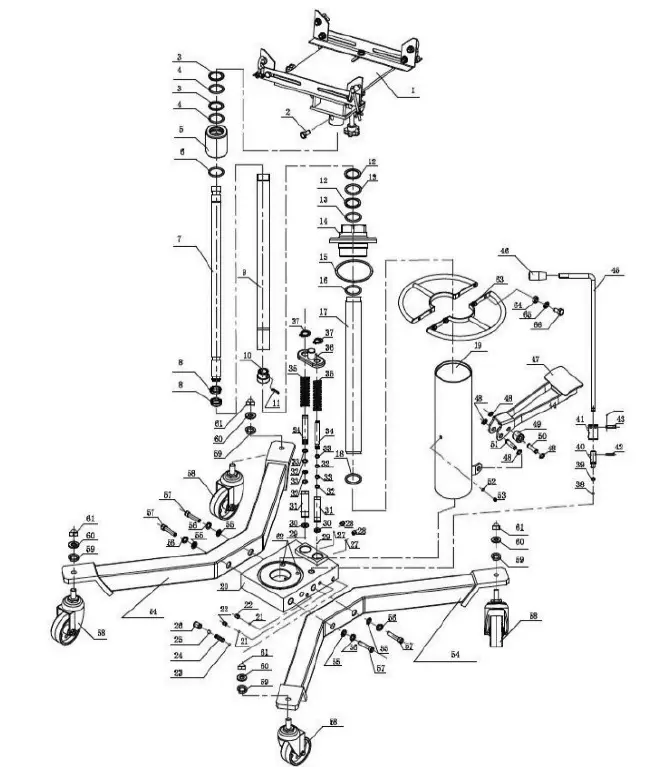 | |||||
| № | Name | Qty. | № | Name | Qty. |
| 1 | Carrier plate | 1 | 34 | Pump piston | 2 |
| 2 | Screw | 1 | 35 | Pedal spring | 2 |
| 3 | Nylon washer | 2 | 36 | Spring seat | 1 |
| 4 | O-ring | 2 | 37 | Spring washer | 2 |
| 5 | Socket | 1 | 38 | Spheric steel element | 1 |
| 6 | O-ring | 1 | 39 | O-ring | 1 |
| 7 | Piston shaft | 1 | 40 | Oil return valve | 1 |
| 8 | Piston ring | 2 | 41 | Valve cover | 1 |
| 9 | Inner cylinder | 1 | 42 | Socket pin | 1 |
| 10 | Cylinder base | 1 | 43 | Socket pin | 1 |
| 11 | Piston bolt | 1 | 44 | Splint | 1 |
| 12 | Nylon washer | 2 | 45 | Oil return | 1 |
| 13 | O-ring | 2 | 46 | Oil return cover | 1 |
| 14 | Cover cap | 1 | 47 | Pedal | 1 |
| 15 | Nylon washer | 1 | 48 | Retainer | 4 |
| 16 | O-ring | 1 | 49 | Bearing | 1 |
| 17 | Outer cylinder | 1 | 50 | Connection bolt | 1 |
| 18 | Washer | 1 | 51 | Connection bolt | 1 |
| 19 | Housing | 1 | 52 | O-ring | 1 |
| 20 | Socket | 1 | 53 | Screw | 1 |
| 21 | Spheric steel element | 2 | 54 | Base | 1 |
| 22 | Locking screw | 2 | 55 | Washer M16 | 2 |
| 23 | Spheric steel element | 1 | 56 | Spring washer M16 | 4 |
| 24 | Spring | 1 | 57 | Screw M16×80 | 4 |
| 25 | Gasket | 1 | 58 | Guide roll | 4 |
| 26 | Locking screw | 1 | 59 | Spring washer M12 | 4 |
| 27 | Spheric steel element | 2 | 60 | Washer M12 | 4 |
| 28 | Locking screw | 2 | 61 | Cover nut | 4 |
| 29 | Spheric steel element | 2 | 62 | O-ring | 2 |
| 30 | Washer | 2 | 63 | Round gasket | 2 |
| 31 | Pump cylinder | 2 | 64 | Nut M8×30 | 2 |
| 32 | O-ring | 2 | 65 | Washer M8 | 2 |
| 33 | Nylon washer | 2 | 66 | Screw M8 | 2 |
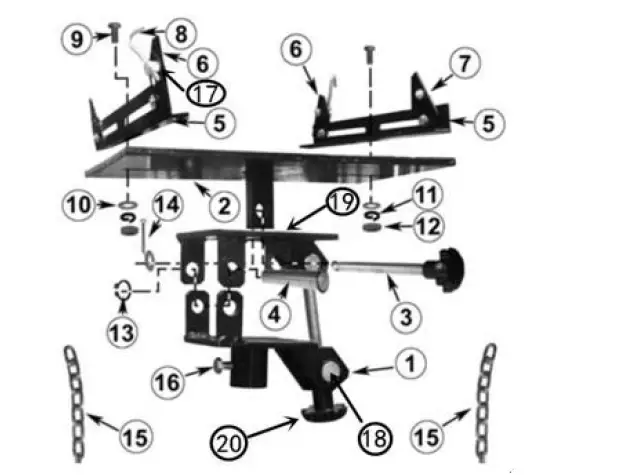 | |||||
| № | Name | Qty. | № | Name | Qty. |
| 1 | Mounting frame | 1 | 11 | Spring washer | 2 |
| 2 | Carrier plate | 1 | 12 | Nut | 2 |
| 3 | Rotary knob screw | 1 | 13 | Circlip | 1 |
| 4 | Bolt | 1 | 14 | Locking bolt | 1 |
| 5 | Lateral bar | 2 | 15 | Chain | 2 |
| 6 | Carrier plate | 4 | 16 | Screw | 1 |
| 7 | Eye bolt | 2 | 17 | Chain hanging | 2 |
| 8 | Chain hook | 2 | 18 | Pin | 2 |
| 9 | Screw | 2 | 19 | Plate support | 1 |
| 10 | Washer | 2 | 20 | Rotary knob screw | 1 |
Important notice:
The reprint or reproduction, even of excerpts, and any commercial use, even in part, of this instruction manual require the written permission of WilTec Wildanger Technik GmbH.


