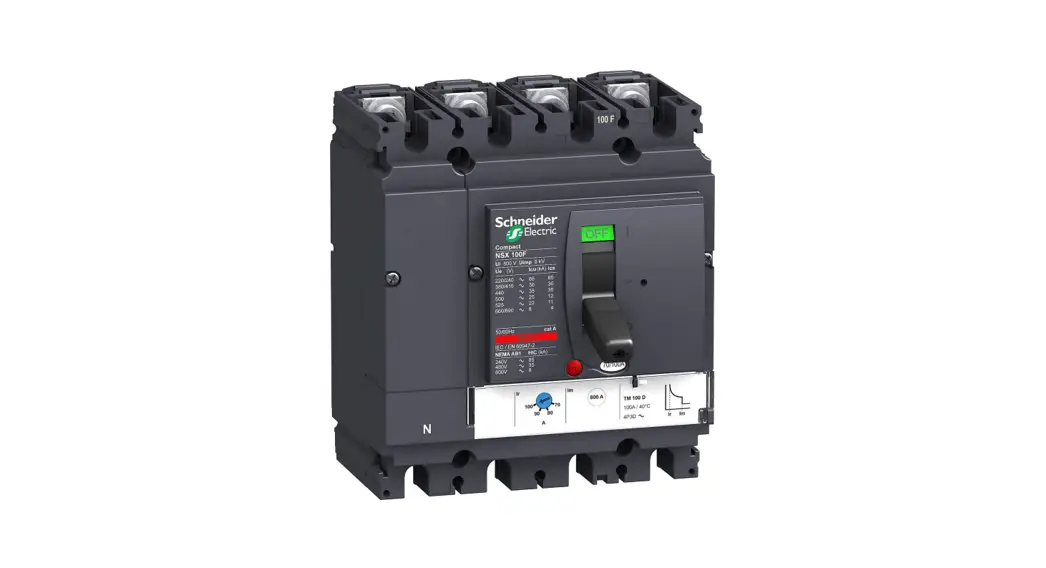
![]() ComPact™ NSX100-250
ComPact™ NSX100-250
MicroLogic 2.2/5.2/6.2 Trip Units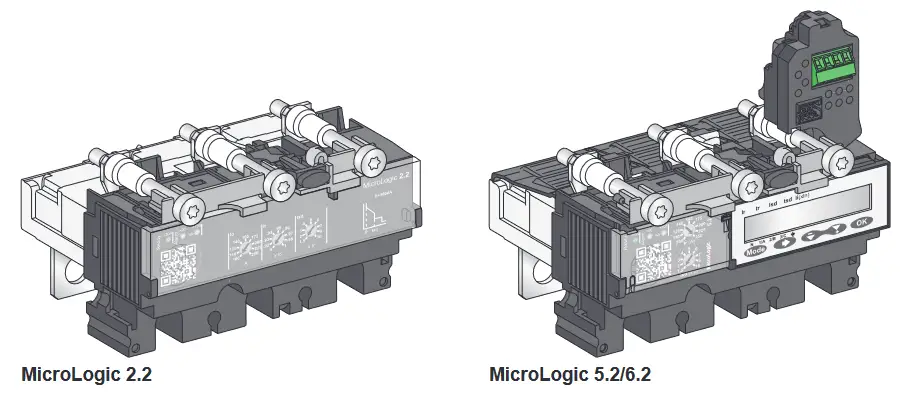
NSX100-250 ComPacT
| www.se.com | |
| ComPactT NSEX100-250 | ComPactT NSEX100-630 |
| NNZ44765407 | DOCA0187 |
| DOCA0188 | |
Retain instruction sheet for future use. Visit our website at www.se.com to download the documents listed above (user guides ![]() or instruction sheets
or instruction sheets ![]() ) and other documents.
) and other documents.
PLEASE NOTE
- Electrical equipment should be installed, operated, serviced, and maintained only by qualified personnel.
- No responsibility is assumed by Schneider Electric for any consequences arising out of the use of this material.
- All pertinent state, regional, and local safety regulations must be observed when installing and using this product.
![]()
![]() DANGER
DANGER
HAZARD OF ELECTRIC SHOCK, EXPLOSION OR ARC FLASH
- Apply appropriate personal protective equipment (PPE) and follow safe electrical work practices. See NFPA 70E, CSA Z462, NOM-029-STPS or local equivalent.
- This equipment must only be installed and serviced by qualified electrical personnel.
- Turn off all power supplying this equipment before working on or inside equipment.
- Always use a properly rated voltage sensing device to confirm power is off.
- Put back all devices, doors, and covers before turning on power to this equipment.
- Beware of potential hazards, and carefully inspect the work area for tools and objects that may have been left inside the equipment.
Failure to follow these instructions will result in death or serious injury.
Required for Installation
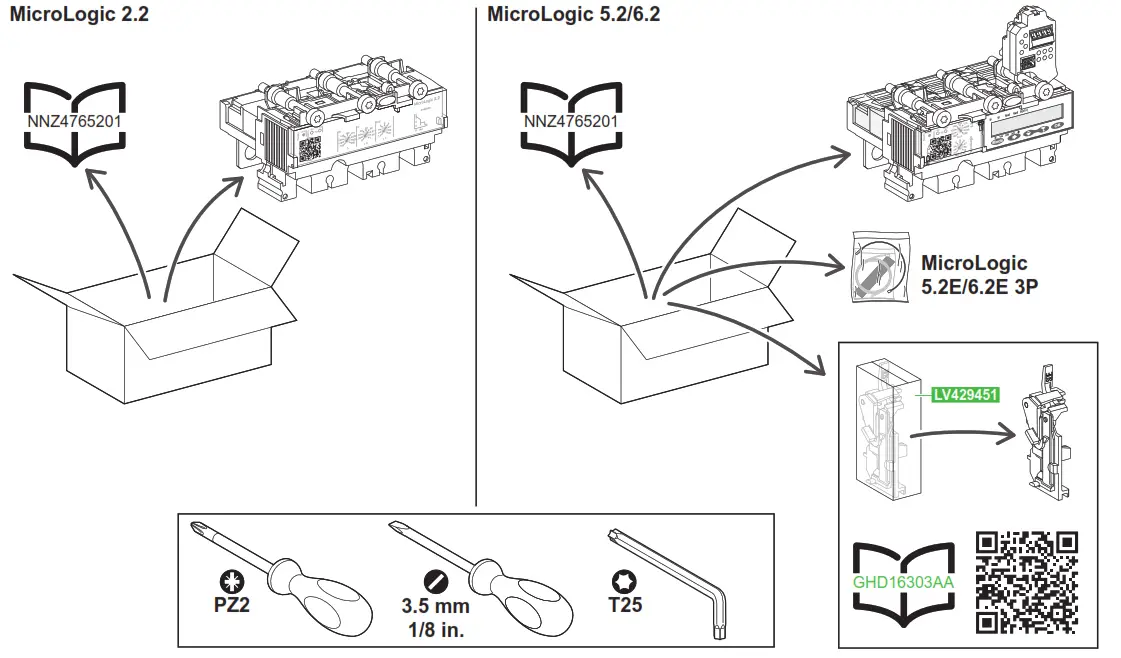 https://download.schneider-electric.com/files?p_Doc_Ref=GHD16303AA
Before Working on Equipment
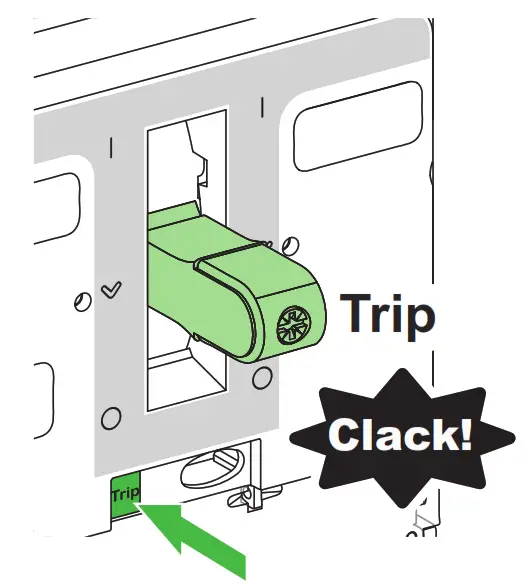
- Turn off all power supplying this equipment before working on or inside equipment.
- Use push-to-trip button to trip the device.
- Use a properly rated voltage sensing device to confirm power is off.
Installation
![]() WARNING
WARNING
HAZARD OF FIRE
- When installing the MicroLogic trip unit, check that the snap-off screws A break when tightened.
- It is mandatory to use snap-off screws LV429513 to install a MicroLogic trip unit.
- In case of replacement of the trip unit by a trip unit with a different rating, you must:
- re-define the trip unit settings
- adapt the connection characteristics.
Failure to follow these instructions can result in death, serious injury, or equipment damage.
- Loosen and remove screws of front cover or accessories as indicated in instruction sheet shipped with device.
- Install the trip unit into compartment.
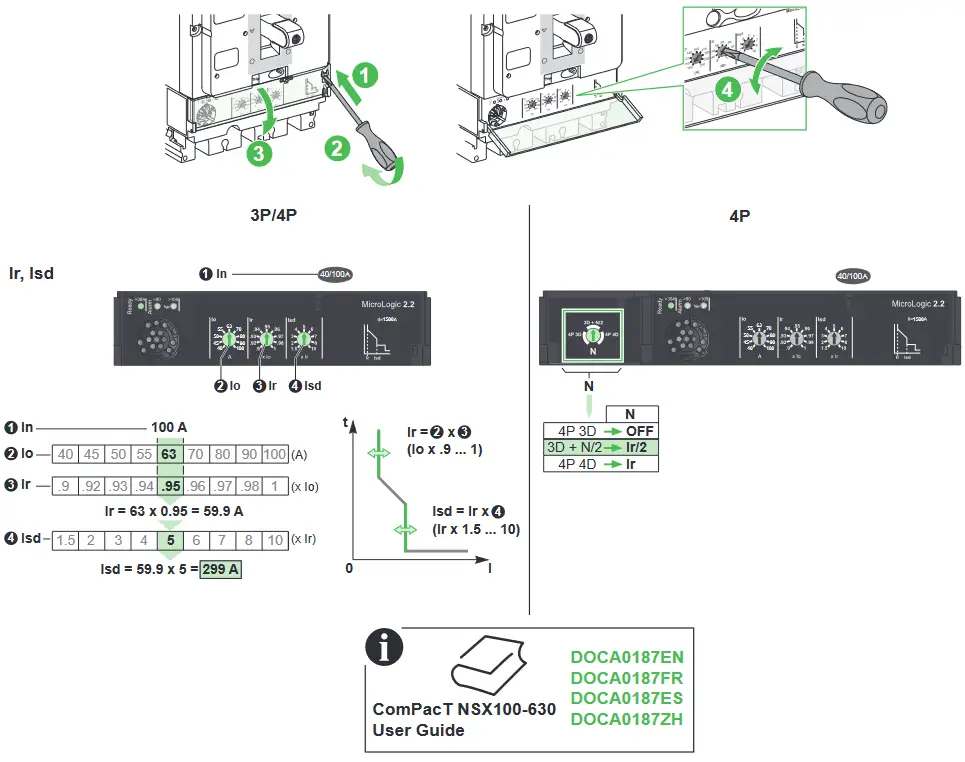
3.1 MicroLogic 2.2
 https://download.schneider-electric.com/files?pWDoc_Ref=GHD16257AA
https://download.schneider-electric.com/files?p_Doc_Ref=GHD16303AA
![]()
![]() DANGER
DANGER
HAZARD OF ELECTRIC SHOCK, EXPLOSION OR ARC FLASH
Install MicroLogic 5/6 trip units with the internal rubber insulation screen in the right position.
Failure to follow these instructions will result in death or serious injury.
Reinstall Front Cover
![]()
![]() DANGER
DANGER
HAZARD OF ELECTRIC SHOCK, EXPLOSION OR ARC FLASH
Put back front cover or accessories before energizing device to prevent access to live terminals.
Failure to follow these instructions will result in death or serious injury.
NOTICE
HAZARD OF EQUIPMENT DAMAGE
- Be careful not to pinch wires when installing front cover.
- Tighten all front cover screws to stated torque.
- Do not overtorque screws.
- Do not use power equipment to torque screws.
Failure to follow these instructions can result in equipment damage.
- Put back front cover and accessories as indicated in instruction sheet shipped with device.
- Device is ready to be placed in service.
Tripping Test
MicroLogic 2.2: Trip Unit Adjustment
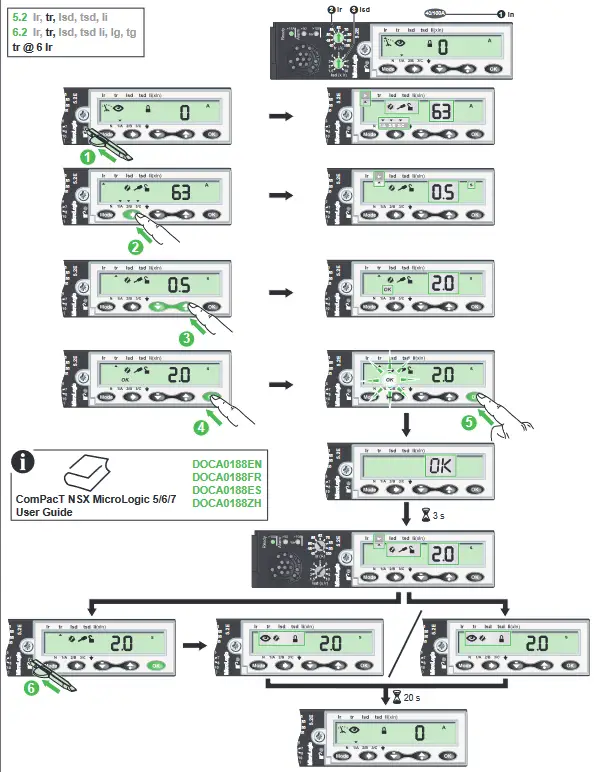
MicroLogic 5.2/6.2: Trip Unit Adjustment
7.1 Trip Unit Supply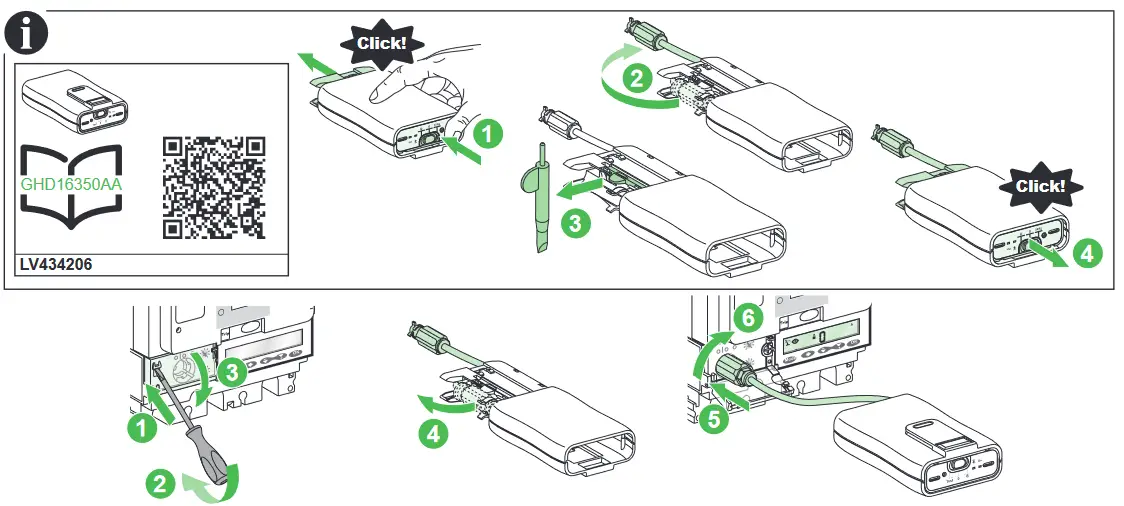 7.2 Settings with Rotary Dial
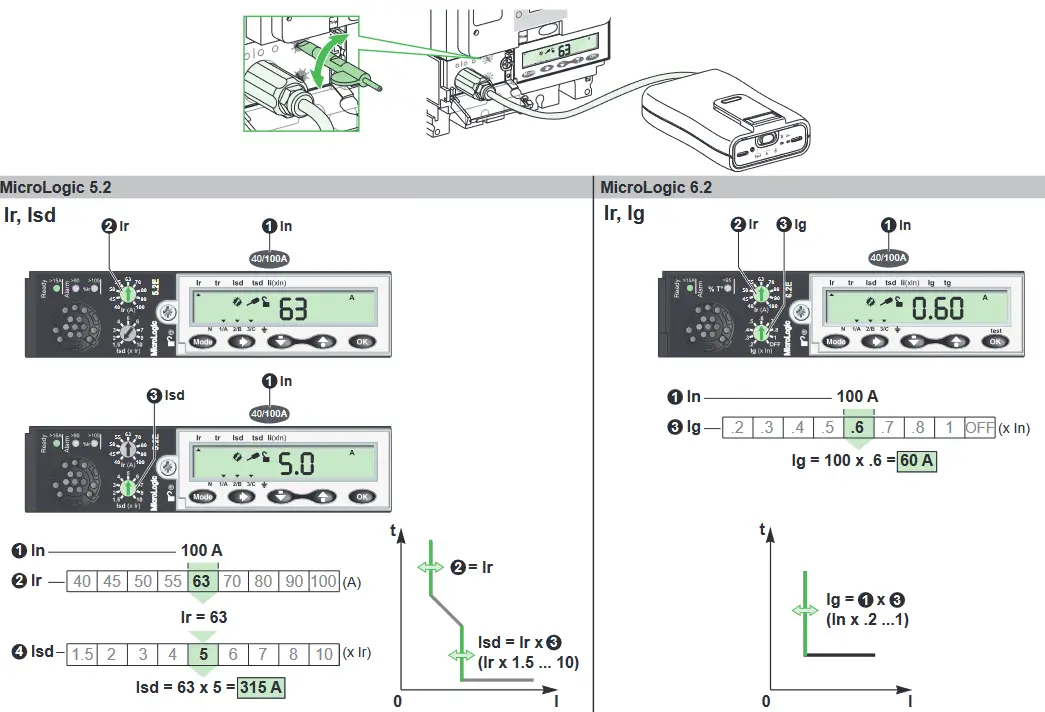 7.3 Settings on HMI
Sealing
 https://download.schneider-electric.com/files?p_Doc_Ref=GHD16303AA
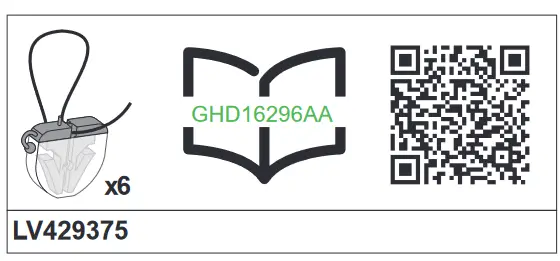
To install the sealing accessory, consult the instruction sheet GHD16296AA.
8.1 MicroLogic 2.2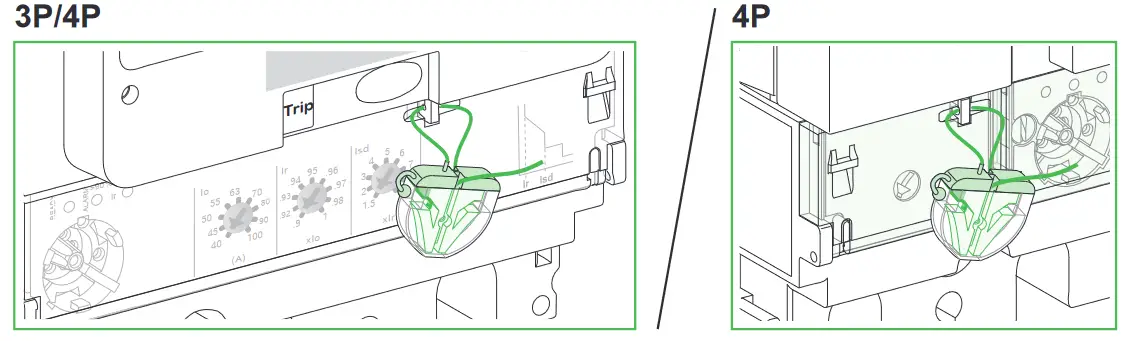 8.2 MicroLogic 5.2/6.2
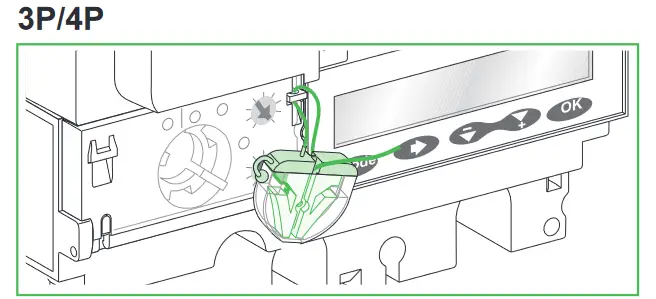
Manufacturing Date
The product’s manufacture date is coded PP-YYYY-Www-D, where:
- PP: plant code
- YYYY: year of manufacture
- Www: week of manufacture
- D: weekday of manufacture (Monday = 1)
Eg: 7Q-2019-W20-3 = product manufactured at plant 7Q on Wednesday 15 May 2019
![]() Schneider Electric Industries SAS
Schneider Electric Industries SAS
35, rue Joseph Monier
CS 30323
F – 92506 Rueil Malmaison Cedex
www.se.com![]() © 2022 Schneider Electric – All rights reserved.
© 2022 Schneider Electric – All rights reserved. Schneider Electric Limited
Stafford Park 5
Telford, TF3 3BL
United Kingdom
www.se.com/uk
NNZ4765207-01
References
 Schneider Electric Global | Global Specialist in Energy Management and Automation
-
Support | Schneider Electric Global
-
Schneider Electric UK | Energy Management and Automation
-
download.schneider-electric.com/files?p_Doc_Ref=DOCA0187EN
-
download.schneider-electric.com/files?p_Doc_Ref=DOCA0187ES
-
download.schneider-electric.com/files?p_Doc_Ref=DOCA0187FR
-
download.schneider-electric.com/files?p_Doc_Ref=DOCA0187ZH
-
download.schneider-electric.com/files?p_Doc_Ref=DOCA0188EN
-
download.schneider-electric.com/files?p_Doc_Ref=DOCA0188ES
-
download.schneider-electric.com/files?p_Doc_Ref=DOCA0188FR
-
download.schneider-electric.com/files?p_Doc_Ref=DOCA0188ZH
-
GHD1625701-07
-
download.schneider-electric.com/files?p_Doc_Ref=GHD16296AA
-
download.schneider-electric.com/files?p_Doc_Ref=GHD16303AA
-
download.schneider-electric.com/files?p_Doc_Ref=GHD16350AA
-
download.schneider-electric.com/files?p_Doc_Ref=NNZ4765407
-
Schneider Electric Global | Global Specialist in Energy Management and Automation
-
Support | Schneider Electric Global


