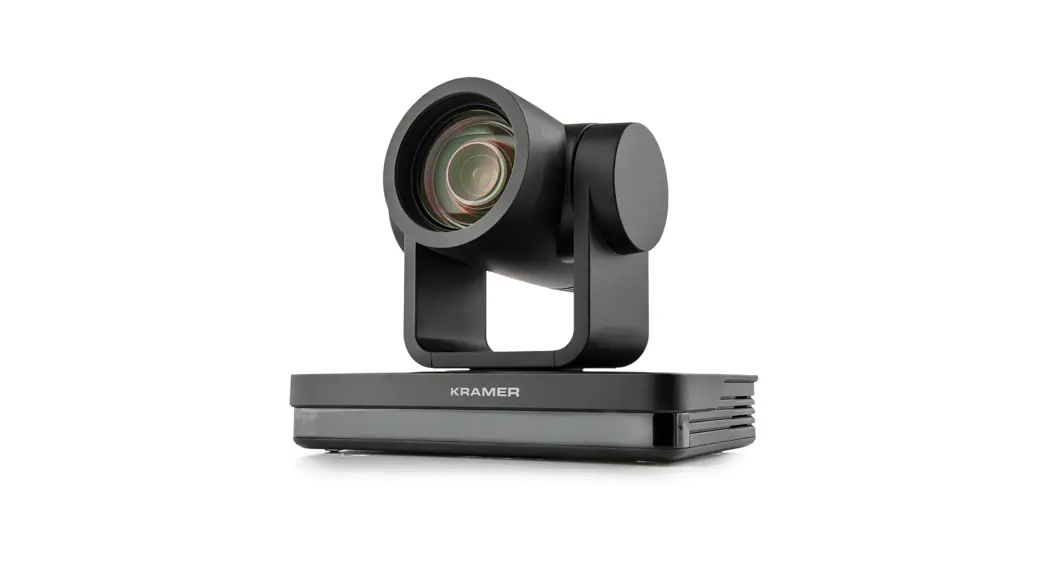
![]() K-CAM-USB
K-CAM-USB
Quick Start Guide
This guide helps you install and use your K-CAM-USB for the first time.
Go to www.kramerav.com/downloads/K-CAM-USB to download the latest user manual and check if firmware upgrades are available.
Scan for full manual
https://de2gu.app.goo.gl/48ZjexcCrePX66Y26
Step 1: Check what’s in the box
K-CAM-USB Full HD Conference Camera
- 1 Power adapter
- Remote control transmitter with batteries
- 1 Wall bracket
- 1 Set of installation screws
- 1 Terminal block plug
- 1 USB-B to USB-A cable
- 1 RS-232 VISCA (m) to 9-pin (f) cable
- Quick start guide
Step 2: Get to know your K-CAM-USB
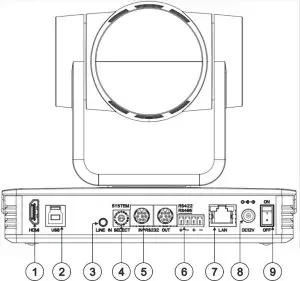
| # | Feature | Function |
| 1 | HDMITM Connector | Connect to a display. |
| 2 | USB Type-B Connector | Connect to computer or collaboration device using the included USB-B to USB-A cable. We recommend connecting K-CAM-USB to a USB 3.0 connector on your computer or collaboration device. |
| 3 | LINE 3.5mm Mini Jack | Connect to a microphone. |
| 4 | SYSTEM SELECT Rotary DIP-Switches | Set the video resolution. By default, it is set to “F” = video resolution is set via the remote control or web pages. |
| 5 | RS232 IN/OUT VISCA Connector | Connect to a camera controller using the included RS-232 VISCA (m) to 9-pin (f) cable. |
| 6 | RS422/RS485 4-pin term. block | Not in use. |
| 7 | LAN RJ-45 Connector | Connect to your network or directly to a computer. |
| 8 | DC12V Power Connector | Connect to the 12V power adapter. |
| 9 | ON/OFF Switch | Turn the unit on and off. |

Step 3: Mount K-CAM-USB
Install K-CAM-USB using one of the following methods:
- Attach the rubber feet and place the unit on a flat surface.
Use the included wall bracket to attach it to a wall as follows: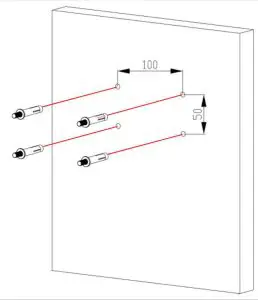
- Drill 4 holes and fasten the bolts to the wall.

 • Ensure that the environment (e.g., maximum ambient temperature & airflow) is compatible with the device.
• Avoid uneven mechanical loading.
• Appropriate consideration of equipment nameplate ratings should be used for avoiding overloading of the circuits.
• Reliable earthing of rack-mounted equipment should be maintained.
• Maximum mounting height for the device is 2 meters.
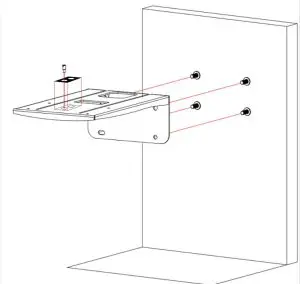
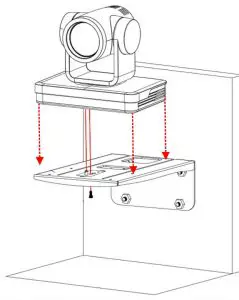
- Fasten the stabilization pin to the upper surface of the bracket and attach the rubber pad to the bracket.
- Attach the bracket to the wall.

- Place K-CAM-USB on the bracket, insert the peg into the hole on the underside of the camera base and fasten the camera to the bracket with the screw.

Step 4: Connect inputs and outputs
Always switch OFF the power on each device before connecting it to your K-CAM-USB.
Step 5: Connect the power
Connect the power adapter to K-CAM-USB and plug it into the mains electricity.
Safety Instructions (See www.kramerav.com for updated safety information)
 Caution:
- For products with relay terminals and GPI\O ports, please refer to the permitted rating for an external connection, located next to the terminal or in the User Manual.
- There are no operator serviceable parts inside the unit.
Warning:
- Use only the power cord that is supplied with the unit.
- Disconnect the power and unplug the unit from the wall before installing.
Step 6: Operate K-CAM-USB
Operate K-CAM-USB via:
- Using the IR remote control transmitter.
- Remotely, embedded web pages via the Ethernet.
- Remotely, by RS-232 serial commands transmitted by a touch screen system, PC, or another serial controller.
| RS-232 Control | |||
| Baud Rate: | 115.200 Parity: | None | |
| Data Bits: | 8 | Command Format: | ASCII |
| Stop Bits: | 1 | Web: 80 | |
| Default Ethernet Parameters Ports | |||
| IP Address: | 192.168.1.39 | Data: 3000 | |
| Subnet Mask: | 255.255.0.0 | Onvif: 2000 | Soap: 1936 |
| Gateway: | 0.0.0.0. | RTMP: 1935 | Rtsp: 554 |
| UDP Port #: | 50000 | Visca: 1259 | WebSocket: 8088 |
| TCP Port #: | 5000 | ||
| Default Username: | admin | ||
| Default Password: | admin | ||
Pairing the remote control to K-CAM-USB
You must perform pairing before using the remote control.
- Press the SET and * keys simultaneously for 3 seconds.
The remote control LED flashes and the pairing is complete.
The terms HDMI, HDMI High-Definition Multimedia Interface, and the HDMI Logo are trademarks or registered trademarks of HDMI Licensing Administrator, Inc.
![]()


