![]()

User Guide
MODEL:
K-Bar
USB Panoramic Camera

![]() SAFETY WARNING
SAFETY WARNING
Disconnect the unit from the power supply before opening and servicing
For the latest information on our products and a list of Kramer distributors, visit our Web site where updates to these installation instructions may be found. We welcome your questions, comments, and feedback.
www.kramerAV.com
[email protected]
K-Bar USB Panoramic Camera
Congratulations on purchasing your Kramer K-Bar USB Panoramic Camera. K-Bar provides a 180° field of view with full-picture immersive technology that provides wall-to-wall coverage, delivering high-quality images in 4K UHD.
K-Bar can be operated via the K-Studio App www.kramerav.com/downloads/K-180Mini) or simply via the top tap button.
Get to know your K-Bar
| # | Feature | Function | |
| 1 | Microphone | 2-array microphone for audio communication, recording or conferencing, with a pick-up distance of up to 4m. | |
| 2 | Camera | Three 12-MP cameras for producing high-resolution panoramic video for conferencing. | |
| 3 | Top Touch Button | Press to select any of the following operation modes. | |
| Panoramic View | 180° view of the meeting room. | ||
| Grid View | The screen is split to several sections. | ||
| Normal View | Zoomed panoramic view. | ||
| Split View | Normal view on top and panoramic view below. | ||
| Composite View | Panoramic view on top and on 3 sections below. | ||
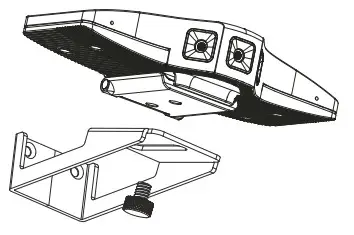
| 4 | Fixed Bracket | Place over the screen edge. | |
| 5 | HOST USB 2.0Type-A Port | Optionally, connect to an additional USB device. | |
| 6 | DEVICE USB-C 2.0 Port | Connect to a computer (for example to capture the video). | |
Mounting K-Bar
Install K-Bar using one of the following methods by attaching the fixed bracket to the screen edge or attach to the wall using the wall bracket (to attach to the screen edge, unfold the fixed bracket then fit in on the screen)
 Ensure that the environment (e.g., maximum ambient temperature, humidity & air flow) is compatible for the device.
- Avoid exposing the product to direct sunlight or any other heat source.
- Keep away from children – product includes small accessories and components.
- Avoid uneven mechanical loading.
- Do not insert any sharp objects into the product.
- Avoid dropping or hitting the product to avoid damaging the product.
- For maintenance, call tech support.
To attach K-Bar onto a wall: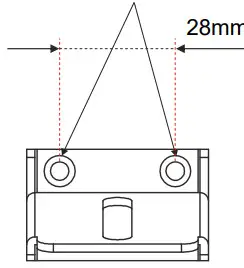
- Find the correct location on the wall.
- In the desired location, drill 2 holes 28mm apart (using a 6mm drill bit).
- Insert the 2 rubber expansion plugs into the holes.
- Attach the wall bracket to the wall, using the two bracket screws.

- Slide the fixed bracket to the wall bracket and fasten musing the thumbscrew.
USB Host Options
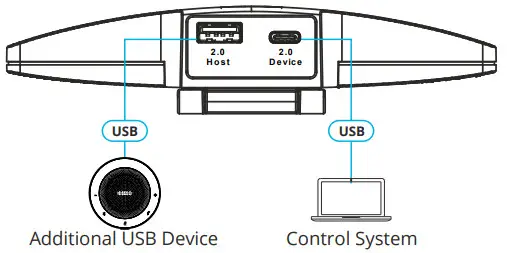
The USB 2.0 host connection allows connecting any additional USB device, or a Bluetooth dongle (for example, of a speakerphone or mouse) allowing a single USB connection to the computer.
Always switch OFF the power on each device before connecting it to your K-Bar.
![]() To achieve specified extension distances, use the recommended Kramer cables available at www.kramerav.com/product/K180Mini. Using third-party cables may cause damage!
To achieve specified extension distances, use the recommended Kramer cables available at www.kramerav.com/product/K180Mini. Using third-party cables may cause damage!
Connecting the Power
K-Bar is powered via USB-C.
Safety Instructions (See www.kramerav.com for updated safety information)![]() Caution:
Caution:
• There are no operator serviceable parts inside the unit.
Warning:
- Disconnect the power and unplug the unit from the wall before installing.
- Do not open the unit. High voltages can cause electrical shock! Servicing by qualified personnel only.
- To ensure continuous risk protection, replace fuses only according to the rating specified on the product label which nlocated on the bottom of the unit.
Operating K-Bar for the First Time
You can operate K-Bar manually via the top configuration button on the camera, or via your PC, using the K-Studio
app (see www.kramerav.com/downloads/K-180Mini).![]() We recommend using K-Studio either for executive offices where a computer with K-Studio installed is handy or in specific cases where a computer is set in the meeting room and dedicated speaker tracking is necessary or if a whiteboard in the room needs to be displayed separately.
We recommend using K-Studio either for executive offices where a computer with K-Studio installed is handy or in specific cases where a computer is set in the meeting room and dedicated speaker tracking is necessary or if a whiteboard in the room needs to be displayed separately.
To operate K-Bar:
- Connect the device via USB to the control system or computer.
The device can also be recognized as a storage drive. A link to downloading the K-Studio software is then available. - Download the K-Studio and install it, or close the window and use K-Bar manual configurations via the Tap button only.
- Open your video conferencing solution (for example, Microsoft Teams).
- Click Settings>Devices, and then select the camera type:
▪ K-180Mini – enables manually controlling the camera when connected directly to USB.
▪ K-Studio Camera (only if installed) – enables advanced camera configurations. K-Bar is ready for operation.
Installation Instructions
Use the K-Bar tap button to select one of the five available modes:
Composite View – The screen displays a panoramic view.

Grid View – Displays 4 areas to view.

Split View – shows the normal view on top and a panoramic view below.

Normal View – The screen shows a zoomed panoramic view.

Panoramic View – shows a 180° view of the meeting room.

Technical Specifications
Ports | 1 USB 2.0 type A | On a USB connector |
| 1 USB-C 2.0 | On a USB-C connector | |
| Video | Output Formats | MJPG; H.264; YUY2 |
| Resolutions | YUY2 (30fps): 640×480, 640×360, 480×270, 352×288, 320×240 | |
| MJPG (30fps): 3840×2160(24fps), 3840×1376, 3840×962, 2560×1440, 1920×1080, 1280×720, 1024×576, 960×544, 640×480, 640×360 | ||
| H264 (30fps): 1280×720, 1024×576, 960×544, 640×480, 640×360 | ||
| Focus | Method | Fixed |
| Distance | 1.5 meters | |
| Camera | Max. Field of View (FOV) | 180 |
| Depth of Field (DOF) | 0.5 to 5 meters | |
| Aperture | 2.2 | |
| Minimum Illumination | 10Lux | |
| Microphone | Quantity | 2 |
| Pickup Distance | Up to 4 meters | |
| Controls | Top Button | Selectable layouts |
| App | Layout configuration via PC | |
| Power | Consumption | 5V DC, 1.5A max. |
| Environmental Conditions | Operating Temperature | 0° to +40°C (32° to 104°F) |
| Storage Temperature | -20° to +60°C (-4° to 140°F) | |
| Humidity | 10% to 90%, RHL non-condensing | |
| Altitude | Below 5000 meters | |
| Regulatory Compliance | Safety | CE, FCC |
| Environmental | RoHS, WEEE | |
| Enclosure | Type | Aluminum |
| General | Net Dimensions (W, D, H) | 14.7cm x 7.4cm x 3.5cm (5.8″ x 2.9″ x 1.4″) |
| Shipping Dimensions (W, D, H) | 17.6cm x 17.6cm x 4.6cm (6.9″ x 6.9″ x 1.8″) | |
| Net Weight | 0.24kg (0.53lbs) approx. | |
| Shipping Weight | 0.59kg (1.3lbs) approx. | |
| Accessories | Included | 1 USB-C cable, wall bracket, screws set |
Specifications are subject to change without notice at www.kramerav.com
K-Bar USB Panoramic Camera


