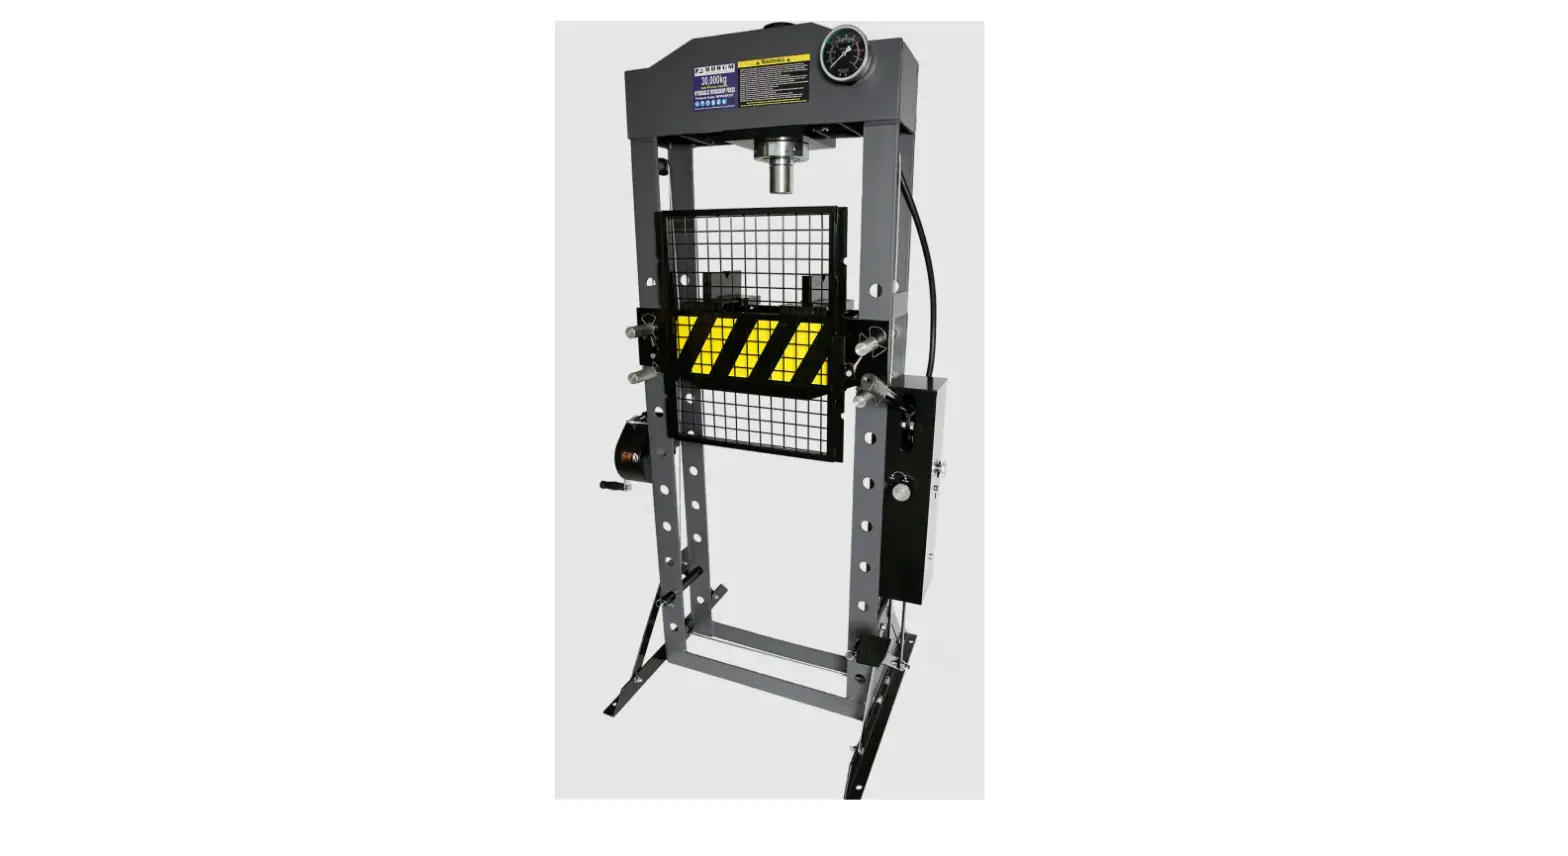
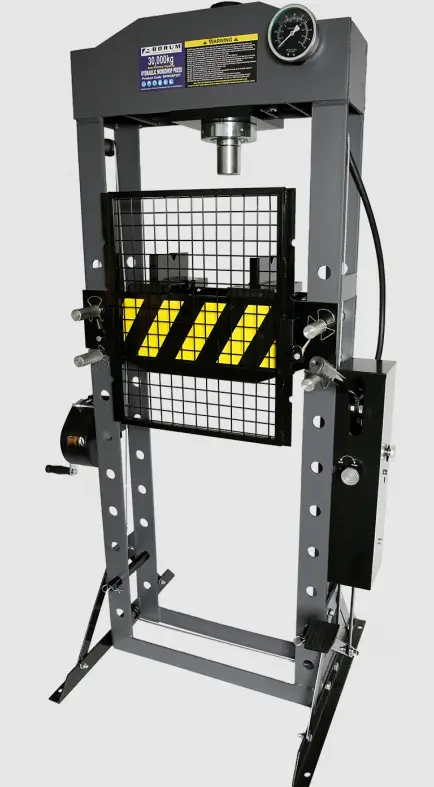
BORUM BHSP30T Hydraulic Work Shop Press
Specifications
- Safe Working Capacity: 30,000kg
- Working Range: 151-1031mm
- Overall Height: 1830mm
- Overall Width: 795mm
- Overall Depth: 700mm
- Bed Outside: 184mm
- Bed Inside: 164mm
- Bed Width: 535mm
- Ram Stroke: 150mm
- Ram Diameter: 80mm
- Side Stroke: 200mm
- Nett Weight: 167kg
- Carton: 2120 x 780 x 270mm
- Gross Weight: 203kg
About the Borum brand:
Our “heavy-duty commercial” range of Borum Industrial equipment has been manufactured to exacting standards for the past 34 years. We specify industrial quality components and design to ensure a long and durable working life in commercial transport, mining, earthmoving and railway environments. Our Borum Industrial range of equipment is focused on achieving superior professional standards, reliability, quality, and are covered by a 12month trade use warranty.
IMPORTANT: READ ALL INSTRUCTIONS BEFORE USE
WARNING:
The instructions and warnings contained in this manual should be read and understood before using or operating this equipment. Do not allow anyone to use or operate this equipment until they have read this manual and have developed a thorough understanding of how this equipment works. Failure to observe any of the instructions contained in the manual could result in severe personal injury to the user or bystanders, or cause damage to the equipment and property. Keep this manual in a convenient and safe place for future reference.
The warnings cautions and instructions discussed in this instruction manual cannot cover all possible conditions and situations that may occur. It must be understood by the operator that common sense and caution are factors that cannot be built into this product but must be supplied by the operator.
Whilst every effort has been made to ensure the accuracy of the information contained in this manual, the Borum policy of continuous improvement determines the right to make modifications without prior warning.
STANDARD OPERATING PROCEDURE
DO NOT use this machine unless you have been trained and assessed to a competent level in its state use and operation, and have been given permission to use this

PRE-OPERATIONAL SAFETY CHECKS
- Inspect the Hydraulic Workshop Press before each use. Do not use if bent, broken, cracked, leaking, or otherwise damaged. Ensure all bolts and nuts are firmly tightened..
- Do not exceed the product’s rated maximum load capacity. Never apply excessive force to a workpiece.
- Steel and other materials can shatter, always wear approved impact goggles, heavy-duty work gloves, and appropriate clothing.
- If you detect anything that may indicate imminent structural failure, stop using the hydraulic workshop press immediately and inspect thoroughly.
- Only use this hydraulic workshop press on a surface that is stable, level, dry and non-slippery, and capable of sustaining the load. Keep the surface clean, tidy and free from unrelated materials and ensure that there is adequate lighting.
- Do not use this hydraulic workshop press to compress springs or any other item that could disengage and cause a potential hazard.
- Keep hands and feet away from the bed area at all times.
- Do not modify any component of this equipment.
- Only use this device for the purpose for which it has been designed.
- When servicing, use only Borum identical replacement parts. Use of any other parts will void the warranty.
- Use the right product for the job. There are certain applications for which the Hydraulic workshop press was designed. Do not modify the Hydraulic workshop press and do not use the Hydraulic workshop press for a purpose for which it was not intended.
Intended Use:
For regular professional straightening, bending & pressing. Removing and installing gears, bearings and bushings.
ASSEMBLY, OPERATION, PREVENTATIVE MAINTENANCE
FEATURES & MODELS
This “Borum Industrial” 30,000kg Hydraulic Workshop Press is great for straightening, stamping, bending, and pressing any component that is hard to handle. The polished inner cylinder walls extend the life of the hydraulic seals to minimize abrasion and wear, while the cylinder ram and pistons are also polished and chromed, guided by high-performance seals, wear rings, and dust seals.
ASSEMBLY
Unpacking: after removing the packing material, make sure the product is in perfect condition and that there are no visible damaged parts. The packaging materials (Polyethylene bags, polystyrene, etc.), must be disposed of in an appropriate refuse collection container. These materials must not be left within the reach of children as they are potential sources of danger.
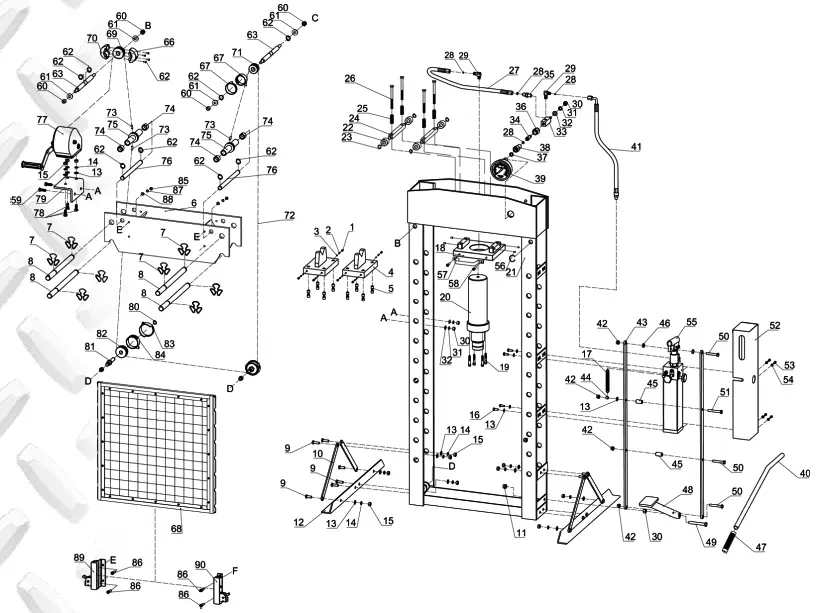
- Use the exploded parts drawing as your guide to assemble this press.
- Identify and layout all parts and assemblies before beginning.
- Attach one support (10) and base section (12) to the left post using bolt (9), washers (13), lock washers (14), and nuts (15), then attach another to the right post.
- Insert bed frame pins (8) into the holes in the posts, then insert the working table (6) into the press frame and onto the bed frame pin.
- Attach the pump and protection cover assemblies to the right post using bolt (9) and washers (13),
- Connect the oil hose (41) to the elbow (29) and assemble the pressure gauge (39) to the pressure gauge fitting (38)
- Connect oil hose (27) to elbow (29) and ram (20)
- Tighten and check all nuts and bolts.
WARNING! Take care not to allow the press platform to drop onto the pins and ensure your hands and fingers are clear of the press platform when lowering.
BEFORE USE
Prior to each use conduct a visual inspection by checking for abnormal conditions, such as cracked and damaged, loose, or missing parts.
Installation
- Securely attach the press to a flat, firm, level surface taking into account clearance for working pieces.
- Before operating the press, purge the hydraulic system in order to eliminate any air that may have built up during transit. Open the long release valve (P25) and short release valve (P31) by turning them counter-clockwise
- Pump the handle several full strokes and close the release valve. Should the system malfunction at any time, repeating this process may resolve the problem.
DANGER!
Models are purpose-designed to withstand greater loads than hydraulic units can develop. For safety reasons, always ensure the workpiece and press tools are secured on the table and will not flex or suddenly “give way” causing danger to the operator or the component. Also, ensure you have read and understood safety instructions.
OPERATION
- Check that the hydraulic unit is fully closed ready for operation.
- Position the working table at the required operating height by inserting the support pins into the appropriate holes in the mainframe.
- Position the press plates and/or press tools to be used onto the work table and align beneath the ram. Place the workpiece onto the work table or press plates and align beneath the ram as required. Note: Care must be taken to ensure press plates do not fall from the press work table. If necessary hold the configuration in position with clamps.
- Close the release valve (P25) and short release valve (P31) by turning it clockwise until firmly closed. Operate the pump slowly with the foot pedal or handle until the ram is close to or just touching the workpiece. Before applying real pressure to the workpiece recheck the alignment with the ram and ensure that the workpiece and press tools are supported in such a way that they cannot flex to breaking point. Then open the short release valve (P31) to change to maximum load pressure.
- When work is complete release the pressure using the release valve and the piston and the ram head will retract automatically.
Note: Always keep the piston retracted after use to avoid corrosion.
STORAGE:
This Hydraulic Workshop Press should always be stored in a dry location with the ram and piston fully retracted on a level surface.
MAINTENANCE
- Check all fittings are tight before each use.
- Lubricate all moving parts at regular intervals.
- Always keep the press clean, dry, and protected from harsh conditions.
- Should you need to replace the oil ensure the piston is fully retracted. An excess of oil will render the press inoperative.
- Use only appropriate hydraulic jack oil. DO NOT use brake fluid. Contact your local dealer for details.
- Bleed the system to remove any air.
SERVICE & REPAIR:
Any Hydraulic Workshop Press found damaged in any way, or found to be worn or operating abnormally should be removed from service until repaired by an authorized service agent. Owners and/or operators should be aware that repair of this product may require specialized equipment and knowledge. Only authorized parts, labels and decals shall be used on this equipment. An annual inspection of the Hydraulic workshop press is recommended and can be made by an authorized repair facility to ensure that your equipment is in optimum condition and that the equipment has the correct decals and safety labels specified by the manufacturer.
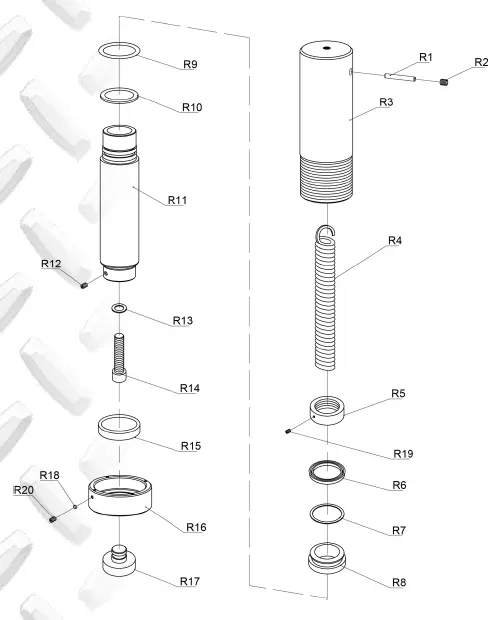
PARTS DIAGRAM
PARTS LIST:
| Part # | Description | QTY | Part # | Description | QTY | |
| 1 | Screw | 8 | 46 | Support Piece | 2 | |
| 2 | Spring | 8 | 47 | Handle Sleeve | 1 | |
| 3 | Ball | 8 | 48 | Foot Pedal Assembly | 1 | |
| 4 | Heel Block Assembly | 2 | 49 | Bolt | 1 | |
| 5 | Screw | 8 | 50 | Bolt | 3 | |
| 6 | Working Table | 1 | 51 | Bolt | 1 | |
| 7 | Circlip | 8 | 52 | Pump Cover | 1 | |
| 8 | Pin | 4 | 53 | Screw | 4 | |
| 9 | Bolt | 12 | 54 | Washer | 4 | |
| 10 | Support Bar | 4 | 55 | Pump Assembly | 1 | |
| 11 | Nut | 1 | 56 | Screw | 4 | |
| 12 | Base Section | 2 | 57 | Handle | 1 | |
| 13 | Washer | 20 | 58 | Screw | 2 | |
| 14 | Lock washer | 15 | 59 | Bolt | 2 | |
| 15 | Nut | 15 | 60 | Nut | 4 | |
| 16 | Bolt | 4 | 61 | Flat Washer | 4 | |
| 17 | Spring | 1 | 62 | Circlip | 8 | |
| 18 | Ram Mounting Plate Assembly | 1 | 63 | Roller Pin | 2 | |
| 19 | Screw | 4 | 64 | Small Roller | 1 | |
| 20 | Ram Assembly | 1 | 65 | Screw | 4 | |
| 21 | Frame Assembly | 1 | 66 | Cover | 1 | |
| 22 | Roller | 4 | 67 | Cover | 1 | |
| 23 | Circlip | 4 | 68 | Grid Guard | 1 | |
| 24 | Square Block | 2 | 69 | Roller | 1 | |
| 25 | Spring | 4 | 70 | Cover | 1 | |
| 26 | Bolt | 4 | 71 | Cover | 1 | |
| 27 | Hose2 | 1 | 72 | Cable | 1 | |
| 28 | O-ring | 4 | 73 | Cable Sleeve | 3 | |
| 29 | Elbow | 2 | 74 | Bushing | 4 | |
| 30 | Nut | 4 | 75 | Tube | 2 | |
| 31 | Lock Washer | 3 | 76 | Lifting Beam | 2 | |
| 32 | Washer | 3 | 77 | Winch Assembly | 1 | |
| 33 | Joint Seat | 1 | 78 | Bolt | 3 | |
| 34 | Screw | 1 | 79 | Mounting Plate | 1 | |
| 35 | Joint | 1 | 80 | Circlip | 4 | |
| 36 | Nut | 1 | 81 | Roller Pin | 2 | |
| 37 | Nylon ring | 1 | 82 | Big Roller | 2 | |
| 38 | Gauge Fitting | 1 | 83 | Cover | 2 | |
| 39 | Pressure Gauge | 1 | 84 | Cover | 2 | |
| 40 | Handle Tube | 1 | 85 | Nut | 4 | |
| 41 | Hose | 1 | 86 | Screw | 4 | |
| 42 | Nut | 4 | 87 | Lock Washer | 4 | |
| 43 | Connecting Rod | 2 | 88 | Flat Washer | 4 | |
| 44 | Bushing | 1 | 89 | Bracket (left) | 1 | |
| 45 | Connecting Tube | 2 | 90 | Bracket (right) | 1 |
PUMP PARTS DIAGRAM
| Part # | Description | QTY |
| P1 | Handle Socket | 1 |
| P2 | Pin | 3 |
| P3 | Connecting Rod | 1 |
| P4 | Big Piston | 1 |
| P5 | Small Piston | 1 |
| P6 | Seal Ring | 1 |
| P7 | O-ring | 1 |
| P8 | Circlip | 1 |
| P9 | Seal Ring | 1 |
| P10 | Piston Seat | 1 |
| P11 | O-ring | 1 |
| P12 | Copper Washer | 1 |
| P13 | Steel Ball | 3 |
| P14 | Steel Ball | 1 |
| P15 | Ball seat | 1 |
| P16 | Spring | 1 |
| P17 | Screw | 1 |
| P18 | O-ring | 1 |
| P19 | Screw | 1 |
| P20 | Dust Cap | 1 |
| P21 | Bolt | 1 |
| P22 | Nut | 1 |
| P23 | U-limit Ring | 2 |
| P24 | Lock washer | 2 |
| P25 | Long Release Valve | 1 |
| P26 | O-ring | 2 |
| P27 | Steel Ball | 1 |
| P28 | Release Valve Seat | 1 |
| P29 | Washer | 1 |
| P30 | Pump Assembly | 1 |
| P31 | Short release valve | 1 |
| P32 | Air Venting Screw | 1 |
| P33 | Spring | 2 |
| P34 | Washer | 2 |
| P35 | Screw | 2 |
| P36 | Split Pin | 3 |
| P37 | Screw | 2 |
| P38 | Steel Ball | 3 |
| P39 | Seal Kit | 1 |
RAM PARTS DIAGRAM
| Part # | Description | QTY |
| P1 | Handle Socket | 1 |
| P2 | Pin | 3 |
| P3 | Connecting Rod | 1 |
| P4 | Big Piston | 1 |
| P5 | Small Piston | 1 |
| P6 | Seal Ring | 1 |
| P7 | O-ring | 1 |
| P8 | Circlip | 1 |
| P9 | Seal Ring | 1 |
| P10 | Piston Seat | 1 |
| P11 | O-ring | 1 |
| P12 | Copper Washer | 1 |
| P13 | Steel Ball | 3 |
| P14 | Steel Ball | 1 |
| P15 | Ball seat | 1 |
| P16 | Spring | 1 |
| P17 | Screw | 1 |
| P18 | O-ring | 1 |
| P19 | Screw | 1 |
| P20 | Dust Cap | 1 |
WARRANTY
Borum Industrial products have been carefully tested and inspected before shipment and are guaranteed to be free from defective materials and workmanship for a period of 12 months from the date of purchase except where tools are hired out when the guarantee period is ninety days from the date of purchase.
Should this piece of equipment develop any fault, please return the complete tool to your nearest authorized warranty repair agent or contact TQB Brands Pty Ltd Warranty team – [email protected]
If upon inspection it is found that the fault occurring is due to defective materials or workmanship, repairs will be carried out free of charge. This guarantee does not apply to normal wear and tear, nor does it cover any damage caused by misuse, careless or unsafe handling, alterations, accident, or repairs attempted or made by any person other than the authorized TQB Brands Pty Ltd repair agent.
This guarantee applies in lieu of any other guarantee expressed or implied and variations of its terms are not authorized.
Your TQB Brands Pty Ltd guarantee is not effective unless you can produce upon request a dated receipt or invoice to verify your proof of purchase within the 12month period.
Consumer Guarantee
Our goods come with a guarantee that cannot be excluded under the Australian Consumer Law. You are entitled to a replacement or refund for a major failure and compensation for any other reasonably foreseeable loss or damage. You are also entitled to have the goods repaired or replaced if the goods fail to be of acceptable quality and the failure does not amount to a major failure.
All images and illustrations shown are for reference purposes only. All information, specifications and illustrations in this manual are based on the latest information available at the time of publication and are subject to change without notice. The information in this manual is periodically revised to ensure the latest information is included. Download the latest version of this manual and other related technical documentation from www.tqbbrands.com.au


