
HARVEST TEC 500A1 Moisture Sensor Kit

Safety
Carefully read all safety signs in this manual and on the moisture sensor kit before use. Keep signs clean and clear of obstruction to view. Replace missing or damaged safety signs. Replacement signs are available from your local authorized dealer. See your installation manual under the replacement parts section for the correct part numbers.
Keep your moisture sensor kit in proper working condition. Unauthorized modifications to the moisture sensor kit may impair the function and/or safety of the machine.
Carefully read and understand all safety signs before installing or servicing.
OPERATION OF 500A1 MOISTURE SENSOR KIT
Introduction and Requirements
Thank you for purchasing a 500A1 Moisture Sensor Kit and congratulations. The 500A1 Moisture Sensor Kit is designed to work with any AGCO 2150-2190 or Challenger LB33B-LB44B large square balers Model Year 2008 and newer. If you do not have the AGCO Bale Chute Scale option you will need the parts listed below:
AGCO part numbers:
- 700733748 Square Baler Module (SBM)
- 700733750 Wire Harness (only needed on 2008-2011 Balers)
The Square Baler Module (SBM) and the Square Baler Controller (SBC) must run on version 3.0 or higher. Please consult the Baler Operation Manual for more information.
For instructions on How to Mount the 500A1 to the Baler please refer to the 500A1 Installation Manual.
Baler Monitor Setup
System Setup
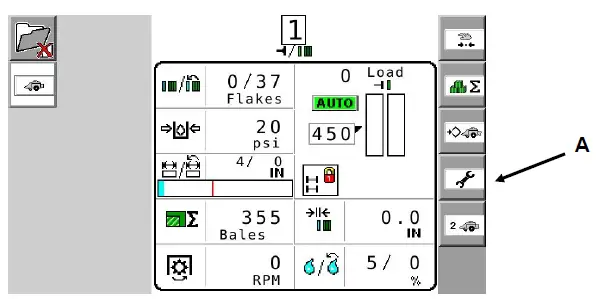
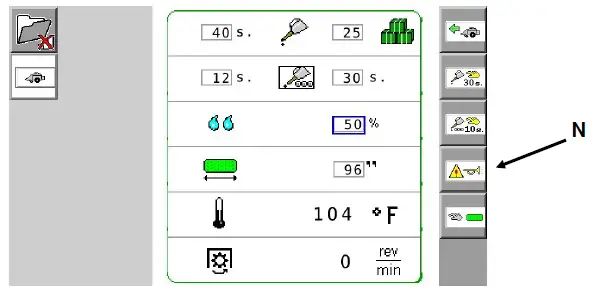
- To view moisture from the 500A1 Moisture Sensor begin setup at the main baler screen. Select the WRENCH icon (arrow A) which is the fourth icon down on the right side of the screen-the right selection menu.

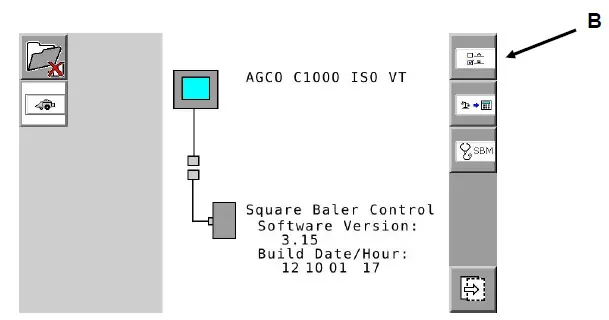
- The service screen displayed below should appear. Press the A B icon (arrow B) located at the top right of the selection menu.

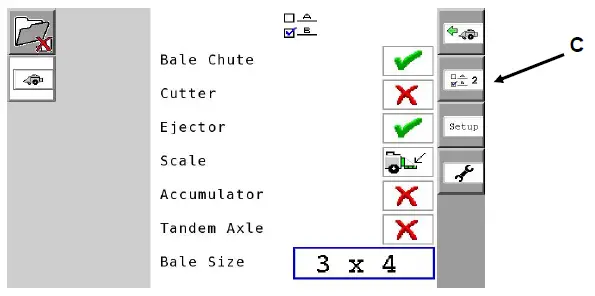
- The A B screen will appear. Next select the A B 2 (arrow C) icon which is the second from the top on the far right selection menu.

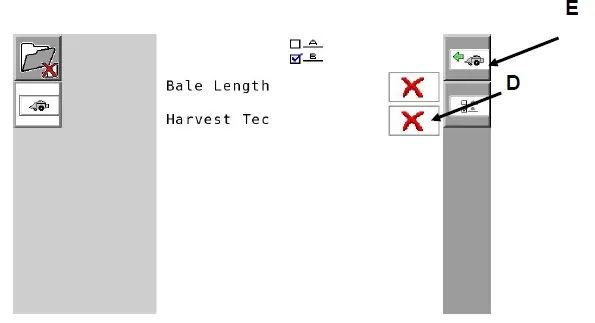
- The A B 2 screen will appear. The Harvest Tec On/Off selection icon can now be selected. To turn the Harvest Tec Moisture Sensor On (signified by a green check mark) or Off
(signified by a red X) navigate to the box and select by pressing On/Off (arrow D). Once the Harvest Tec Moisture Sensor has been turned On/Off you can navigate back to the main baler work screen by pressing the BALER (arrow E) icon on the top right of the selection menu.
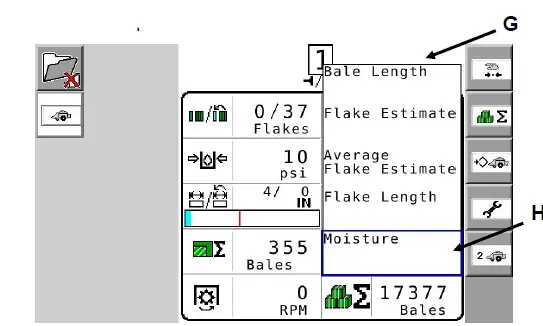
- The main baler work screen will appear. Select the container or option (arrow F) where you have positioned it on this screen to view and adjust moisture. Note: This can be done on the primary or secondary baler work screen. The screen has been or can be customized for viewing containers or options as you would like and as guided in the baler manual.

- Once the user has selected the menu option or container they would like to change, a drop down list (arrow G) will appear. The Moisture option (arrow H) should be at the bottom of the drop down container or option selection list.

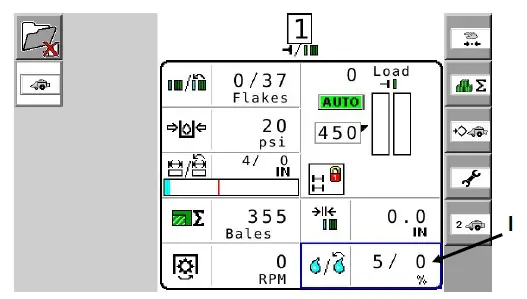
- Select the desired moisture and it will appear on the baler work screen as pictured below. The two values indicated in the moisture option are as follows: current moisture / last bale average moisture (arrow I).


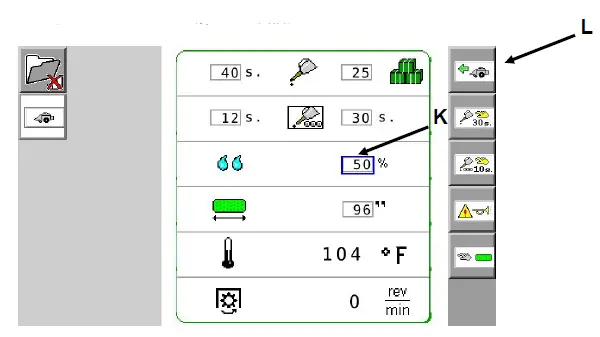
To Adjust the Moisture Alarm
- From the main baler screen, select the third icon down the right selection menu that shows a diamond beside a baler (arrow J).

- To adjust the moisture alarm set point select the box option to the right of the moisture droplets (arrow K) and adjust to the desired moisture limit. To return to the baler work screen, press the baler icon at the top right of the selection menu (arrow L).
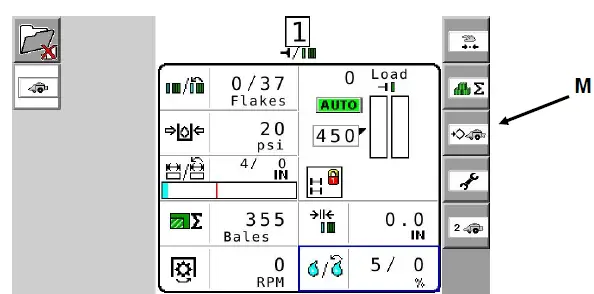
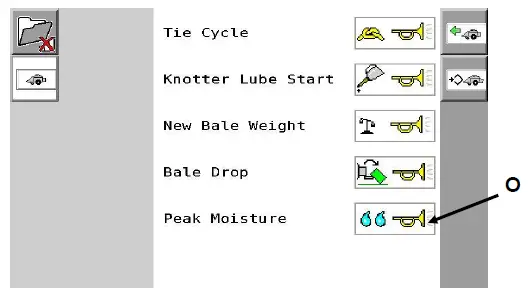
Option to turn Off/On all Alarms or Beeps
- 1. From the main baler work screen select the third icon down the right selection menu that shows a diamond beside a baler (arrow M).

- Select the fourth icon down on the right selection menu showing a bugle beside an alarm icon (arrow M).

- The alarm screen should now be displayed. All alarms can be silenced before they are ever heard. This can be done by selecting the Peak Moisture icon (arrow O) and turning the alarm On/Off. To return to the baler work screen, press the baler icon located at the top right of the selection menu.

Please refer to the baler service manual for software updates.
PARTS BREAKDOWN
Controls and Harnesses 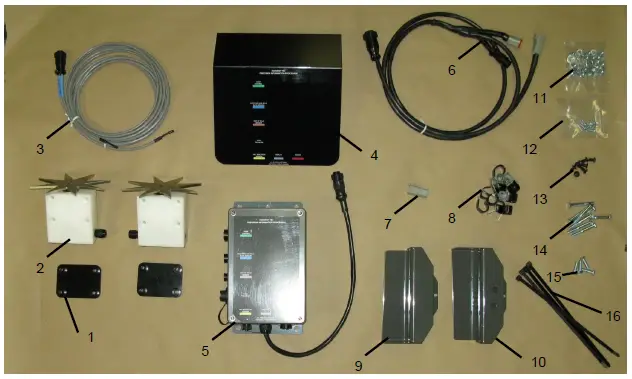
| No. | Description | Part no. | Qty | No. | Description | Qty |
| 1 | Star wheel spacer | 001-6707E | 2 | 11 | 5/16” nuts | 22 |
| 2 | Star wheels | 006-4641 | 2 | 11 | 5/16” lock washers | 14 |
| 3 | Moisture harness | 006-4640E2 | 1 | 11 | 5/16” flat washer | 4 |
| 4 | PIP cover | 001-5650X | 1 | 12 | 10/24 x 5/8” PHS | 8 |
| 5 | Precision Information Processor (PIP) | 006-5671LS2 | 1 | 12 | 10/24 lock washers | 8 |
| 6 | Comm. harness | 006-5650J | 1 | 13 | 5/16” x 1/2″ BHCS | 8 |
| 7 | Terminating resistor | 006-5650JT | 1 | 14 | 5/16” x 2-1/4” hex bolt | 8 |
| 8 | Wire clips | 008-9018 | 9 | 15 | 5/16 x 1” hex bolt | 4 |
| 9 | Twine diverter | 001-4645H | 1 | 16 | 12” cable ties | 5 |
| 10 | Twine diverter | 001-4644H | 1 | |||
| NP | Terminating resistor | 006-5650Z | 1 |
Star Wheels Sensors 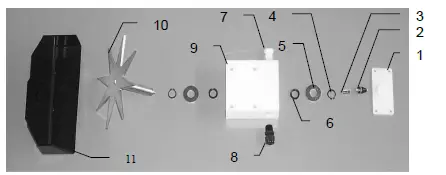
| Ref | Description | Part# | Qty | Ref | Description | Part# | Qty |
| 1. | Block cover | 006-4641B | 2 | 9. | Star wheel block | 006-4641A | 2 |
| 2. | Electronic swivel | 006-4642A | 2 | 10. | Star wheel sensor | 030-4641C | 2 |
| 3. | Swivel insert | w/ Ref # 10 | 2 | 11. | Twine guard-left | 001-4645 | 1 |
| 4. | Snap ring (per side) | 006-4641K | 2 | Twine guard-right (prox) | 001-4644 | 1 | |
| 5. | Washer (per side) | w/006-4641K | 2 | Twine guard-left for Agco | 001-4645H | 1 | |
| 6. | Dust seal (per side) | w/006-4641K | 2 | Twine guard-Right for Agco | 001-4644H | 1 | |
| 7. | Plug fitting | 003-F38 | 2 | 1-10 | Star wheel assembly | 030-4641 | 2 |
| 8. | Wiring grommet | 008-0821A | 2 | 12. | Spacer plate for Agco | 001-6707E | 2 |
COMMON QUESTIONS
How do I turn the system on/off? Turn the key in the tractor to the on position. The 500A1starts when the baler VT is started. The moisture will display once crop has been fed into the baler.
The moisture content displays “0%” or “HIGH” all the time.
When the moisture content display does not change frequently while bailing, there is likely a faulty star wheel connection. One of the first places to check is inside the white star wheel block. Check to see if the electronic swivel is in the star wheel shaft and check to see that the star wheel shaft is not working out of the block.
Also check star wheel wires and connections to see if there is a continuity or grounding problem.
Another possible cause could be dirt in the terminating resistor on the side of the PIP. Wipe clean and use dielectric grease. Or replace it.
If there is a communication failure with the CAN
(Controlled Area Network) the error message HARVEST TEC NOT DETECTED will display on the screen.
Should the battery connections be removed before jump-starting or charging a battery? Yes. Anytime the tractor will have voltage going up rapidly the connections should be removed.
Can the Harvest Tec 500A1 be updated for preservative or a tagger?
Yes. Please ask your Dealer and/or your Harvest Tec representative for more details. Listed below are compatible attachments.
Add Preservative Application:
| HT5A14518B | Standard | 2150-2190 |
| HT5A14519B | Cutter | 2150-2190 |
| HT5A14527B | Packer | 2150-2190 |
| HT5A14530B | 2170 XD with | Cutter |
TROUBLESHOOTING CHECKS
| PROBLEM | POSSIBLE CAUSE | SOLUTION |
| Moisture reading errors (high or zero) | Wire disconnected or bad connection between star wheels | Reconnect wire |
| Low power supply to PIP | Check voltage at box (min of 12 volts required). See diagnostics section of manual. | |
| Wet hay over 75% moisture | ||
| Ground contact with one or both star wheels and baler-mounted processor. | Reconnect | |
| Short in wire between star wheels and PIP. | Replace wire. | |
| Moisture readings erratic | Test bales with hand tester to verify that cab monitor has more variation than hand tester. | |
| Check all wiring connections for corrosion or poor contact. | Apply dielectric grease to all connections. | |
| Check power supply at tractor. Voltage should be constant between 12 and 14 volts. | Install voltage surge protection on tractor alternator. | |
| Moisture alarm constantly sounding | Crop moisture too high. | Stop baling. |
| Peak moisture set too low. | See section on moisture alarm adjustments. |
For questions regarding the installation of hardware please contact:
HARVEST TEC, LLC.
P.O. BOX 63
2821 HARVEY STREET
HUDSON, WI 54016
PHONE: 715-386-9100
1-800-635-7468
FAX: 715-381-1792
Email: [email protected]


