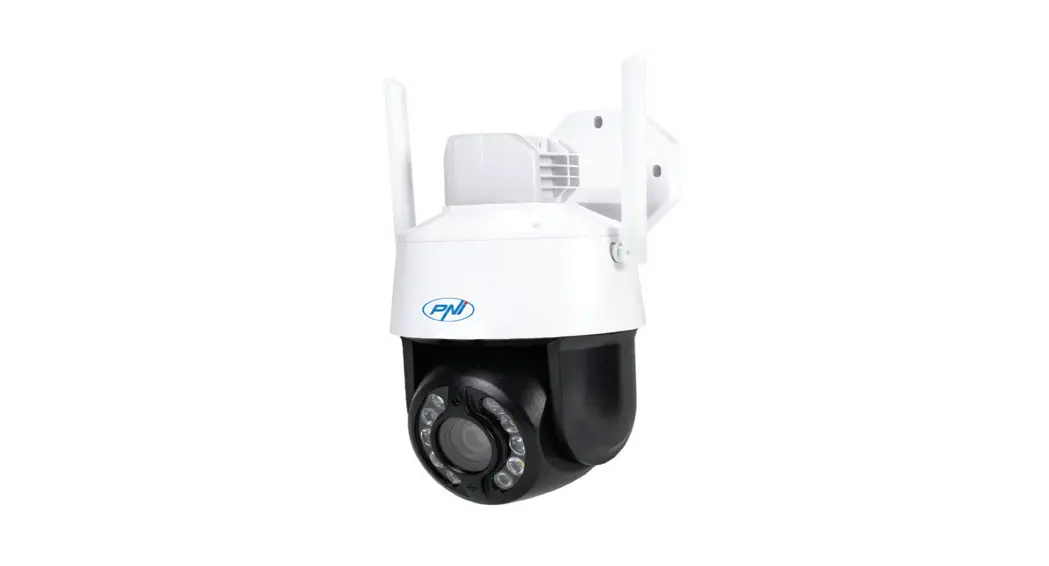
![]() PNI House IP575
PNI House IP575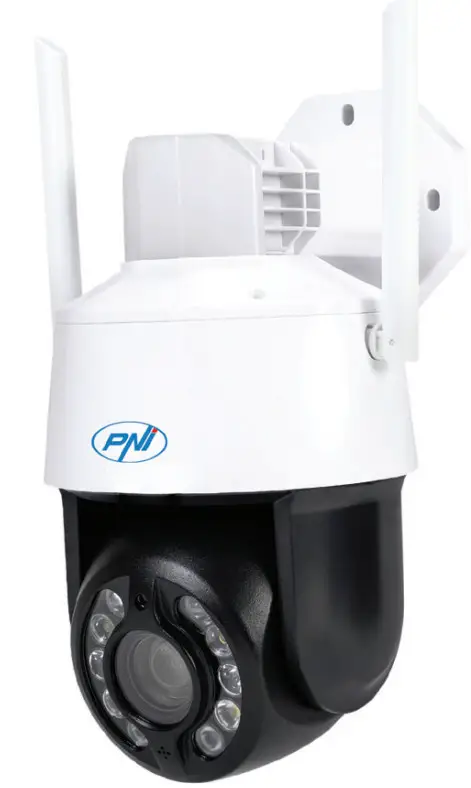
Technical specifications
| Sensors | 1/2.7” SC5335P CMOS |
| Chipset | XM550AI |
| Sensor resolution | 5MP |
| Video resolution | Main stream: 5MP 2592×1944@15fps 4MP 2560×1440@20fps 2MP 1920×1080@20fps; Second stream: 800×448@25fps |
| Shutter | 1/25s ~ 1/100000s |
| WDR | Support D-WDR |
| DNR | 2D/3D-DNR |
| Optical zoom | 20X |
| Lens | 4.7-94mm |
| Minimum illumination LED | 0.01Lux @(F1.6,AGC ON), 0 Lux with IR |
| LED | 4 x IR LED, 4 x White LED, 2 x Laser LED |
| IR distance | Up to 150 meters |
| Video compression | H.265X (H.264+/H.264 compatible) |
| Video format | AVI |
| Network interface | RJ45 |
| Network protocols | TCP/IP, UDP, DHCP, NTP, RTSP, PPPoE, DDNS, SMTP, FTP |
| Wireless frequency | 2.4GHz |
| WiFi transmission power | 100mW |
| Onvif | Yes, V16.12 and newer |
| Motion detection | Support |
| Face detection | Support |
| Human detection | Support |
| Waterproof | IP65 |
| Power voltage | DC12V/2A |
| Operating temperature | -26°C ~ +80°C |
Control from the ICSee application
Adding the camera to the application
- Install the ICSee application by accessing Google Play or the App Store or by scanning the QR code below:


https://play.google.com/store/apps/details?id=com.xm.csee&hl=en&gl=US&pli=1 https://apps.apple.com/us/app/icsee/id1130153523 - Create an account in the application or log in if you already have one.
- Activate the GPS Location function in your phone.
- Power the camera with the power supply adapter in the package. You will immediately hear the message “System starting up. Wait to be configured”. If you do not hear this message, reset the camera by long pressing the Reset button on the motherboard, next to the micro SD card slot.
- In the application, press the + icon to add your camera.
- Select “WiFi Camera”.
- Select the WiFi network you want to connect the camera to and add the network password. Note: For the first setup, position the camera and phone as close as possible to the WiFi router. Both devices must be connected to the same WiFi network.
- Press “Confirm”, then “Next”.
- A QR code appears on the phone screen. Position the phone in front of the camera lens. Wait for the connection. At the end, you will hear the connection confirmation message.
- Choose a password for the camera.
- Press “Confirm”.
- Choose a name for your camera.
- Choose the recording mode: continuous or only in case of an alarm.
- Press “Next” and “Done” to complete the procedure.


Note: If the procedure fails, reset the camera and repeat the steps above.
Main interface
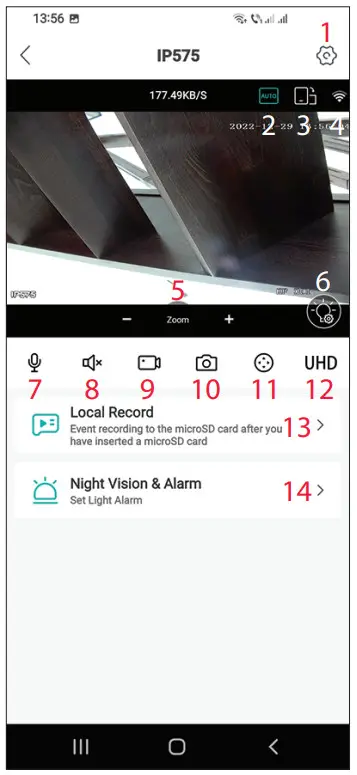
- Camera settings menu
- Image display mode
- Go to full-screen mode
- WiFi signal level
- Zoom in / Zoom out
- LED settings
- Microphone. Press to talk
- Speaker. Press to listen
- Start recording. The files will be saved in the phone’s memory
- Screenshot
- Camera rotation (PTZ)
- Display resolution: UHD or SD
- Search for recordings saved on the micro SD card
- LED settings
Camera presentation
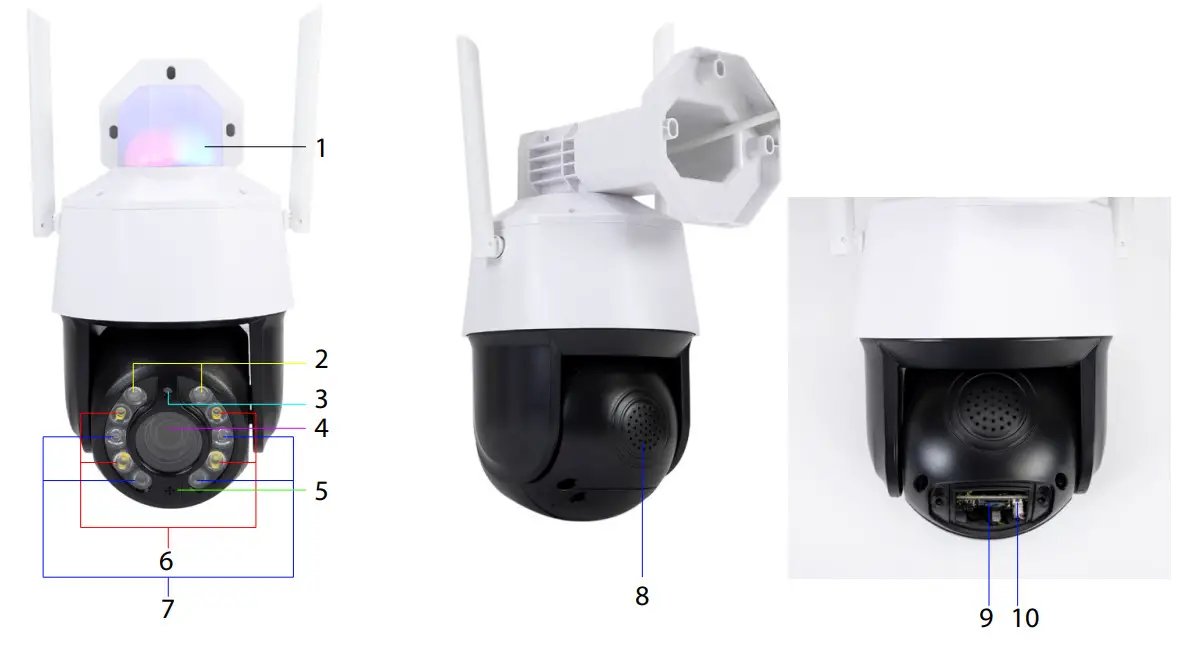
| 1. Alarm LEDs (red/blue) 2. Laser LEDs 3. Light sensor 4. Lens 5. Microphone | 6. White LEDs 7. IR LEDs 8. Speaker 9. Micro SD card slot 10. Reset button |
LED operating mode
Alarm LEDs (red / blue)
The two LEDs light up alternatively when the camera speaker is activated. For example, when in the application you press the microphone button to talk to the person in front of the surveillance camera.
White, IR and Laser LEDs
In the application, press “Night Vision & Alarm” to set the operation mode of the LEDs.
Full color: the 4 white LEDs light up
Infrared Vision: the 4 IR LEDs light up
Dual Light Alert: The Laser LEDs light up when the optical zoom is greater than 9X. Otherwise, only the IR LEDs light up. In Dual Light mode, the image is in color only when the camera detects human presence. Otherwise, the image is black/white as in Infrared mode.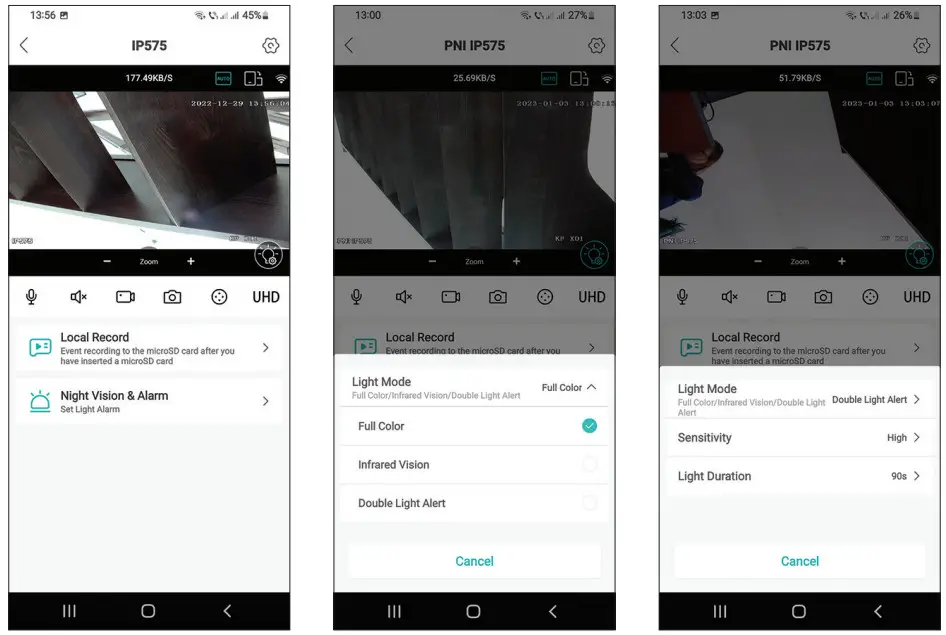 The PNI House IP575 surveillance camera can be used independently (standalone) or can be connected to an NVR.
The camera can be controlled remotely from the phone through the ICSee or XMEye application or from the computer through the VMS application which allows, among others, to enable/disable the motion detection, human detection and face detection functions (only works when you connect the camera to an XM NVR).
Note: Due to the numerous updates of the applications, there may be some differences compared to the images or content presented in this manual.
Scan the QR code below to download the VMS Lite application: https://cdn.mypni.com/public/Software/11362/vms_lite-2021-11-22.zip
Simplified EU declaration of conformity
SC ONLINESHOP SRL declares that the PNI House IP575 video surveillance camera complies with RED Directive 2014/53/EU. The full text of the EU declaration of conformity is available at the following internet address:
https://www.mypni.eu/products/8978/download/certifications![]()


