![]() Multi-Function LED RGBW Controller
Multi-Function LED RGBW Controller
Instructions Manuals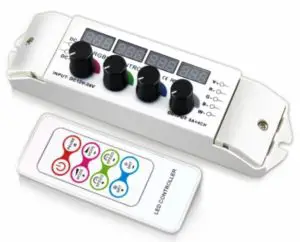
![]()
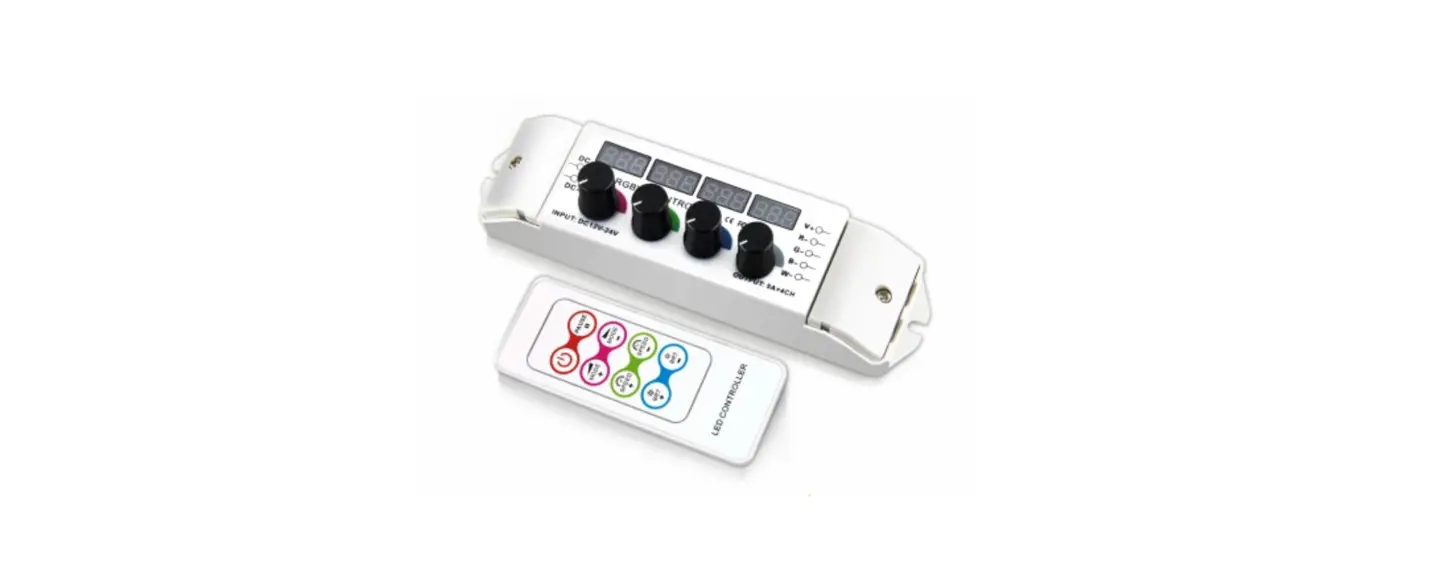
This 4 channel rotary controller is a universal high-performance dimmer designed to control RGBW LEDs. It utilizes 7.2 kHz high-frequency PWM dimming technology for flicker-free use on camera. It provides an industry-standard common anode constant voltage output. It can control our FlexLED tape, FlexLED modules, and much more low voltage LED lighting products. It comes with a very handy RF remote control for playback, brightness, and on/off controls. It also has an onboard digital readout which provides accurate, repeatable output levels.
FUNCTION & FEATURES
- Input voltage equals output voltage. Use with constant voltage 12-24VDC power supplies.
- 37 Colour changing modes including strobe, color fade, etc. RGBW 4096 greyscale levels for smooth changes.
- The four readouts indicate brightness levels, modes, and speed settings.
- Four Rotary knobs for dimming and color control provide precision accuracy.
- Save your custom colors and playback via the remote.
- Over-current protection and short circuit protection.
- One unit can be combined with our power amplifier to control virtually limitless amounts of LED.
- Display times out after ~3 minutes. To return, just turn in any potentiometer.
SAFETY WARNINGS
- To ensure the safe operation of this product, please read the entire user manual before energizing.
- Do not install the product near any strong magnetic field or in a high voltage area.
- Ensure all connections to the input and output terminals are secure before energizing.
- Please ensure the dimmer is installed in a well-ventilated area and not next to any heat sources in order to ensure the unit does not overheat.
- The dimmer must be connected to a DC constant voltage power supply that is appropriate for use of the LED dimmer ratings as well as the ratings of the LED load on the output of the dimmer.
- Test all wiring connections with a continuity multimeter prior to energizing to ensure there are no short circuits.
- Do not open the dimmer for repairs. please contact Moss LED or your local distributor for any questions or concerns.
- Do not stack.
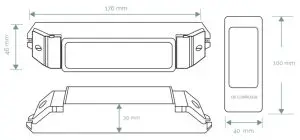
INSTALLATION & USAGE
Wiring Diagram:
- Power supply output must match LED strip voltage (ex. 24VDC power supply can only be used with 24VDC LED products)
- Only use constant voltage power supply & LED products.
- Use proper wire type and gauge that matches your power requirements (AWG 26-12)

Wiring Diagram for using Power Amplifier (4 channel rotary controller dimmer can share the same power supply with the power amplifier)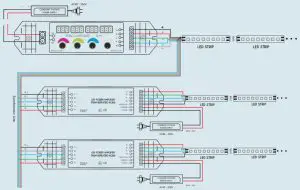
Operation Instructions
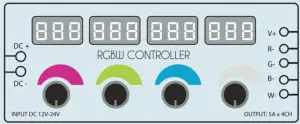
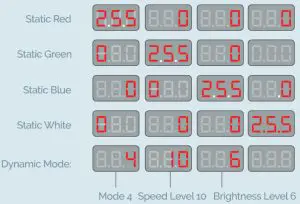
Four rotary knobs are able to individually control four LED channels. These channels can be Red, Green, Blue, White (RGBW) or any other type of constant voltage LED. When adjusting the knobs, the operation mode automatically changes to mode 1 and the readout above each rotary knob shows the output level of the respective channel. In effect mode, the readouts indicate current mode, speed, and brightness.
To select or change mode please see the Remote Control section.
Example of Mode 1:
When the controller is overloaded or short-circuited, the controller will automatically shut off all LED outputs. The LED display will change and show “ERR” on the corresponding display channel where the overload occurred as below:
The 8 buttons on remote controller are: ON/OFF | PAUSE | MODE+ | MODE- | SPEED+ | SPEED – |BRT+ | BRT –

REMOTE CONTROL ID LEARNING GUIDE:
Press and hold the ON / OFF button on the remote controller. When the light blinks, press the pause button on the remote control. When the light blinks again, the ID is set.
| SIGN | BUTTON | DESCRIPTION |
| ON/OFF | Turn on/off the controller Any button can start the controller in OFF status. | |
| PAUSE | Press to hold the current output levels. Press again to resume output levels changing. | |
| MODE + | Press to select the next mode. Hold for 3 seconds, when the LED flashes 3 times, the controller enters into cycle mode | |
| MODE – | Press to select the previous mode. Hold for 3 seconds, when the LED flashes 3 times the controller enters into cycle mode. | |
| SPEED + | Press to increase speed. There are 1-16 speed levels. Hold for 3 seconds, when the LED flashes 3 times, it indicates the speed of all modes has been reset to default. | |
| SPEED – | Press to decrease speed. There are 1-16 speed levels. Hold for 3 seconds, when the LED flashes 3 times, it indicates the speed of all modes has been reset to default. | |
| BRT + | Press to increase the brightness level. There are 16 different brightness levels. Hold for 3 seconds, when the LED flashes 3 times, it indicates the brightness of all modes have been reset to default | |
| BRT – | Press to decrease the brightness level. There are 16 different brightness levels. Hold for 3 seconds, when the LED flashes 3 times, it indicates the brightness of all modes has been reset to default. |
TABLES OF CHANGING MODE
| MODEL NO: | MODE | REMARK |
| 1 | DIY static color | Manual RGBW Adjustment |
| 2 | Static Red | Brightness Adjustable |
| 3 | Static Green | Brightness Adjustable |
| 4 | Static Blue | Brightness Adjustable |
| 5 | Static Yellow | Brightness Adjustable |
| 6 | Static Purple | Brightness Adjustable |
| 7 | Static Cyan | Brightness Adjustable |
| 8 | Static White | Brightness Adjustable |
| 9 | 3 Color skipping | Brightness, Speed Adjustable |
| 10 | 7 color skipping | Brightness, Speed Adjustable |
| 11 | White Strobe | Brightness, Speed Adjustable |
| 12 | RGBW Strobe | Brightness, Speed Adjustable |
| 13 | 7 Color Strobe | Brightness, Speed Adjustable |
| 14 | White Speed-Up Strobe | White Strobe Increasing |
| 15 | Red Fading | Brightness, Speed Adjustable |
| 16 | Green Fading | Brightness, Speed Adjustable |
| 17 | Blue Fading | Brightness, Speed Adjustable |
| 18 | Yellow Fading | Brightness, Speed Adjustable |
| 19 | Purple Fading | Brightness, Speed Adjustable |
| 20 | Cyan Fading | Brightness, Speed Adjustable |
| 21 | White Fading | Brightness, Speed Adjustable |
| 22 | RGB Fading | Brightness, Speed Adjustable |
| 23 | Red Green Smooth | Brightness, Speed Adjustable |
| 24 | Red Blue Smooth | Brightness, Speed Adjustable |
| 25 | Green Blue Smooth | Brightness, Speed Adjustable |
| 26 | Red Yellow Smooth | Brightness, Speed Adjustable |
| 27 | Green Cyan Smooth | Brightness, Speed Adjustable |
| 28 | Blue Purple Smooth | Brightness, Speed Adjustable |
| 29 | Red Purple Smooth | Brightness, Speed Adjustable |
| 30 | Green Yellow Smooth | Brightness, Speed Adjustable |
| 31 | Blue Cyan Smooth | Brightness, Speed Adjustable |
| 32 | Red White Smooth | Brightness, Speed Adjustable |
| 33 | Green White Smooth | Brightness, Speed Adjustable |
| 34 | Blue White Smooth | Brightness, Speed Adjustable |
| 35 | Yellow Purple Cyan Smooth | Brightness, Speed Adjustable |
| 36 | Full-Color Smooth | Brightness, Speed Adjustable |
| 37 | Cycle Mode | All Cycling (Repeats) |
TROUBLESHOOTING
| No Light | 1. No power from the outlet or power supply | 1. Check the outlet and power supply |
| 2. Reverse connection of power +/- | 2. Ensure + is connected to the positive wire and – is connected to the negative wire | |
| 3. Wrong or lose connection | 3. Ensure all terminals are securely fastened to the wires | |
| Wrong Color | 4. RGBW wrong wiring | 4. Re-wire RGBW |
| Brightness of the LED is not even | 5. Voltage drop; output wire is too long | 5. Reduce wire length, OR attach the wire to both ends of the LED, OR use a wire that is a thicker gauge. |
| 6. Voltage drop; the output wire is too thin | 6. Calculate the current and change to a thicker wire. | |
| 7. Power supply overloads (shuts down) | 7. Change to a large power supply | |
| 8. Controller overloads | 8. Add a power repeater where required | |
| Mode not change | 9. The speed is too low | 9. Press the SPEED + button to increase speed |
| Can’t be Remote Controlled | 10. The remote control is no longer functional | 10. Replace the battery |
| 11. The remote control is no longer functional | 11. Ensure you are within RF distance range |
WARRANTY
This product comes with it a 3-year warranty. If you notice a defect, please contact us immediately. This 3-year warranty does not cover the following cases:
- Any damage caused by improper operation.
- Any damage caused by wiring this controller to an improper power supply.
- Any damages caused by unauthorized removal, maintenance, modifying circuit or opening the chassis housing.
- Any damage due to physical impacts, or water damage.
- Any damage caused by natural disasters.
- Any damage caused by negligence, or usage in inappropriate locations due to the surrounding environment.
NOTES
Power Source Selection:
The power source must be a DC constant voltage between 12 ~ 24VDC. The power source must match the voltage of the LED strip. The power supply must be capable of supplying at least 20% power over the draw of the LED. For example, if your LED draws 100 watts, please use a power supply rated for 120 watts.
www.mossled.com
1.800.924.1585 -416.463.6677
[email protected]![]()
![]() WWW.MOSSLED.COM
WWW.MOSSLED.COM


