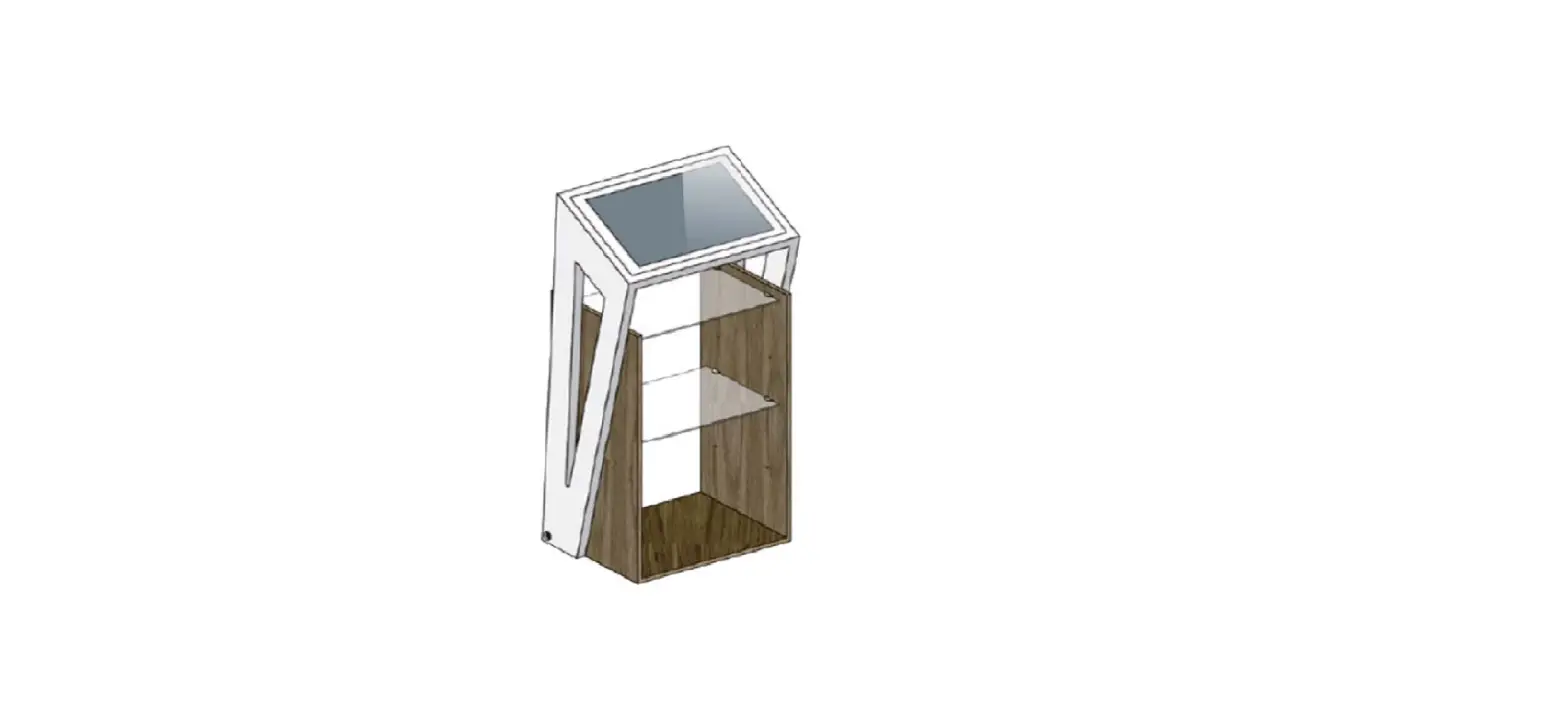
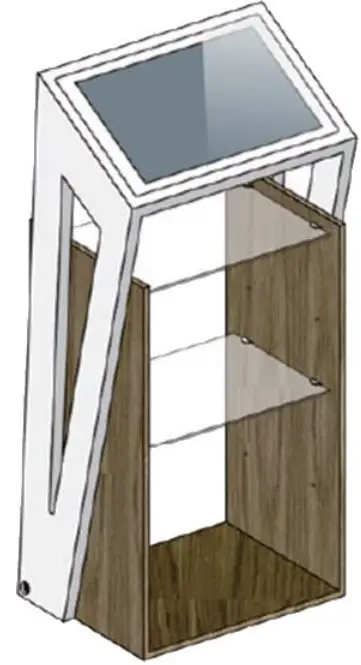
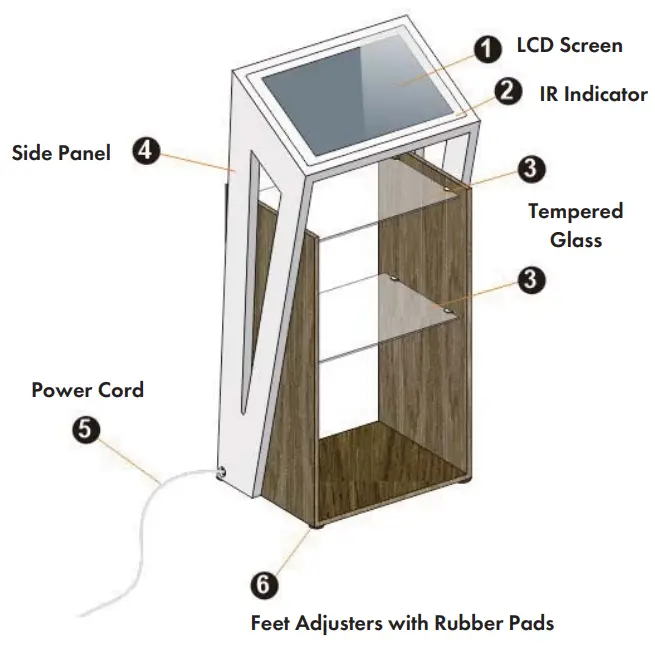
DISPLAYS2GO DM021TLW 21.5 Inch Touch Interactive Digital Kiosk
FEATURES
- Embedded with Android 11 smart operating system and unique UI design
- Supports USB mouse and keyboard
- Built-in Wi-Fi module high-capacity memory and high-capacity cache makes it easier to display 1080p HD videos
- High-quality LCD display with high brightness, high contrast, wide viewing angle, and no flicker.
- Multi-channel USB interfaces with HD media streaming
SAFETY WARNINGS AND PRECAUTIONS
Thank you for purchasing this product from Displays2go. We have considered the factors to ensure personal safety in product design and have tested rigorously at the factory. However, improper installation and use may result in electric shock and fire. In order to safely use, maximize performance of the unit and extend the life of the product, please read and follow all instructions carefully before using the product. Keep the instructions for future reference. We strongly recommend using a surge protector, or a power strip with internal circuit breaker to prevent damages to the digital signage.
Symbol Legends
- Warning: May cause personal injury or death
- The operation is prohibited
- Caution: May cause damage or property loss
- The operation must be executed
If any of the following occurs
- Power outage or instable voltage.
- Abnormal sound or smell from the unit.
- AC power cord is damaged.21.5
- Digital Signage is damaged due to drop, knock or impact.
- Any liquid or foreign matters fall into the enclosure.
 Turn off the Digital Signage immediately, pull out the plug from the power outlet, and ask the authorized personnel for maintenance.
If coal gas or other flammable gas leaks, do not pull out the plug of the LCD Digital Signage or other electrical appliances; instead, turn off the gas valve immediately, and open the doors and windows quickly.
WARNING
- Do not use power supply other than AC 110V, 60Hz.
- Cut off the power supply before connecting or disconnecting any cables.
- Do not place the Digital Signage on any instable positions, or else it may be damaged or cause fire.
- Do not place the Digital Signage in the positions such as:
- The environment subject to direct strong sunlight, moisture, extreme temperature or too much dust;
- The environment with flammable or explosive materials;
- The environment with flammable or corrosive gases;
- Do not use damaged or inappropriate power outlets, and ensure that the plugs and outlets contact properly.
- Do not let dust or metal deposits adhere to the plugs and outlets.
- Do not damage the power cords:
- Do not modify the power cords;
- Do not place heavy objects on the power cords;
- Keep the power cords away from heat source;
- Do not pull the cord to remove the plug.
- Do not connect too many plugs to one outlet in parallel, or else it may cause fire due to excessive power consumption.
- Do not approach the Digital Signage with open flame (e.g. a lighted candle), or else it may cause electric shock or fire.
- Do not put any sharp objects, metal or liquid into the vents or let them touch the signal terminals to avoid short circuit, product damage, and electric shock.
- The openings in the enclosure are designed for ventilation and cooling, to ensure long time reliable running of components inside the enclosure and prevent overheating. Do not block the openings while in use.
- Do not touch the plugs with wet fingers, or else it will cause electric shock.
- Do not use the Digital Signage in stormy weather, especially when there is lightning; instead, please disconnect the power and antenna plugs to avoid lightning strike.
- Do not disassemble the Digital Signage without permission, or else it may cause electric shock or fire. Please ask qualified technician for repair.
CAUTION
- Do not let children climb onto the Digital Signage.
- Keep the small parts away from children to prevent them from swallowing.
- If the Digital Signage won’t be used for a long time, please turn it off and pull out the power plug.
- To adjust the position of the Digital Signage, please disconnect all power cords and move slowly to avoid tip over.
- Do not scratch or knock the LCD with hard object, or twist and squeeze the LCD.
- Do not turn on the unit immediately when it is moved from a place with low temperature to high temperature, or else it will cause condensation and malfunction.
- Before cleaning the Digital Signage, please pull out the power plug; wipe with soft cloth; do not use industrial chemicals; prevent foreign matters from entering the machine. Improper cleaning (such as cleaning solution, water) may damage the product, erase the printed information, and even cause damage of the components if fluid flows in, resulting in machine failure.
- If the unit displays the same screen for a long time or the moving picture has fixed text or icon, it will leave ghosting on the screen and won’t disappear when the unit is turned off; it is normal and isn’t covered by the warranty.
- The power of the Digital Signage can be cut off by pulling out the plug.
- If the LCD screen ruptures and the liquid splashes on the skin, please rinse for 15 minutes with clean water immediately, and consult your doctor.
- To carry the Digital Signage with hands, please grab and hold the edges; do not apply pressure on the panel.
- Use the Digital Signage properly: Use in proper lighting conditions; insufficient lighting or exposure over a long time may impair your eyesight.
- When the plug or coupler is used as disconnection device, it should be easy to operate the device.
- Insert the plug into the outlet properly, or else it may cause sparks and fire.
- The technical specifications printed herein and on the packaging are subject to change without prior notice. The Manual may be slightly different from actual operation, and the latter is applicable.
This Manual is for reference only and is subject to change without prior notice.
If you have any questions regarding our products, please visit us at www.displays2go.com or contact Displays2go customer service at 844-221-3388. Scan QR code to visit product page.
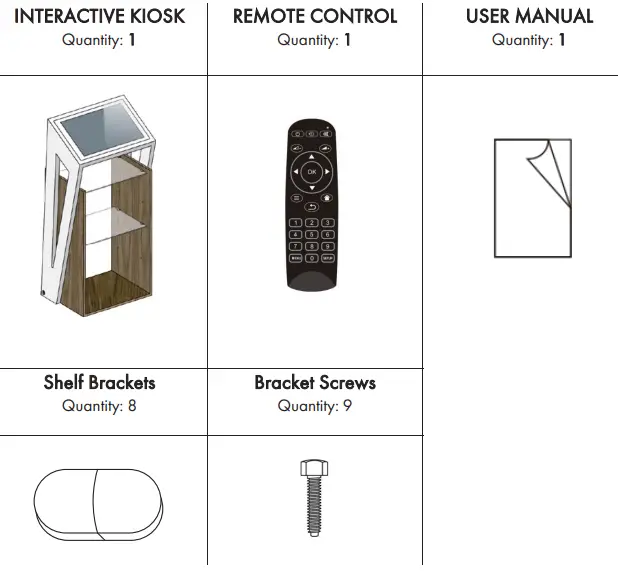
PACKING LIST
OPERATION
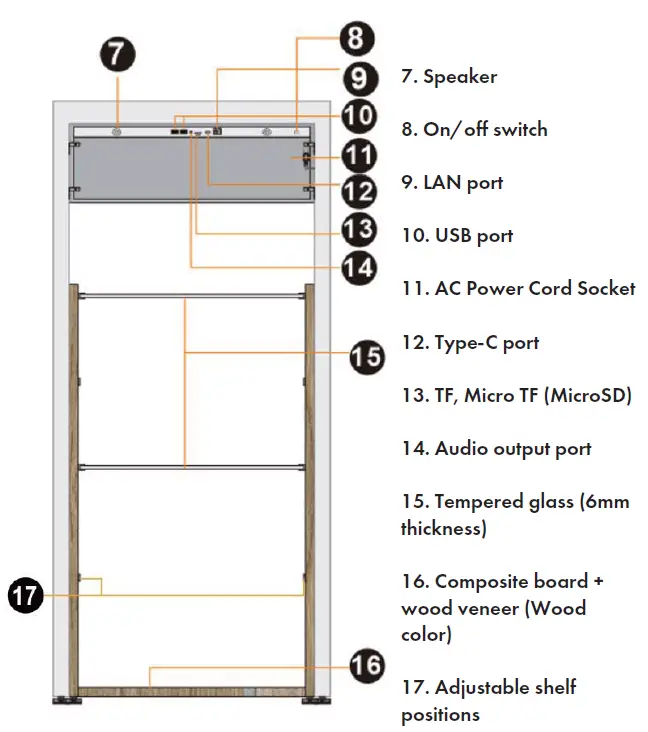
Interface Diagrams
CAUTION: Disconnect the power plug before assembling or disassembling the unit!
Power On/Off
- Turn on by inserting power cord into unit and connect to outlet. Then, flip power switch on the back of the unit to ON.
- To temporarily turn on and off, use the “ POEER” power button on the remote control.
- To shut down, flip the power switch on the back of the unit to OFF, then unplug the unit.
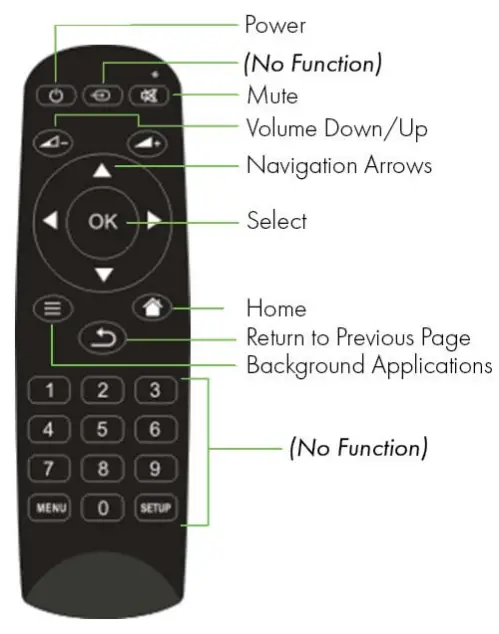
Remote Control of LCD Screen
Description of Buttons
Precautions
- Aim the remote control at the receiver window. Do not place any object between the remote control and the receiver window to avoid interference with the normal operation.
- Keep the remote control away from violent vibration. In addition, do not set or place the remote control in direct sunlight, or else the remote control may be deformed by heat.
- The remote control may be invalid when the receiver window of the unit is in direct sunlight or strong lighting; in this case, please adjust the angle of the lighting or the unit or approach the receiver window to use it.
- The distance of remote control will be shortened if the battery voltage is insufficient; in this case, please replace with new batteries; if the remote control won’t be used for a long time or the batteries are run out, please take out the batteries to avoid corrosion due to battery leakage, which will damage the remote control.
- Do not use batteries of different types or mix new batteries with old ones. Always replace the batteries in pairs.
- Do not put the batteries in fire, or charge or disassemble them, or charge, short circuit, disassemble, heat or burn used batteries. Please dispose of waste batteries in accordance with local environmental regulations. Do not expose the batteries in overheated environments such as sunlight and fire.
Settings
Once turned on, the unit automatically displays the home screen. This includes the App Drawer and the menu bar.
The App Drawer![]() shows all applications. From this menu, you can adjust local settings in the Settings app, connect to Wi-Fi and online accounts, launch the DiViEX app, and more.
shows all applications. From this menu, you can adjust local settings in the Settings app, connect to Wi-Fi and online accounts, launch the DiViEX app, and more.
Note: To return to a previous screen, click the Back on the remote control or the navigation bar at any time.
Connecting to Wi-Fi
- Click the App Drawer
 to display all applications, then click Settings.
 - Click Network Connection from the list of Settings.
- Select your Wi-Fi network and enter login credentials.
DiViEX Application
First, check that your device meets or exceeds the system requirements.
System Requirements
| CPU | RK3568 chip, quad-core Cortex-A55 |
| Operating System | Android 11.0 |
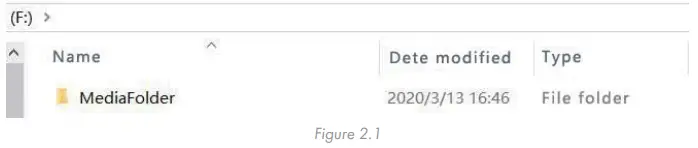
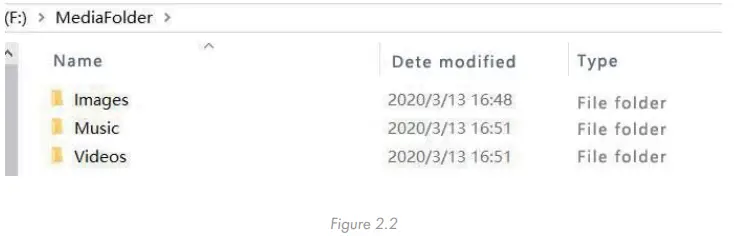
- Insert your USB drive to your computer. Create a new folder and name it “MediaFolder” (See Fig 2.1).

- In “MediaFolder,” create 3 subfolders and rename them: “Images”; “Videos”; “Music”.

- Copy the media files to be displayed into the coordinating folder.
Check that your desired imagery fits the requirements. (See table below.)
Supported File Formats
| Supported Image Files | JPG/JPEG/BMP/PNG/GIF |
| Supported Video Files | AVI, MPEG4, WMV, MKV, FLV, MP4, MOV |
| Supported Audio Files | MP3 |
- Safely eject the USB from your computer and insert into the Kiosk.
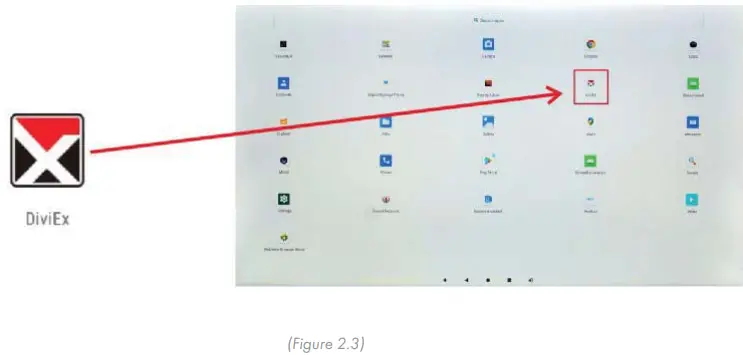
- Open the DiViEX App. (See Fig 2.3)

- DiViEX automatically copies over your media files from the USB. The status of the USB can be seen in the upper right corner. Once the copy is finished, press Play to display media. (Fig 2.4)

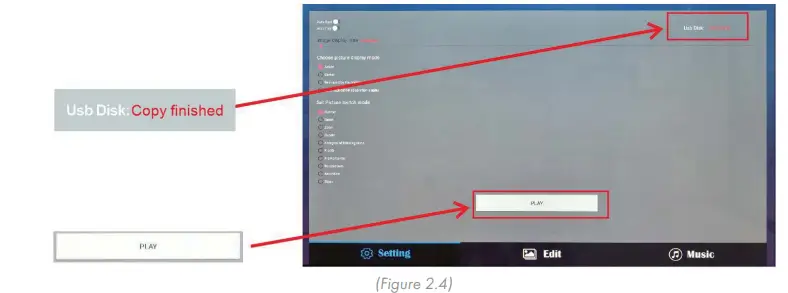
Note: The USB must remain inserted in the machine to display media.
DiViEx Slideshow Settings
- Set the time each picture is to be shown on the screen by dragging the bar to the desired time.
- Select how you would like the images to display. Select the desired transition effect between pictures:
- Auto Boot
- DiViEX APP will automatically open when the digital signage is turned on.
- Auto Play
- DiViEX APP will automatically play the slidshow when it is opened.
- Choose Picture display mode
- Check a fit option how you want the pictures to be displayed.
- Set Picture switch mode
- Choose an animation option to set the fade in and fade out effects.
- Auto Boot
Edit Picture
- This menu shows all editing functionality for your slideshow.
- This function shows all pictures, you can edit all pictures, and remove it.
Crop
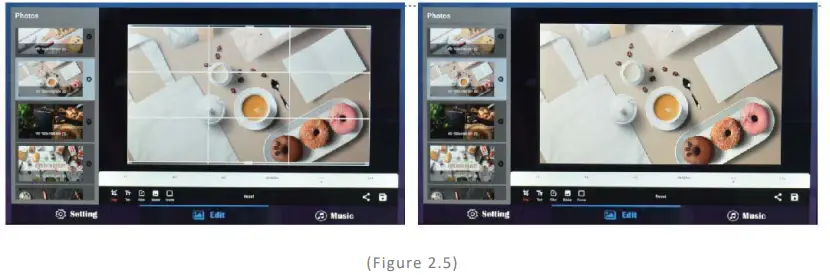
There are four corner handles and four border handles to crop the picture. Click and drag a handle to reshape the image to any size you need. You can also set aspect ratio such as 16:9, 4:3 and 1:1 for a picture in edit section. (Fig. 2.5)
Add Words and Themes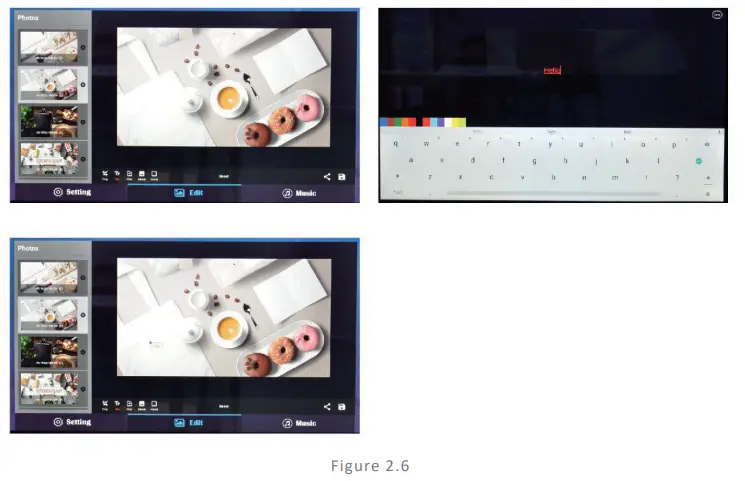
- You can write some words on your video. (Fig. 2.6)
Add Filters and Transition effects
- You can browse and try different filters in the filter gallery below the image.
Add Stickers and Frames
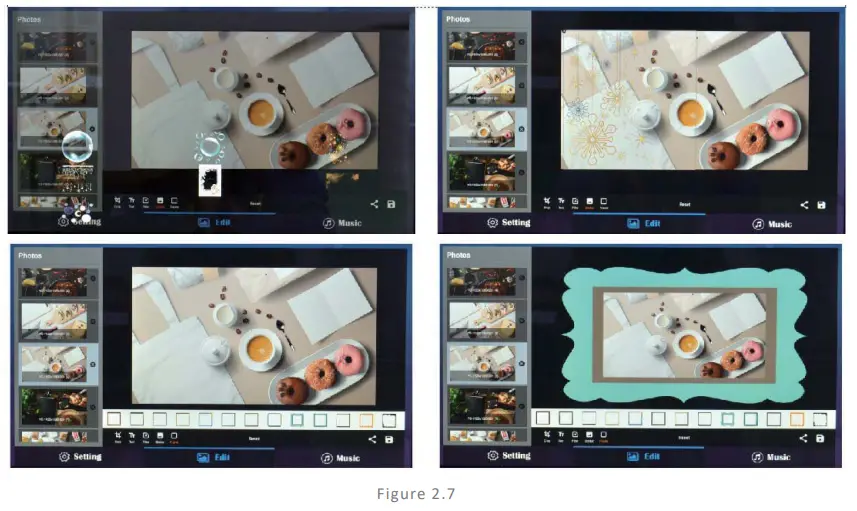
- Add stickers on your picture or video. Edit a picture to have border or frame overlay effects. (See Fig. 2.7)
Reset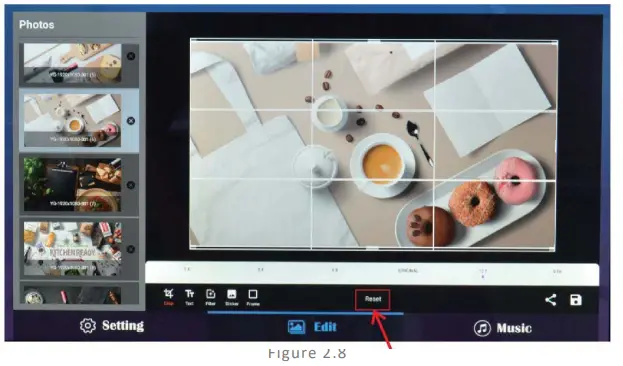
- Click “Reset” to remove all the editing you applied to the image. (See fig. 2.8)
Save ![]()
- Click the Save icon in the lower right corner save the edited image as a new image.
Share![]()
- After a picture has been edited, it can be saved and shared w/Friends and tagged on social media.
Image deletion![]()
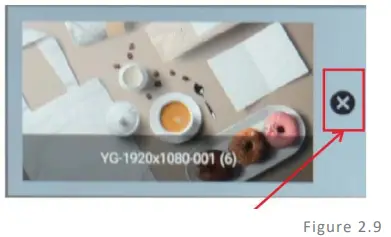
- Click the Delete icon next to image thumbnails to delete unwanted pictures. (See fig. 2.9)
Music
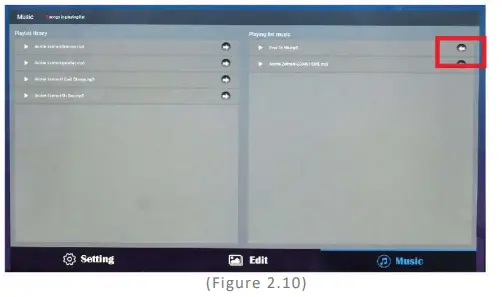
- The Playlist library lists all music files. (See fig. 2.10)
- To add songs from the playlist library to the playing list music, click the right arrow next to the song title.
- To remove the added music file from the playlist, click the left arrow in the playlist.
TECHNICAL SPECIFICATIONS
| PRODUCT | |
| Material | Wood composite board, steel, glass |
| Panel Type | 21.5″ BOE LCD |
| Display Area | 18.75”(W) x 10.54”(H) |
| Optimum Resolution | 1920 x1080 |
| Contrast Ratio | 1000:1 |
| Viewing Angles | 89/89 |
| Response Time | 12ms |
| Light Source | 89/89 |
| Brightness | LED |
| Pixel Pitch | 0.24795(H)X0.24795(V)mm |
| Display Colors | 16.7M (8bits-true) |
| Color Temp | Cold white |
| Aspect Ratio | 16:9 |
| Refresh Rate | 50/60HZ |
| Panel Surface Material | TFT |
| Touch | Yes, PCAP |
| Operating Time | 7x18hrs |
| Panel Life (hours) | 30,000 hrs |
| PLAYBACK SOFTWARE | |
| Operating System | Android 11.0 |
| Software | DiViEx |
| Player | Integrated in software |
| Drive Type | Integrated in software |
| External or Integrated | Integrated |
| Templates | YES |
| Maximum video decoding | 1080P |
| HTML5 | NO |
| IP Streaming | YES |
| Multi-Zone | YES |
| Day Parting | YES |
| Scheduling | YES |
| Drag & Drop Functionality | YES |
| Loops | YES |
| Remote Content Update | YES |
| Operating System | Android 11.0 |
| Software | DiViEx |
| Player | Integrated in software |
| Drive Type | Integrated in software |
| External or Integrated | Integrated |
| Templates | YES |
| MEDIA | |
| Video Format | AVI, MPEG4, WMV, MKV,FLV,MP4,MOV |
| Audio Format | MP3 |
| Image Format | JPG, JPEG, BMP, PNG, GIF |
| Video Input | NO |
| Internal Storage Capacity | 32GB |
| Speaker Amplifier | Output |
| CONNECTOR | |
| CPU | RK3568 |
| SD Slot | NO |
| Ethernet LAN | YES |
| Audio_IN | NO |
| USB | YES |
| HDMI Output | YES |
| VGA | NO |
| USB/SD/Micro SC/HDMI: list all | 2xUSB, 1xRJ45, 1xType-C, 1x TF, 1 x Micro TF Card port |
| CPU | RK3568 |
| POWER | |
| Voltage (in/out) | AC 100-240V |
| Consumption (Watts) | About 23W |
| Cord Length | 5.5 ft |
| Compliance Listed (on power source) | Power supply with UL listed |
| Voltage (in/out) | AC 100-240V |
| Consumption (Watts) | About 23W |
| Cord Length | 5.5 ft |
| Compliance Listed (on power source) | Power supply with UL listed |
| OPERATING CONDITIONS | |
| Temperature | Operating Temperature 32 – 104 degrees F Storage Temperature 68 – 140 Degrees F |
| Humidity | 10-80% |
| DIMENSIONS | |
| Screen | 21.5″ |
| Overall Unit | 24.2 x 16.9 x 52″ |
| WEIGHT | |
| N.W.(kgs) | 84 lbs |
| G.W.(kgs) | 112 lbs |
| PACKAGING | |
| Packing Size (mm) | 58.3 x 29.5 x 560 x 22″ |
| Weight (kgs) | 28.6 lbs |
| GENERAL | |
| Regulations / Compliance | FCC |
| Package Contents | Product, Instruction Manual, Remote control |
| Warranty | 1 year |
| UPC | Barcode |
TROUBLESHOOTING GUIDE
| ISSUE | PROBABLE CAUSE | SOLUTIONS |
| No Navigation bar on screen | The Navigation bar has been turned off. | In Settings, toggle Display Navigation to ON |
|
No Picture or Sound |
|
|
|
No Sound (Picture Is Working) |
|
|
|
No Picture (Sound Is Working) |
|
|
| Remote Control Not Working |
|
|
|
No Wi-Fi Signal |
|
Click the on/off icon in the upper right-hand corner to turn on Wi-Fi. “On” will appear on the upper left side Select your Wi-Fi network.
|
|
Parts Missing or Damaged |
|
|
|
Cannot Upload Content |
|
|
If all the potential solutions have been tested for a particular issue and problems have not been resolved, contact a customer service representative for guidance.
Contact Information
- Website: www.displays2go.com
- Phone: 844-221-3388
Cleaning and Maintenance
- Avoid strong vibration or impact on the product.
- Keep the product dry to avoid possible damage by moisture.
- Don’t place the product under direct sunlight which may shorten the service life of the screen.
- Clean screen and product by using a glass cleaner.
- If the product will not be used for a long time, pull out the power cord to prevent the internal short circuit or other potential dangers.
Names and Contents of Toxic and Hazardous Substances or Elements in the Product
| Part name | Toxic and hazardous substances or elements | |||||
| Pb | Hg | Cd | Cr6+ | PBB | PBDE | |
| Display | 0 | 0 | 0 | 0 | 0 | |
| Shell | 0 | 0 | 0 | 0 | x | x |
| Circuit board assembly * | 0 | 0 | 0 | 0 | 0 | |
| Wires | 0 | 0 | 0 | 0 | 0 | 0 |
| Metal parts | 0 | 0 | 0 | 0 | 0 | 0 |
| Packaging materials* | 0 | 0 | 0 | 0 | 0 | 0 |
| Remote control | 0 | 0 | 0 | 0 | 0 | |
| Speaker | 0 | 0 | 0 | 0 | 0 | |
| Accessories* | 0 | 0 | 0 | 0 | 0 | 0 |
- *: Circuit board assembly includes PCB and the electronic elements thereof; Packaging materials include packaging box, styrofoam, etc.; Other accessories include instruction manual.
- O: the content of the toxic and hazardous substances or elements in the part is lower than the limit specified in GB/T 26572-2011 standard.
- X: the content of the toxic and hazardous substances or elements in the part is higher than the limit specified in GB/T 26572-2011 standard.
The table shows that the machine contains harmful substances inside. The data is provided by material suppliers and verified by the company according to the material type. Some materials contain harmful substances that can’t be replaced in present technology. We are dedicated to improving this. The EFUP of the product is ten years. The pollution control label is shown on the right![]() . The EFUP is valid only when the user operates in the normal conditions specified in the manual herein.
. The EFUP is valid only when the user operates in the normal conditions specified in the manual herein.
Waste Electrical and Electronic Products Recycling and Disposal Regulations To protect the earth, if you do not need this product or its service life expires, please abide by your local Waste Electrical and Electronic Products Recycling and Disposal Regulations or send it to qualified local manufacturer for recycling. This Manual is for reference only and is subject to change without prior notice.
Visit www.displays2go.com for the latest product information and manual updates.
FCC Statement
Changes or modifications not expressly approved by the party responsible for compliance could void the user’s authority to operate the equipment. This equipment has been tested and found to comply with the limits for a Class B digital device, pursuant to Part 15 of the FCC Rules. These limits are designed to provide reasonable protection against harmful interference in a residential installation. This equipment generates uses and can radiate radio frequency energy and, if not installed and used in accordance with the instructions, may cause harmful interference to radio communications. However, there is no guarantee that interference will not occur in a particular installation. If this equipment does cause harmful interference to radio or television reception, which can be determined by turning the equipment off and on, the user is encouraged to try to correct the interference by one or more of the following measures:
- Reorient or relocate the receiving antenna.
- Increase the separation between the equipment and receiver.
- Connect the equipment into an outlet on a circuit different from that to which the receiver is connected.
- Consult the dealer or an experienced radio/TV technician for help
This device complies with part 15 of the FCC rules. Operation is subject to the following two conditions
- this device may not cause harmful interference.
- this device must accept any interference received, including interference that may cause undesired operation.
To maintain compliance with FCC’s RF Exposure guidelines, This equipment should be installed and operated with minimum 20cm distance between the radiator and your body: Use only the supplied antenna.
FCC ID: 2ASCB-DM021TLW
This device complies with Part 15 of the FCC Rules. Operation is subject to the following two conditions:
- this device may not cause harmful interference.
- this device must accept any interference received, including interference that may cause undesired operation.
Any changes/modifications to this equipment not approved by the party responsible for compliance could void the user’s authority to operate the equipment.
NOTE: Before using the product, please read the instructions carefully.
Do not attempt to disassemble this product. If the product does not work properly, please call our Customer Service Department at 1-844-221-3393.
Scan the QR code to visit the product page


 User Manual")

