
![]() User Manual
User Manual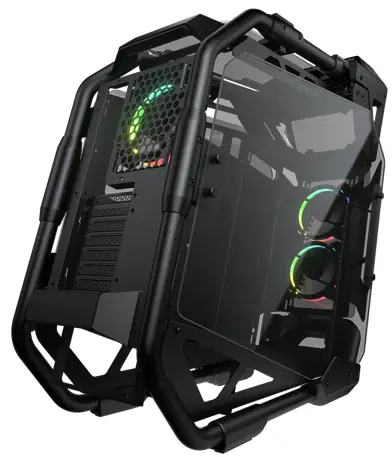
FEATURES
3D CONSTRUCTED TUBE FRAME
The design concept of Cratus originates from the innovative character C stroke as the mechanism to express the Creative image of COUGAR.
The precise combination of steel tubes and tempered glass is the creation of aesthetics and high accuracy workmanship.
3D Constructed Tube Frame
Forward-Dynamic Design
Showcase PC with Curved Tempered Glass
Support for E-ATX Motherboard
Up to 460mm Graphics Cards
Superior Cooling Up to 360mm Water Cooling
SPECIFICATIONS
| Model Name | Cratus | |
| Model No. | CGR-SLMSB | |
| Case Form Factor | Mid Tower | |
| Motherboard Type | Mini ITX / Micro ATX / ATX / CEB / E-ATX | |
| Dimensions (WxHxD) | 283(W) x 636(H) x 635(D) mm | |
| 11.1(W) x 25(H) x 25(D) in | ||
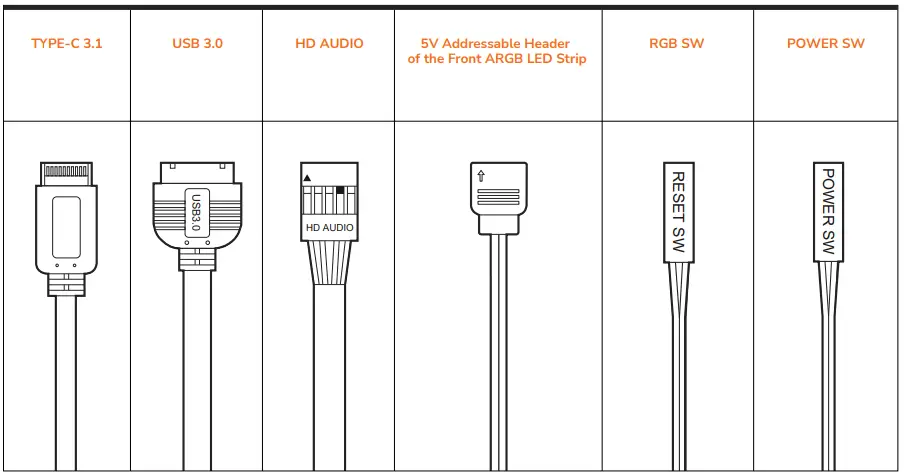
| I/O Panel | Type C 3.1 x 1 , USB 3.0 x 4 , 4 Pole Headset Audio Jack x 1 , RGB Button | |
| 3.5″ Drive Bay | 2 | |
| 2.5″ Drive Bay | 3 + 2 ( converted from 3.5″ drive bays , 3 SSD trays included ) | |
| Expansion Slots | 7 + 2 ( support for over 45mm thick graphic card vertical installation ) | |
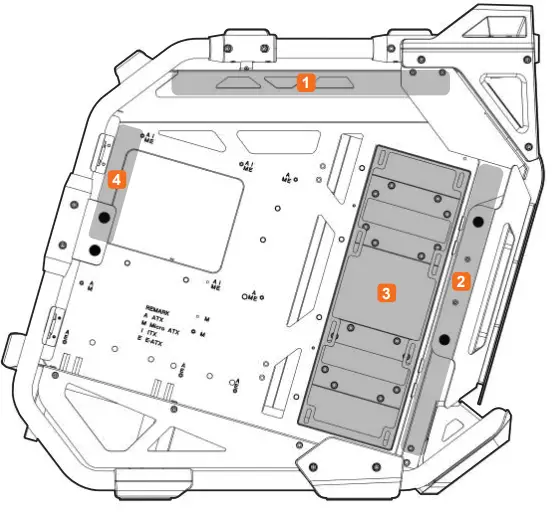
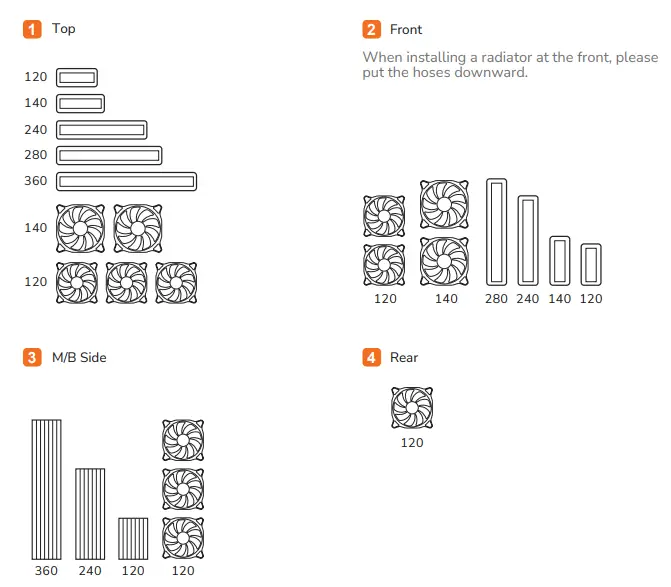
| Cooling Fan Support | Front | 120mm x 2 / 140mm x 2 |
| Top | 120mm x 3 / 140 mm x 2 | |
| M/B Side | 120mm x 3 | |
| Rear | 120mm x 1 | |
| Maximum Number of Fans | 9 Max. | |
| Water Cooling Support | Front | * 280mm / 240mm / 140mm / 120mm |
| Top | 360mm / 280mm / 240mm / 140mm / 120mm | |
| M/B Side | 360mm / 240mm / 120mm | |
| Transparent Panel | 4mm Tempered Glass x 4 | |
| Onboard Lighting System | Yes | |
| RGB Sync with M/B | Yes | |
| Max. Graphics Card Length | 460mm / 18.1in (without fans and radiator at M/B side) | |
| 325mm / 12.8in (with fans and radiator at M/B side) | ||
| Max. CPU Cooler Height | 190mm / 7.5in | |
| Max. PSU Length | 180mm / 7.lin | |
* When installing a radiator at the front, please put the hoses downward.
* Specifications might vary depending on the country or region of sale.
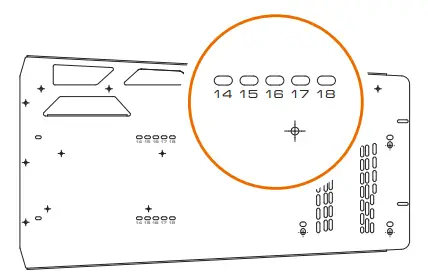
I/O CONNECTORS
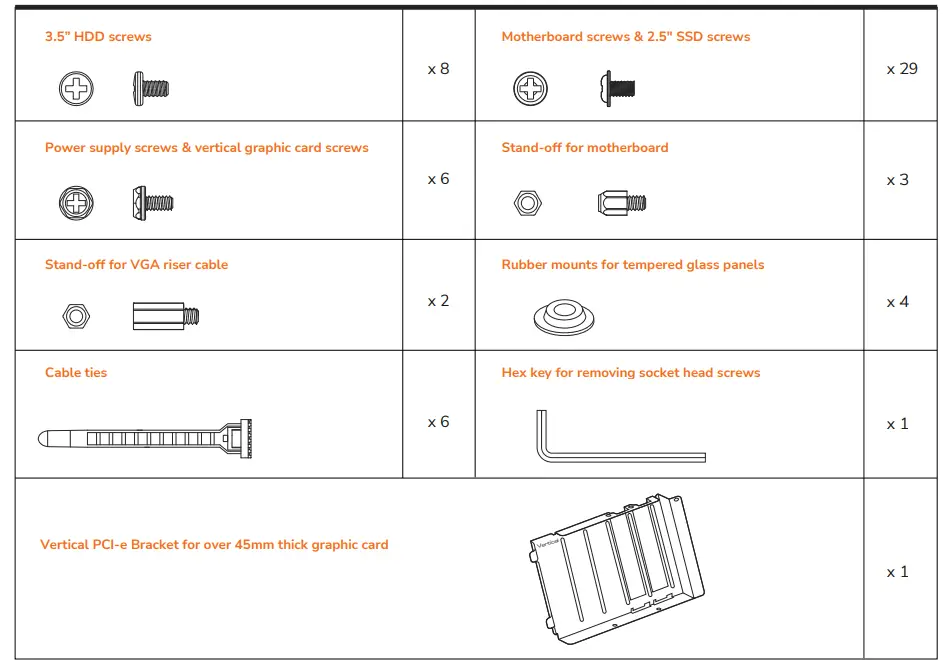
ACCESSORY KIT
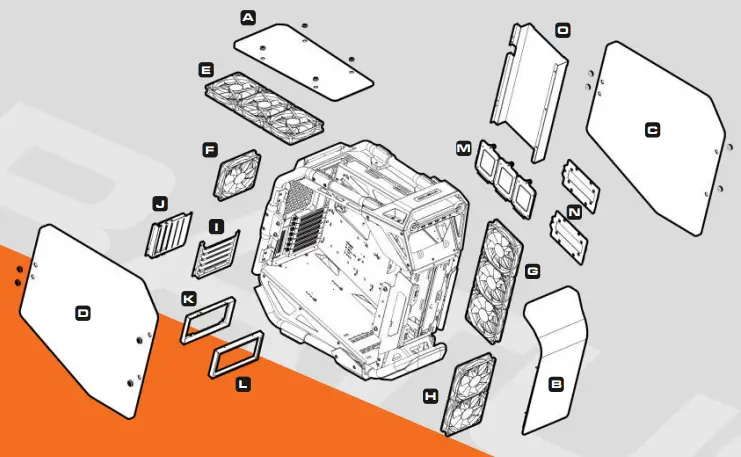
ASSEMBLY DRAWING
| A Tempered glass top panel B Curved tempered glass front panel C Tempered glass right panel D Tempered glass left panel E 120mm x 3 / 140mm x 2 fans for top panel F 120mm x 1 fan for rear panel G H 120mm x 2 / 140mm x 2 fans for front panel | I Horizontal PCI-e bracket (pre-installed) J Vertical PCI-e bracket (packed in accessory kit) K Rear PSU bracket L Front PSU bracket M 2.5” SSD trays N 3.5” HDD trays O Cable management cover |
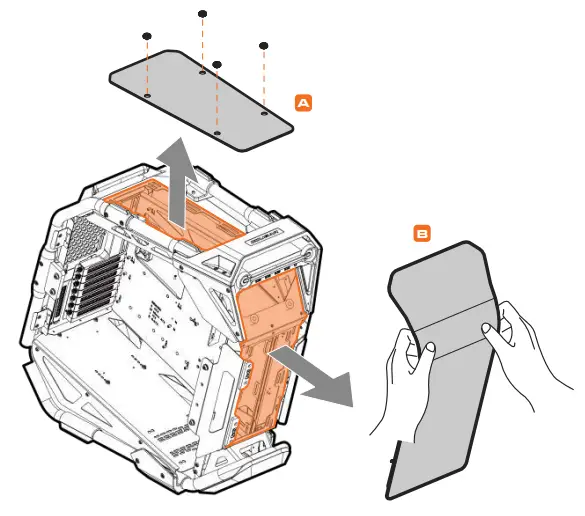
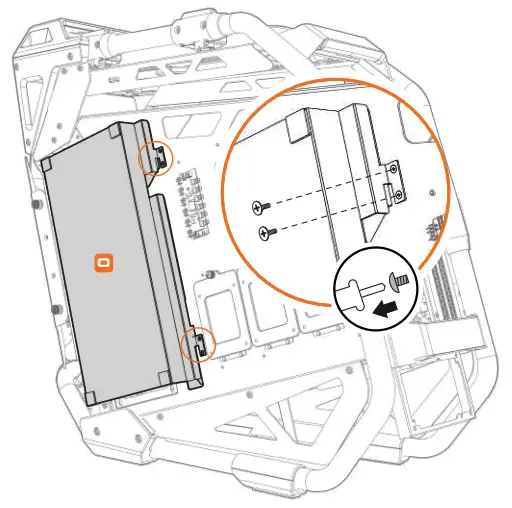
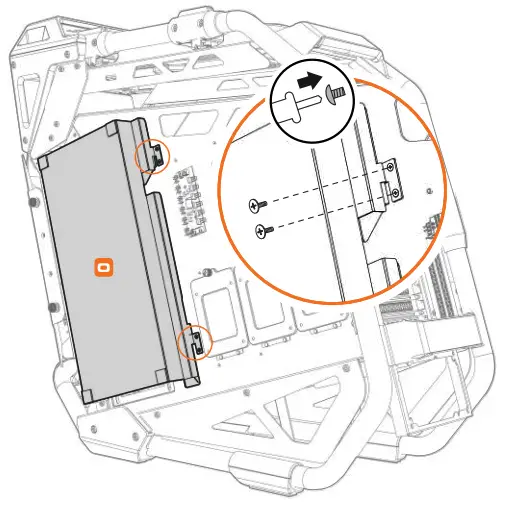
REMOVING THE FRONT PANEL AND THE TOP PANEL
INSTALLING THE SIDE PANELS

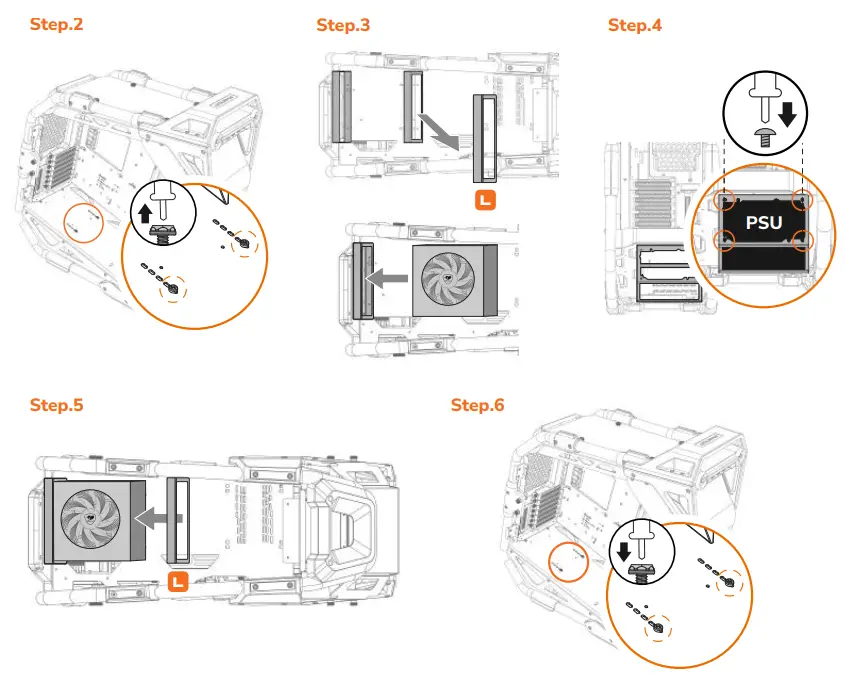
POWER SUPPLY INSTALLATION INSTRUCTIONS
For a better installation experience, we suggest installing the power supply first.![]() Please check the length of your PSU first and the front PSU bracket needs to be fixed at the corresponding location.
Please check the length of your PSU first and the front PSU bracket needs to be fixed at the corresponding location.
INSTALLING WATER COOLING RADIATORS & COOLING FANS
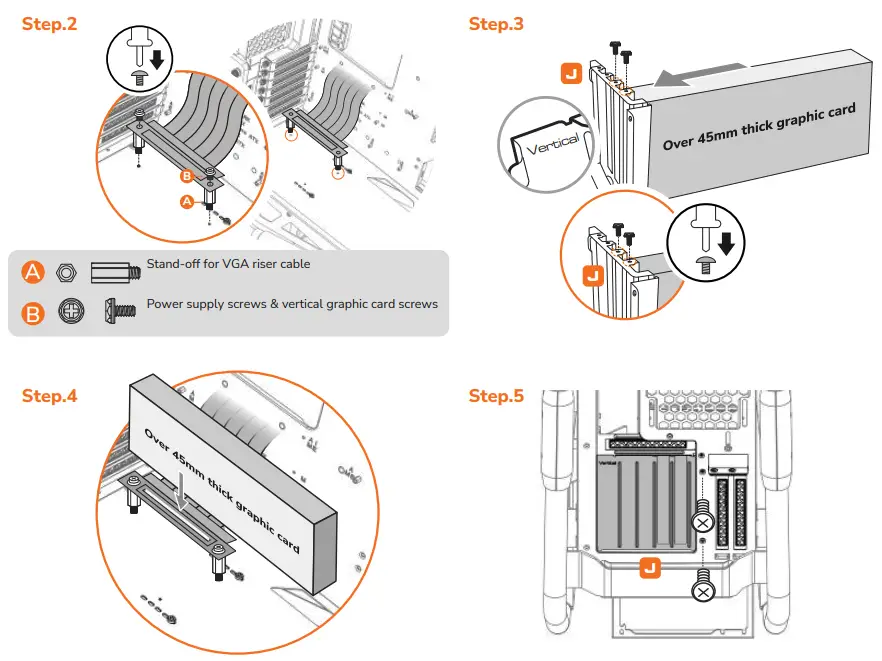
VERTICAL GRAPHIC CARD INSTALLATION METHOD
Within 45mm thick graphic card

The riser cable also needs to be fixed at the corresponding position.
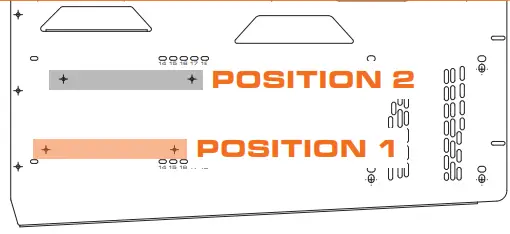
POSITION 1

Over 45mm thick graphic card
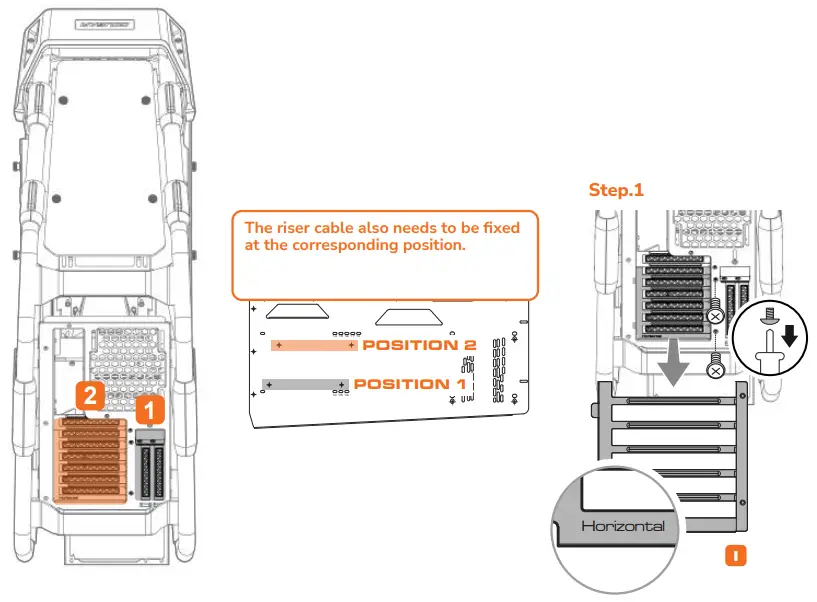
POSITION 2
INSTALLING THE 3.5″ HDDS / 2.5″ SSDS
![]() The 3.5” HDD trays are placed inside the cable management cover.
The 3.5” HDD trays are placed inside the cable management cover.
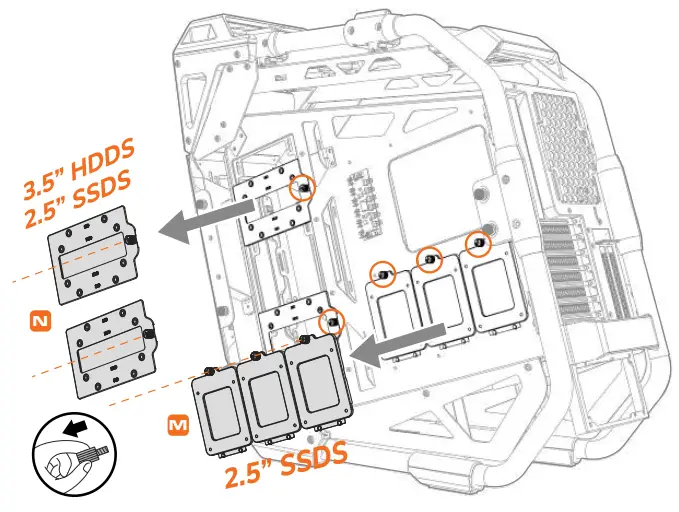
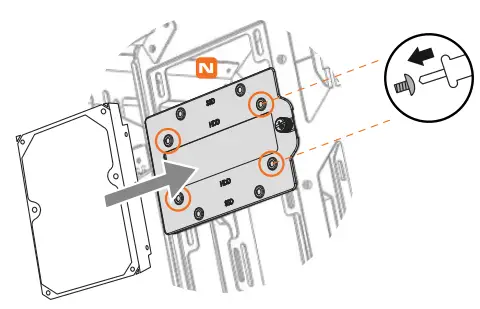
INSTALLING THE 3.5″ HDD
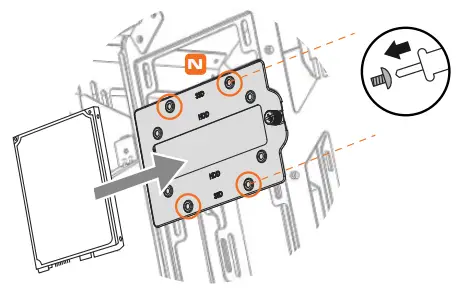
INSTALLING THE 2.5″ SSD
CABLE MANAGEMENT COVER DISASSEMBLY INSTRUCTIONS
CABLE MANAGEMENT COVER INSTALLATION INSTRUCTIONS
CONTROLLING LIGHTING MODES
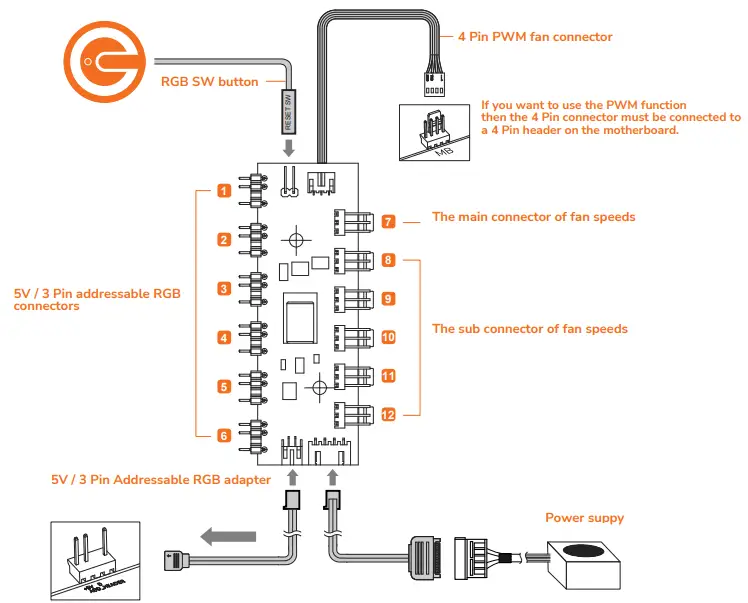

![]() First Mode: 18 Default Lighting Effects
First Mode: 18 Default Lighting Effects
Please connect the power connector to the PSU and you can short press the RGB SW button to switch the 18 beautiful lighting effects we have preset for you.
 Second Mode: Motherboard Synchronization
Please use the included adapter to connect to a compatible motherboard’s 3-pin 5V Addressable RGB header. The light will be automatically controlled by the motherboard synchronization software.
As long as the 3-pin 5V Addressable RGB header is still plugged, every time you restart the PC, it will stay on motherboard synchronization mode.
SWITCH BETWEEN DEFAULT MODE AND MOTHERBOARD SYNCHRONIZATION MODE
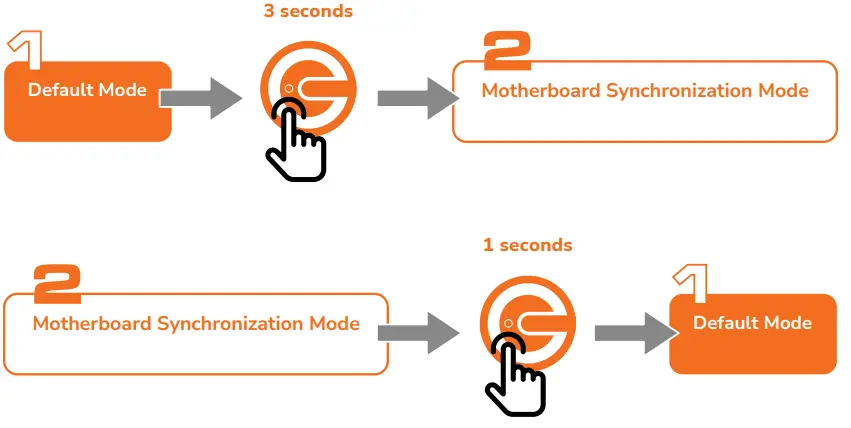
![]() Over 6 seconds
Over 6 seconds
If you press and hold the RGB button for over 6 seconds, the lights will flash in white for twice, and the lights will be turned off.![]() The lighting controller has memory function after REBOOTING.
The lighting controller has memory function after REBOOTING.
However, if you press and hold for over 6 seconds and return on the light again, it will only return to the first light mode of default, and it cannot memorize the light effect before it was turned off.
GLOBAL WARRANTY POLICY
WARRANTY PERIODS OF COUGAR GAMING DEVICES
Product : COUGAR CRATUS
Warranty : Please refer to our official website. (https://cougargaming.com/us/support/warranty/)
This warranty gives you specific legal rights. You may also have other rights granted under local law.
Only for electrical components.
 http://cougargaming.com.cn/support/warranty/
![]() www.cougargaming.com
www.cougargaming.com
COUGAR USA Technical Service
Tel: (833) 256-3778
Mail: [email protected]
Compucase Enterprise Co., Ltd.
All rights reserved.  https://cougargaming.com/
![]() Made in China
Made in China


