Sistemamt HYBRID350CMY 350W 3in1 LED Moving Head
Prouct Information
Product Name: HYBRID350 CMY
Type: 350W 3in1 LED Moving Head
User Manual: Included
Acc ssories:
- Signal cable – Quantity: 1
- Power cable – Quantity: 1
- User manual – Quantity: 1
- Safety rope – Quantity: 1 (charge)
- G clamp – Quantity: 2 (charge)
- Omega clamp – Quantity: 2 (charge)
Warranty: One year for the whole machine (light source not covered)
Product Usage Instructions
Safety Instructions
Please read the following safety instructions carefully before installing, energizing, operating, or repairing the product:
- Keep the lamp away from high temperature, fire, electric shock, vibration, and strong light environments.
- Only qualified operators should carry out installation, maintenance, and repair, following the operating procedures in the manual.
- Do not attempt to repair the lamp by yourself. No user repairs are allowed.
User Instructions
Cleaning and Maintenance:
The cleaning frequency depends on the operating frequency of the lamp and the surrounding environment. Follow these guidelines for cleaning:
- Use a soft cloth and general glass cleaning products to clean the lamp.
- Clean the external optical system at least once every 20 days.
- Clean the internal optical system at least once every 30/60 days.
- Keep the lens clean and avoid touching the optics of the lamp with your hands.
Note: Before performing any maintenance or cleaning, ensure that the power is cut off. Only qualified technicians should carry out maintenance work.
Preventing High Temperature Damage:
Before powering off the lamp, use the Y-axis control channel to keep the lamp head down. This prevents sunlight or other light from directly irradiating the head lens and causing high temperature damage to the lamp
Do’s:
- Use a soft cloth and general glass cleaning products to clean the lamp housing.
- Follow the recommended cleaning frequencies for the external and internal optical systems.
- Lubricate the gobo and focus lens guide rails every two months using high-temperature-resistant lubricating oil/grease.
Don’ts:
- Do not wipe the lamp housing with organic solvents such as alcohol to avoid damage.
- Do not use solvents containing chemical components to clean the coated color filters..
Note: This manual include important information on how to install and use it safely.
Please read it carefully before install and operate as required. At the same time,
please keep this manual properly for emergencies.
Accessories:
The following random accessories have been packaged with light, please check and verify:
| Name | QTY | Remark |
| Signal cable | 1 | |
| Power cable | 1 | |
| User manual | 1 | |
| Safety rope | 1 | charge |
| G clamp | 2 | charge |
| Omega clamp | 2 |
When this product leaves the factory, the performance is intact and the packaging is complete. All users should strictly abide by the warnings and operating instructions stated in this manual. Any damage caused by misuse is not covered by the company’s warranty. Failures and problems caused by ignoring the operating manual are not within the scope of the dealer’s responsibility.
This manual is subject to technical changes without notice.
Note: The company’s products are calculated based on the company’s delivery date.
The warranty period of the whole machine is one year, and the light source is not within warranty.
SAFETY INSTRUCTIONS
Notice
Please read the safety requirements in this section carefully before installing, energizing, operating or repairing !
The following important safety signs will be used in this product manual
- After receiving the lamp, please unpack and check whether there is any damage caused by transportation. If there is damage caused by transportation, please do not use this lamp, and contact the dealer or manufacturer as soon as possible.
- The manufacturer will not be held responsible for the losses caused by not following this manual and changing the lamps at will.
- Please note that the damage to the lamp caused by the modification of the lamp is not covered by the warranty.
- If you have any questions or suggestions, please contact the dealer or manufacturer in time.
- When the lamp is in use, it must be kept away from high temperature, fire, electric shock, vibration and strong light environment.
- Qualified operators can carry out installation, maintenance and repair, and ensure that they operate in strict accordance with the operating procedures of this manual
- There are no children who can be repaired by the user inside this lamp, please do not open the lamp to repair by yourself.
- Do not look directly at the light source of the lamp (especially for patients with epilepsy) to avoid damage to the eyes!
- Do not connect this lamp to any other dimming device. If visible damage occurs to the light source, lens or display protective cover on the lamp, it is damaged to the extent of failure. If cracks or deformation occur, please stop using it and contact the manufacturer to
replace the original accessories, otherwise normal use will be affected. - The installation position of the luminaire should be such that it will not be stared at at a distance of less than 4 meters for a long time.
- Before starting to operate the lamp, please check whether all the covers (or shells) have been installed and whether the screws have been tightened reliably. It is forbidden to use the lamp with the cover (or shell) open.
- Keep the lamp clean and do not touch the lamp glass directly with your hands.
- During operation, it is recommended to wear necessary protective equipment, such as goggles, gloves, etc.
- The person who connects the electrical part must have the corresponding qualifications before the operation.
- Before installation, please make sure that the power supply voltage you are using matches the voltage marked on the lamp.
- Each lamp should be properly grounded, and electrical installation should be carried out in accordance with relevant standards.
- Do not use power cords with damaged insulation, and do not overlap power cords with other wires.
- When the lamp is not in use or cleaning, please hold the power cord plug to unplug it, do not pull or directly pull the power cord.
- Make sure that the power cord used complies with safety regulations.
- If the lamp is not waterproof or dustproof, please be careful not to short-circuit the lamp when it is exposed to rain or moisture during the operation of the lamp.
- Do not turn on or off the lamp repeatedly within a short period of time, as this will shorten the life of the lamp light source or other electrical components.
- There is a safety rope connection hole at the bottom of the lamp. For safety reasons, please pass the safety rope equipped with the lamp through the safety rope connection hole for auxiliary lifting.
- Before any installation, maintenance and cleaning of the lamp, please make sure that the power supply has been cut off!
- Under normal working conditions at room temperature, the temperature of the outer metal surface of the lamp (including the surface of the radiator) will reach 50°C at the highest temperature.
- There will be smoke and peculiar smell before the light is turned on for the first time. This is a normal process and does not mean that the lamp is defective.
- When using, do not touch the shell with bare hands to avoid burns!
- Please do not install the lamp directly on the surface of ordinary combustible materials.
- Do not project the lamp directly on combustible objects, and the distance between the lamp and the illuminated object is more than 10 meters.
- The lamp should be installed in a well-ventilated place, and the distance from the wall should be kept at least 50 cm. At the same time, please check whether the fan and ventilation holes are unblocked.
- Please do not expose the front glass to sunlight or other strong light sources from any angle. The lens may focus the light in the lamp, which may cause a potential fire hazard.
- This product complies with the “General Technical Requirements Standards for the Recycling of Waste Electrical and Electronic Products”
- When the product reaches the scrap standard and needs to be scrapped, the customer can scrap and recycle the product.
USER INSTRUCTIONS
Cleaning and Maintenance
- When the lamp cannot be started, please check whether the power fuse of the lamp is blown.
- The lamp is equipped with an overheating protection device.
- The protection device will automatically cut off the power when it is overheated. When this happens,
- please check whether the fan is running normally and whether the fan and fan net are blocked by dust. Find out the fault and repair it before starting the lamp.
- Because substances such as smoke oil and dust tend to adhere to the lens and reduce the light output, in order to ensure the reliable use of the lamp, it is very necessary to keep the lamp clean.
- The cooling fan should be cleaned every 15 days. The cleaning of internal and external optical lenses, mirrors, and coated color filters must be performed periodically to optimize light output.
- The cleaning frequency depends on the operating frequency of the lamp and the surrounding environment. When cleaning, use a soft cloth and general glass cleaning products to clean. It is recommended to clean the external optical system at least once every 20 days, and clean the internal optical system at least once every 30/60 days.
- Keep the lens clean and do not directly touch the optics of the lamp with your hands.
- Before performing any maintenance and cleaning the lamp, please make sure that the power has been cut off!
- Only qualified technicians can carry out maintenance work.
- Before maintenance,the power must be completely cut off!
- In order to prevent sunlight or other light from directly irradiating the head lens and focusing on the inside of the lamp body to cause high temperature damage to the lamp, before the lamp is powered off,please use the Y-axis control channel to keep the lamp head down.
- Do not wipe the lamp housing with organic solvents such as alcohol to avoid damage.
- Do not use any solvents containing chemical components to clean the coated color filters.
Lubrication
In order to maintain the smooth rotation of the gobo and the smooth movement of the focus lens, it is recommended to give the focus lens every two months The 3 guide rails and the 2 guide rails of the magnifying lens are lubricated once. Good and high-temperature-resistant lubricating oil/grease should be used.
Ordinary Troubleshooting
| Fault description | Take countermeasures |
| The lamp can’t work normally | check if the power fuse is blown Check if the bulb is in good condition |
| The lamps are not controlled by the controller | Check if the DMX start address of the lamp is set correctly Check if the XLR signal cable is damaged |
| The lamps work intermittently | Check whether the fan is working normally, and whether dust is blocking the fan and the fan net |
| The light is dim and the brightness is obviously reduced | Check whether the LED light source has reached the expiration date Check whether the internal and external optical system is clean |
| The beam is impure (has a halo) | Clean the dust and oil from the lens and other parts |
| Serious beam distortion | Check if the lens is broken Clean the lens dust or oil |
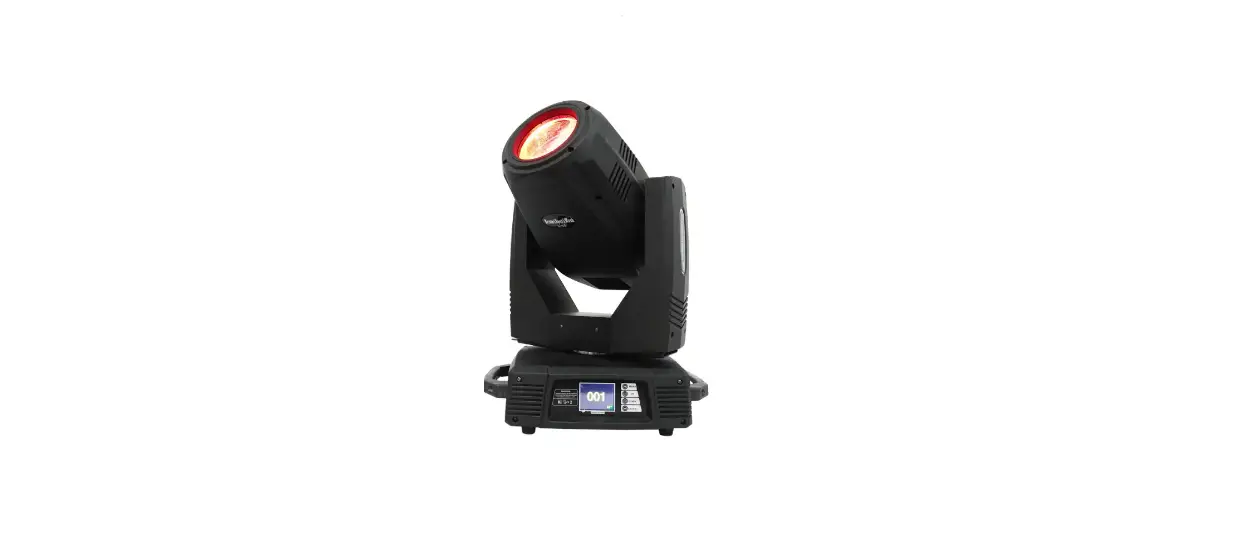
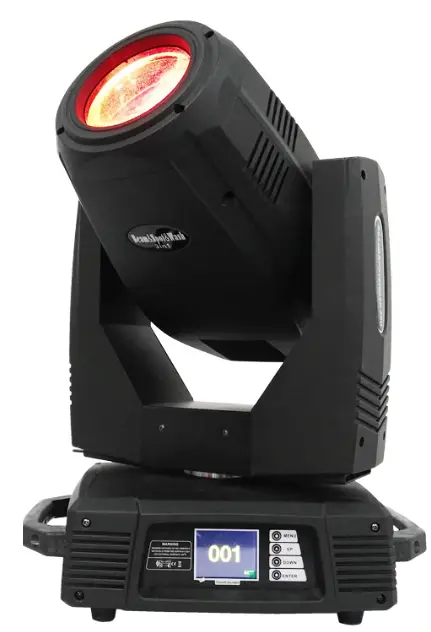
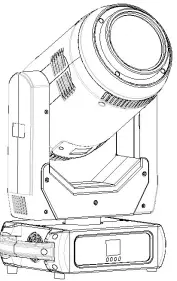
LAMP APPEARANCE
INSTALLATION
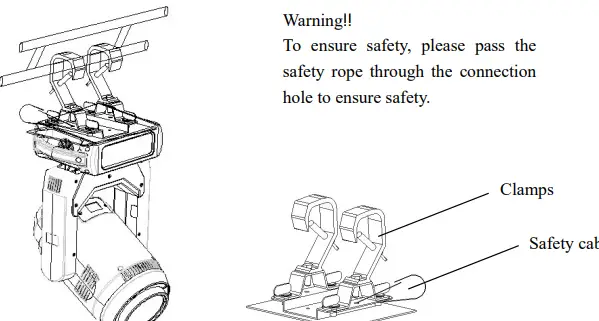
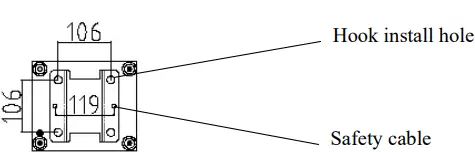
Take out the 2 hooks and 1 safety rope that came with the machine, use the 4 hook quick knobs attached to the hooks to install the 2 hooks on the bottom of the luminaire, and then hang the luminaire on the fixed bracket with the hooks and twist Tighten the hook and lock bolts to fix the whole lamp. Please confirm that the lamp is installed firmly and reliably, and ensure that the hoisting position has enough strength to bear the weight of the lamp. For safety reasons, please follow the warning shown in the figure above to pass the safety rope provided with the lamp through the safety hole at the bottom of the lamp holder for auxiliary lifting to ensure safety.
Warning!!
- The hook is only used when hoisting the lamp. It is strictly forbidden to use the hook as a handle to carry the lamp. Please use the handle when carrying.
- For safety reasons, please use a safety rope that can withstand 10 times the weight of the lamp to pass through the safety hole of the lamp for auxiliary lifting
Power connection:
The power cord connection is as follows:
- L (fire wire) = brown wire
- E (ground wire) = yellow/green two-color wire
- N (center line) = blue line
- When connecting the power supply, please note that the power supply voltage and frequency must be consistent with the voltage and frequency marked on the nameplate of the lamp. When multiple lamps are used at the same time, it is recommended to connect the power supply of each lamp separately, so that each lamp can be individually controlled on/off.
- When connecting the power supply, the ground wire (yellow/green two-color wire) must be safely grounded, and the electrical installation must comply with all relevant standards.
- If you have any questions about electrical installation, please do not operate and consult a qualified electrician.
Connection of control signal
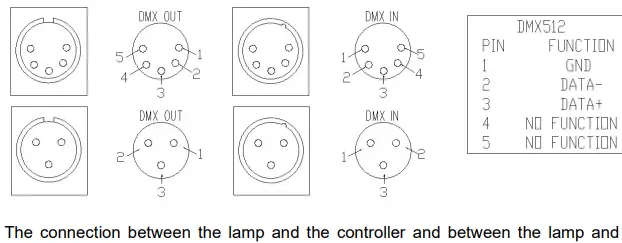
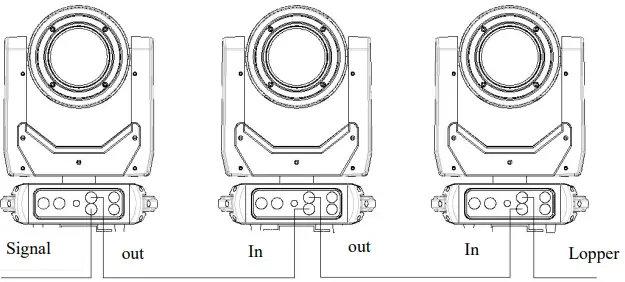
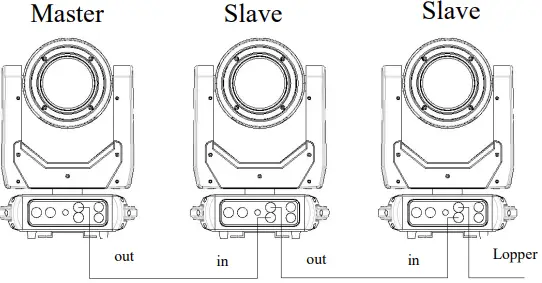
The connection between the lamp and the controller and between the lamp and the lamp must use a two-core shielded wire with a diameter of not less than 0.5 mm. Please use a 3-pin (included) XLR plug/seat to connect the DMX512 output/inlet of the lamp. The connection between the XLR plug/socket and the wire is shown in the list above. It must be noted that the 3-core of the XLR plug/seat cannot be in contact with the inner shell and the core and the core cannot be in contact during the connection. Except for the connection methods shown in the list above, the XLR plug/seat and the XLR control line cannot be connected in any other way. This product receives the international standard DMX512 (1990) control signal. Use the XLR-XLR control cable to connect the DMX output port of the controller to the DMX input port of the first slave, and connect the DMX output port of the first slave to the DMX input port of the second slave, and so on By analogy, until all the slaves are connected, and finally the circuit is connected to the signal output port of the last lamp to complete the controller mode connection. As shown below:
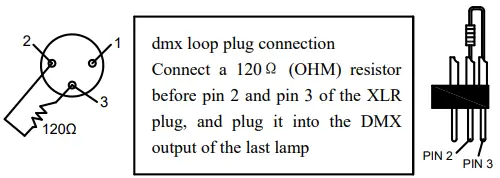
DMX loop plug
In the “controller mode”, the DMX output port of the last lamp must be connected to the DMX loop plug. This circuit is inserted between pin 2 and pin 3 of the “Canon” plug and connected with a resistance of about 120Ω (OHM) (as shown in the figure below). Plug this loop into the output port of the last lamp, which can effectively avoid the noise and reflection caused by the DMX512 signal during the transmission process.
FUNCTION SETTING
Display operation
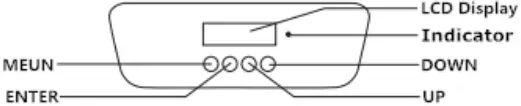
To view or modify the function settings of the lamp, press any key (in the power-on state) to light up the screen, and then press the UP and DOWN keys to enter the corresponding menu of the lamp. There are corresponding sub-menus in the function operation main menu, and each menu represents a specific function of the lamp. For details, see the sixth point “Operation Menu” below.
- In the lamp function menu setting page, press the UP and DOWN keys to select the corresponding function.
- When operating the menu, the MENU button is the menu button, and the ENTER button is the confirmation button. Press the ENTER button to save your changes or enter the submenu. Press the UP or DOWN button to modify the value (increase or decrease the value).
Press the MENU button to return to the previous menu. If you don’t press it, the system will automatically return to the display state.
DMX address setting
When using the controller to control multiple lamps, each lamp must set the DMX start address to receive the signal from the controller and respond correctly. This product has two control modes, namely standard mode and simplified mode. Take the standard mode as an example: the product has a total of 20 channels, then the DMX start address of the first lamp is set to 001, the second is 021, the third is 041 and so on. The menu setting of this fixture optimizes the address setting. The operations for several setting address codes are as follows:
- Select “Previous” or “Next”, the lamp will automatically calculate the address code of the next or previous set according to the current address code and channel data, which can be set quickly;
- Click the address code value to enter the value editing window, where any valid address code can be set, the fixture will automatically obtain the current channel number of the fixture, and automatically filter the unusable address code (512-current channel number).
- The lamps support the RDM protocol, and the address code of the lamps can be set remotely through RDM.
Stand-alone mode
Do not connect the controller and the control line. When the automatic program of the host mode of the lamp is set to be valid, the lamp will run in the stand-alone mode.
Master/Slave synchronization mode
If you need to connect multiple fixtures in master/slave sync mode, first connect the XLR-XLR control cable from the DMX output port of the first fixture to the DMX input port of the second fixture, and then connect the XLR-XLR control cable from the DMX output port of the second fixture to the DMX input port of the second fixture Connect to the DMX input port of the third fixture, and so on, until all the fixtures are connected, then connect the loop plug to the signal output port of the last fixture to complete the connection, and then set the host in the menu, or Slave After power on, the lighting group runs in master/slave synchronization mode.
| Option | Instruction | |
| Add | 0-512 | |
| up | ||
| down | ||
|
Operate | DMX | Console mode, receive DMX signal, RDM signal |
| Auto | run auto mode according to the built-in program | |
| Sound | When the luminaire detects a strong sound, the luminaire automatically runs a scene according to the built-in program, otherwise it keeps the last scene | |
| Scene Mode 01 | Runs in the set scene mode, supports custom editing of up to 10 scenes | |
| 1-10 | specified scene output | ||
|
Auto | Automatically loop and output scenes in the order of the set scene time (non-zero), and the scene with time of 0 is automatically skipped and ignored | ||
| Master/slave | Run when not in DMX mode, select the data output mode, the lamp automatically detects the DMX state and switches the output to prevent data conflict | ||
|
Master | Build in program run, if there is no DMX signal, it will output data (synchronization), otherwise it will not output data | ||
| Slave | Build in program run and do not output data (do not synchronize with other lamps) | ||
| Auto | no DMX signal, build in program run, otherwise, dmx signal run | ||
|
Display | Language | Language setting | |
| English | English | ||
| 中文 | Chinese | ||
| screen protector | Set the screen content or method of the screen after there is no operation on the screen for 30 seconds | ||
| off | Keep the last operation page, bright screen | ||
| Mode 1 | Off | ||
| Model 2 | black, The lower left corner displays the current fixture address code | ||
| Model 3 | Display trademark, address code and operating mode | ||
| screen rotation | Seting the display orientation of the screen | ||
| off | Do not reverse the display | ||
| on | reverse the display | ||
| auto | Automatically detect the direction of the lamps and lanterns, and switch the display direction | ||
| DMX indication | Set the indication method of the DMX signal indicator | ||
| Model 1 | With signal-on, without signal-off | ||
| Model 2 | With signal-off,without signal-on | ||
| Model 3 | With signal- flicker, without signal-off | ||
| screen backlight | Set the brightness of the screen backlight after 10 seconds of no operation, bright when operate | ||
| 1-10 | 10 levels | ||
|
scene | scene selection | operate the scene | |
| 1-10 | 10 setting formats | ||
| Scene time | Set the retention time of the current scene in automatic mode, the unit is 0.1 seconds | ||
| 0 | This scene does’t participate in auto output | ||
| 1-255 | 0..1 seconds to 25.5 seconds | ||
| 1.X | 0-255 | Set the data of each channel, the display content and sequence are in one-to-one correspondence with the channel table of the fixture | |
| —– | 0-255 | ||
| —– | 0-255 | ||
| N.function | 0-255 | ||
|
advanced | X-axis reversed | Set the X-axis rotation direction | |
| off | not reverse | ||
| on | reverse | ||
| Y-axis reversed | Set the Y-axis rotation direction | ||
| off | not reverse | ||
| on | reverse | ||
| Optocoupler | Set whether the fixture detects XY out of step and | ||
| Correction | corrects it | ||
| off | Do not correct position after out of step | ||
| on | Automatically correct position after out of step, and record out-of-step fault | ||
| X-axis offset | Set the position of the X-axis zero point of the fixture | ||
| 4-150 | |||
| Y-axis offset | Set the position of the Y-axis zero point of the fixture | ||
| 4-48 | |||
| data retention | Setting dmx without signal,lighting output state | ||
| off | No signal,The motor and light source return to the position and state when the reset was completed | ||
| on | No signal, keep the last DMX output | ||
| scene time | 1-255 | ||
| reset | Sure | ||
| No | |||
| Factory settings | Sure | ||
| No | |||
|
status | Motor information | Displays the information status of all motors and signals | |
| Hall | No-motor has no Hall calibration 0-motor leaves the calibration position 1-motor is at the calibration position. | ||
| Status | Motor reset completion status | ||
| X | Real-time position value | ||
| Y | Real-time position value | ||
| optocoupler | Display the two signal level status of the X and Y axis optocouplers, binary | ||
| Fault/Status Log | The last 8 fault records when the lamp is reset and running, the fault record will not be saved after the | ||
| power is turned off, and the current power-on cycle will be valid | |||
| fault data | total number of failures | ||
| 12::03 | The fault power-on time, in minutes | ||
| Hall fault | No valid signal detected | ||
| hall error | signal is always valid | ||
| Optocoupler failure | No valid optocoupler signal | ||
| out of step | Motor loses step during operation | ||
| striker | hits the positioning rod when motor reset | ||
| sensor failure | Temperature sensor signal error | ||
| fan failure | Main fan work error | ||
| Lamp status | Display key status data, for reference | ||
| communication | 0~100%, the communication quality of the data link inside the lamp | ||
| error count | The total number of error frames detected after power-on | ||
| led temperature | Display the temperature of the current light source, “—” means no detection | ||
| Display board temperature | Displays the current display board temperature or nearby ambient temperature | ||
| Sensor temperature | Displays the current motherboard temperature or the ambient temperature where the motherboard is installed | ||
| Version Information | Display the information and version, an important reference for after-sales maintenance | ||
| equipment | name,Same as RDM information | ||
| model | model, Same as RDM information | ||
| Display board | Firmware version and serial number | ||
| mainboard | Firmware version and serial number | ||
| Light source time | Record the total cumulative time when the light source is turned on, in minutes, and the user can manually clear it as a time reference for the regular maintenance of the light source. | ||
| Lamp time | Record the total cumulative time of the lamp being turned on, in minutes, which cannot be cleared. | ||
DMX CHANNEL
20 channel mode sheet
| 20CH | Function | Channel Value | Description |
| CH1 | Pan | 0-255 | 0-540° |
| CH2 | Pan fine | 0-255 | 0-2° |
| CH3 | Tilt | 0-255 | 0-270° |
| CH4 | Tilt Fine | 0-255 | 0-1° |
| CH5 | X, Y speed | 0-255 | From fast to slow |
| CH6 | Dimmer | 0-255 | 0-100% dimmer |
|
CH7 |
LED Strobe | 0-3 | Turn off |
| 4-127 | Pulse Slow to fast | ||
| 128-191 | Gradient from slow to fast | ||
| 192-251 | Random from slow to fast | ||
| 252-255 | Turn on |
|
CH8 |
color | 0-129 | Linear color |
| 130-139 | Color 1 | ||
| 140-149 | Color 2 | ||
| 150-159 | Color 3 | ||
| 160-169 | Color 4 | ||
| 170-179 | Color 5 | ||
| 180-189 | Color 6 | ||
| 190-199 | Color 7 | ||
| 200-222 | Forward flow from fast to slow | ||
| 223-225 | off | ||
| 226-255 | Reverse flow from slow to fast | ||
| CH9 | C | 0-255 | |
| CH10 | M | 0-255 | |
| CH11 | Y | 0-255 | |
|
CH12 |
CMY Macro | 0-9 | No function |
| 10-19 | Macro 1 | ||
| 20-29 | Macro 2 | ||
| 30-39 | Macro 3 | ||
| 40-49 | Macro 4 | ||
| 50-59 | Macro 5 | ||
| 60-255 | Color change from slow to fast | ||
|
CH13 |
Rotating gobo | 0-9 | white |
| 10-19 | Gobo1 | ||
| 20-29 | Gobo2 | ||
| 30-39 | Gobo3 | ||
| 40-49 | Gobo4 | ||
| 50-59 | Gobo5 | ||
| 60-69 | Gobo6 |
| 70-79 | Gobo7 | ||
| 80-168 | Forward flow from fast to slow | ||
| 169-255 | Reverse flow from slow to fast | ||
| CH14 | Gobo rotation | 0-127 | 0-400 degree |
| 128-190 | Forward flow from fast to slow | ||
| 191-192 | off | ||
| 193-255 | Reverse flow from slow to fast | ||
| CH15 | Focus | 0-255 | From far to near |
| CH16 | Zoom | 0-255 | From small to big |
| CH17 | Prism | 0-127 | No prism |
| 128-255 | Prism | ||
|
CH18 |
Prism rotation | 0-127 | 0-400 degree |
| 128-187 | Forward flow from fast to slow | ||
| 188-195 | Off | ||
| 196-255 | Reverse flow from slow to fast | ||
| CH19 | Frost | 0-127 | No function |
| 128-255 | Frost | ||
| CH20 | Function | 0-199 | No function |
| 200-255 | Reset all over 5 seconds |
TECHNICAL PARAMETER
- Electrical parameters:
- Voltage: 100V~240V AC, 50/60Hz
- Power: 450W @ 220V
- Power factor: PF>0.9
- Light source specification:
- Light source:350W high brightness LED
- Color temperature:7500K-8000K
- Life time:50000 hours
- colour:
1 color wheel: 7 colors + white Variable speed bidirectional with rainbow effect Step/Linear conversion color optional
With C M Y function, color can be adjusted;
Can be mixed to make the color richer. - Rotation gobo wheel:
1 rotating gobo wheel: 7 gobos + white
The pattern plate adopts a detachable design, which is more convenient to replace the pattern plate - Prism:
5-facet prism, can be rotated in both directions - Focus:
DMX linear focus adjustment, super smooth focus adjustment. - Strobe/Dimming:
Electronic strobe, 0.3-25 times/second,linear dimming - Atomization:
Independent atomized lens, softer light - Rotation angle:
Use three-phase stepping motor, fast, quiet, with automatic return function.
Horizontal:540°
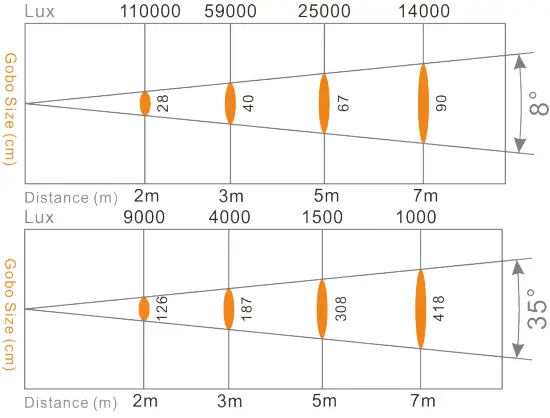
vertical: 270° - Beam Angle:
8-35°
DMX linear amplification, the beam angle can be freely switched from 8 to 35 degrees - Control mode:
DMX512 signal, 3-pin + 5-pin 20CH channel mode - Other functions:
Horizontal and vertical speed adjustable
Use powerful silent fan, LED temperature display, reduce power due to overheating, and ensure LED lifetime
Modular structure for easy maintenance - Housing material/protection level:
High temperature/UV light resistant engineering plastic Protection grade: IP20 - weight:
Net weight: 16kg
Gross weight: 19kg - packing size: (mm)
390(L)*31(W)*710(H) - Working temperature:
Maximum ambient temperature 50°C
Bottom box installation dimensions: (mm)
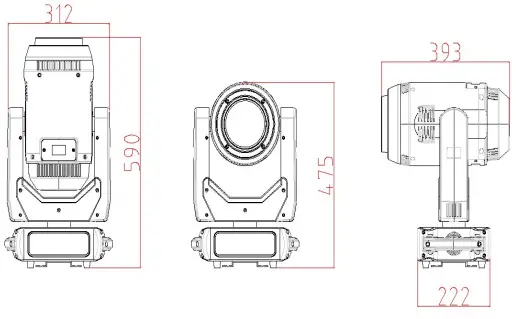
Body size: (mm)
PHOTOMETRIC DATA