H16, HH16S, H16 Pro
Office headset
User Manual
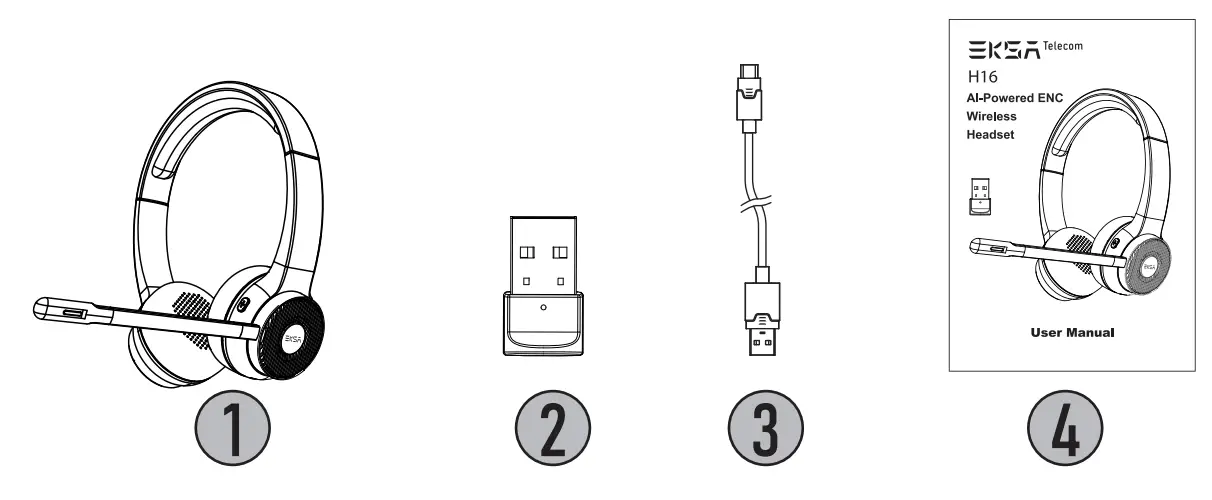
 Package Contents
- EKSAtelecom H16 Wireless Headset
- EKSA USB-A Bluetooth Adapter
- Type-C Charging Cable
- User Manual
 Specifications
 Specifications
Product Name:
Bluetooth Version: 5.2
Driver Diameter: 40 mm
Frequency Response: 20 Hz – 20 kHz
Battery: 400 mAh / 3.7 V
Charging Time: 2 hours
Effective Wireless Range: 15 m
Net Weight: 150 g
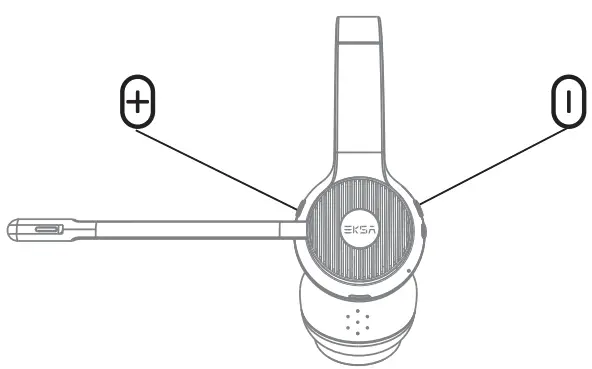
 Product Overview
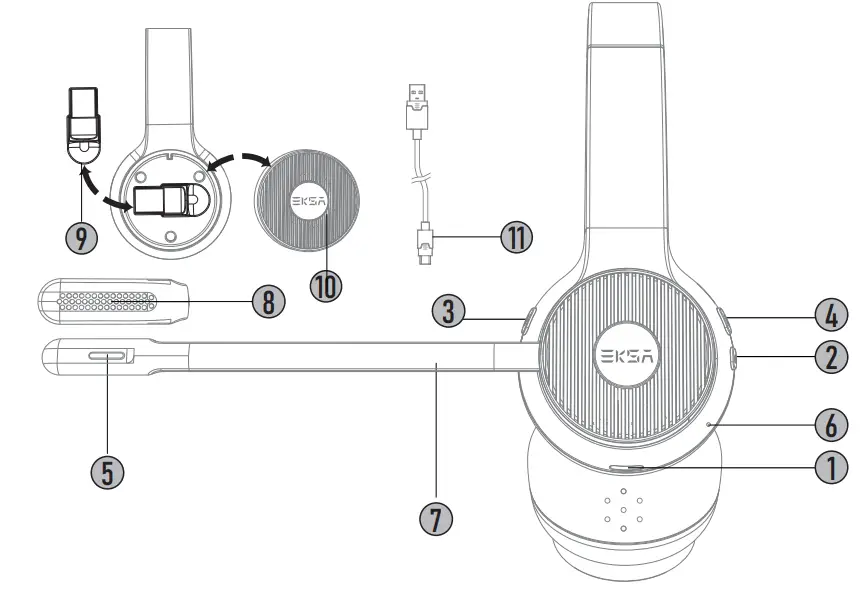
 Type-C Charging Port
 Power Button
 Volume + / next track
 Volume – / previous track
 Microphone Mute Button
 LED Status Indicator
 Long Boom Microphone (Rotatable)
 Microphone Hole
 USB Adapter
 Removable Ear Shell
 USB TypeC Charging Cable
 Operation Guide
 Operation Guide
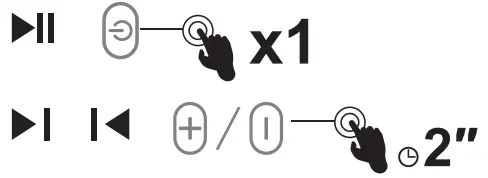
![]() Switch on/off
Switch on/off
 In the shutdown state, long press the “power button” for about 2 seconds to start the headset, and the blue light is always on for 2 second:
 In the power on state, long press the “power button” for about 3 seconds to shut down, the red light is always on for 2 seconds, and the headset is turned off.
Note: The headset will shut down automatically in 10 minutes when there is no connection.
 Bluetooth Pairing Connection
 Bluetooth Pairing Connection
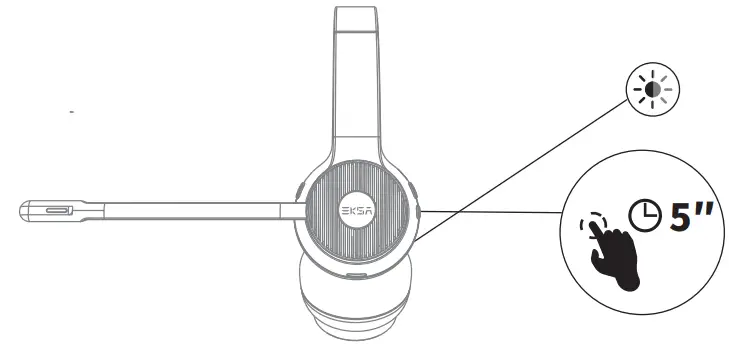
- When the phone is turned off, long press the “power button” for about 5 seconds to turn on the phone. The blue light and red light flash alternately, and the headset enters the pairing state.

- If no connection is successful after power on, it will automatically enter the pairing state.
- When the headset is disconnected, it will automatically enter the pairing state.
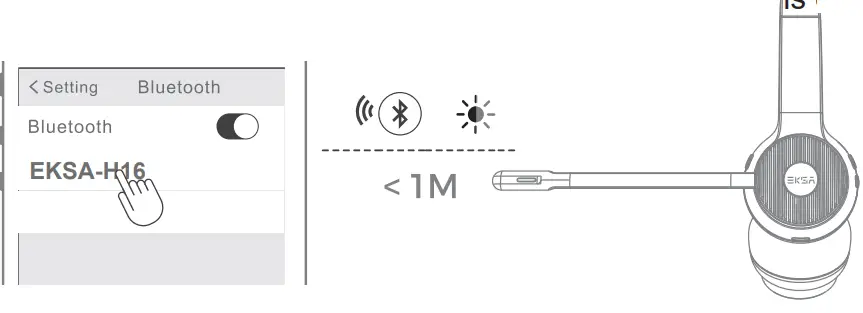
- Turn on the Bluetooth of the device, search for the Bluetooth headset, and then select “EKSA-H16” for pairing connection. After the connection is successful, the headset prompts “Connected”, and the blue light flashes once every 10s. The device displays that the Bluetooth headsetLis ponnected.
Note:
- If you need to connect a new device, you need to disconnect the Bluetooth connection from the connected device first, and the headset will automatically enter the pairing state, then use the new device to search for Bluetooth and complete the connection with the headset.
- Each time the headset is turned on, it will automatically search for and connect to the nearest connected device.
- When the phone is turned on (except for the call), press and hold the volume up key and volume down key for 5 seconds at the same time, and the red and blue lights flash once at the same time to clear all pairing information in the headset. After the pairing record is cleared, the previous device cannot be connected after the phone is turned on again, and you need to pair and connect again.
 USB Adapter Connection
 USB Adapter Connection
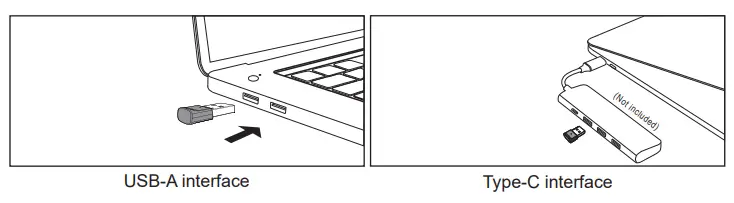
PC:
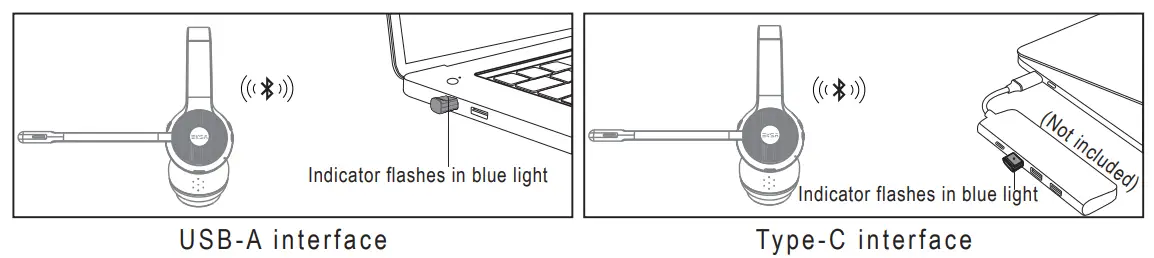
- Insert the USB adapter into the computer, the adapter will automatically start up and display “EKSA PC Adapter” on the computer, and the blue LED of the adapter will slowly flash into the pairing state.

- Turn on the headset, and the headset and adapter will automatically connect successfully.
Note: A computer with Bluetooth function can have Bluetooth connection and USB adapter connection at the same time; Select one of the connection methods by switching the audio driver. Select the audio driver with the name of EKSA-H16 for Bluetooth connection, and select the audio driver with the name of EKSA PC Adapter for USB adapter connection.
- After successful connection, the headset blue light flashes once every 10 seconds, and the adapter blue light remains on.
Windows®:
Audio Settings:

![]() [Control Panel]
[Control Panel]![]() [Hardware and Sound]
[Hardware and Sound]![]() [Sound]
[Sound]![]() [Playback]
[Playback] [EKSA PC Adapter(Set as Default Device)]
Microphone Settings:
![]() [Control Panel]
[Control Panel]![]() [Hardware and Sound]
[Hardware and Sound]![]() [Sound]
[Sound]![]() [Recording] [EKSA PC Adapter (Set as Default Device)]
[Recording] [EKSA PC Adapter (Set as Default Device)]
macOS:
[System Preferences] [Sound] [Input]
 ![]() [EKSA PC Adapter ]
[EKSA PC Adapter ]
[Output] ![]() [EKSA PC Adapter ]
[EKSA PC Adapter ]

 One to Two Bluetooth Connection
 One to Two Bluetooth Connection
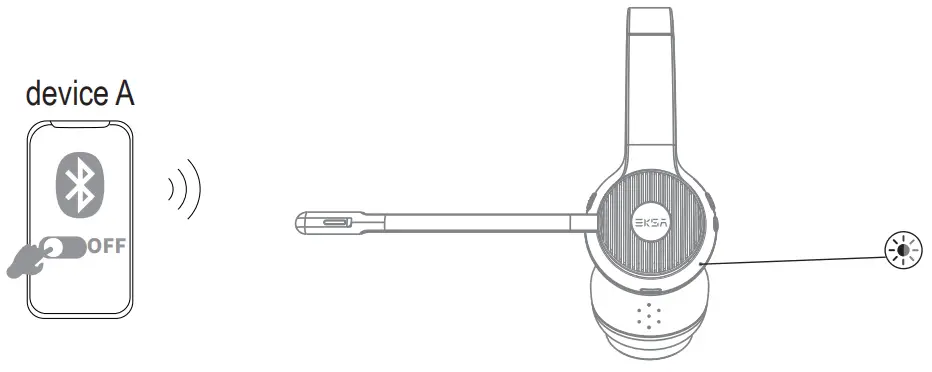
The headset supports the simultaneous connection of two devices via Bluetooth. The specific steps are as follows:
- First connect the headset to device A through Bluetooth pairing, and then turn off device A. At this time, the headset is disconnected and enters pairing mode.

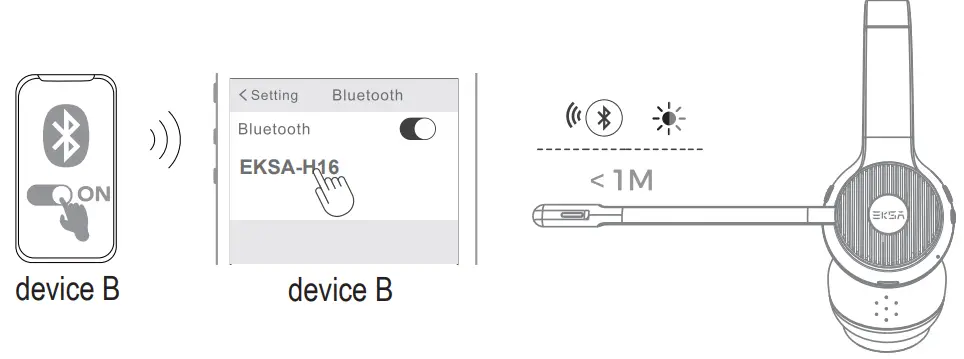
- Then open device B, and successfully connect with the headset through Bluetooth search pairing.

- Turn on device A again, and then connect the headset through device A. After the connection is successful, the headset will be connected to device A and device Bat the same time.

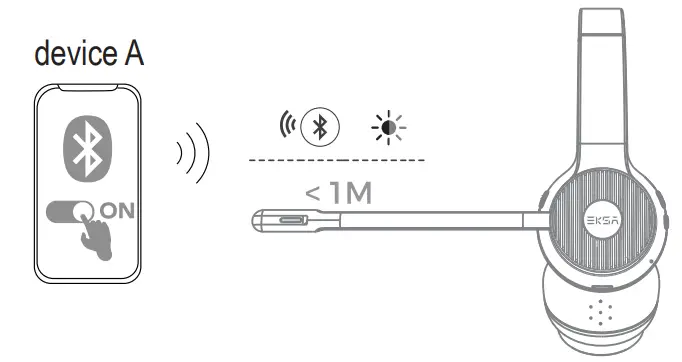
Note: The headset is connected to two devices at the same time. Only one of the devices works when using it. When the other device needs to be used, the currently working device needs to be suspended.
 Call Functions
 Call Functions
Call Handling:
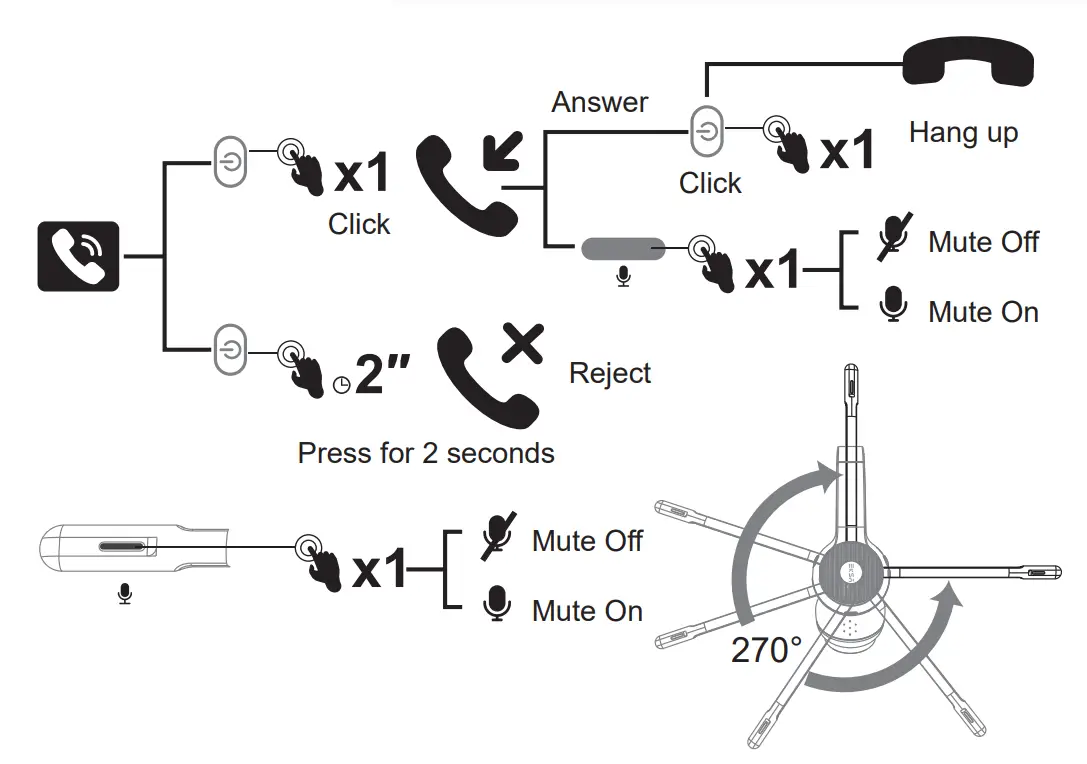
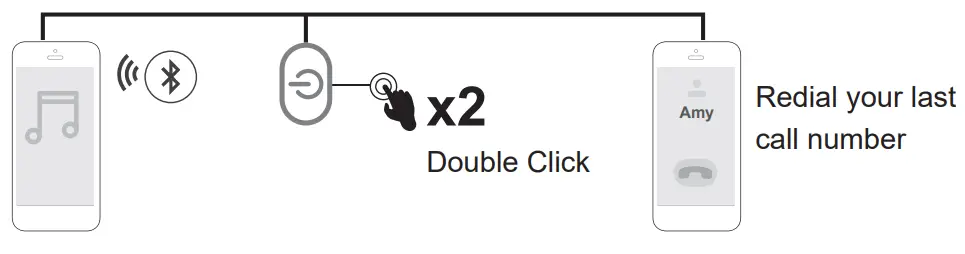
Redial:
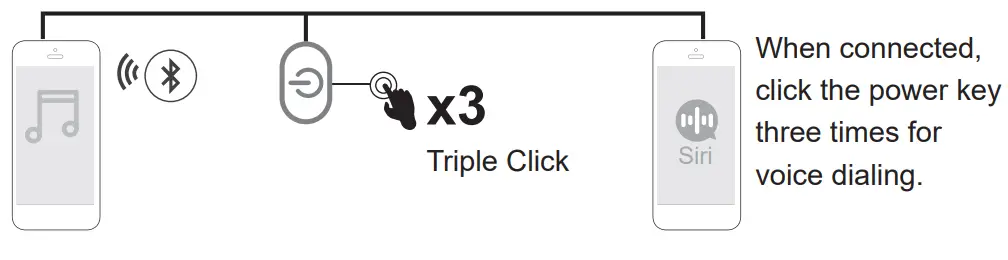
Voice dialing:
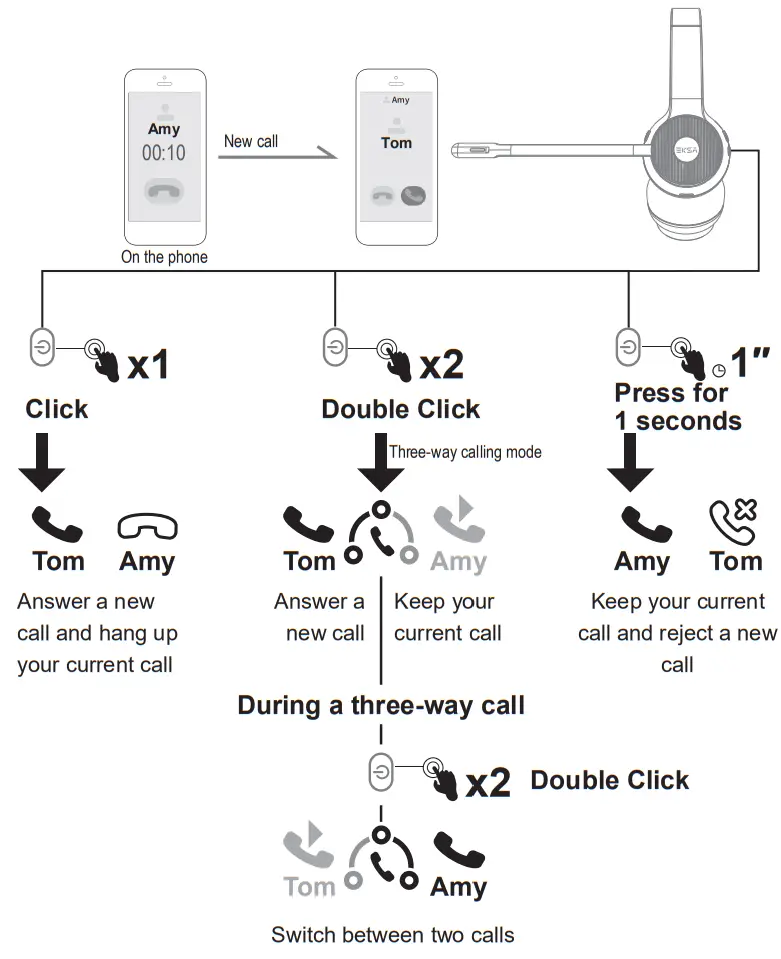
 Three-Way Calling:
 Music
Music
 Music
Music- Short press the power key to play and pause music.

- Long press the volume decrease key to perform the previous song operation.
- Long press the volume increase button to perform the next song operation.
 Volume Up and Down
 Volume Up and Down
- Short press the volume up key to increase the volume.
- Press the volume decrease key briefly to decrease the volume.
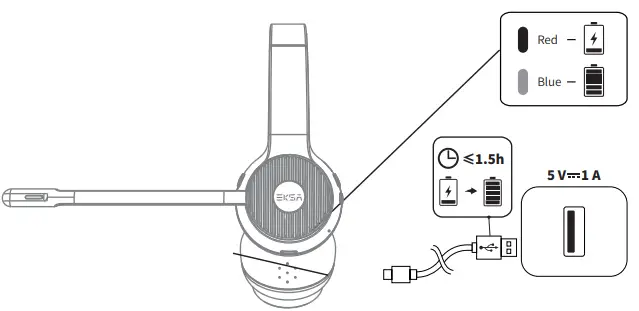
 Charging
- When the headset battery is low, a voice reminder will be given every 3 minutes: “Low Battery please charge”, and the red light will flash once every 5 seconds.
- Plug in the USB TypeC charging cable for charging, reset the headset and turn it off automatically, enter the charging state, the red light is always on when charging, and the blue light is always on when fully charged.
 FAQ
FAQ
– First check whether the headset is correctly connected to the device by referring to the manual, and then use the device to talk or listen to music.
– Confirm that the microphone of the headset or device is not muted and adjusted to the appropriate volume Confirm that the speaker of the headset or device is not muted and adjusted to the appropriate volume.
– Set the audio driver of the device correctly; Select EKSA-H16 for Bluetooth connection and EKSA PC Adapter for USB adapter connection.
– Replace another device or another USB jack to use, and confirm that the headset can work normally.
– First, refer to the headset manual, connect the headset and the computer correctly, and confirm that the connection is in good contact.
– Check whether the headset power supply is normal and ensure that the headset can be switched on and off normally.
– Check whether the headphone connector and the computer connector are dirty. Please keep the connector clean to prevent poor contact due to dirt.
– Replace another device or another USB jack to use, and confirm that the headset can work normally.
FCC WARNING
This device complies with part 15 of the FCC Rules. Operation is subject to the following two conditions: (1) this device may not cause harmful interference, and (2) this device must accept any interference received, including interference that may cause undesired operation. Any changes or modifications not expressly approved by the party responsible for compliance could void the user’s authority to operate the equipment.
NOTE: This equipment has been tested and found to comply with the limits for a Class B digital device, pursuant to Pan 15 of the FCC Rules. These limits are designed to provide reasonable protection against harmful interference in a residential installation. This equipment generates, uses and can radiate radio frequency energy and, if not installed and used in accordance with the instructions, may cause harmful interference to radio communications. However, there is no guarantee that interference will not occur in a particular installation. If this equipment does cause harmful interference to radio or television reception, which can be determined by turning the equipment off and on, the user is encouraged to try to correct the interference by one or more of the following measures:
- Reorient or relocate the receiving antenna.
- Increase the separation between the equipment and receiver.
- Connect the equipment into an outlet on a circuit different from that to which the receiver is connected.
- Consult the dealer or an experienced radio/TV technician for help.
The device has been evaluated to meet general RF exposure statement. The device can be used in portable exposure condition without restriction FCC ID:2A25A-H16
IC Caution:
Radio Standards Specification RSS-Gen, issue 5
This device contains licence-exempt transmitter(s)/receiver(s) that comply with Innovation, Science and Economic Development Canada’s licence-exempt RSS(s). Operation is subject to the following two conditions: This device may not cause interference. This device must accept any interference, including interference that may cause undesired operation of the device.
RF exposure statement:
The device has been evaluated to meet general RF exposure requirement. The device can be used in portable exposure condition without restriction.
Limited Warranty
Our friendly customer service team is ready and waiting to help. Feel free to contact us:
![]() GLOBAL: +852 6940 4955 (Mon to Fri 9:00 am-6:30 pm, UTC +8 HKT) INDIA: +91-8929-369-620 (Mon to Fri 1ST 9:30 am-5:30 pm)
GLOBAL: +852 6940 4955 (Mon to Fri 9:00 am-6:30 pm, UTC +8 HKT) INDIA: +91-8929-369-620 (Mon to Fri 1ST 9:30 am-5:30 pm)![]() GLOBAL: [email protected] INDIA: [email protected]
GLOBAL: [email protected] INDIA: [email protected]![]() www.eksatelecom.com/pages/warranty
www.eksatelecom.com/pages/warranty
Manufacturer: Y1 ZHAO (SHENZHEN) CO., LIMITED
Add.: 6th Floor, T3 Creative Building, Shenzhen Colorful Hu and Creative Expo City, No.5010 Baoan Avenue, Caowei Co Hangcheng Street, Baoan District, Shenzhen City, Guangdong Province, China 6th Floor, T3 Creative Building, Creative Expo City, No.5010 Baoan Hangcheng Street, Baoan Shenzhen, China![]() C&E Connection E-Commerce (DE) GmbH
C&E Connection E-Commerce (DE) GmbH
Add.: Zum Linnegraben 20, 65933, Frankfurt am Main, Germany
Tel.: +4906927246648
Email: [email protected]![]() APEX CE SPECIALISTS LIMITED
APEX CE SPECIALISTS LIMITED
Add.: 89 Princess Street, Manchester, M1 4HT, UK
Tel.: +441616371080
Email: [email protected]
Points de toilette sur www.quefairedemesdechets.fr


Made in China
FCC ID: 2A25A-H16 FCC ID: WSG-KH50 IC:28237-H16


