![]()
| GB3000003656 | GB3700P 012276 | GB6500M 000068 |
| GB8500MP 014645 | GB9000MP 014720 | GB10000MP 018438 |
GB3000 Gasoline Generator
| Technical Data of Gasoline Generators | |||
| Model | GB3000 | GB3700P | GB6500M |
| Nominal Voltage & Frequency | 230 V AC – 50 Ηz | 230 V AC – 50 Ηz | 230 V AC – 50 Ηz |
| Nominal power output (kW) | 3,3 kVA | 3,3 kVA | 7 kVA |
| Maximum Power (kW) | 3,5 kVA | 3,5 kVA | 7,5 kVA |
| DC Voltage (Volt) | 12 | 12 | 12 |
| Voltage Regulation | ΑVR | AVR | AVR |
| Engine Type | 4 stroke, air-cooled | 4 stroke, air-cooled | 4 stroke, air-cooled |
| Displacement (cc) | 208 | 208 | 420 |
| Horsepower (hP) | 7 | 7 | 13 |
| Cooling system | Air Cooled Engine | Air Cooled Engine | Air Cooled Engine |
| Oil tank capacity (lt) | 0,6 | 0,6 | 1,1 |
| Fuel | Gasoline | Gasoline | Gasoline |
| Fuel tank capacity (lt) | 15 | 15 | 25 |
| Noise at 7 meters distance (db(A)) | ≤ 68 | ≤ 68 | ≤ 75 |
| Dimensions (L x P x A) (mm) | 590 x 433 x 445 | 590 x 465 x 450 | 680 x 520 x 550 |
| Weight (kg) | 39 | 39 | 73 |
| Sockets | 2 x 16 Α, 1 x 12 V DC | 2 x 16 Α, 1 x 12 V DC | 2 x 16 Α, 1 x 12 V DC |
| Other characteristics | – | – | With starter, battery |
| Model | GB8500MP | GB9000MP | GB10000MP |
| Nominal Voltage & Frequency | 230 V AC – 50 Ηz | 230 V AC – 50 Ηz | 230 V AC – 50 Ηz |
| Nominal power output (kW) | 7,5 kVA | 8,5kVA | 9kVA |
| Maximum Power (kW) | 8,1 kVA | 9 kVA | 10 kVA |
| DC Voltage (Volt) | 12 | 12 | 12 |
| Voltage Regulation | ΑVR | AVR | AVR |
| Engine Type | 4 stroke, air-cooled | 4 stroke, air-cooled | 4 stroke, air-cooled |
| Displacement (cc) | 420 | 459 | 459 |
| Horsepower (hP) | 16 | 18 | 18 |
| Cooling system | Air Cooled Engine | Air Cooled Engine | Air Cooled Engine |
| Oil tank capacity (lt) | 1,1 | 1,1 | 1,1 |
| Fuel | Gasoline | Gasoline | Gasoline |
| Fuel tank capacity (lt) | 25 | 25 | 25 |
| Noise at 7 meters distance (db(A)) | ≤ 76 | ≤ 76 | ≤ 80 |
| Dimensions (L x P x A) (mm) | 720 x 530 x 610 | 720 x 530 x 610 | 720 x 530 x 610 |
| Weight (kg) | 81 | 85 | 87 |
| Sockets | 2 x 16 Α, 1 X 12 V DC | 2 x 16 Α, 1 X 12 V DC | 2 x 16 Α, 1 X 12 V DC |
| Other characteristics | With starter, battery | With starter, battery | With starter, battery |
ATTENTION
- Children should be kept in a safe distance from the generator.
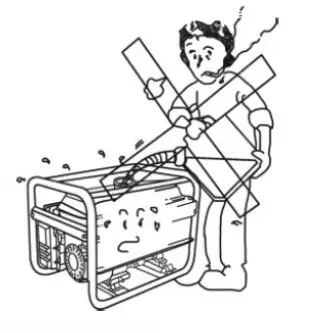
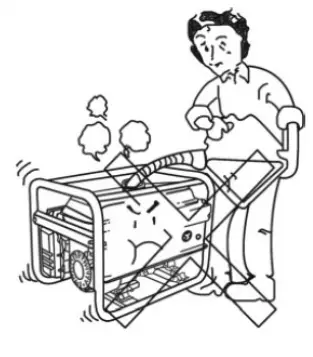
- Do not touch the engine and muffler while the generator is working or was just turned down to avoid injury. Please pay attention to the warning stickers on the generator.
- Electrical equipment (including cables and plug connecting component) should be in good condition before starting.
- New circuit breaker must be of the same level of performance, characteristics and parameters as the one of replacement.
- Due to high mechanical stress, only rubber sheath cables or parity products are allowed to be used.
- When using extension wire or mobile distribution cabinets, wire with 1.5mm cross section should not be longer than 60 metres; for 2.5mm cross section, wire should not be longer than 100 metres.
- For manual starting engines, the risk of a sudden change in direction of rotation must be avoided.
- On standard working conditions, the generator can only load on a rated output. If the working conditions are not standard, the generator should be run at a lower output. When temperature, altitude and humidity is higher than standard working conditions, the generator can reduce the output.
- Before any checks or maintenance work to the generator, the engine must be stopped. Disassemble the spark plug and key to make sure the engine will not start improperly/suddenly. Then check and maintain the generator based on the scheduled repair calendar.
- Besides daily maintentance and cleaning, other specific checking and readjustments to the generator should be conducted by authorized professional
personnel only and the required components sourced by them. (Contact your local retailers.) - A new or newly repaired machine must undergo a breaking-in period of at least 30 hours, during which its performance should not exceed 75% of rated performance.
THE IMPORTANCE OF THE SECURITY LABEL
| Caution |
| Risk of electric shock |
| Stay away from the the heat source |
| Do not remove moving parts |
| Read the user manual before using |
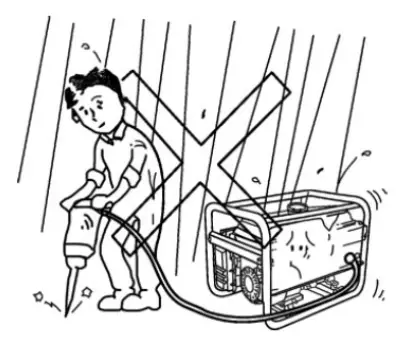
| Do not use in the rain, do not wash with water jet |
| Earthing terminal |
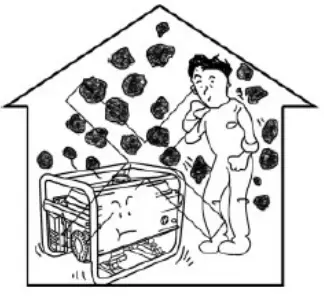
| Do not use in a non ventilated area for the risk of death |
| Conduct oil check |
| Don’t use water in case of an oil fire |
| Keep safety distance |
| Toxic exhaust fumes with risk of death |
| Hearing protection |
| HOT SURFACE |
| Don’t let children without surveillance around the device |
| Do not spill out when fueling. Remember to stop generator before fueling. |
| Within the EU, this symbol indicates that this product cannot be disposed of as waste. It contains valuable recyclable materials, and a recycling process should be followed to avoid damage to the environment and the human health from uncontrolled waste disposal. Please dispose of the device through appropriate collection systems or through your original retailer. This is a recyclable device. | ||
| Do not connect to electronic devices | ||


INTENDED USE / NOT INTENDED USE
This machine is a portable generator with a four-stroke gasoline engine, with AC, 50Hz / 60Hz and 12V DC output for domestic use.
- This gasoline generator is suitable for temporary power supply.
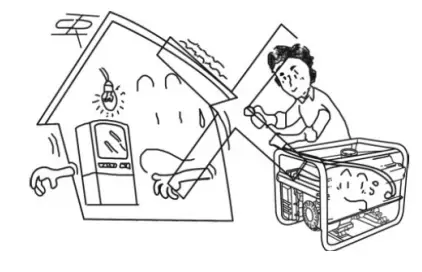
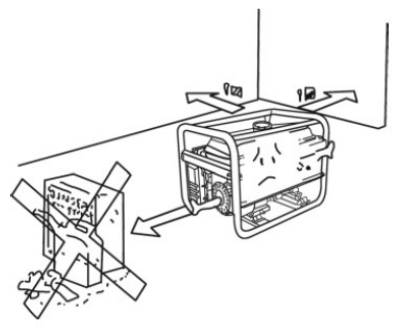
- The machine must only be operated outdoors or in a ventilated room.
- This product is intended for household use only in accordance with the instructions. All other applications, including professional use, are specifically
excluded. For damage or injury resulting from such an abuse, the user / operator is liable and not the manufacturer. - Part of the intended use is also the consideration of the safety and operating instructions in the manual.
- Persons who operate this machine should be familiar with the instructions and the possible dangers of using it. In addition, the existing safety rules should be strictly followed. Other general rules for safety and security areas should be respected.
- If there are user-made changes to the machine, there is no manufacturer liability for any damage from this set and the warranty is considered expired.
RESIDUAL RISKS
Even when the machine is properly used, there is always some residual risk that can not be ruled out. Because of the construction of the machine during the use the following potential hazards can arise:
– Inhalation of fumes (poisoning danger)
– Avoid contact with hot surfaces / exhaust system (danger of severe burns)
– Impairment of hearing for non-adherence to the prescribed hearing protection
– Skin contact with petrol/oil
– Inhalation of gasoline fumes
SAFETY TIPS
Never operate the generator in poor ventilated areas. If you cannot avoid indoor use, make sure that the room is adequately ventilated so that it does not affect people and animals. If you feel drowsy or have other symptoms of fatigue, seek fresh air. Ventilate the room very well before you enter and seek medical assistance.
Do not operate the generator under humid weather to avoid electric shock or short circuits. Do not touch the generator when either the generator or your hands are wet. This generator is not waterproof, so it should not be used in a place exposed to rain, snow or water splashes.
Never connect to house power circuit if commercial power supply is not cut. Always make sure that the general circuit breaker is closed. Otherwise, the sudden restoration of power may cause damage to either the generator or the appliance, and there is also a risk of fire.
Keep at least 1 m (3ft) away from inflammables. Store flammable materials such as gasoline, kerosene, matches, etc. away from the generator, as the temperature around the generator may rise during its operation.
Do not smoke while fuelling.
Make sure not to overfill when refuelling. Dry with a clean cloth in case you spill fuel outside.

Remember to stop generator before fuelling.
Other safety measures:
- Do not touch the exhaust or the exhaust cover under any circumstances while the engine is running or has just stopped.
- Never permit anyone to operate the generator whithout proper instructions.
- Always wear safety shoes and proper clothing.
- Keep children and pets away from the generator when it is operating.
- Do not use any other types of fuel other than the ones listed.
- Always operate the generator on level ground to ensure optimal operation and avoid fuel leakage.
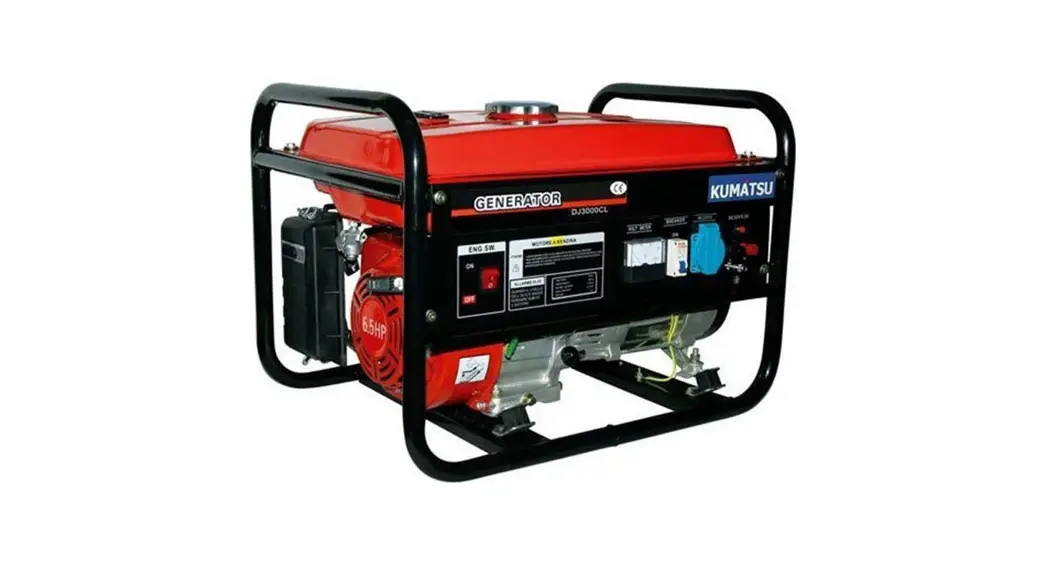
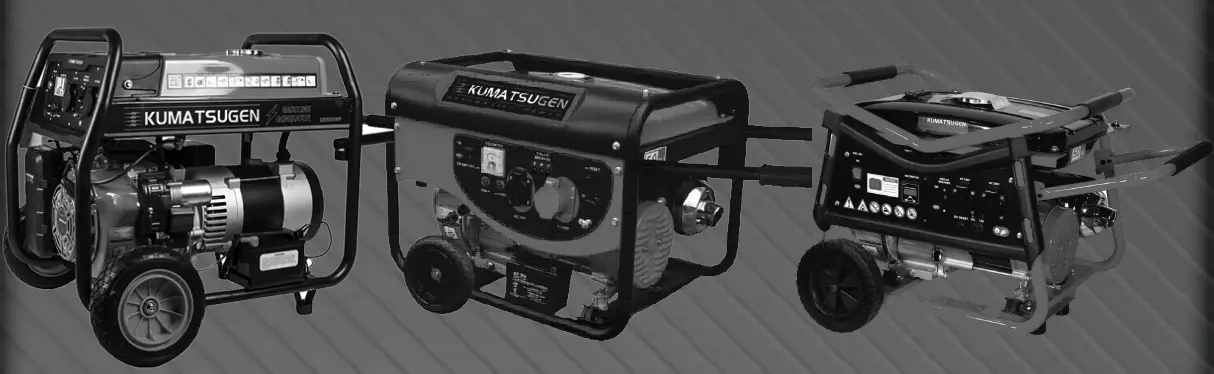
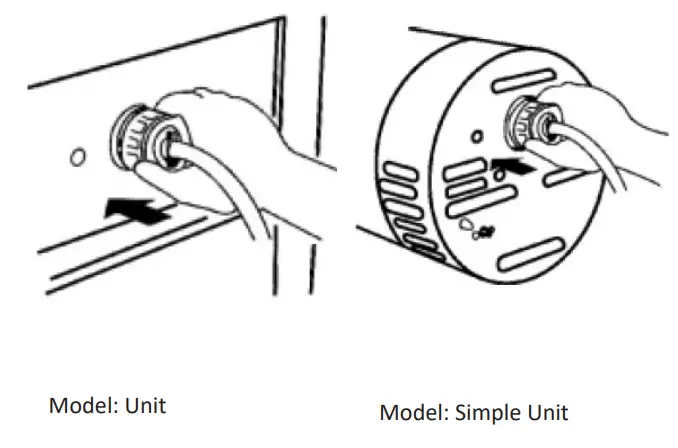
PARTS AND COMPONENTS INTRODUCTION
Model: Unit
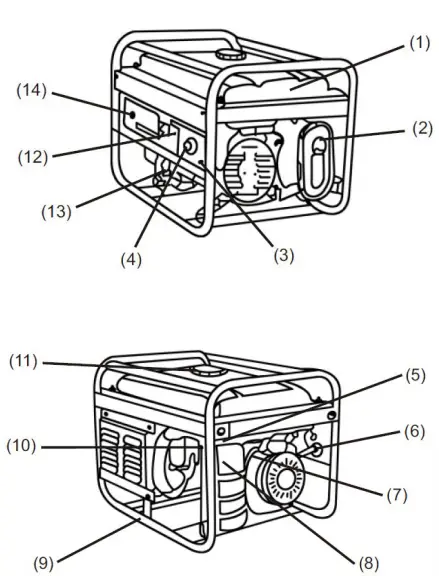
- Fuel tank
- Muffler
- Earthing terminal
- AC socket/plug
- Carburetor throttle lever
- Starter handle
- Fuel cock
- Air filter
- Pipe frame
- Spark plug
- Fuel tank cap
- Breaker
- Oil gauge Dipstick
- Starter switch
- AC protector
Model: Simple Unit
(Non-frame model)
INSPECTION BEFORE OPERATING
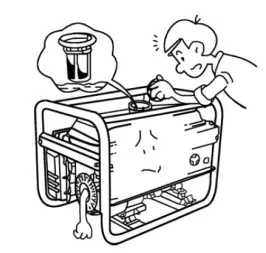
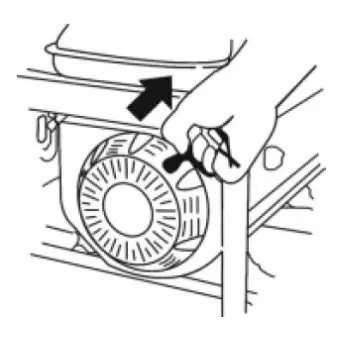
- Oil level
Always check the oil level before using the machine, with the generator switched off and on a level surface
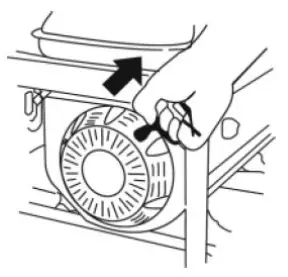
1. Unscrew the oil fillter gauge (dipstick) and clean it with a clean cloth.
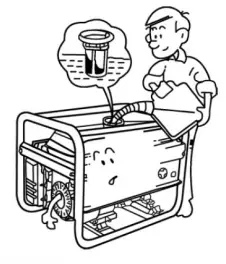
2. Insert the dipstick back without rescrewing, and check the oil level.
3. In case the oil level is below the lower mark of the dipstick, refill the oil to the upper mark.
4. Screw back on the dipstick. - Fuel
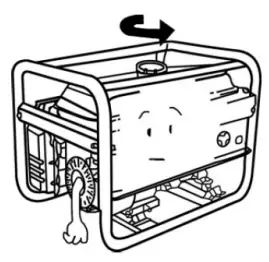
1. Open the fuel tank cap.
2. Check the fuel level, and refuel if necessary.
3. Refuel up to the shoulder of the fuel fillter.
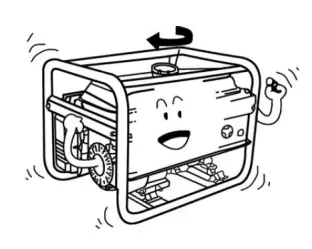
4. Screw back on the fuel tank cap.
- Air filter


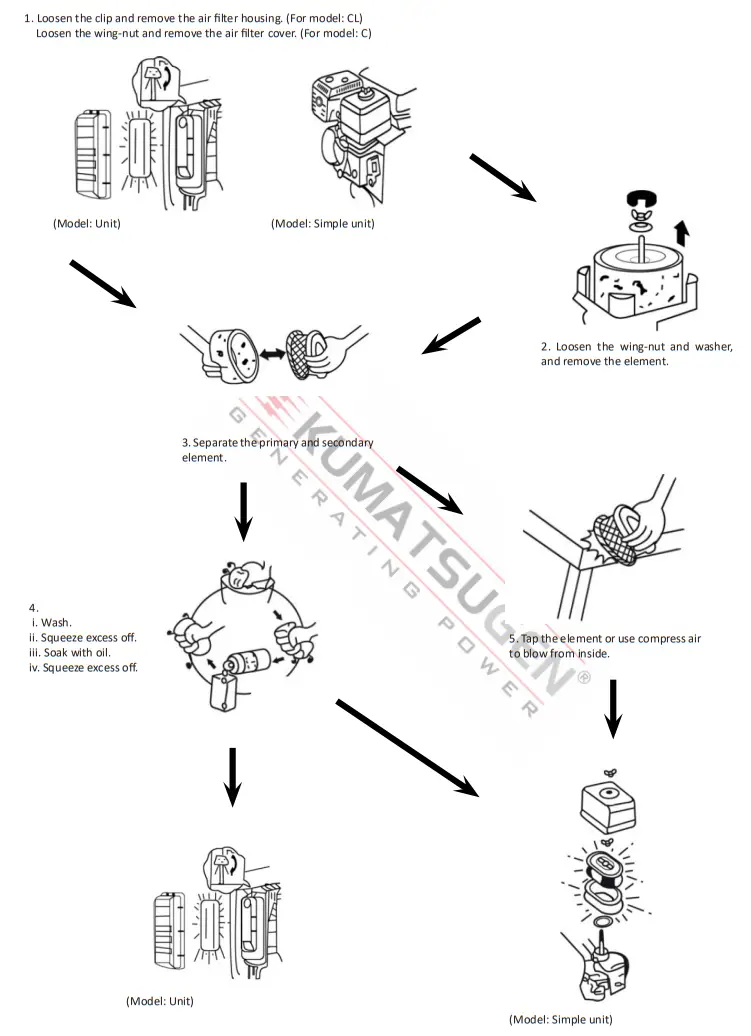
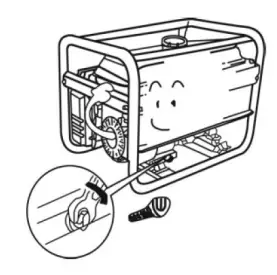
STARTING THE GENERATOR
- Remove all the loads from AC socket and switch off the BREAKER.

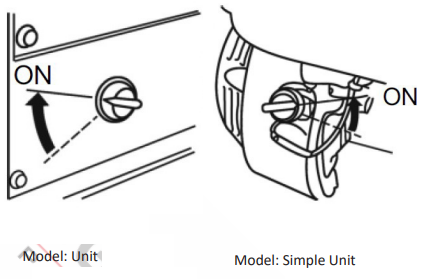
- Set the fuel cock to “ON” position.

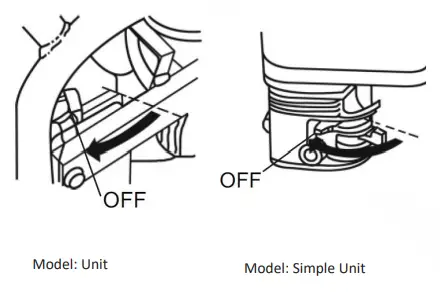
- Push the choke lever to “OFF” position.

- Turn the engine switch to “ON” position.

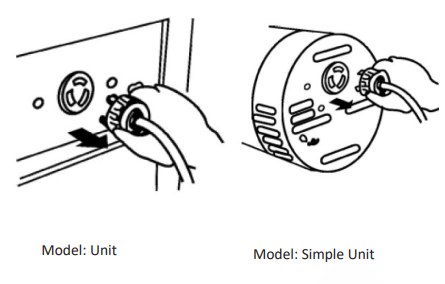
- Pull the starter handle until resistance is felt, then pull it out swiftly from original position.

- Once the generator starts, gradually turn the chock lever to “ON” position.


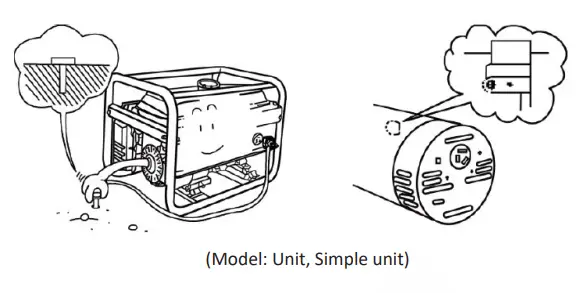
ELECTRICAL CONNECTION
![]() CAUTION!
CAUTION!
To keep the generator in the best running and electrical condition, please adhere to the following:
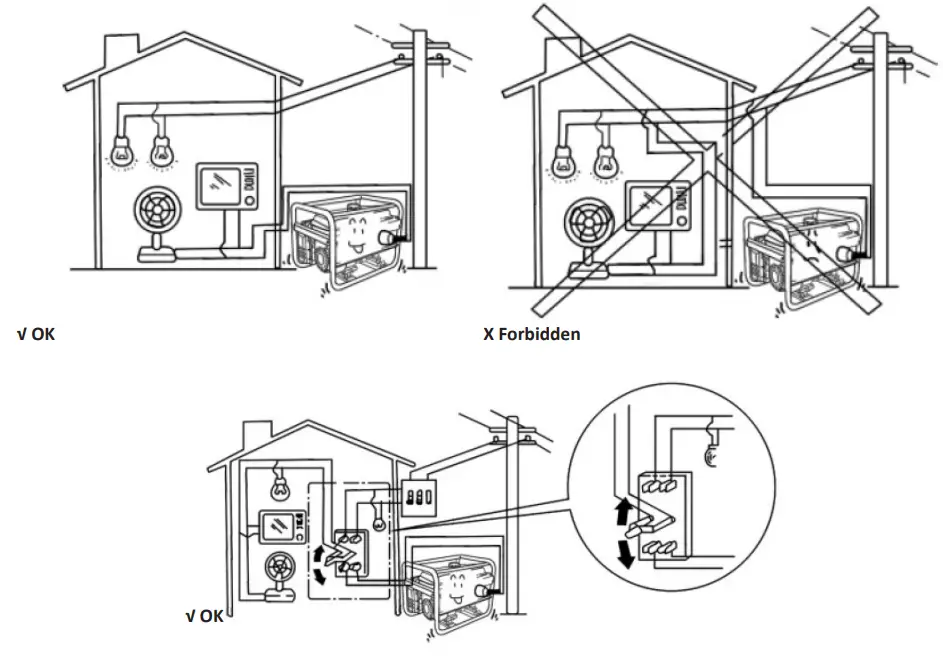
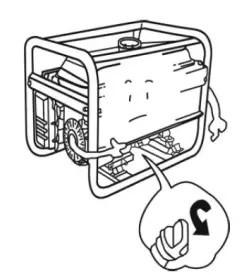
Ground the generator to prevent electric shock. Connect a piece of heavy wire between the grounding terminal of the generator and an external grounding device. If you are unsure of the correct way to connect and ground the generator, seek assistance from a licensed electrician.
Refer to the following table for the recommended electrical consumption of certain appliances:
| Type | Wattage | Appliance | Example | |||
| Starting | Rated | Appliance | Starting | Rated | ||
| Electric bulb or heater | X1 | X1 |  Electric bulb Electric bulb | | 100VA(W) | 100VA(W) |
 | Electric bulb 100W | |||||
| Fluorescent light bulb | X2 | X1.5 |  | | SOVA(W) | 60VA(W) |
| Fluorescent light bulb | 40W Fluorescent light bulb | |||||
| Motor Drive | X3-5 | X2 |  Refrigerator Refrigerator | | 45 0-750 VA | 300VA(W) |
 Electric fan Electric fan | Refrigerator 150W | |||||
CAUTION!
- Allow the machine to warm up without loading for 3 minutes.
- Make sure that all devices are in good condition when you connect them to the generator.
- If the generator supplies power to more than 2 devices, make sure you connect and start them one by one with the highest input power first.
- Most motorized devices require more than the listed power to start.
- Do not exceed the power limit needed for any single phase current.
- If an appliance starts to operate abnormally (becomes slow or stops suddenly), turn off the generator from the main switch immediately. Then unplug the appliance and examine it for signs of malfunction.
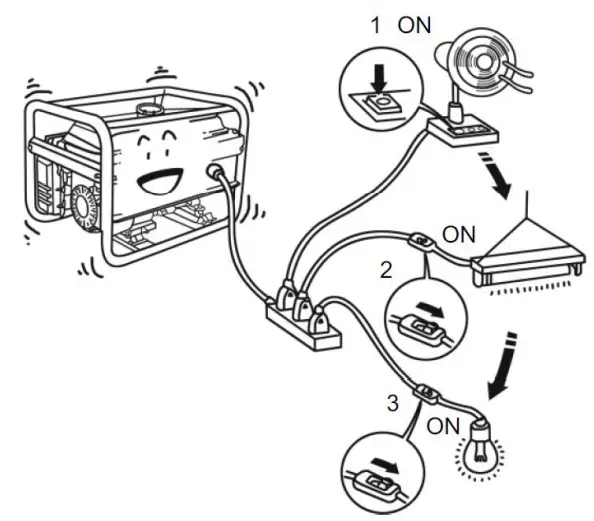
CAUTION: Do not connect the generator to a home’ power circuit. When such a connection is necessary, be sure that a skilled electrician does the job. Improper connecting between the generator and the home’s power circuit may cause damage to the generator, and even lead to a fire accident.
AC electrical connection
- Starting the generator.

- Connecting the appliances.

- Turn on the BREAKER or push down the AC protector.

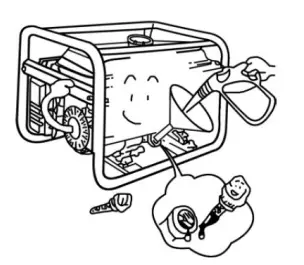
DC connection
The DC terminal may be used for charging 12V automotive-type batteries only.
- When using automatic-type batteries with battery cables, be sure to disconnect the minus pole battery cable from the battery before charging.
- Connect the charging cable to the battery terminals and the DC terminal of the generator.
• Connect the positive battery terminal to the positive generator terminal.
• Do not reverse the charging cables, or serious damage to the generator and/or the battery may occur.
• Do not allow the free ends of the cable to touch each other, if this occurs, the battery will short-circuit.
• When a large capacity battery is charged, excessive current flows through (the value varies depending on the discharged condition), and the fuse for DC
current might burn out. - Batteries produce flammable gases. Keep sparks, flames and cigarettes well away.
- To prevent the possibility of creating a spark near the battery, always connect the charging cables to battery first and only then to the generator. When
disconnecting, you should disconnect the cables from the generator first. - Charge the battery in a well ventilated place.
- Before charging, remove the cap from each cell of the battery. Stop charging if the electrolyte temperature exceeds 45°C.
STOPPING THE GENERATOR
- Remove all connected appliances and leave the generator working without load for 5 minutes.
- Turn off the Breaker.

- Turn off the engine switch.

- Turn off the fuel valve.

NOTE: In cases of emergency, turn the engine switch to “OFF” to stop the generator![]() WARNING!
WARNING!
Overworking the generator at a high speed and under heavy load, will result in damage.
REGULAR INSPECTION AND MAINTENANCE
![]() CAUTION!
CAUTION!
Daily and regular inspection is important to assure safe, proper and long-term operation of the generator. Refer to the following regular inspection table when conducting inspection and maintenance.
 Daily Daily |  After 20hrs or After 20hrs orevery month | every 3 months |  After 300hrs or After 300hrs orevery 6 months | once a year | ||
| Lubricant oil check |  |  | ||||
| Replace engine oil |  |  | | |||
| Air filter check |  | | ||||
| Air filter wash |  | |||||
| Fuel filter cup |  | |||||
| Fuel filter |  | | ||||
| Spark plug |  | |||||
 | Valve clearance | |||||
| Cylinder cover wash | ||||||
| Fuel tank wash |  | Every 2 years or when necessary | ||||
Engine oil replacement
 Unscrew and remove the dipstick.
- Unscrew the drain screw and empty the oil into a container.

- Screw in and tighten the drain screw with a sealing grommet.


- Fill with oil to the highest point of the indicator.

- Reinstall the dipstick
Recommended engine oil:
Four-stroke petrol engine oil SF, SF from API Service Classification or SAE 10W-30 equivalent to SG Class.
For freezing ambient temperature (below -15°C):
SE.SF from API Service Classification or SAE5W-30 equivalent to SG Class.
 Unscrew and remove the dipstick.
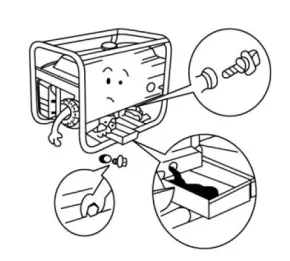
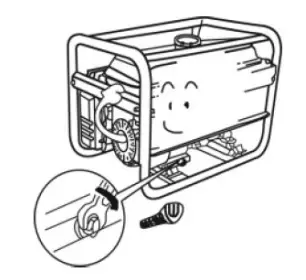
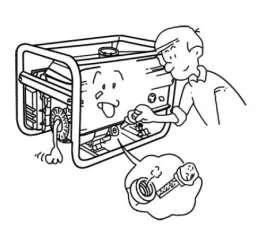
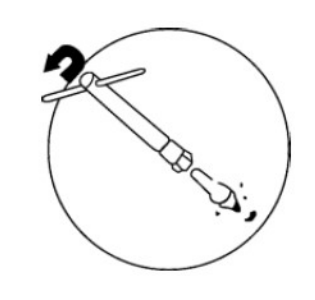
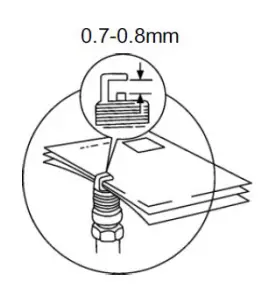
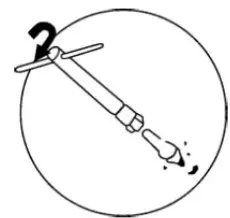
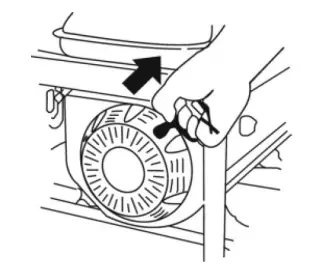
Spark plug cleaning
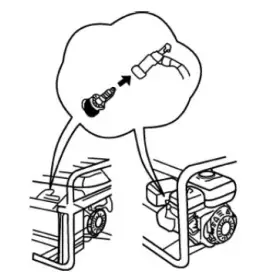
- Remove the cable from the spark plug.

- Remove the spark plug.

- Clean away any carbon sediment

- Measure the distance between electrodes.

- Reinstall the spark plug and cap.

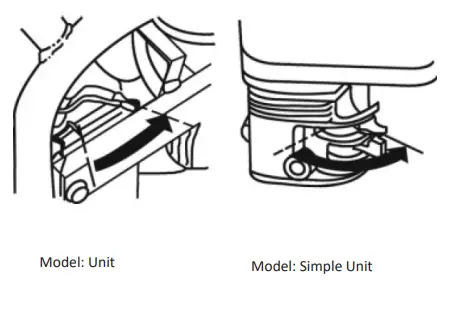
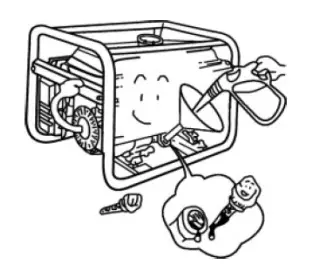
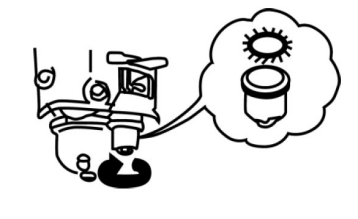
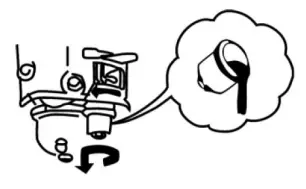
Fuel filter cleaning
- Set the fuel cock to “OFF” position, and remove the filter cup.
 Remove the fuel filter. (Model: Unit)
 Remove the fuel filter cup. (Model: Simple unit)
- Clean the fuel filter using an air pressure blow gun.

- Clean the fuel filter cup thoroughly.

- Insert a new rubber ring and then the filter cup securely.
 Remove the fuel filter. (Model: Unit)
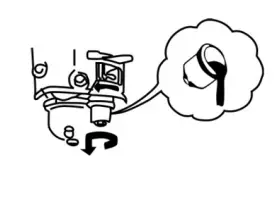 Remove the fuel filter cup. (Model: Simple unit)
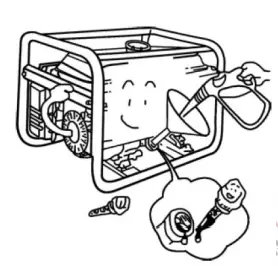
LONG-TERM STORAGE
If the generator has to be stored for a long period of time (more than 30 days), the following steps should be followed.
- Turn the fuel tap to “OFF” position, remove the fuel filter cup, and drain off the fuel in the cup. (Model: Simple unit)

- Unscrew the fuel valve and drain all the fuel. (Model: Simple unit)

- Reinstall the fuel filter cup with a new rubber ring. (Model: Simple unit)

- Loosen the carburetor’s drainplug and drain off the fuel. (Model: Unit)

- Loosen the oil drain plug and dipstick and drain off the engine oil.

- Reinstall the drain plug and dipstick.

- Pull the starter handle gently until resistance is felt.
Remember that if you try to start your engine after a long storage period, you need to check your spark plug for traces of oil. In such cases, clean your spark plug with a little petrol fuel.
TROUBLESHOOTING
| PROBLEM | CAUSE | SOLUTION |
| Engine not starting | Not enough fuel. | Refuel. |
| Engine switch not at ON position. | Turn the switch to ON. | |
| Not enough oil. | Check the oil level and refill. | |
| The power while pulling the handbrake is not enough. | Start the engine according to the instructions. | |
| The spark plugs are oxidized. | Check and clean the spark plugs following the manual instructions. | |
| No energy is generated | The main switch is turned off. | Turn the switch to ON. |
| Socket contact not good. | Adjust the distance of the of the cable. | |
| The necessary engine speed cannot be achieved. | Adjust according to the requirements. |
For most efficient performance and maximum working life of the generator, proper use and maintenance according to the instructions in this manual is essential. For proper maintenance, contact an authorized repair shop or the supplier.
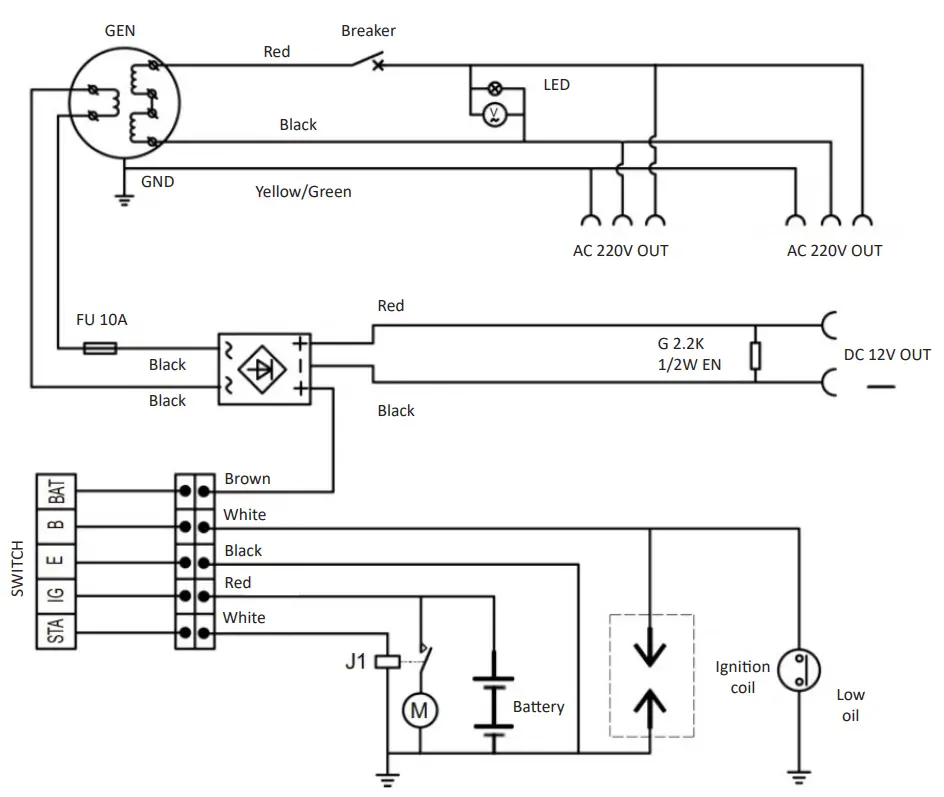
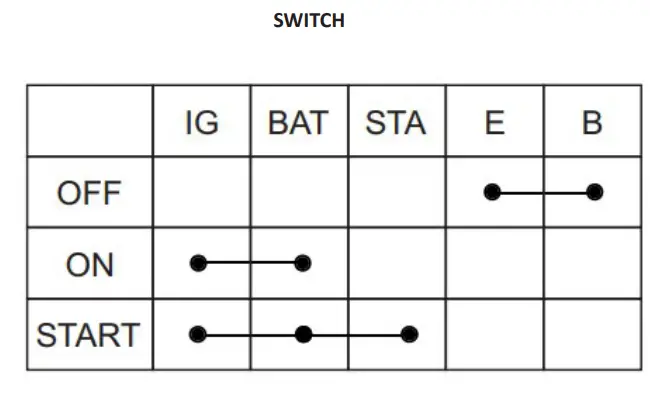
ELECTRIC DIAGRAM
The generators have been manufactured according to strict standards, set by our company, which are aligned with the respefive european quality standards. The generators are provided with a warranty period of 24 months for non-professional use and 12 months for professional use. The warranty is valid from the date of purchase of the product. Proof of the warranty right is the purchase document of the generator (retail receipt or invoice). Under no circumstances shall the company cover the relevant cost of spare parts and respective required work- ing hours unless a copy of the purchase ocument is presented. In case the repair has to be done by our service department the cost of transportati on (to and from) is enllirely borne by the sender (client). The generators must be sent for repair to the company or to an authorized workshop in the appropriate way and means of transport.
WARRANTY EXEMPTIONS AND RESTRICTIONS:
- Spare parts that wear out naturally as a consequence of being used (wheels, handles, spark plugs etc.).
- Generators damaged as a result of non-compliance with the instructi ons of the manufacturer.
- Generators poorly maintained.
- Damages as a result of exceeding the maximum load or maximum durative on of continuous operation according to the specifi cations of each generator type, as presented in the instruc-ons manual.
- Generators given to third entties free of charge.
- Storing the generator for a longtime with fuel.
- Damage as a result of mistaken assembly or bad maintenance.
- Damage as a result of mistaken mixing of fuel with oil.
- Damage as a result of poor quality of fuel or lubricant.
- Damage as a result of not cleaning the generator as required.
- Generators that have been modified or disassembled by unauthorized personnel.
- Generators used for rent.
The warranty covers only the free of charge replacement of the component that presents a manufacturing defect or material failure. In case of lack of a specificspare part the company
reserves the right to replace the generator with another of the same kind. After all warranty procedures have been concluded, the warranty period of a generator shall not be extended
or renewed. Replacement of a spare part with repair charge is covered by a 1 year warranty of good operation, subject to compliance with the warranty terms. The spare parts or tools
that are replaced remain in the possession of our company. Requirements, other than those mentioned in this warranty form, regarding repairing a generator or damage thereof, do not
apply. Greek law and relative regultive ons apply to this warranty.
WARRANTY
This appliance is a quality product. It was designed in compliance with current technical standards and made carefully using normal, good quality materials. The warranty period is 24 months for non-professional use and 12 months for professional use and commences on the date of purchase, which can be verified by the receipt, invoice or delivery note. During this warranty period all func-tional errors, which, despite the careful treatment described in our operating manual, are verifiably due to material flaws, will be rectified by our after-sales service staff. The warranty takes the form that defective parts will be repaired or replaced with perfect parts free of charge at our discretion. Replaced parts will become our property.
Repair work or the replacement of individual parts will not extend the warranty period not will it result in a new warranty period be-ing commenced for the appliance. No separate warranty period will commence for spare parts that may be ted. We cannot offer a warranty for damage and defects on appliances or their parts caused by the use of excessive force, im-proper treatment and servicing.
This also applies for failures to comply with the operating manual and the installation or spare and accessory parts that are not included in our range of products. In the event of interference with of modifica-tions to the appliance by unauthorized persons, the warranty will be rendered void. Damages that are attributable to improper handling, over loading, or nat-ural wear and tear are excluded from the guarantee. Damages caused by the manufacturer or by a material defect will be corrected at no charge by repair or by providing spare parts. The prerequisite is that the equipment is handed over assembled, and complete with the proof of sale and guarantee.
For a guar-antee claim, only use the original packaging. That way, we can guarantee quick and smooth guarantee processing. Please send us the appliances post-paid or request a Freeway sticker. Unfortunately we will be unable to accept appliances that are not postpaid. The warranty does not cover parts that are subject to nat-ural wear and tear. If you wish to make a warranty claim, report faults or order spare parts or accessories, please contacti., after-sales center: Subject to change without prior notice. <


