itek ITMF24V075FHD 23.8 Inch Flat FHD 1920×1080 Monitor User
Safety Precautions
WARNING:Safety Instructions
Do not place the monitor in rain,humid environment or open the monitor case to avoid any shock, electrical hazards,and/or mechanical hazards.
Operation
- Keep the monitor out of direct sunlight and away from stoves or any other heat source.
- Keep the monitor out of water source.
- Remove any object that could fall into ventilation holes or prevent proper cooling of the monitor’s electronics.
- Do not block the ventilation holes.
- Do not knock or drop the monitor during operation or transportation
Maintenance Guidelines
CAUTION
Before cleaning the monitor, unplug the monitor power cable from the electrical outlet.
Car ing For Your Monitor
- To clean your screen, slightly dampen a soft, clean cloth with water, If possible, use a special screen-cleaning tissue or solution. Do not use benzene, thinner, ammonia, abrasive cleaners, or compressed air.
- Use a slightly dampened, warm cloth to clean the frame. Avoid using detergent of any kind as some detergents might leave a milky film on the plastics.
- Unplug the monitor if you are not going to use it for an extended period of time.
- To avoid the risk of shock or permanent damage to the set, do not expose the monitor to dust, rain, water, or excessive moisture environment. If your monitor gets wet, wipe it with dry cloth as soon as possible.
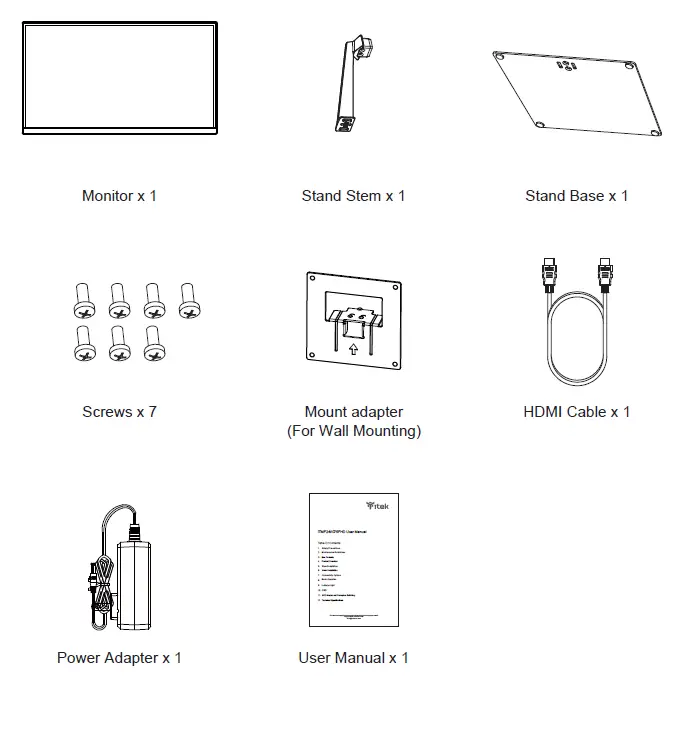
Box Contents
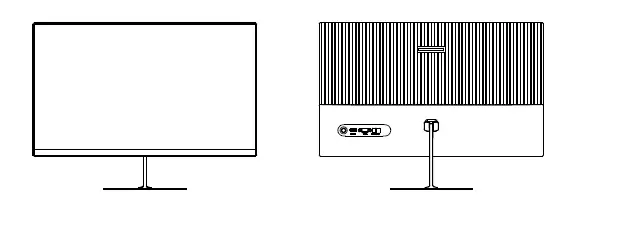
Product Overview
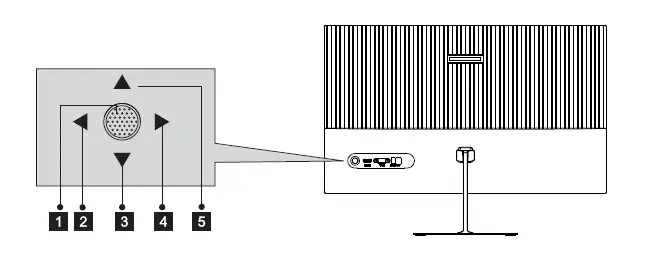
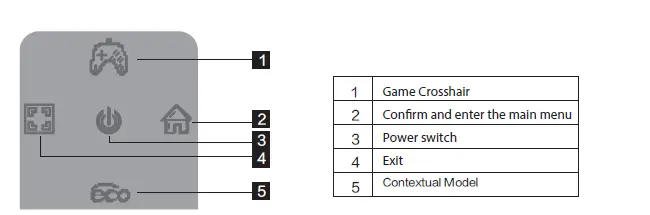
- Rocker switch button: Press to turn on or turn off the monitor.
- Left rocker button: Push the rocker left to exit OSD menu.
- Down rocker button: Push the rocker down to move down in menus.
- Right rocker button: Push the rocker right to enter sub-menus/ quickly enter the main menu.
- Up rocker button: Push the rocker up to move up in menus.
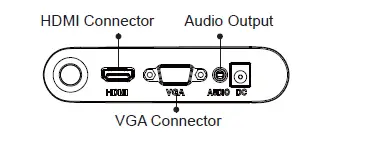
Monitor Ports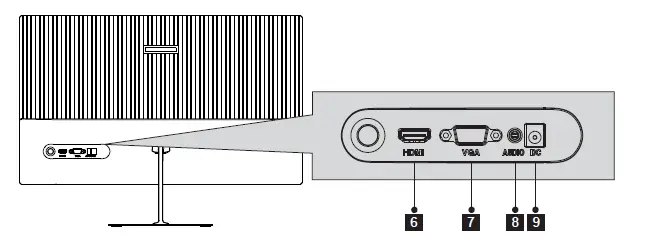
- HDMI Connectors: Insert one end of the HDMI cable into the computer’s HDMI output and connect the other end to the monitor’s HDMI port.
- VGA Connectors: Insert one end of the VGA cable into the VGA output device and connect the other end to the monitor’s VGA port.
- Audio Output: Insert one end of the Audio cable into the computer’s Audio output to receive the Audio signals from your monitor.
- Power Connector: Insert the power Cable to supply power to the monitor
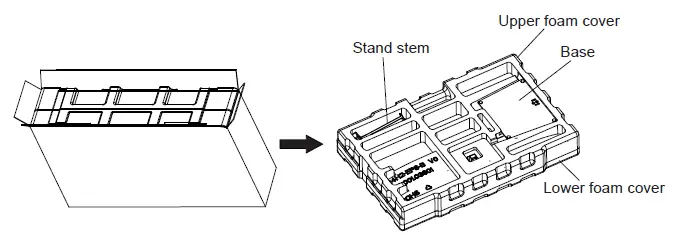
Stand lnstallation
- Open the package to take out foams and put them on a flat tabletop

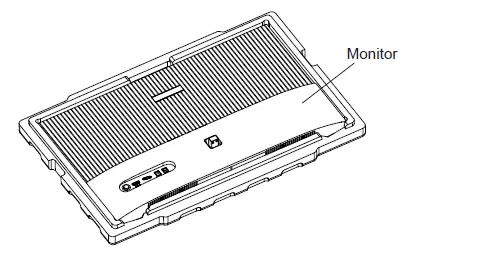
- Remove the upper foam cover and put it aside, take out the monitor film bag and put the monitor in the lower foam cover

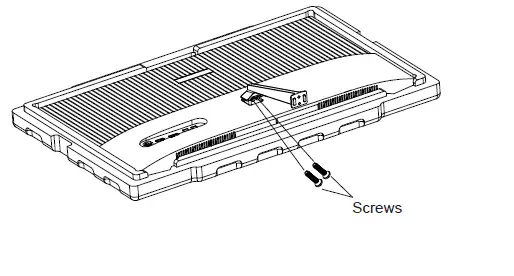
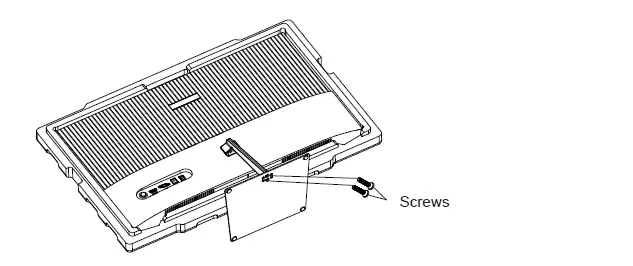
- Take out the stand, install it on the rotary shaft of the monitor and tighten them with 2 screws.

- Take out the base, align it with the bottom of the stand and tighten them with 2 screws.

- Grasp the bracket with your hands to stand up the machine.

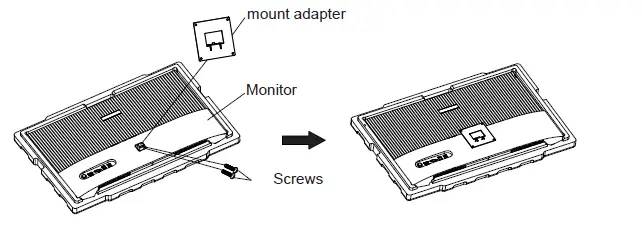
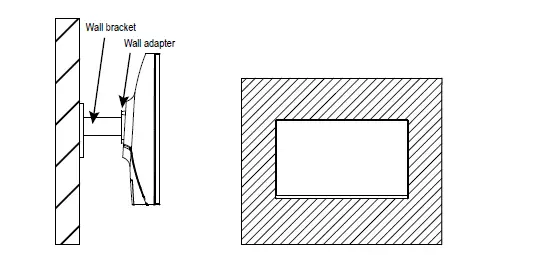
Mount Installation
- Open the package to take out foams and put them on a flat tabletop.
- Remove the upper foam cover and put it aside, take out the monitor film bag, and put the monitor in the lower foam cover. Take out the mount adapter and 2 screws and tighten the mount adapter with 2 screws.

- Do not pinch the screen directly with your hands during the process of hanging the product to prevent the screen from breaking

Connectivity Options
Connecting the Power Cable
Connect the included power adapter to the power connector, and then plug the other end into an wall outlet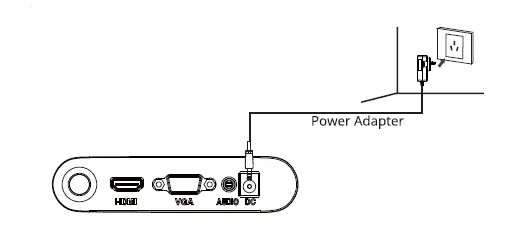
Connecting Your Earphones
Plug in your earphones to receive audio signals from your monitor. If your earphones are connected to the monitor and audio devices are connected to your computer at the same time, the audio devices will not produce sound. Earphones and other audio devices not included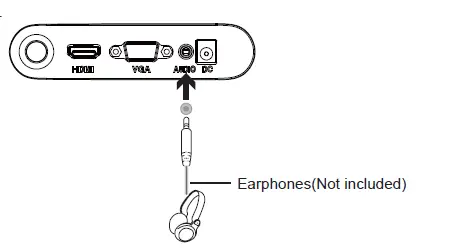
VGA Connectivity
In order for the monitor to receive VGA signals from the computer, use the VGA cable to connect the monitor to the computer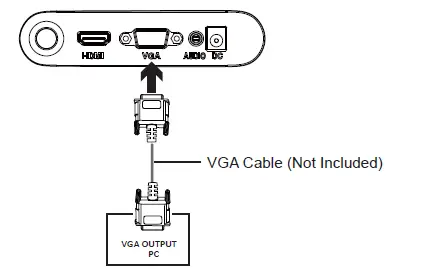
HDMI Connectivity
In order for the monitor to receive HDMI signals from the computer, use the HDMI cable to connect the monitor to the computer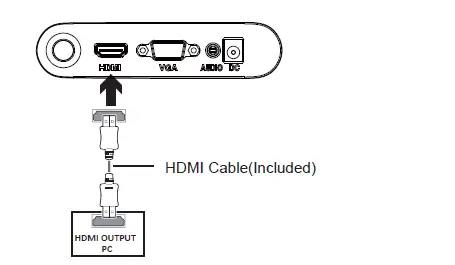
Basic Operation
- Insert one end of the HDMI cable into your PC’s graphics card. A VGA cable may also be used.
- Connect the other end of the cable to the corresponding connector on your monitor.

- Connect the power cable to your monitor then connect the other end to your power source. It is recommended that you use a surge protector with adequate voltage if a wall outlet cannot be reached directly.
- Locate the power button on the monitor and press it to turn on the monitor.
Adaptive-Sync
This feature is off by default. To activate, you must have hardware with Adaptive-Sync capability, a DP or HDMI cable, and the latest graphic drivers. After connecting your computer and monitor with a DP or HDMI cable, you may receive a prompt to enable the feature on your computer. If you do not, you may need to enable the function in your graphics card menu. See your graphics card manufacturer’s documentation for instructions.
Indicator Light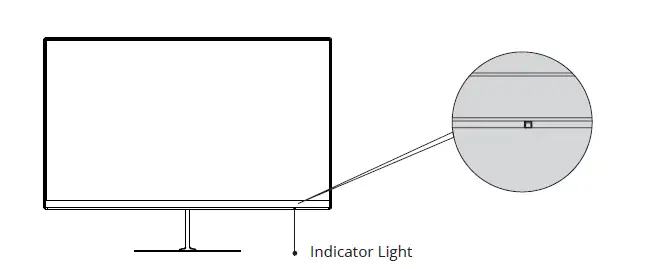
Steady blue light indicates the power is on and the monitor runs normally. Red light indicates no video source and no horizontal or vertical signal detected or low voltage. Please make sure that your computer is turned on and all video cables are fully plugged in and/or connected
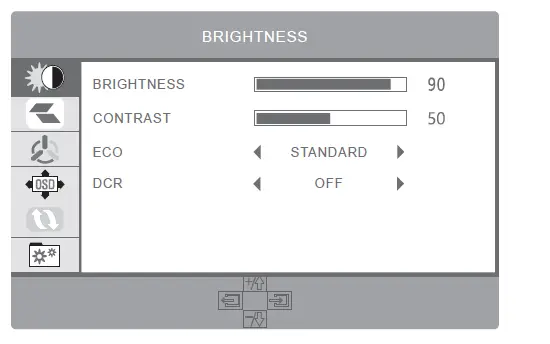
OSD
The On-Screen Display(OSD) Menu may be used to adjust your monitor’s settings and appears on screen after turning on the monitor and pressing the M button
When using the monitor for the first time, settings will automatically adjust to optimal settings according to your computer’s configuration and parts etc
- Push the rocker buttons ( ) to activate the browser screen

- Push the rocker button right
 to enter the OSD screen.
- Push the rocker buttons
 or
or to scroll through the functions. – Select the desired function, and push the rocker buttons to enter the sub-menu. – Push the rocker buttons or to scroll through sub-menus, and push the rocker buttons key to select and confirm the desired function. – Push the rocker buttons or to select one option, and push the rocker buttons to confirm settings and exit from the current menu.
 - Push the rocker buttons to exit from the menu screen
| Main Menu | Sub Menu | Options | Description |
| BRIGHTNESS | BRIGHTNESS | 0-100 | Adjust display brightness |
| CONTRAST | 0-100 | Adjust display contrast | |
| ECO | STANDARD/GAME/ RTS/FPS/MOVIE/TEXT | Set visual mode | |
| DCR | OFF/ON | Turn off/on DCR function | |
| IMAGE | H.POSITION | 0-100 | Adjust horizontal position |
| V.POSITION | 0-100 | Adjust vertical position | |
| CLOCK | 0-100 | Adjust clock | |
| PHASE | 0-100 | Adjust phase | |
| ASPECT | WIDE/AUTO/4:3 | Set Aspect Ratio | |
| COLOR TEMP. | COLOR TEMP. | WARM/USER/COOL | Adjust color temperature |
| RED | 0-100 | Customize RGB components | |
| GREEN | 0-100 | ||
| BLUE | 0-100 | ||
| OSD SETTING | LANGUAGE | ENGLISH/ESPAÑOL/ PYCCKИЙ/FRANÇAIS/ PORTUGUÊS/한국/ DEUTSCH/TÜRKÇE/ 日本語/简体中文/ POLSKI/ITALIANO/ NEDERLANDS | Set OSD language |
| OSD H.POS. | 0-100 | Adjust OSD horizontal position | |
| OSD V.POS. | 0-100 | Adjust OSD vertical position | |
| OSD TIMEOUT | 5-100 | Set how long the OSD remains open | |
| TRANSPARENCY | 0-100 | Set OSD overall transparency | |
| RESET | IMAGE AUTO ADJUST | N/A | Auto adjust display image |
| COLOR AUTO ADJUST | N/A | Auto adjust display color | |
| RESET | N/A | Reset monitor configurations | |
| MISC | SIGNAL SOURCE | HDMI/VGA | Display the input signal |
| MUTE | OFF/ON | Turn off/on the mute feature | |
| VOLUME | 0-100 | Adjust audio volume | |
| LOW BLUE RAY | 0-100 | Set blue ray filtering level | |
| OVERDRIVE | OFF/ON | Turn off/on the overdrive | |
| Adaptive-Sync | OFF/ON | Turn Adaptive-sync off/on |
Technical Specifications
| Model | ITMF24V075FHD |
| Screen Size | 23.8″ |
| Aspect Ratio | 16:9 |
| Backlight | E-LED |
| Brightness | 250cd/m²(Typ.) |
| Panel | VA |
| Resolution | HDMI1.4: 1920*1080@75Hz |
| Refresh Rate | 75Hz |
| Response Time | 5ms |
| Viewing Angle | 178°(H)/178°(V) |
| Contrast Ratio | 3000:1 |
| VESA Mounting | 75 x 75mm |
| Display Colours | 16.7M |
| Adaptive-sync | Yes |
| Interface | HDMI 1.4*1, VGA *1 |
| Power Input | DC 12V 2.5A |
| Audio | |
| Speakers | NO |
| Audio Out | Yes |
| Accessories | |
| Power Adapter | Yes |
| HDMI Cable | Yes |
| Additional Functions | |
| Low Blue Light | Yes |
| Physical Dimensions | |
| Dimensions (w/ stand) | 542.4 x 402.8 x 160.9 mm |
| Dimensions (w/o stand) | 542.4 x 323.1 x 38.5 mm |
| Net Weight | 3.3kg |
| Gross Weight | 4.5kg |
Imported and distribuited for ITEK Europe Bestit Srl, via dei Fabbri, 40050, Funo di Argelato, Bologna, Italy Web: www.itekevo.com Mail: [email protected]


