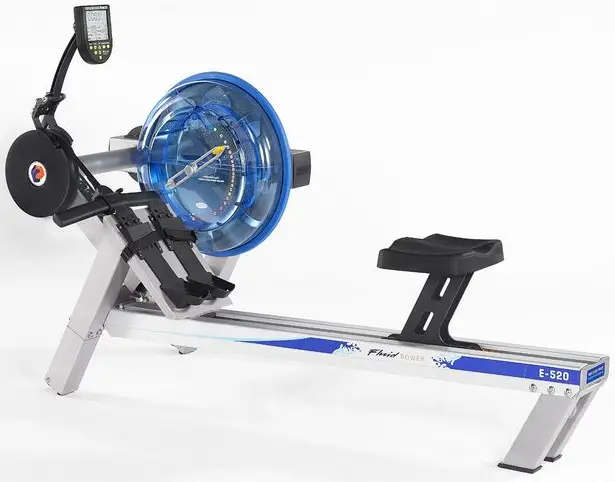
FDF Fluid Rower FR-E520
Training with the E520
1. As with any piece of fitness equipment, consult a physician before beginning your E520 exercise program.
2. Follow instructions provided in this manual for correct foot position and basic rowing techniques.
CAUTION
1. The E520 can stand for storage. When doing so, please follow the instructions given on the basic operation section of this manual.
2. Keep hands away from moving parts, as indicated by the warning sticker on the mainframe of your machine and on the rear of the fluid tank.
Rower Mainframe
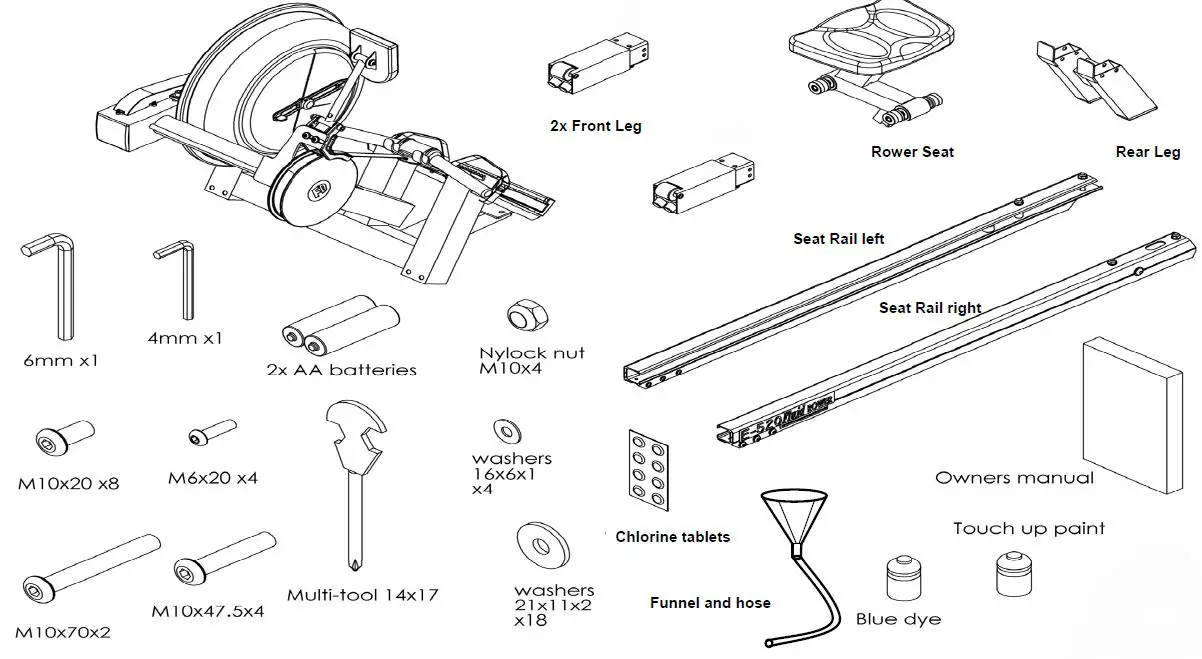
Main frame Parts:
1. Main frame.
2. Front leg x2.
3. Rear leg.
4. Rower Seat.
5. Seat Rail (Left/Right)
Taped inside aluminum rails:
1. M10x70mm bolt x2.
2. 10mm washer x2.
3. Seat Rail spacer x2.
Bolt pack contents:
1. M10x20mm x8.
2. M10x47.5mm x4.
3. M10x70mm bolt x2.
4. M6x20mm bolt x4.
5. M10 washer x18.
6. M6 washer x4.
Miscellaneous:
1. Funnel and hose.
2. E520 Owners Manual.
3. 6mm Allen key.
4. 4mm Allen key.
5. Chlorine tablets x8
6. Blue dye.
7. Main frame touch up paint.
INSTALLING INSTRUCTIONS
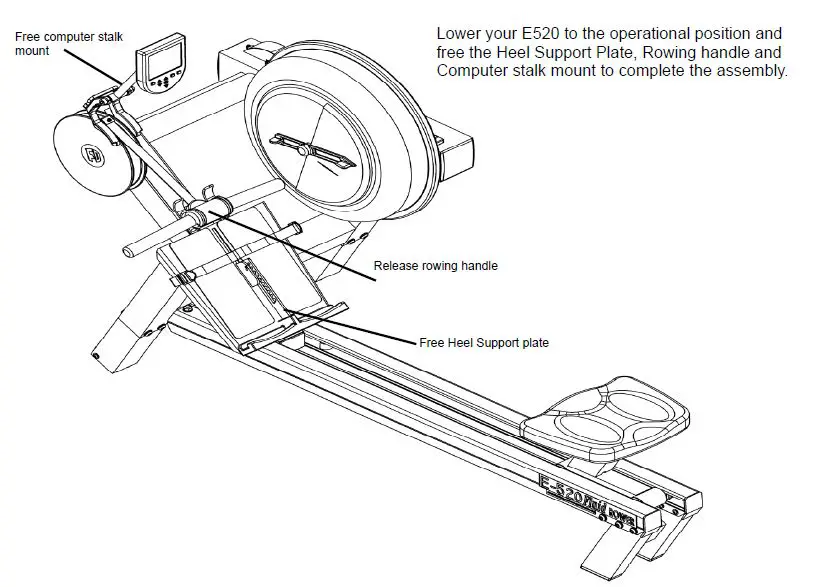
Step 1: Requires the mainframe, 2x front leg, 8x M10x20mm bolt and washer. Remove mainframe from box and lay on soft surface such as carpet as shown. Tilt frame upward slightly and install rower front leg with 4x M10x20mm bolt/washer. Repeat for other leg. Do not free Rowing handle, Heel support or computer stalk until assembly is complete.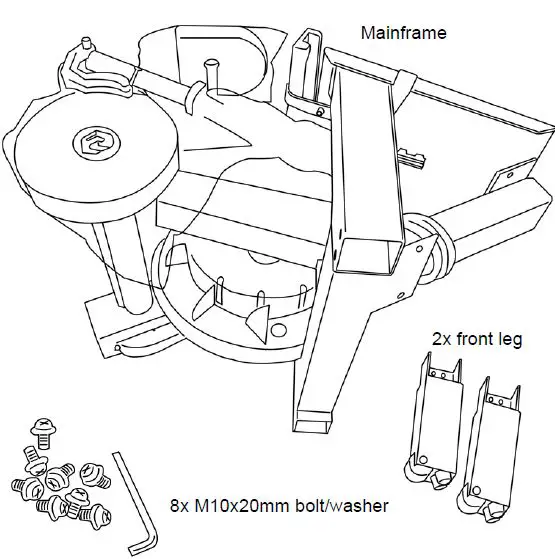
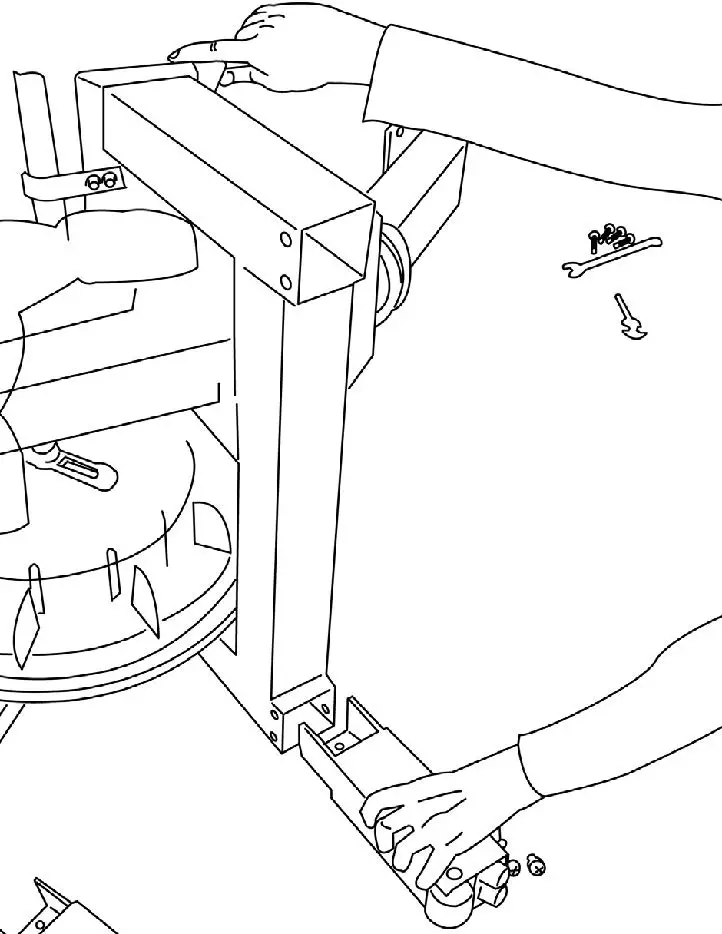
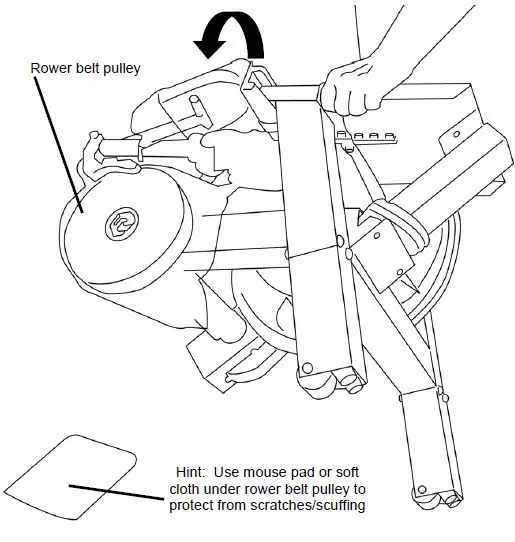
Next, slowly stand the rower upright. On a hard surface, it is recommended to place something soft under the rower belt pulley to avoid surface scratches.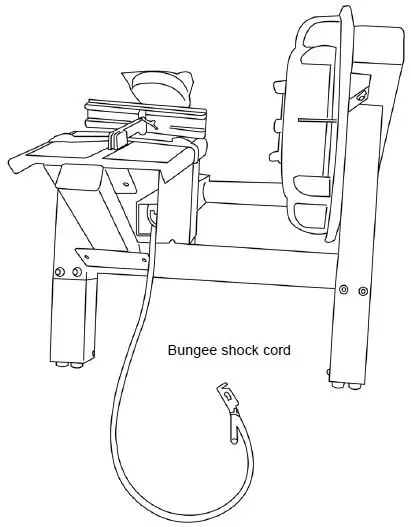
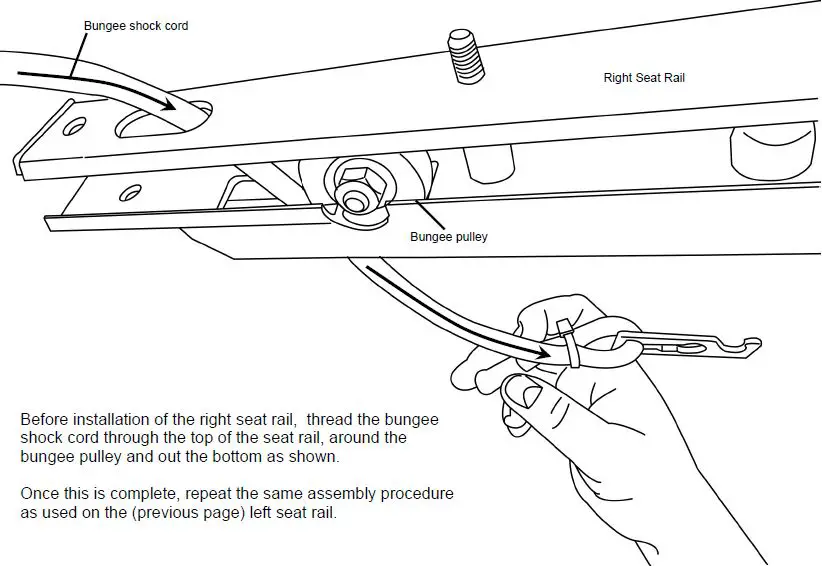
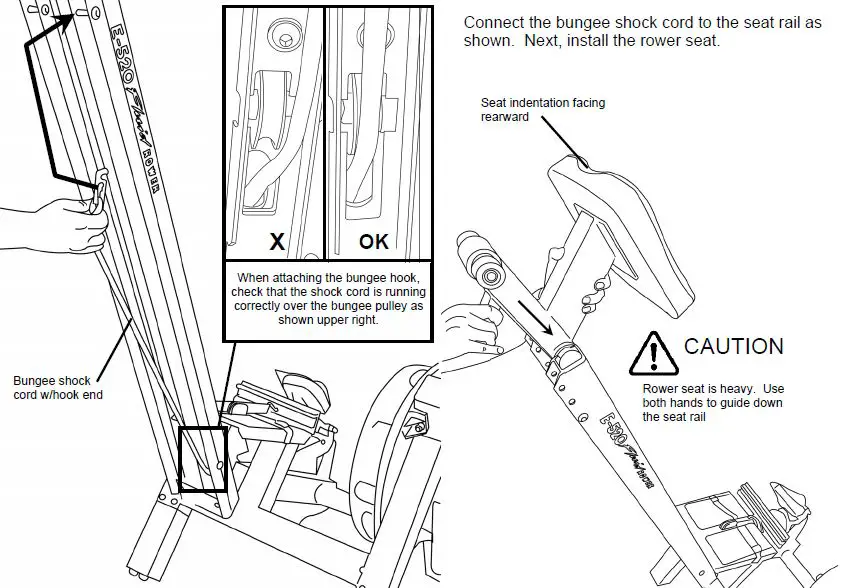
Locate and unwrap the bungee shock cord from the frame before moving on to the installation of the seat rails.
Step 2: Attaching seat rails to frame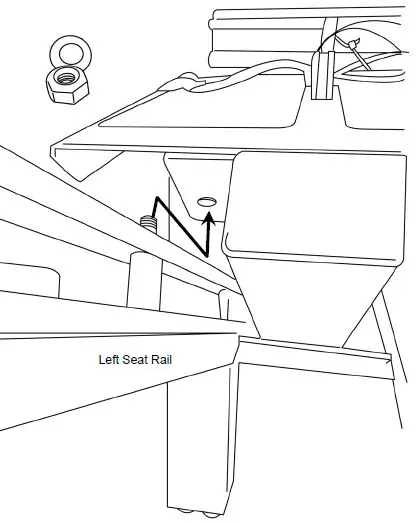
This portion of the assembly requires the mainframe, 1x left/1x right seat rail, 2x M10x70mm bolt, 4x M10 Nylock nut and 4x M10 washer.
Note 2x M10x70mm bolt/spacer are pre-installed on the seat rails for your convenience.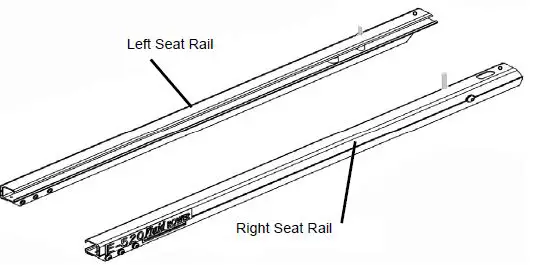

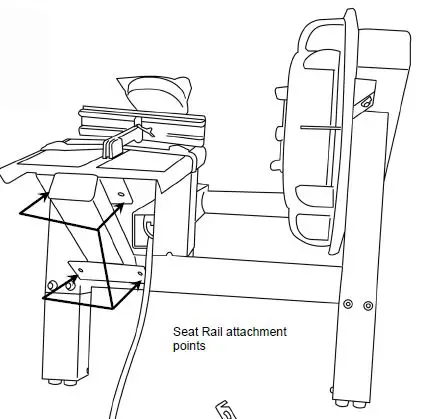
Begin with Left seat rail and align using the pre-installed M10x70mm bolt as shown. Secure from behind with M10 Nylock Nut and M10 Washer.
Next, align and secure lower attachment points using M10x70mm bolt, M10 Nylock Nut and M10 Washers

Tank filling and water treatment
Note: A large bucket is required for filling (Not included) In areas where tap water quality is known to be poor, FDF recommends the use of distilled water.
Open the rear upper yellow tank plug and insert hose into tank (rotating the impeller slightly may be necessary to allow the hose to pass), move the tank adjuster handle to level 20 and begin filling. Do not fill the tank higher than the level indicator on the front of the clear shell. A properly filled tank holds approximately 8liters of water.
Warning: Do not under any circumstances put fingers into the tank. Use the end of the hose to move the impeller should the need arise.
Water Treatment Procedures:
1. Add Chlorine tablet.
2. Wait a minimum of 72 hours. Then add very small amount of blue dye and check for desired color. Important! Do not add blue dye for at least 72 hours following Chlorine treatment. The blue dye adds visual appeal as well as cutting down the amount of light affecting the tank water, extending the amount of time between water treatments.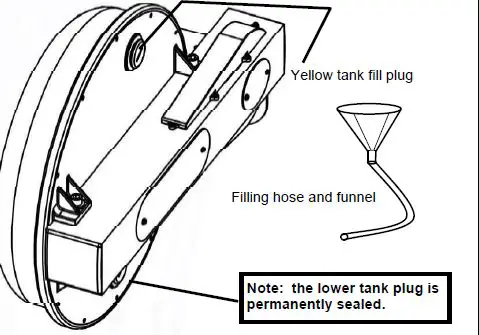
Draining the Fluid tank:
When draining indoors, a suitable container capable of holding 8 liters of water is required. Open the yellow fill plug, and on a protective surface, turn the E520 on its side as shown. Once the rower is in this position, the tank can be easily drained.
Long term water treatment and basic operation
CAUTION: Do not fill past the calibration mark as indicated on the tank level sticker or water spillage may occur. See tank filling/water treatment page for details.
Long term water treatment:
Do not use any water treatment other than the tablets supplied with this machine. For replacement tablets, contact your local First Degree Fitness distributor.
Water treatment schedules for the E520 will vary according to the fluid tanks exposure to sunlight, but expect 8-12 months near a bright, sunlit window and 2 years or more for a darker location. At the point of finding the water slightly cloudy, add a Chlorine tablet. Remember to wait 72 hours following the chlorine tablet before adding the blue dye as the Chlorine tablet is extremely concentrated.
CAUTION: It is strongly recommended that a drop cloth be used under the fluid tank whenever the tank plug is opened for water treatment. The blue dye treated water will readily stain carpet or clothing.
Vertical storage: The E520 can easily be stored in a vertical position. For safety, choose a suitable location, such as a corner of a room. It is recommended that something soft (such as carpet or a small towel) be placed under the rowing pulley of the unit to avoid chipping or floor damage. Note: Move with caution as the machine is heavy. Pick up from back and pull at 45 degree angle.
Heel support adjuster: The E520 has a unique and easy to use Heel plate Support system. Simply slide the Heel plate up or down and allow the teeth to lock it into place. This should be adjusted to place the ball of your foot directly under each horizontal foot strap. Tighten to secure before rowing.
Resistance:
Resistance is determined by the level indicator on the front of the tank. Level 1 indicates lightest resistance and level twenty the heaviest. Allow three to four strokes, after moving the level indicator, for the new level to be achieved. Note computer level must be changed to provide accurate input at each individual tank level. Consult your IPM computer manual (included) for details.
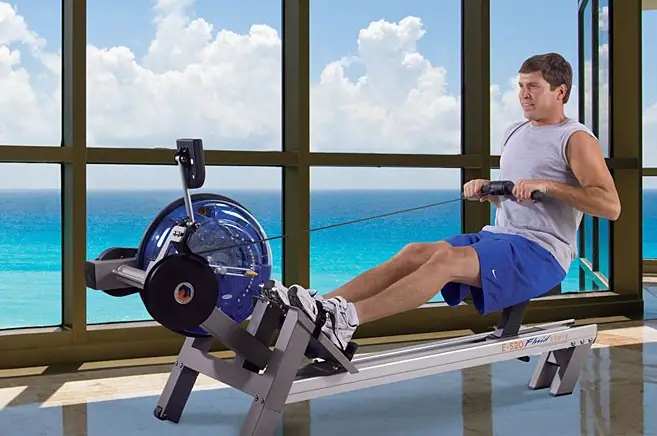
E520 Rower Ergometer.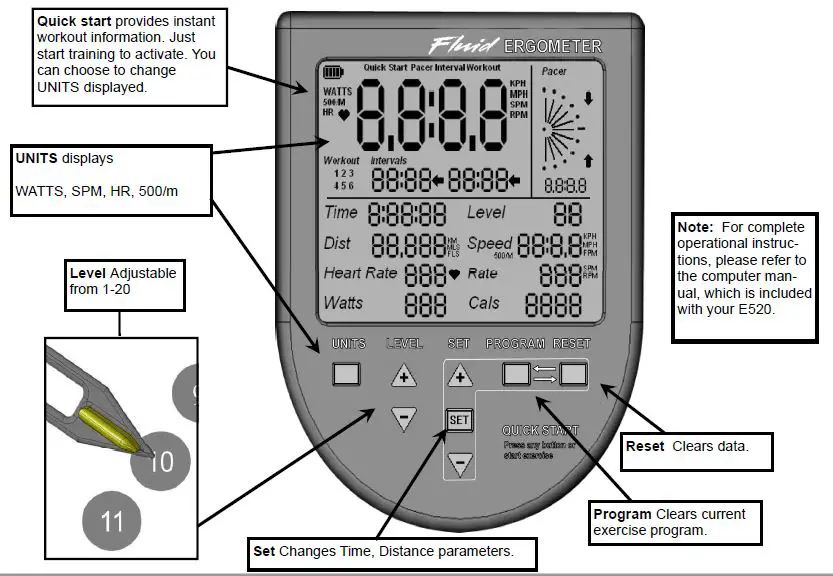
How to row?
1. Begin the stroke comfortably forward and push strongly back with your legs while keeping your arms and back straight.
2. Begin to pull your arms back as they pass over your knees and continue the stroke through to completion rocking slightly back over your pelvis.
3. Return to the starting position and repeat.
How often?
Begin with 5 minute training sessions once a day and aim for around 2:30 to 2:45 for 500m time. Row at a pace that keeps the water circulating continuously between strokes. Progress a few minutes more each day until you are comfortable with 30-45 minutes training time 3 or 4 times a week. This will provide aerobic endurance benefits, muscle toning and sufficient calorie burning to form part of a weight loss program.
CAUTION Always consult a doctor before beginning an exercise program. Stop immediately if you feel faint or dizzy.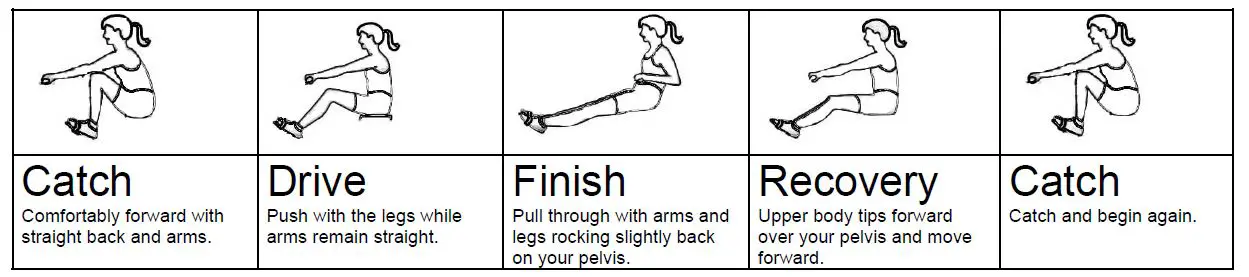
Maintenance chart.
| Item | Timeframe | Instructions | Notes |
| Seat and seat rails. | Weekly. | Wipe seat rails with a clean, dry cloth. Lightly spray the inside of rails with silicone spray. | |
| Frame. | Weekly. | Wipe down with lint free cloth. | |
| Tank and water treatment. | 12 months to 2 years. | Follow instructions as specified in the “Water Treatment” section of this manual. | |
| Bungee cord. | Check every hundred hours for correct tension and for signs of wear. | The bungee cord should last for many years. If a bungee cord change is required, please follow the instructions provided in the “Changing the bungee cord” section of this manual. | |
| Rowing belt. | Check every hundred hours for correct tension and for signs of wear. | The rowing belt should provide many years of trouble free use. If a rowing belt change is required, please contact your local ser- vice representative or go online at www.firstdegreefitness.com for further de- tails. |
Troubleshooting Guide
| Fault | Probable Cause | Solution | |
| Water changes color or becomes cloudy. | Rower is in direct sunlight or has not had water treatment. | Change rower location to reduce direct exposure to sunlight. Add water treatment and blue dye or change tank water as directed in the water treatment section of this manual. | |
| Rowing stroke return is too light. | Bungee not under enough tension.
Rowing belt missing one wrap around rower belt pulley.
Bungee has slipped off the bungee pulley wheel. | Cut bungee tie rack and tighten slightly on bungee hook. | |
| Computer screen illuminates, but does not register when rowing. | Loose or failed connection/Sensor gap too wide (see erratic computer display). | Check that the computer lead is connected properly. If connected properly check sensor gap. Contact your lo- cal service center if this fails to address the problem. | |
| Rowing belt cannot extend to the end of rowing stroke or no resistance. | Rowing belt needs to be unwrapped 1 turn or, requires an extra wrap on the rower belt pulley |
| |
| The E-520 computer does not illuminate after battery installation. | Batteries installed incorrectly or need re- placing. | Reinstall batteries in correct position and try again. If the LCD screen fails to illuminate, try rotating the batteries slightly in the computer. If this fails, contact your local service center. | |
| The E-520 computer display is erratic while displaying SPM and 500meter times. | Gap between sensor and magnetic ring is too wide. | ||
| Remove large service cover and check gap between sensor and magnetic ring (should be no more than 2.5mm). | |||
Tank Belt adjustment
Step 1: Remove large metal inspection plate as shown above.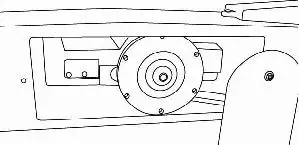
Step 2: Using a long tool, push out the rear end cap as pictured above right. This will give you access to the tank tensioning bolt (shown above right).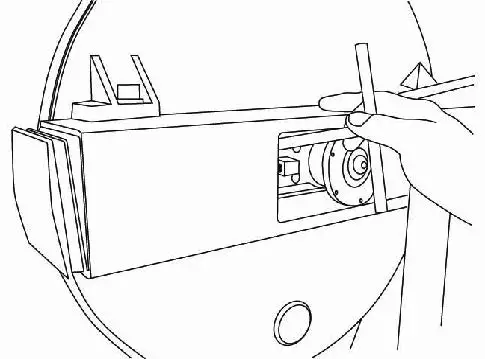
Tip: Twist the belt by hand to gauge tightness. Correct tension should be obtained when no longer able to twist more than 60 degrees.
Step 3: Loosen both the rear and front tank bolts slightly as shown left. Remove front rubber belt cover.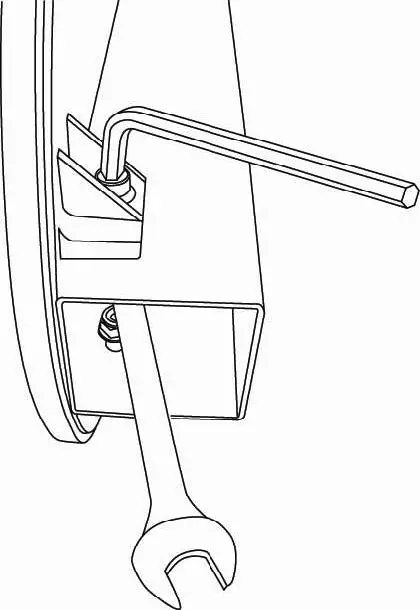
Step 4: Using a 6mm Allen key, tighten the belt using the tank tensioning bolt until the belt no longer slips Bduring hard rowing.
Note: Do not over tighten tank bolts.
BUNGEE CORD REPLACEMENT. DEALER ASSISTANCE REQUIRED.
(Expect 2-5 years bungee life in commercial use. Damage during initial rower assembly is not covered under warranty)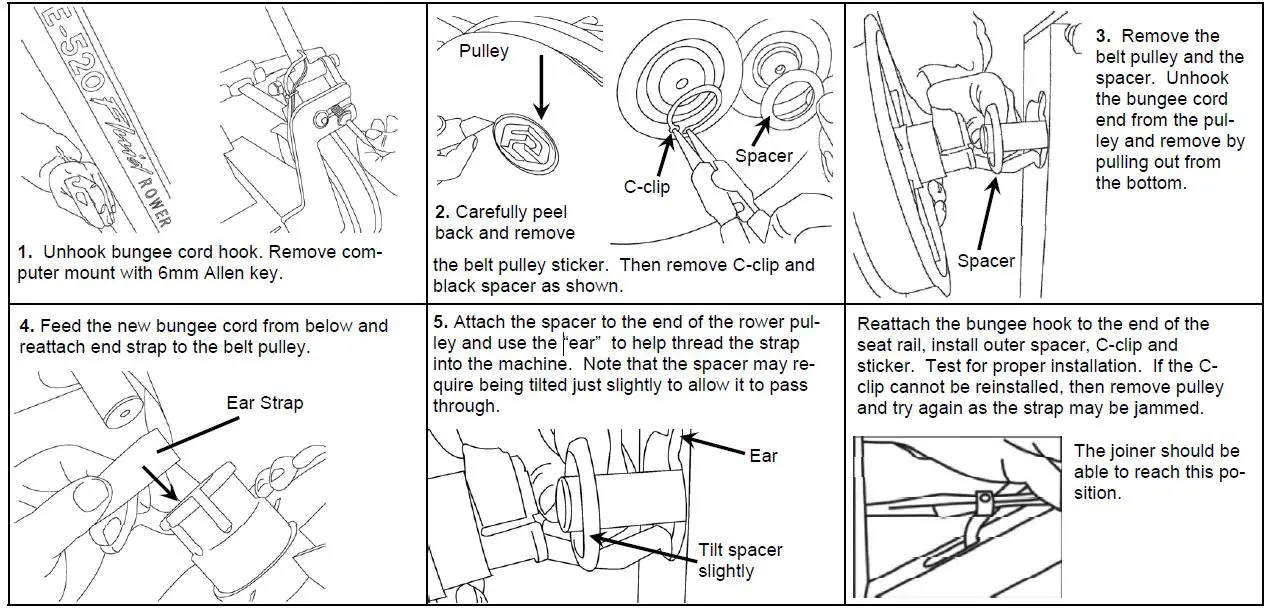
Note: A light tap may be required if the black inner spacer will not pass inside the frame.
Reassemble. Note: A tight C Clip mounting indicates the process should be repeated as the belt is jammed up.
Parts List
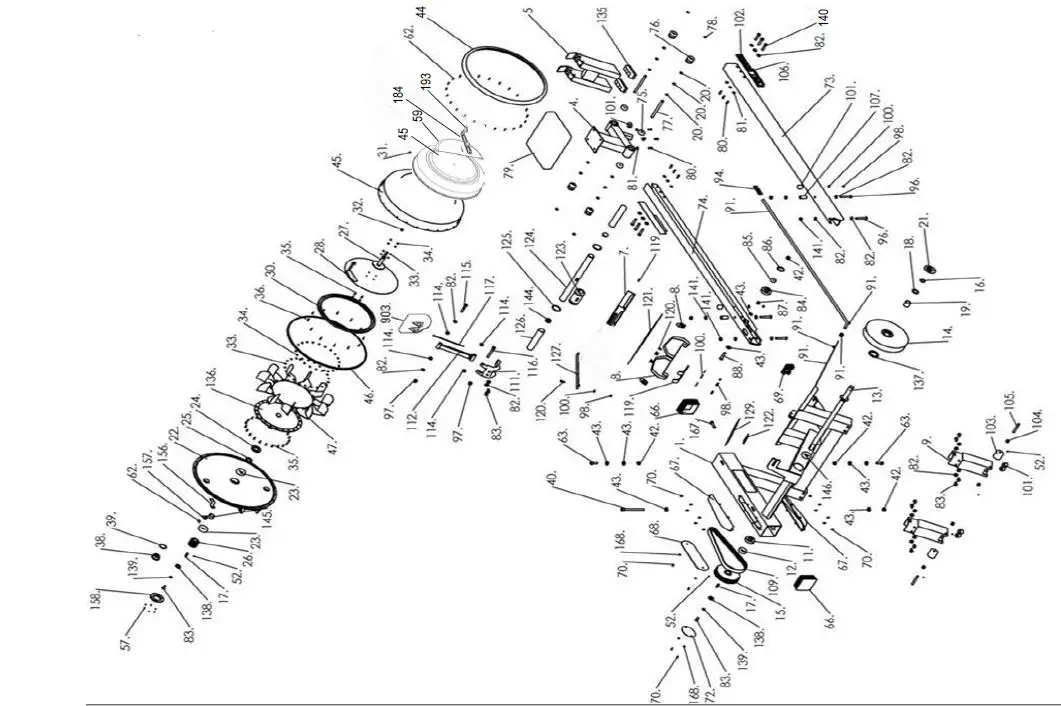
| Key No | Description | Key No | Description | Key No | Description |
| 1 | Bare main frame | 46 | Tank large seal. | 104 | Spacer 16x10x12 |
| 4 | Seat frame | 47 | Impeller blade | 105 | Shaft |
| 5 | Rear leg | 52 | Grub screw mM4x6 | 106 | Rail small decal |
| 7 | Heel Support bracket | 57 | Rare earth magnet 4mm | 107 | Rail spacer |
| 8 | Ankle strap with buckle | 59 | Tank level decal. | 109 | PK belt 7 rib 926mm |
| 9 | Front leg frame part only. | 62 | tank screw M3x10 | 111 | Belt guard aluminum. |
| 11 | Bearing housing | 63 | Tank bolt M12x40 | 112 | Computer mount arm. |
| 12 | Bearing NSK 6005zz | 66 | 100mm end cap | 114 | Bushing |
| 13 | Main pulley shaft | 67 | Rubber cover. | 115 | M10x80 bolt |
| 14 | Belt pulley | 68 | Large side cover. | 116 | M10x60 bolt |
| 15 | Large pk transmission pulley | 69 | 75x50mm cap | 117 | Sensor wiring. |
| 16 | C clip stw-25 | 70 | M4x10 screw | 119 | Stainless handle catch. (1 only) |
| 17 | Key way 7x7x32 | 72 | Small side cover | 120 | M6x10 bolt |
| 18 | Washer steel 40×25.5×2 | 73 | Left aluminum seat rail. | 121 | 3m foot plate (1 only) |
| 19 | INA clutch bearing 25mmx30 | 74 | Right aluminum seat rail | 122 | Frame caution decal |
| 21 | Pulley decal | 75 | Bearing NBN6301zz | 123 | Handle centre rubber cover |
| 22 | Aluminum tank back | 76 | PU seat wheel. | 124 | Rower handle. |
| 23 | Bearing NSK6205ZZ | 77 | 12mm shaft 12*149 | 125 | Handle rubber cover ring (1 only) |
| 24 | Tank shaft seal housing. | 78 | C clip stw-12 | 126 | Hand grip 28×150 (1 only) |
| 25 | Seal nbr 37x8x30 | 79 | Seat | 129 | How to use decal |
| 26 | Small pk transmission pulley | 80 | M6x20 seat bolt | 135 | Rubber rear leg insert (1 only) |
| 27 | Stainless adjuster shaft | 81 | Seat washer 13x6x1.2 | 136 | Impeller centre shaft |
| 28 | Stainless backing plate | 82 | Washer 21x11x2 | 137 | Belt pulley spacer |
| 30 | Blue poly backing ring. | 83 | M10x20 bolt | 138 | Shaft washer |
| 31 | Grub screw M8x8 | 84 | Bungee pulley | 139 | Spring washer |
| 32 | Adjuster O Ring 12x9x1.5 | 85 | Bearing NBN-6201ZZ | 140 | 10×47.5mm rear leg bolt (takes 6mm insert bolt) |
| 33 | Stainless washer 10×4.2×1 | 86 | C Clip RTW-32 | 141 | 10mm nylock nut |
| 34 | Stainless nut M4 | 87 | Spacer 16x12x12.5 | 144 | Rower handle end inserts. |
| 35 | Stainless bolt M4 | 88 | Bolt M12x50 | 145 | Bearing spacer |
| 36 | Back ring s/s screw m3x20 | 91 | Bungee shock cord | 146 | NSK 6006 ball bearing |
| 37 | Resistance handle decal | 94 | Bungee hook end. | 156 | Sensor bracket |
| 38 | Tank plug with breather | 96 | M10x70 seat rail bolt | 157 | Sensor round, mounts in fdr-3-68 |
| 39 | Tank plug O Ring 42x26x3 | 97 | M10 dome head nut | 158 | Magnet Ring |
| 40 | Tank bolt 12x140mm | 98 | M6 nut | 167 | Tank Adjuster Bolt. |
| 42 | Nut M12 | 100 | Washer 13x6x1.5 | 168 | 3mm washer |
| 43 | Washer 24x13x2 | 101 | Rubber bumper | 184 | Tank level resistance handle |
| 44 | Tank black outer cover ring. | 102 | Aluminum rail large decal | 193 | PU Yellow resistance handle cover |
| 45 | Polycarbonate tank. | 103 | Transport wheel. | 903 | Computer. no h/receiver. |
FLUID ROWER (model FR-E520)
INTERNATIONAL WARRANTY – COMMERCIAL USE
First Degree Fitness Limited warrants that the Fluid Rower (model E520), purchased from an authorized agent, is free from defects in materials and workmanship. First Degree Fitness or its agents will, at their discretion, repair or replace parts that become defective within the warranty period.
Metal Frame – 10 Year Limited Warranty
First Degree Fitness will repair or replace the metal Main Frame of the Rower should it fail due to any defect in materials or workmanship within 10 years of the original purchase. Warranty does not apply to frame coating.
Polycarbonate Tank & Seals – 3 Year Limited Warranty
First Degree Fitness will repair or replace the polycarbonate tank or seals should they fail due to any defect in materials or workmanship within 3 years of the original purchase.
Mechanical Components (of a non-wearing nature) – 2 Year Limited Warranty
First Degree Fitness will repair or replace any mechanical component should it fail due to any defect in materials or workmanship within 2 years of the original purchase.
Wearing Components – 2 Year Limited Warranty
First Degree Fitness will repair or replace any component should it fail due to any defect in materials or workmanship within 2 years of the original purchase.
Specific Inclusions
- Bungee recoil cord, belt and pulley
- Hand grips & foot straps
- Seat
- Seat rollers & bearings
- All rubber components
- Computer & speed sensor (excluding replaceable batteries)
- All drive belts & bearings
- Aluminum seat rails
General Exclusions
- Damage to the finish of any part of the machine
- Damage due to neglect, abuse or incorrect use of the machine
- Any charges for freight or customs clearance associated with the return or dispatch of parts
- Any damage to or loss of goods during transport of any kind
- Any labour cost associated with a warranty claim
General Conditions
- The serial number of the machine must be correctly registered with First Degree Fitness Limited or one of its appointed distributors
- First Degree Fitness Limited reserve the right to examine any part where replacement is claimed under warranty
- Warranty period applies only to the original purchaser from the date of purchase and is not transferable
- The product must be returned to your place of purchase in original packaging with transportation, insurance and associated charges paid for by you and risk of loss or damage assumed by you.
First Degree Fitness makes no other warranties except as stated here and expressly disclaims all warranties not stated in this warranty. Neither First Degree Fitness nor its associates shall be responsible for incidental or consequential damages.


