![]()
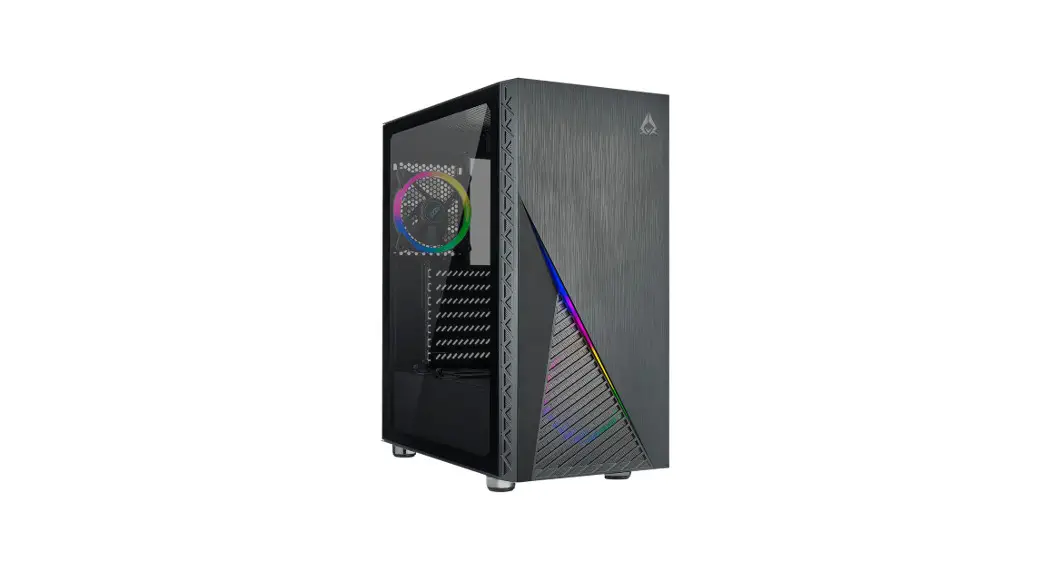
ZENO
User Manual
Installation Instructions
Specifications
| Model | |
| Model Name: | ZENO |
| Model Number: | CSAZ-350 |
| Specifications | |
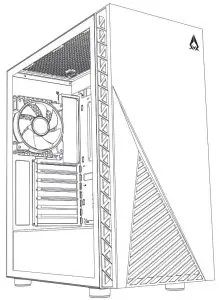
| Type: | ATX Mid Tower |
| Color: | Black/Black(interior) |
| Side Panel Window: | Left side panel: tempered glass with rubber mounts |
| Max CPU Cooler Height: | UP to165mm |
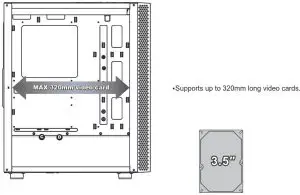
| Max Video Card Length: | Up to 320mm long video card |
| Power Supply: | Not included |
| Motherboard Compatibility: | <275mm EATX • ATX • Micro ATX • ITX |
| Expansion | |
| External 5.25″ Drive Bays: | 0 |
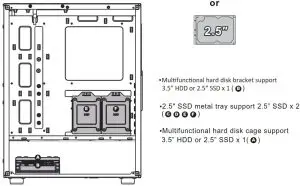
| Internal 2.5″ Drive Bays: | Up to 4 |
| Internal 3.5″ Drive Bays: | Up to 2 |
| Expansion Slots: | 7 |
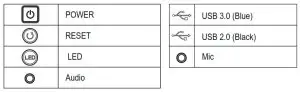
| Top Ports: | Power button, reset button,led button, HD Audio, USB 3.0 x 1, USB2.0x2 |
| Physical Specifications | 475x210x410 / 18.7×8.3×16.1 inches |
| Weight: | 6kg /13.21bs |
| Features | |
| Tempered Glass Sides Window: | High-quality tempered glass side window allows for clear visuals to inner components |
| Addressable RGB Light Effects: | Addressable RGB light strip in the front. All Addressable RGB light devices sync with the motherboard, allowing the motherboard software or LED button to directly control the lighting. |
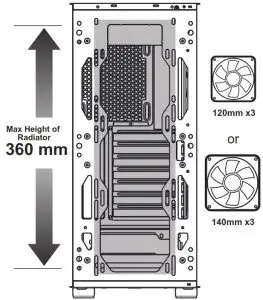
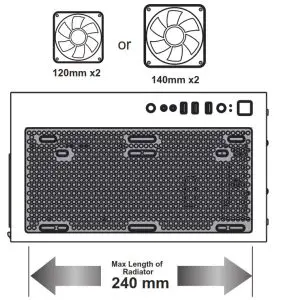
| Available Fan Ports: | 3x120mm or 3x140mm Fan ports in the front(lx120mm ARGB Fan included) 2x120mm or 2x140mm Fan ports on the top lx120mm Fan port in the rear (1x120mm ARGB Fan included) |
| Water Cooling: | Supports radiators up to 280/360mm in the Front Supports radiators up to 240mm in the Top |
| Dust Filters: | Removable (magnetic) dustproof net on the top , iron net on bottom of chassis. |
| Power Supply Support: | Bottom mounted ATX Power Supply |
Chassis Parts
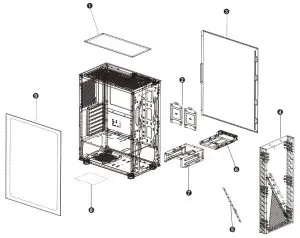
| 1 | Removable (magnetic) dustproof mesh |
| 2 | 2.5″ SSD metal tray x 2 |
| 3 | Right side metal panel |
| 4 | Front panel |
| 5 | ARGB led light strip |
| 6 | Multifunctional hard disk bracket |
| 7 | Multifunctional hard disk cage |
| 8 | Steel dust filter |
| 9 | Sliding tempered glass panel |
Control Panel Functions

3.5 ˝/ 2.5˝ HDD/SSD Installation
Cooling System Installation
Front
Rear

Top
ARGB Control Modes Switching
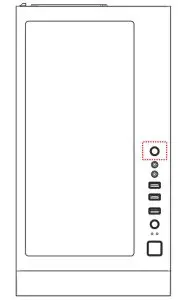
※To control the front panel ARGB lighting modes, press the LED button to cycle through 13 RGB lighting modes.
※Hold the LED button for 3 seconds to switch the RGB control function between motherboard RGB software and LED button.
※To synchronize all addressable RGB light devices, it needs to be switched to be controlled only by the motherboard.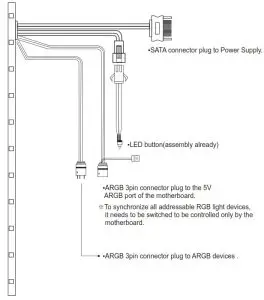
![]()


