CL-M100C 1000W RGB Mini Studio SMD LED Light
SWITR
CL-M100C
100W RGB Mini Size
Studio SMD LED Light Ver:B
USER MANUAL
SWIT Electronics Co.,Ltd.
Tel:+86-25-85805753
Fax:+86-25-85805296
http://www.swit.cc
E-mail: [email protected]
Thank you for choosing SWIT products. Please read the instructions before using, and keep it for future reference.
Specification
| Model | CL-M100C | |
| LED QTY | RGB LED (170pcs) +Warm White LED(340pcs) | |
White Light | Color Temperature | 2800K-10000K, Minimum Adjust Step:50K |
| Brightness | 0%-100%, Minimum Adjust Step:0.1% | |
| Illumination | 3000 Lux@1m/ 854Lux@2m/384Lux@3m | |
| CRI | 96 Max., Avg 94 | |
| TLCI | 93 Max., Avg 90 | |
| RGB Light | RGB+W,Color Gamut,HUE,Saturability adjustment | |
| G-M Offset | Continuous adjustment (-1.00~+1.00, Adjust step 0.01) | |
| Half Beam Angle | About 62° | |
| Mode | CCT, HSI, RGB、CIE、 GEL、 EFF, DMX, SYS | |
| Control | Button, DMX,APP | |
| Update | USB: (Format”FAT” or “FAT32”) | |
Power | Power Consumption | About 100W |
| Power Supply | AC 100-240V, 50/60HZ | |
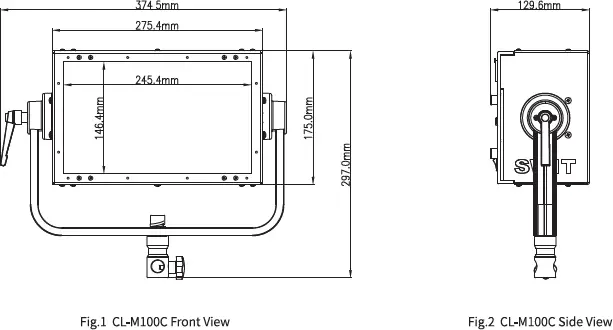
Dimension | luminous Surface (LxW) | 245mm x 146mm |
| Full Light(LxWxH) | See Fig.1 & 2 | |
| Weight | 5.1Kg | |
Warning
- Please do not disassemble the light or touch its inner part with metal object to avoid damage;
- Please do not put the light under conditions full of moisture or dust to avoid damage.
- Only use the light in the temperature range of -10°C~40°C.
Maintenance
- Please use a soft dry cloth to clean the front panel of the product, or use a soft cloth dipped in a neutral detergent solution Wipe with a soft, dry cloth.
- Do not use wet cloth, anhydrous alcohol, gasoline or a mixture of anhydrous alcohol and ether etc. to wipe the front LED panel.
Appearance
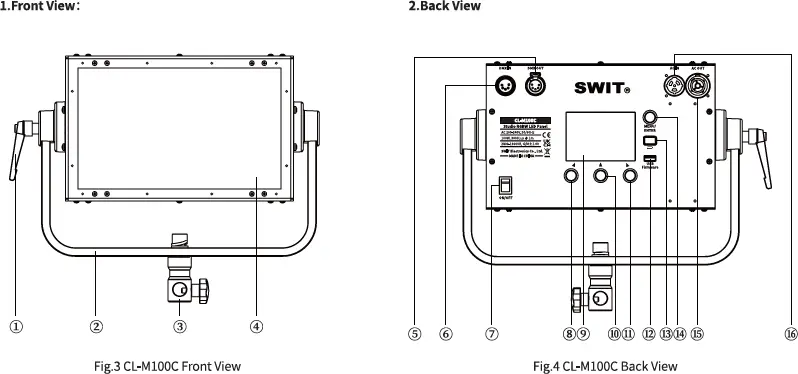
(1) YOKE TILT LOCK KNOB
(2) U SHAPE BRACKET
(3) STAND ADAPTOR
(4) DIFFUSER
(5) DMX OUT
(6) DMX IN
(7) POWER ON/OFF
(8) ADJUST KNOB
(9) LCD
(10) ADJUST KNOB
(11) ADJUST KNOB
(12) USB
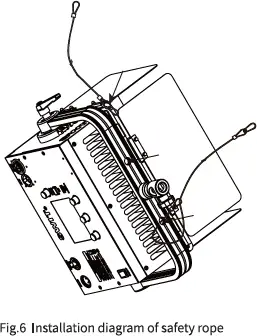
Installation of safety rope
When lifting and using the lamps, please pass the safety rope (hereafter referred to as “safety rope”) through the lamp wire hole and the round tube of the barn door according to the method shown in Fig. 6, so as to establish an effective connection between the product and the hanging devices such as hinges.
Precautions for use of safety rope are as follows:
 If you use your own safety rope, please confirm that the load of the safety rope is greater than that of this product.
- The safety rope cannot be dragged on the rough surface.
- Please check carefully before using the safety rope, where the rope strand is broken or the number of broken wires in one twist distance exceeds 6, the safety rope shall not be used. Safety rope with obvious wear, corrosion, deformation and damage caused by heat or arc is not allowed to use.
- The safety rope is strictly prohibited from contact with any charged body, hot object or flame.
- The two safety rope buckles shall not be directly connected with each other, and D shackle in accordance with the load specifications must be added.
 If you use your own safety rope, please confirm that the load of the safety
 User control
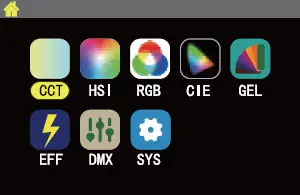 Fig.7 Main Menu
| No. | Menu List | No. | Menu List |
| 1 | CCT Mode | 5 | GEL Mode |
| 2 | HSI Mode | 6 | EFF Mode |
| 3 | RGB Mode | 7 | DMX Mode |
| 4 | CIE Mode | 8 | SYSTEM |
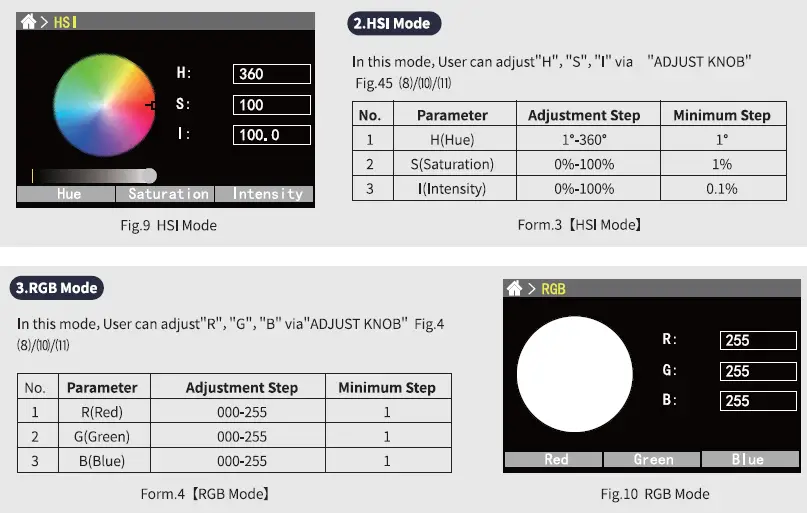
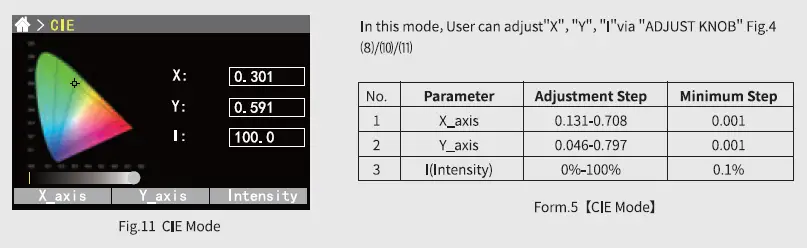
4. CIE Mode
5. GEL Mode
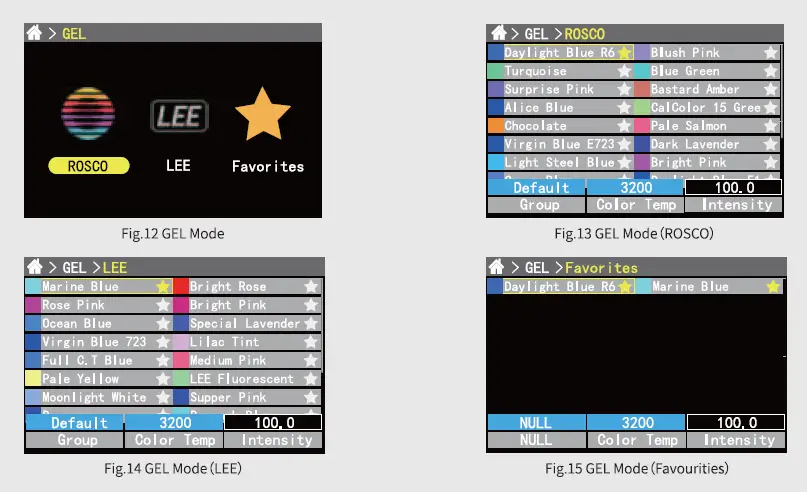
User can choose different filters and adjust the “Intensity”, “Color Temp”in this mode:
1) “MENU/ENTER”
► Rotate: To choose different selection
► Press: Enter into ROSCO/LEE/favourities, put the filters into your facourities.
2) “ADJUST KNOB”: Fig.4 (8)/(10)/(11), to adjust different parameters.
| No. | Selection | Adjustment |
| 1 | ROSCO | 1.20 kinds of Filters 2.Color temperature:3200K/5600K 3.Intensity: 0%-100%, Minimum steps: 0.1% |
| 2 | LEE | 1.20 kinds of Filters 2.Color temperature:3200K/5600K 3.Intensity:0%-100%, Minimum steps:0.1% |
| 3 | Favorites | 1.Color temperature:3200K/5600K 2.Intensity:0%-100%, Minimum steps:0.1% |
Form.6 [GEL Mode]
6. Effect Mode
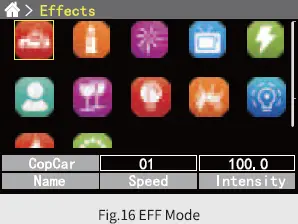 User can choose from 12 kinds of effect in this mode “COPCAR”,” CANDLE”, “FIREWORK”, “TELEVISION”, “LIGHTNING”, “PAPARAZZI“, “PARTY“, “BROKEN LIGHTS“, “EXPLODE”, “NEON LIGHT”, “FIRE and “COLORCYCLE”.
In this mode, User can select different Effect via “MENU/ENTER” button (Fig.4), adjust”Speed” “Intensity” via “ADJUST KNOB” Fig.4 (8)/(10)/(11).
| No. | Parameter | Adjustment Step | Minimum Step |
| 1 | Effect | COPCAR, FIREWORKS Etc. | / |
| 2 | Speed | 1-100 | 1 |
| 3 | Intensity | 0%-100% | 0.10% |
7. DMX Mode
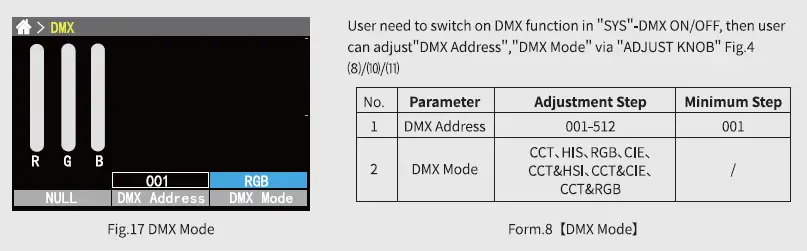
7.1 DMX Address and DMX Mode
The DMX address and DMX Mode can be set in the following two ways:
1) Set in “DMX mode“(Fig.22);
2) Set in “SYS”-“DMX Address“/”DMX Mode“.
7.2 DMX Channel Setting
DMX address adjustment range: 001-512, suppose the current address is N:
| No. | DMX Mode | Channel | Definition |
1 | CCT | N | Intensity:0%-100% |
| N+1 | Color Temperature:2800K-10000K | ||
| N+2 | G/M:-1.00 +1.00 | ||
2 | HSI | N | Intensity:0%-100% |
| N+1 | Hue:1°-360° | ||
| N+2 | Saturation: 0%-100% | ||
3 | RGB | N | Red:0-255 |
| N+1 | Green:0-255 | ||
| N+2 | Blue:0-255 | ||
4 | CIE | N | Intensity:0%-100% |
| N+1 | X_axis:0.131-0.708 | ||
| N+2 | Y_axis:0.046-0.797 | ||
5 | CCT&HSI | N | Intensity:0%-100% |
| N+1 | Color Temperature: 2800K-10000K | ||
| N+2 | G/M:-1.00 +1.00 | ||
| N+3 | Mode Change (CCT→HSI) | ||
| N+4 | Hue:1°-360° | ||
| N+5 | Saturation:0-100% | ||
6 | CCT&CIE | N | Intensity:0%-100% |
| N+1 | Color Temperature: 2800K-10000K | ||
| N+2 | G/M:-1.00 +1.00 | ||
| N+3 | Mode Change (CCT→CIE) | ||
| N+4 | X_axis:0.131-0.708 | ||
| N+5 | Y_axis:0.046-0.797 | ||
7 | CCT&RGB | N | Intensity:0%-100% |
| N+1 | Color Temperature:2800K-10000K | ||
| N+2 | G/M:-1.00 +1.00 | ||
| N+3 | Mode Change (CCT→RGB) | ||
| N+4 | Red:0-255 | ||
| N+5 | Green:0-255 | ||
| N+6 | Blue:0-255 |
Form.9 【DMX Mode] DMX
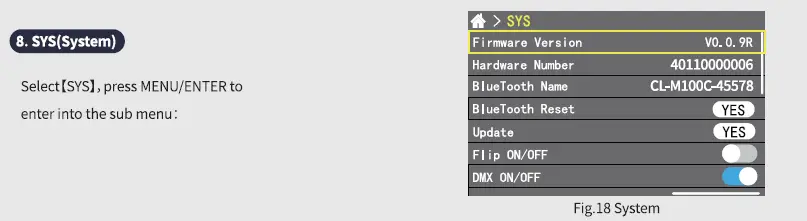
8.1 [Firmware Version] &[Hardware Number]
Show the information of the version of the device.
8.2 [Bluetooth Name)]
User can rename the Bluetooth of the device via “MENU/ENTER” button.
8.3 [Bluetooth Reset]
In the process of using the APP to control the lamp, if the APP loses control or the target lamp cannot be found, the user can
choose to try to reset the target lamp.
The bluetooth reset steps is as follows: Choose [Bluetooth Reset]-[Yes] to reset the bluetooth.
8.4 Update
Prepare the update firmware and U-disk (Make sure the format of U-disk is : FAT32), connect U-disk with USB port of the light,
Choose [Update]-[Yes], after updating, reboot your light to finish the
updating.
Tips: The firmware need to be saved into the root of the U-disk.
8.5 LCD Flip
Choose 【Flip ON/OFF】 to switch ON/OFF screen flip function.
8.6 DMX Mode
Choose [DMX ON/OFF to switch ON/OFF DMX function.
8.7 DMX Address
Choose 【DMX Address] to set DMX address from 001-512.
8.8 DMX Mode
Choose 【DMX ON/OFF to select from different DMX Mode.
8.9 Light Curve
Choose 【Light Curve】 to select from different Light Curve.
8.10 Language
Choose [Language】 to change language to Chinese or English, reboot your light after choosing the language.
8.11 EFF File Import
Put the Effect files in your U-disk, choose 【EFF File Import), select the Effect files you want to import, choose-【yes】 to import the Effect files.
Tips: Make sure the Effect files you saved is in the U-Disk CL-M100C
8.12 GEL File Import
Put the GEL files in your U-disk, choose 【GEL File Import), select the GEL files you want to import, choose-【yes] to import the
GEL files.
Tips: Make sure the filters files you saved is in the U-Disk CL-M100C
8.13 EFF File Delete
Choose [EFF File Delete), select the Effect files you want to delete, choose [【Yes】 to delete the Effect files.
8.14 GEL File Delete
Choose 【GEL File Delete), select the GEL files you want to delete, choose [Yes] to delete the GEL files. 8.15 All Files Import
User can Import all Effect files and GEL files from the U-disk via this function:
Choose [All Files Import]-[Yes] to import all Effect and GEL files from your U-disk to the light.
8.16 System Reset
User can do factory reset to reset Bluetooth and Userdata.
8.17 Factory Menu
Not available to users.
APP
 1. APP name and download
- Name: SWIT Console
- Download
Android: Scan QR to Install(Fig.19);
IOS:Apple Store
Packing list
| No. | Content | Quantities |
| 1 | CL-M100C | x1 |
| 2 | AC Power Cable | x1 |
| 3 | Safety Rope | x2 |
| 4 | AC Loop out Cable | Optional |


