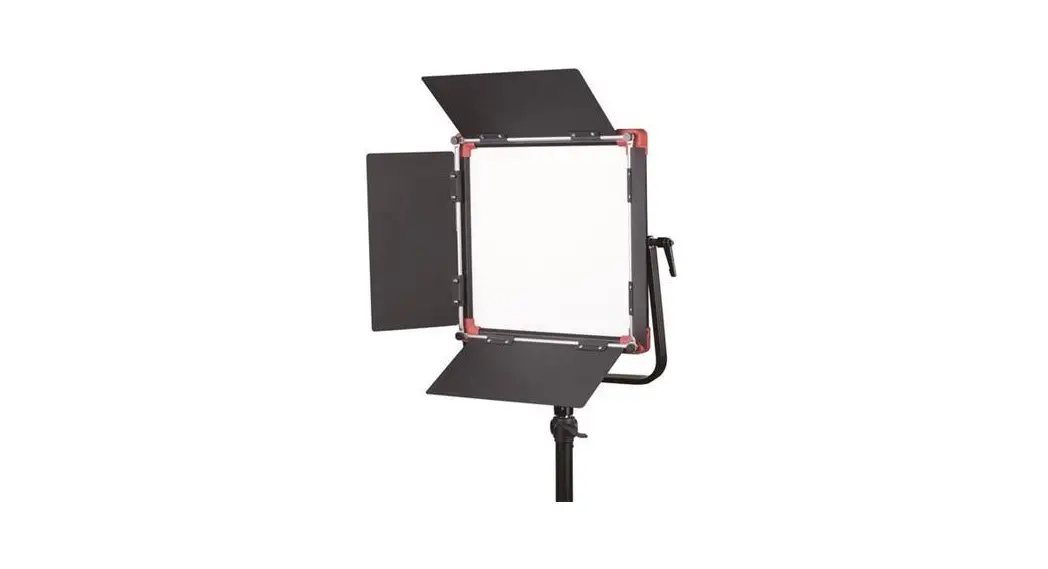
![]() PL-E60D Edge Mounted SMD Panel LED Light
PL-E60D Edge Mounted SMD Panel LED Light
User Manual
Ver:D
SWIT Electronics Co.,Ltd.
Congratulations on your purchase of this product. Please read this user manual carefully.
Introduction
This product is designed and applied to use in film, TV, photography, and studio lighting also can be used in theater, concert, or other entertainment stage lighting.
Specification
| Model | PL-E6OD | PL-E9OD |
| Color temperature | 2700K-6500K | |
| Brightness | 0%-100% | |
| luminance | 1500 Lux@lm | 2200 Lux@lm |
| Half beam angle | Appr.70°( without honeycomb) Appr.40° (with honeycomb) | |
| Beam angle | 110° | |
| CRI | 96 | 97 |
| TLCI | 99 | |
| Working voltage | DC 11-36V | |
| Power consumption | Appr.60W | Appr.105W |
| Energy Efficiency Index | G Test est under this parameter: Dim mer=100%, CCT=6500K | |
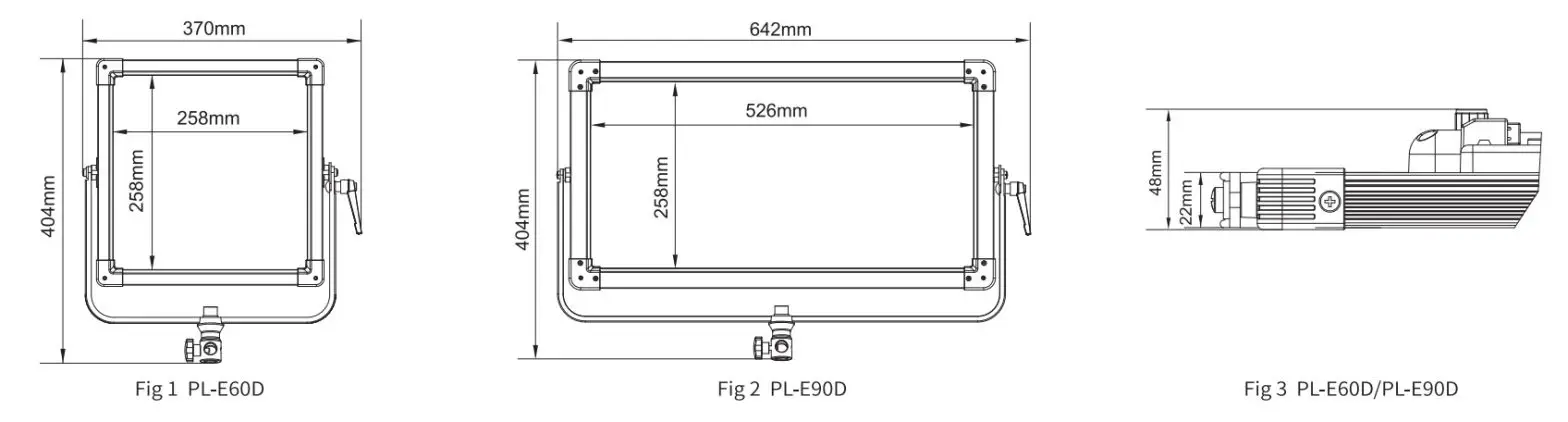
| Dimension | Details find fig 1,2,3 | |
| Lighting area | 258mmx258mm | 526mm x 258mm |
| Net weight | 3.2Kg | 4.8Kg |
Caution
- Please do not disassemble the light or touch its inner part with metal;
- Please do not put the light under conditions full of dust or moisture to avoid damage;
- USB socket is reserved socket; pis use according to specified using environment for related products and do not use for another purpose to avoid damage.
- When using the interaction control function, pis do not connect to DMX output equipment, otherwise, this function can not be used.
- Only use the light in the temperature range of -10°C-40C.
Clean
- Please clean the front LED panel with a soft dry cloth. If using a soft cloth with a slightly clean neutral detergent solution, please wipe again with a soft dry cloth.
- Do not use a wet cloth, anhydrous alcohol, gasoline, or a mixture of anhydrous alcohol and ether, etc. to wipe the front LED panel.
Dimension
Appearance
Front view: 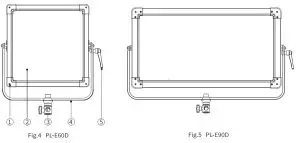
| 1. Barn door mounting point | 4. U-shape bracket |
| 2. Diffuser | 5. bracket knob |
| 3. U-shape bracket connector | |
Rearview
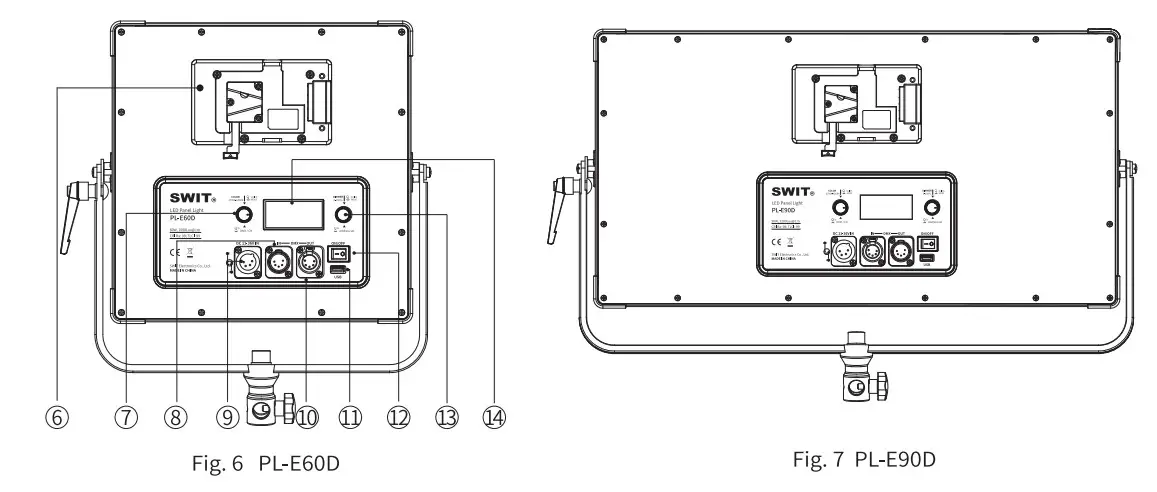
| 6. Battery plate | 11. USB socket |
| 7. CT dimming knob | 12. Power switch |
| 8. DMX IN | 13. Dimmer knob |
| 9. DC11-36V IN | 14. LCD display |
| 10. DMXOUT |
LCD display
For example color temperature 5600K, dimmer 100%, powered by fully charged battery, DMX communication mode, address008, it will display as below:
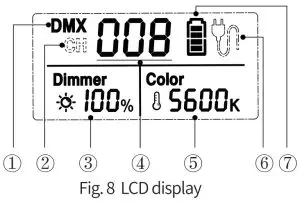
- Current communication control mode
-DMX communication mode - Current communication control mode
-interaction control mode - Brightness display
- Communication address
- CT display
- Power supply display(AC adaptor power supply)
- Power supply display( battery power supply)
Note: When powered by battery, the battery capacity will be displayed as below:
| Four LEDs | About 80%-100% |
| Three LEDs | About 60%-80% |
| Two LEDs | About 40%-60% |
| One LED | About 20%-40% |
| No display (outline border flicker) | Under 20%, lack of power |
Optional Accessory Installation
Fig. 9⁓12is the installation instruction for PL-E6OD; the installation of PL-E9OD is the same as PL-E60D.
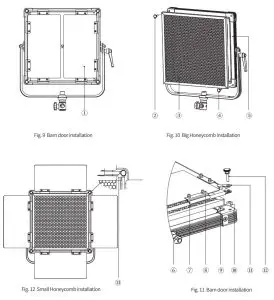
| 1,8, Barndoor | 7, Low head screws |
| 2,4,12 Knurled thumb screws with collar | 9, Small Honeycomb |
| 3 Big Honeycomb | 10 Shim |
| 5, 6 Light body | 11, 13 Pressure plate |
- The way to install the barn door is shown in Fig.9 and Fig.11.
Note: Put the low head screws upward during the installation. - Please confirm the types of honeycomb before using them. (The types of honeycomb size are shown as below).
1) Purchase of big honeycomb
The way to install the honeycomb is shown as Fig.10.
2) Purchase of small honeycomb
The small honeycomb can be used with the barndoor simultaneously. Fix the honeycomb by rotating the pressure plate(see Fig.12 (13) installation as shown in Fig.11, and then use the light normally.
| Honeycomb type | PL-E6OD | PL-E90D |
| Big honeycomb (L x W x H) | 290mm x 290mm x 10mm | 558mm x 290mm x 10mm |
| Small honeycomb(L x W x H) | 268mm x 268mm x 10mm | 536mm x 268mm x 10mm |
Usage
- Installation
1.1 Accessory installation
Pls, check Optional Accessory Installation for the honeycomb (Fig. 10(3)/Fig.119) and barn door (Fig. 9 CD) installation.
1.2 User can install the light on a tripod or stand, and adjust demanded beam angle by a knob on both sides of the Li-stand. - Power supply
The light provides two ways of power supply, by V-mount or Gold mount battery or by4-pin XLRAC-DC power. Turn on the light (fig. 62) and set the color temperature (Fig.6 3) and brightness (Fig. 6(7) to user’s requirements.
Tips: The connection and disconnection of power adaptor xl.
1. Connection
Align the hump of output male XLR to the gap of the DC socket,connect XLR and DC socket, the adaptor will connect with the light when you hear the crack sound.
2. Disconnection
Hold the hump of the DC output female XLR and pull out, the power adaptor and the light will be disconnected. - Dimmer and color temperature setting
The light provides two ways of adjusting the color temperature and brightness: normal adjusting mode and quick-adjusting mode. User can switch the adjusting mode by pressing the dimmer knob and color temperature adjusting knob (Fig.6(13)3/7). Users can quickly set the dimmer and color temperature to their needs by combining two adjusting modes.
3.1 Normal adjusting mode
(1). Color temperature adjust
Range: 2700K-6500K, adjust value: SOK
(2). Dimmer adjust
Range: 0%-100%, adjust value: 1%
3.2 Quick adjusting mode
(1). Color temperature adjust Under this the mode, user can quickly choose common color tern to operate re: 2700K, 3200K, 4500K, 5600K, and 6500K
(2). Dimmer adjust
Range: 0%-100%, adjust value: 10% - Communication Address Setting and Usage
Press and hold dimmer knob (Fig.6(13) for 2s to enter communication address setting interface, the address setting range is 001 to 512.
LCD digital tube (Fig.8(4) flashing means the current address is selected, rotate the brightness adjusting knob (Fig.6(13) to set the current address, press the brightness adjusting knob (Fig.613) to confirm, when finishing the last setting, press the brightness adjusting knob (Fig.6(13) or wait for about to quit. - Communication Control Mode Setting and Usage
Connect the lights network using a DMX cable. Press and hold the color temperature adjusting knob (Fig.6 CD) for around 2 seconds to complete the communication control setting.
5.1. DMX Communication Mode
The upper left corner of the LCD shows “DMX” (Fig.8) indicating that the communication control mode currently is the DMX communication mode. In this mode, connect the DMX signal output device to the lights network, and set up the communication address to work normally.
A light occupies 2 DMX control channels. The current DMX address (N) is brightness control, and the next set address of the current value (N+1) is color temperature control.
For example:DMX Communication address DMX Control address Function 005 005 Brightness 0%-100% 006 Color temperature 2700K-6500K 5.2. Interaction Control Mode
The upper left corner of LCD shows “CH” (Fig. 82) indicating that the communication control mode currently is interaction control mode. In this mode, set the target lights to the same communication address to work normally, and the master-slave machine is not distinguished.
Note: when using this mode, please do not connect the DMX signal output equipment in the lighting network; otherwise the function can not be used normally. - USB socket
USB socket is a reserved socket. Pls use according to specified using environment for related products, and do not use for another purpose to avoid damage.
Packing List
| PaC king Oa\ | Package 1 | Package 2 | Package 3 | Package 4 | |
| 1 | PL-E60D/PL-E9OD | x 1 | x 1 | x 3 | x 3 |
| 2 | Barn door | / | xl | / | x3 |
| 3 | Power cable | xl | xl | x3 | x3 |
| 4 | Power adaptor | x 1 | x 1 | x 3 | x 3 |
| 5 | V-mount hook&loop | x 1 | x 1 | x 3 | x 3 |
| 6 | Tripod | / | / | x3 | x3 |
| 7 | Carrying case | x 1 | x 1 | / | / |
| 8 | Trolley case | / | / | x 1 | x 1 |
| 9 | DMX cable (Optional) | Customers can purchase separately according to the requirements. | |||
| 10 | Honeycomb (Optional) | ||||
| 11 | Barn door (Optional) | ||||
| 12 | Set of Barn door and Honeycomb(Optional) | ||||
Note:
- Package 1: Single light package
- Package 2: Single light package (with barn door)
- Package 3: KITl (with trolley case)
- Package 4: KIT2 (with trolley case, barn door)
- The adaptor and LED PCB board can be changed, the parameters of recommended adaptor are below:
| No. | Specification | Parameter |
| 1 | DC output socket | 4Pin XLR |
| 2 | Adapter output power polarity | Pin 1″-“,Pin 4″+” |
| 3 | Working voltage | AC 100-240V, 50/60Hz |
| 4 | Output voltage | DC 11-36V |
| 5 | Voltage accuracy | ±5% |
| 6 | Rated Power (Max.) | >90W(PL-E60D) >105W(PL-E90D) |
| 7 | Power factor | >0.9 |
| 8 | Working temperature | -10°C-40°C |
![]() Tel:+86-25-85805753
Tel:+86-25-85805753
Fax:+86-25-85805296
http://www.swit.cc
E-mail: [email protected]


