![]() User Manual
User Manual
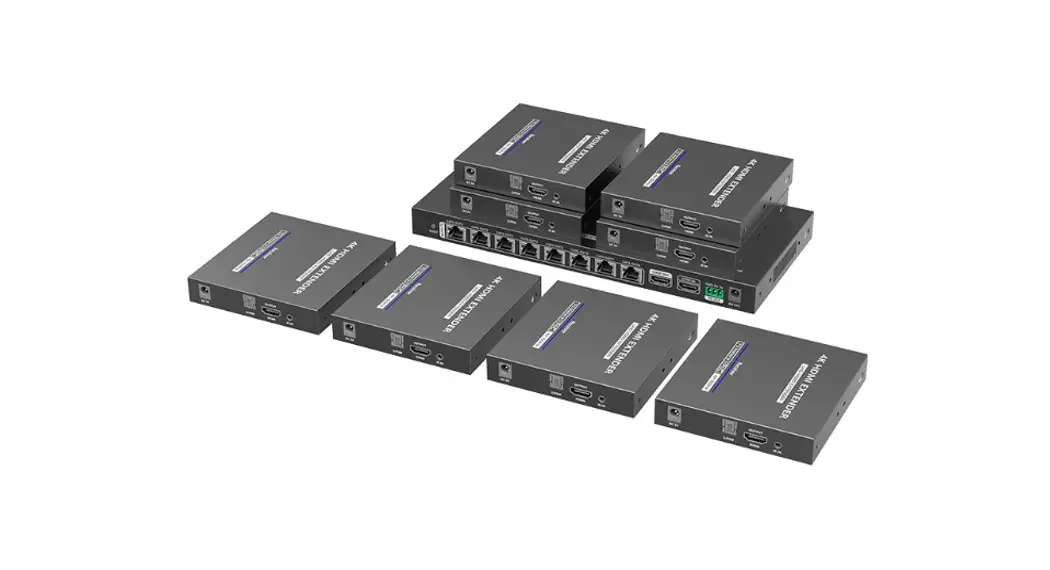
1×8 HDMI Splitter With Extender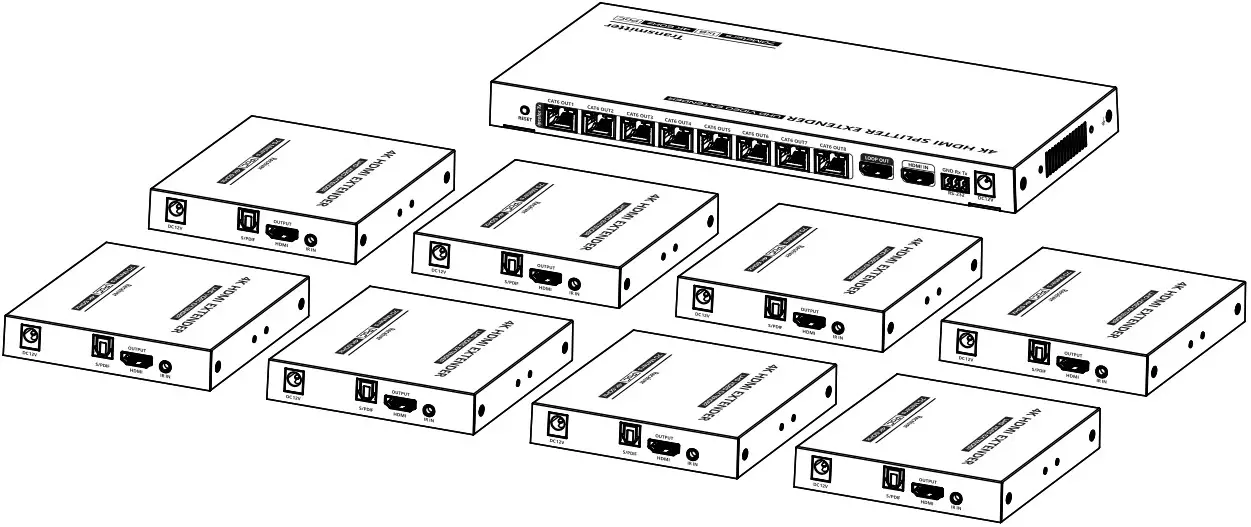
LKV828P-I 1×8 HDMI Splitter with Extender
• Important safety notice:
- Do not expose this device to rain, moisture and liquid.
- Do not put any stuff into the device.
- Do not disassemble or repair this device without qualified service technician.
- Make sure the specification matched if using 3rd party DC adapters.
Introduction
This product is a 1 input 8 outputs extender splitter kit, which integrates the functions of distribution and extension. It distributes 1 HDMI input signal to 8 identical signal outputs, extends these signals up to 70 meters, and supports 4K60Hz resolution. It also supports IR passback, RS-232 control and other functions. It is suitable for studios, multimedia classrooms, rail transit, etc.
Features
- Zero latency transmission.
- Split and extend one HDMI input signal to eight identical network output signals.
- Support up to 4K@60Hz resolution.
- Transmission distance up to 70 meters by using Cat6/6A/7 cables.
- Support IR passback (20KHz~60KHz).
- The transmitter supports HDMI loop out.
- The receiver can output the digital audio of the TV or source device from the S/PDIF port.
- Support EDID passthrough or manually set the EDID of the product.
- Support RS-232 command control.
- Surge Protection, Lightning Protection, ESD Protection.
- Equipped with rack mount ears.
- Support PoC, only the transmitter is required to supply power.
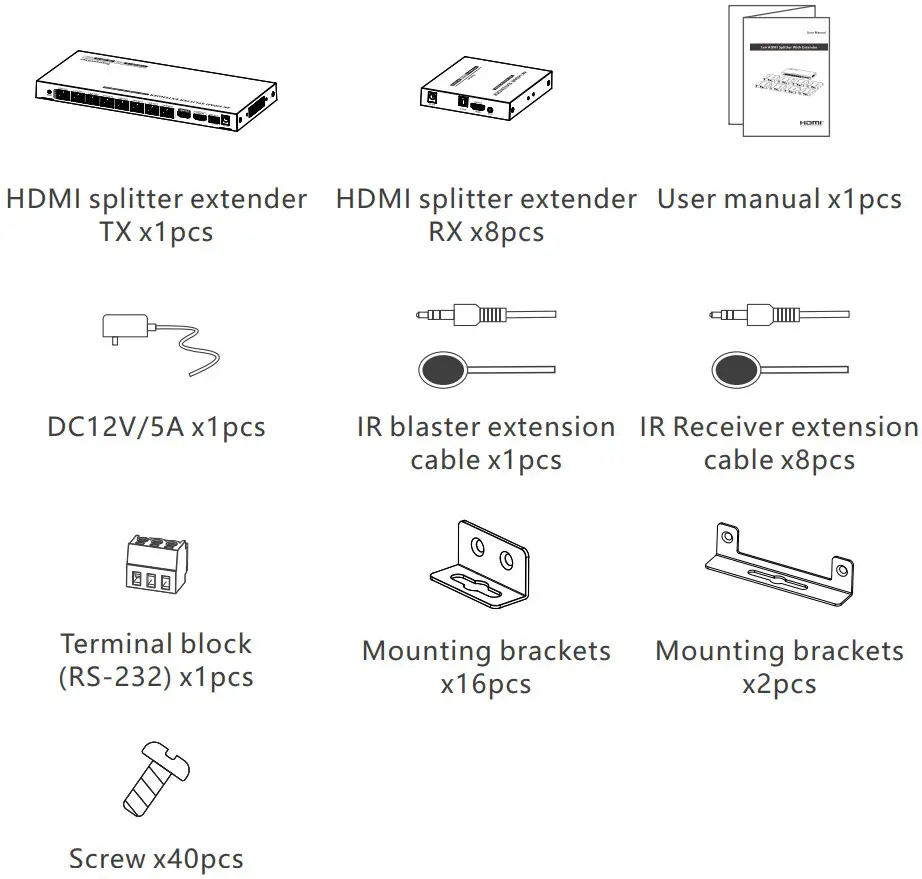
Package Contents
 Installation Requirements
- HDMI source device (PC, DVD, play station, etc.)
- HDMI display device (TV, monitor, projector, etc.)
- UTP/STP CAT6/CAT6A/CAT7 cable. Follow standard IEEE-568B.
It is recommended to choose high-quality network cables.
Panel Description
Transmitter (TX)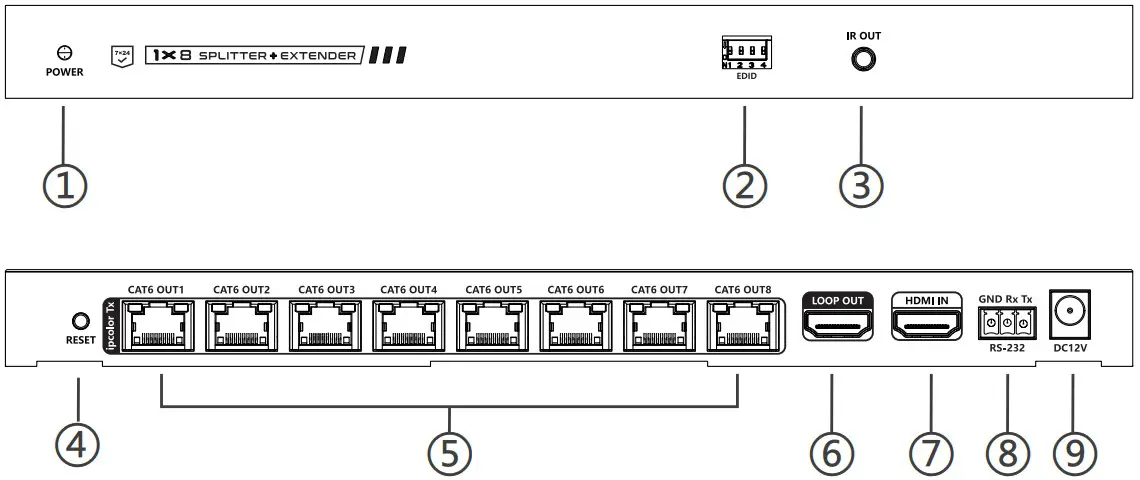
| ① | Power indicator | The indicator will turn blue when the power is turned on |
| ② | EDID DIP switch | Set output resolution through EDID DIP switch |
| ③ | IR out | Connect with IR blaster extension cable |
| ④ | Reset button | Restart the device |
| ⑤ | RJ45 output port | Connect with Cat6/6A/7 network cables |
| ⑥ | HDMI output port | Connect with local HDMI display device with HDMI cable |
| ⑦ | HDMI input port | Connect with HDMI source device with HDMI cable |
| ⑧ | RS-232 Port | Connect with the external device to control the transmitter. |
| ⑨ | Power | Connect with DC 12V/5A power adapter |
Receiver (RX)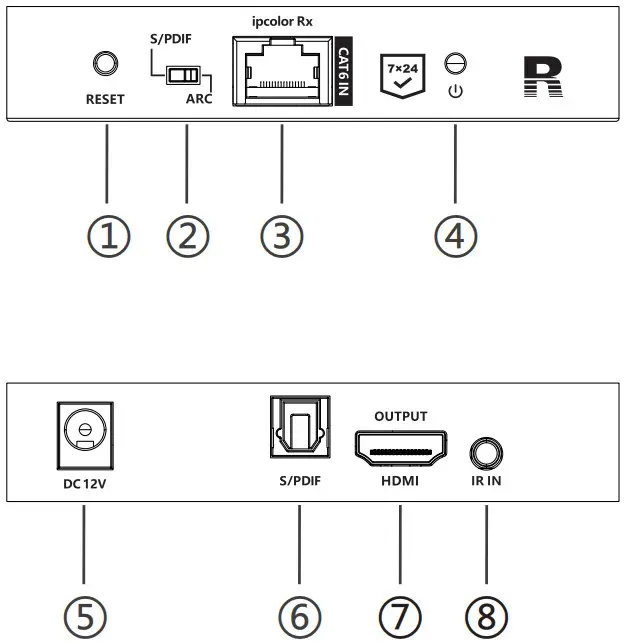
| ① | Reset button | Restart the device |
| ② | Audio switch | Choose the audio source (output from the S/PDIF port) S/PDIF: from the source device ARC: from the TV (receiver end) |
| ③ | RJ45 signal input | Connect with Cat6/6A/7 network cables |
| ④ | Power/Signal indicator | When there is power and no HDMI signal, the indicator will flash, when there is HDMI signal, the indicator will light solid blue |
| ⑤ | Power | PoC (Powered by TX) |
| ⑥ | S/PDIF output | Connect with speaker or amplifier |
| ⑦ | Connect with HDMI display device | |
| ⑧ | Connect with IR receiver extension cable |
Installation Procedures

1. Network cable
Follow the standard of IEEE-568B:
| 1- Orange/white 2- Orange | 3 Green/white 4-Blue |
| 5 Blue/white 6 Green | 7-Brown/white 8-Brown |
2. Connection
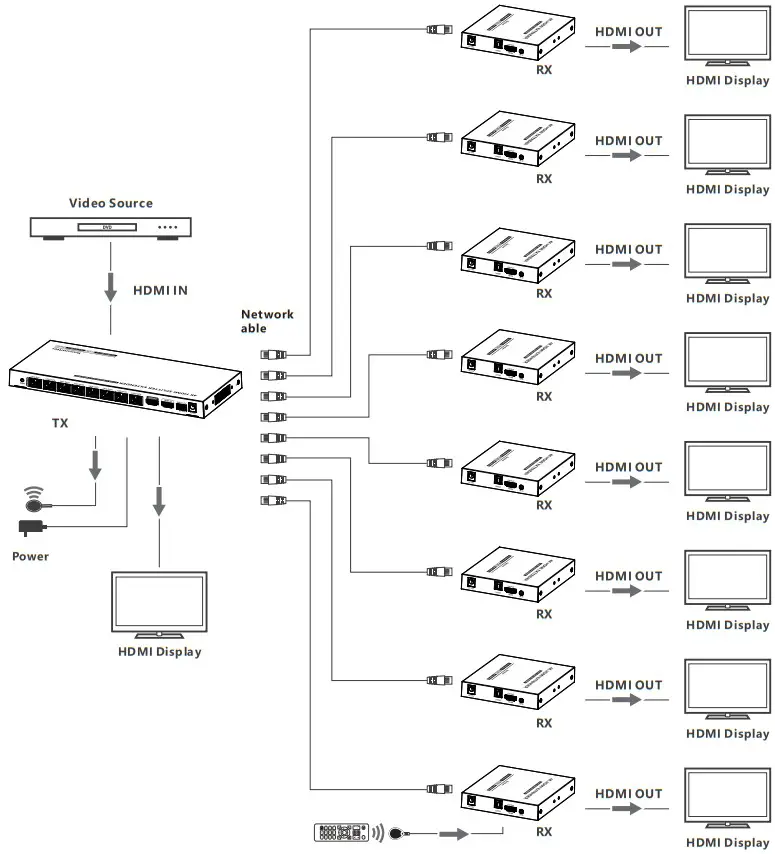 3. Connection instructions
- Connect the source device to the HDMI IN port of the transmitter through an HDMI cable.
- Connect the CAT6 OUT ports of the transmitter to the CAT6 IN port of the receivers through the network cables.
- Connect the HDMI OUTPUT port of the receivers to the display devices through HDMI cables.
- If using HDMI loop out, connect the LOOP OUT port of the transmitter to the display through an HDMI cable.
- If using the RS-232 control, connect the RS-232 port of the transmitter to an external device.
- Plug the power into the devices to get started.
4. IR User Guide
- IR blaster extension cable should plug in the IR OUT port of the transmitter, IR receiver extension cable should plug in the IR IN port of the receivers.
- The emitter of the IR blaster extension cable should be as close as ossible to the IR receiving window of the source device.
- Point the remote control at the receiving head of the IR receiver extension cable to operate.
Function setting
1. RS232 settings
The default configuration is as follows:
Baud rate: 9600
Data bits: 8
Stop bits: 1
Parity: 0
| Control Commands | Function Descriptions | |
| ES XX On [Enter] | Turn on the network signal output port(s), choose from “01” to “08” (the network ports from left to right are: 01, 02, 03, 04, 05,06,07,08.); “All” means all four ports | |
| ES XX Off [Enter] | Turn off the network signal output port(s), choose from “01” to “08” (the network ports from left to right are: 01, 02, 03, 04, 05,06,07,08.); “All” means all four ports | |
| Reset [Enter] | Restart the device | |
| Recover [Enter] | Restore device factory settings | |
| Baud XX [Enter] | Set the baud rate value: 9600 (default), 19200, 38400, 57600, 115200 | |
| Examples of control commands are shown below: | ||
| Control Command | ES 04 On [Enter] | |
| Function Description | Trun on network signal output port 04 | |
| Return Values | Received successfully | ES 04 On OK |
| Receive failed | ES 04 On FAIL | |
| Control Command | ES All Off [Enter] | |
| Function Description | Turn off all the network signal output ports | |
| Return Values | Received successfully | ES All Off OK |
| Receive failed | ES All Off FAIL | |
| Control Command | Reset [Enter] | |
| Function Description | Restart the device | |
| Return Values | Received successfully | Reset OK |
| Receive failed | Reset FAIL | |
| Control Command | Baud 19200 [Enter] | |
| Function Description | Set the baud rate value: 19200 | |
| Return Values | Received successfully | Baud 19200 OK |
| Receive failed | Baud 19200 FAIL | |
2. EDID settings:
There are 16 built-in EDIDs in the product, which can be switched through the DIP switch. The upward DIP switch indicates “1”, and the downward DIP switch indicates“0”.
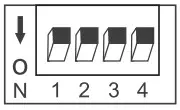 | Switch up for “1” | 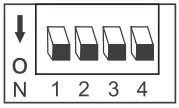 | Switch down for “0” |
| Switch Status | EDID Information | |||
| 1 | 2 | 3 | 4 | |
| 0 | 0 | 0 | 0 | 4K@60Hz 2CH |
| 1 | 0 | 0 | 0 | 4K@60Hz 5.1CH |
| 0 | 1 | 0 | 0 | 4K@60Hz 7.1CH |
| 0 | 0 | 1 | 0 | 4K@60Hz HDR 7.1CH |
| 0 | 0 | 0 | 1 | 4K@30Hz 2CH |
| 1 | 1 | 0 | 0 | 4K@30Hz 5.1CH |
| 1 | 0 | 1 | 0 | 4K@30Hz 7.1CH |
| 1 | 0 | 0 | 1 | 4K@30Hz HDR 7.1 CH |
| 0 | 1 | 1 | 0 | 1080p@60Hz 2CH |
| 0 | 1 | 0 | 1 | 1080p@60Hz 5.1CH |
| 0 | 0 | 1 | 1 | 1080p@60Hz 7.1CH |
| 1 | 1 | 1 | 0 | 1080i@60Hz 2CH |
| 1 | 1 | 0 | 1 | 1080i@60Hz 5.1CH |
| 1 | 0 | 1 | 1 | 1080i@60Hz 7.1CH |
| 0 | 1 | 1 | 1 | 1080p@60Hz HDR 7.1CH |
| 1 | 1 | 1 | 1 | Auto |
FAQ
Q: Why there is no image output on the display device?
– A: 1) Please check the power supply and all the cables are well-connected.
– 2) Please check whether there is an HDMI signal input.
– 3) Please make sure that the corresponding network port output is not turned off by the RS-232 command.
Q: Why is the output image unstable?
– A: 1) Please check whether the length of the network cable is within 70 meters.
– 2) Press the “reset” button on TX and RX panels to restart and reconnect.
Q: Why does the TV have a snowy/fuzzy screen?
– A: 1) Please change the HDMI cable or use a shorter HDMI cable.
– 2) The recommended length of the HDMI cable connected to the transmitter is ≤3 meters, and the recommended length of the HDMI cable connected to the receiver is ≤5 meters.
Technical Parameters
| Item | Specification |
| Transmission protocol | ipcolor |
| Distribution mode | 1 IN 8 OUT |
| Transmission distance | CAT6/6A/7570m |
| HDMI signal | HDMI 2.0, HDCP 2.2 |
| HDMI Resolution | 480i@60Hz, 480p@60Hz, 576i@50Hz, 576p@50Hz, 720p@50/60Hz, 10801@50/60Hz, 1080p@50/60Hz, 1280×960, 1280×800, 1280×768, 1680×1050, 1360×768, 1366×768, 1600×900, 1024×768, 800×600, 3840×2160@24/25/30/50/60Hz, 4096×2160@24/25Hz |
| Audio formats | LPCM/DTS-HD/DTS-Audio/Dolby Digital 5.1 |
| IR | Support IR passback function (20KHz-60KHz) |
| RS-232 | 3 pin: TxD-RxD-GND, follows RS-232 levels |
| Working temperature | -20-60°C |
| Storage temperature | -30-70°C |
| Humidity (no condensation) | 0-90% RH |
| Protection | ESD protection 1 a Contact discharge level 2 1 b Air discharge level 3 Implementation of the standard: IEC61000-4-2 |
| Lightning protection | |
| Surge protection | |
| Power supply | TX: DC12V/5A |
| Power consumption | TX+ RX < 50W |
| Material | Iron |
| Color | Black |
| Weight | TX:731g RX: 243g |
| Dimension | TX: 264.0(L) x 120.0(W) x 23.0(H)mm RX:105.5(L)x 102.5(W)x 20.0(H) mm |
Disclaimer
The product name and brand name may be registered trademark of related manufactures. ™ and ® may be omitted on the user manual.The pictures in this user manual are just for reference. The terms HDMI, HDMI High-Definition Multimedia Interface, and the HDMI Logo are trademarks or registered trademarks of HDMI Licensing Administrator, Inc.We reserve the rights to make changes without further notice to a productor system described herein to improve reliability, function or design.
![]()


