![]()
User manual
Dimmer
Safety warnings
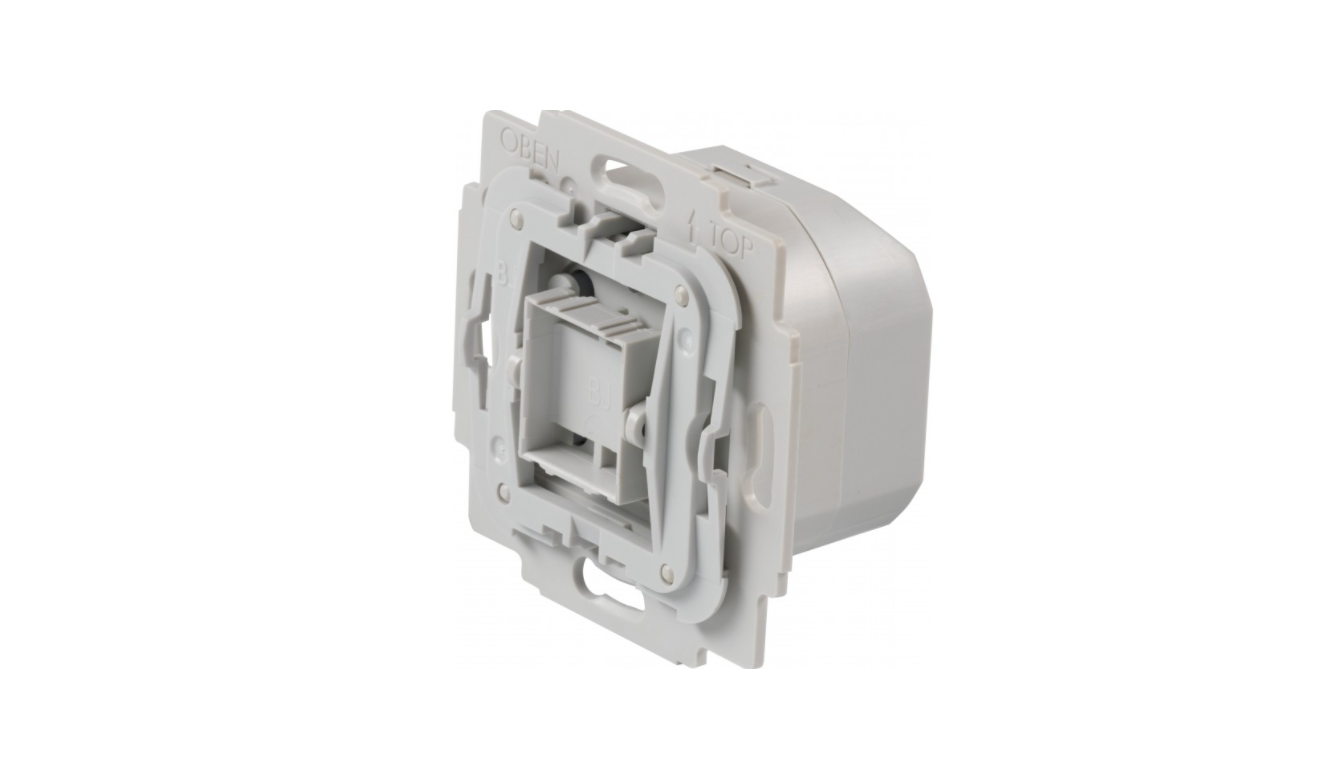
 INSTALLATION
- To prevent electrical shock and/or equipment damage, disconnect electrical power at the main fuse or circuit breaker before installation and maintenance.
- Be aware that even if the circuit breaker is off, some voltage may remain in the wires — before proceeding with the installation, be sure no voltage is present in the wiring.
- Take extra precautions to avoid accidentally turning on the device during installation.
- Connect the device according to the wiring diagram.
![]() Danger of electrocution!
Danger of electrocution!
Installation of this device requires a great degree of skill and may be performed only by a licensed and qualified electrician. Please keep in mind that even when the device is turned off, the voltage may still be present in the device’s terminals.
IMPORTANT DISCLAIMER
Wireless communication is not always 100% reliable. This device should not be used in situations in which life and/or valuables are solely dependent on its functioning. If the device is not recognized by your gateway (hub) or shows up incorrectly, you may need to change the device type manually and make sure your gateway (hub) supports Z-Wave Plus devices.
WARNING
Do not dispose of electrical appliances as unsorted municipal waste, use separate collection facilities. Contact your local government for information regarding the collection systems available. If electrical appliances are disposed of in landfills or dumps, hazardous substances can leak into the groundwater and get into the food chain, damaging your health and well-being. When replacing old appliances with new ones, the retailer is legally obligated to take back your old appliance for disposal free of charge.
Z-Wave
This product can be operated in any Z-Wave network with other Z-Wave certified devices from other manufacturers. All non-battery-operated nodes within the network will act as repeaters regardless of vendor to increase the reliability of the network.
Z-Wave Plus
This device is a security-enabled Z-Wave Plus product that is able to use encrypted Z-Wave Plus messages to communicate to other security-enabled Z-Wave Plus products.
This device must be used in conjunction with a Security Enabled Z-Wave Controller in order to fully utilize all implemented functions.
Key features
The Dimmer controls the on/off and dimming function for one electrical device. It measures the power consumption of the connected device.
– In-wall mounted light dimmer
– Z-Wave Plus
– Security S2
– SmartStart
– compatible with German market wall switch product lines
– Overload protection
Overview
Front
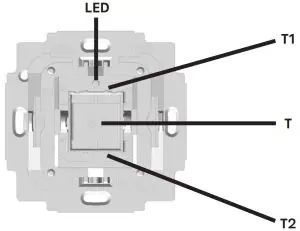
| LED | status-LED |
| T1 | short press = on / hold = dim up (brighter) |
| T2 | short press = off / hold = dim down (darker) |
Back
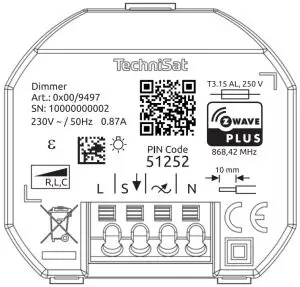
| L | Live lead |
| Switched output with dim function to | |
| N | Neutral lead |
| S | Extension input (can detect a live lead) |
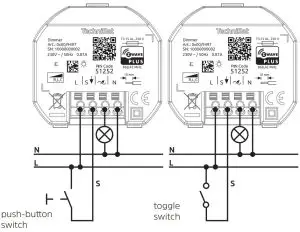
Wiring diagram
SmartStart inclusion
SmartStart enabled products can be added into a Z-Wave network by scanning the Z-Wave QR Code present on the product with a controller providing SmartStart inclusion. No further action is required and the SmartStart product will be added automatically within 10 minutes of being switched on in the network vicinity.
- The Z-Wave QR-Code is located on the back of the product.
- Please follow your SmartStart enabled Z-Wave gateway‘s manual, on how to use SmartStart inclusion.
- Install the TechniSat Dimmer.
- After checking the correct installation, re-enable electrical power at the main fuse or circuit breaker
- The TechniSat Dimmer will be added to your Z-Wave network within 10 minutes after re-enabling electrical power.
Manually adding the device to the Z-Wave network
- Install the TechniSat Dimmer.
- After checking the correct installation, re-enable electrical power at the main fuse or circuit breaker.
- Start the Z-Wave device add mode on your Z-Wave gateway, according to the gateway‘s manual.
- Press position T1 3x within 1 second.
- The red status LED is on while the device is added to the Z-Wave network.
- The green LED is on for 5 seconds after successfully adding the device.
Removing the device from the Z-Wave network
- Start the Z-Wave device remove mode on your Z-Wave gateway, according to the gateway‘s manual.
- Press and hold position T1 for more than 10 seconds.
- The red status LED is on while the device is removed from the Z-Wave network.
- The green LED is on for 5 seconds after successfully removing the device.
Factory Default Reset
![]() Use this procedure only when the network primary controller is missing or otherwise inoperable.
Use this procedure only when the network primary controller is missing or otherwise inoperable.
- Press and hold position T2 for more than 20 seconds.
- The LED will alternately flash red and green for 5 seconds after a successful reset.
Configuration
| Parameter | Description | Size (Bytes) | Value | Default |
| 1 | Enable/Disable Central scene notifications for 2x-5x press | 1 | 0 – disable 1 – enable | 1 |
| 2 | Interval of current wattage meter reports in 10 seconds | 2 | 0 – disable unsolicited reports 1 … 8640 (30 seconds – 1 day) | 3 (30s) |
| 3 | Interval of active energy meter reports in minutes | 2 | 0 – disable unsolicited reports 10 … 30240 (10 minutes – 3 weeks) | 60 (1hour) |
| 4 | The operation mode of button T | 1 | 0 – T1 turns output L1 on, T2 turn output L1 off 1 – T1 & T2 toggle output L1 | 0 |
| 5 | Configuration of switch type connected to extension connector S | 1 | 0 – toggle switch 1 – push-button switch | 0 |
| 6 | Central Scene mapping of extension input S | 1 | 1 – map S to central scene of T1 2 – map S to central scene of T2 3- map S to own central scene | 1 |
| 7 | Dimming curve selection | 1 | 0 – dimming curve 1 1 – dimming curve 2 | 0 |
Supported Association Groups
| ID | Name | Max group members | CC-Commands |
| 1 | Lifeline | 1 | – Device Reset Locally Notification – Central Scene notification – Meter Report – Multilevel Switch Report – Notification Report |
| 2 | Switch State | 10 | – Basic Set |
Basic Command Class
This device controls members of association group 2 with Basic Command Class Set commands.
The set commands mirror the device‘s state.
When the device is set to a specific multilevel value, the same value is sent as a Basic Set to members in association group 2.
If the target value is unspecific, because the up or down buttons are held (the dimmer will dim until the button is released or min/max brightness is reached), a Basic Set with the min/max dimming value corresponding with the current direction of dimming (either 0x01 or 0x63)) will be sent to members in association group 2.
If dimming is stopped before min/max brightness is reached, an additional Basic Set command with the current dimming value where the dimming was stopped, will be sent to members in association group 2.
Notification Command Class
| Notification Type | Notification Event | Description |
| Power Management (0x08) | Idle (0x00) | No event detected/event cleared |
| Overload detected (0x08) | The maximum resistive load on L1 has been exceeded |
Supported Command Classes documentation
| Command Class | Version | Required Security Class |
| Association | 2 | highest granted |
| Association Group Information | 1 | highest granted |
| Basic | 2 | highest granted |
| Central Scene | 3 | highest granted |
| Configuration | 1 | highest granted |
| Device Reset Locally | 1 | highest granted |
| Firmware Update Meta Data | 4 | highest granted |
| Manufacturer Specific | 2 | highest granted |
| Meter | 4 | highest granted |
| Multilevel Switch | 4 | highest granted |
| Notification | 8 | highest granted |
| Powerlevel | 1 | highest granted |
| Security 0 | 1 | none |
| Security 2 | 1 | none |
| Supervision | 1 | none |
| Transport Service | 2 | none |
| Version | 3 | highest granted |
| Z-Wave Plus Info | 2 | none |
Central Scene
The Dimmer can send central scene activation notifications to a Z-Wave gateway.
Pressing the respective button position multiple times will send the corresponding scene number:
| Button position | T1 | T2 | S (switch connected to extension input) |
| Scene number | 1 | 2 | 1 or 2 or 3 depending on configuration parameter 6 |
The following Z-Wave key attributes are available for all scenes:
| Button position pressed | Z-Wave key attribute |
| two times | Key Pressed 2 times |
| three times | Key Pressed 3 times |
| four times | Key Pressed 4 times |
| five times | Key Pressed 5 times |
Firmware update
This device supports firmware update via Z-Wave. For enhanced security, the device requires a manual confirmation, before an update of the device‘s firmware can be initiated. To perform a firmware update follow these steps:
- Follow your Z-Wave gateway‘s manual, on how to update the firmware of a Z-Wave device.
- From your gateway issue a Z-Wave request to get the current firmware version of the device to be updated.
- When the request has been received, your device‘s LED will glow red for 10 seconds.
- While the LED glows red, press T1 or T2 to allow a firmware update – the LED will now glow green for 10 seconds.
- While the LED glows green, start the device‘s firmware update from your gateway.
Technical Data
| Product Key Features | In-wall mounted binary switch control Z-Wave Plus Security S2 SmartStart compatible with German market wall switch product lines Overload protection |
| supply voltage | 230 VAC+/- 10% |
| line frequency | 50Hz+/- 10% |
| the rated load current of output (resistive load) | 0.87 A |
| output circuit power – minimum load – resistive load – capacitive load – inductive load | 1 W 200 W 200 VA 200 VA (cos phi > 0,95 (0 < phi < 18°) in case of transformer) |
| power consumption (without load) | < 0.5 W |
| extension input S | supply voltage 230 VAC +/- 10% power consumption: < 35 mW |
| operation altitude | < 2000 m sea level |
| IEC protection class | II |
| accuracy of power measurement | >= 100W: +/- 3% |
| Status LED | Red status LED is on while adding the device Green LED is on for 5 s after successfully adding the device |
| Z-Wave frequency and transmission power | 868,42MHz 4dBm |
| Ambient Conditions Operational | Temperature: +5°C to +35°C Humidity: 10 % to 75% RH IP Code: IP20 |
| Ambient Conditions Warehousing & Transport: | Temperature: -20°C to +60°C Humidity: 5 % to 90% RH non condensing |
Subject to technical changes and errors.
Subject to change for amendments and printing errors.
Last updated: 02/20
Duplication and reproduction only with the publisher‘s approval.
TechniSat is a registered trademark of:
TechniSat Digital GmbH
PO box 560
54541 Daun (Germany)
www.technisat.com
Technical Hotline
Mon. – Fri. 8:00 – 18:00
03925/9220 1800
Caution! ![]()
If you encounter a problem with this equipment, please contact our
Technical Hotline immediately.
Z-Wave and Z-Wave Plus have registered trademarks of Silicon
Laboratories and its subsidiaries in the United States and other countries.
 Please keep this page with the full device-specific key (DSK) in a safe place!
It is needed throughout the entire product lifetime


