![]() P/N:110401110183X
P/N:110401110183X
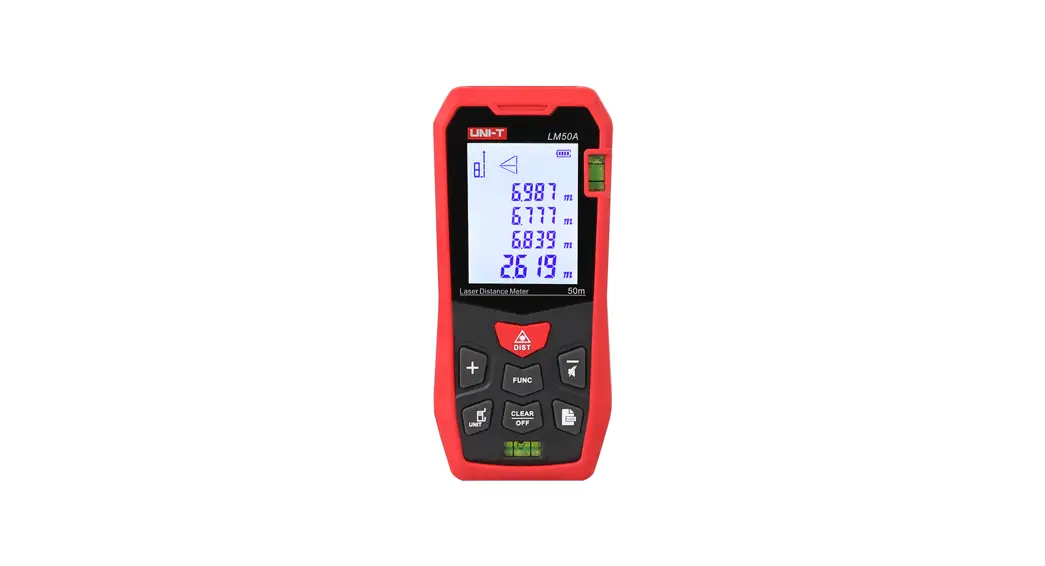
LM50A/LM 70A/LM 1 00A/LM 120A
Laser Distance Meter
User Manual
Safety Information
Before using the meter for the first time, please read the safety information and operating instructions carefully.
- Use the meter only as specified in this manual. Otherwise, it may cause damage to the meter, affect measurement accuracy and result in personal injury.
- Do not disassemble or repair the meter without authorization. Do not refit or change the performance of the laser transmitter illegally. Please keep the meter properly, do not place it where children can reach it, and avoid use by irrelevant personnel.
- Do not irradiate the laser at the eyes and other parts of the body, and on the surface of highly reflective objects.
- The electromagnetic radiation of the meter may cause interference to other equipment. Please do not use the meter near airplanes, medical equipment, or in flammable and explosive environments.
- The replaced batteries and discarded meters cannot be disposed of together with domestic garbage. Please dispose of them in accordance with relevant national or local laws and regulations.
- If the meter has any quality problems, or if users have any questions about the use of the meter, please contact the local dealer or manufacturer in time.
Product Introduction
Batteries
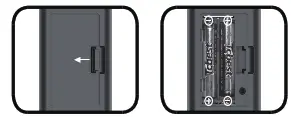
- Open the battery door on the back of the meter, install the battery according to the polarity instructions, and close the battery door.
- The meter can only use 1.5V AAA alkaline batteries.
- When the meter is not used for a long time, please take out the battery to prevent it from corroding the meter’s main body.
Power On and Function Settings
- Power On/Off
In the shutdown state, press the meter, and the laser will be started at the same time.
In the power-on state, press, and hold for 3 seconds to turn off the meter. If no operation is performed within 150 seconds, the meter will automatically shut down.
 - Unit Settings
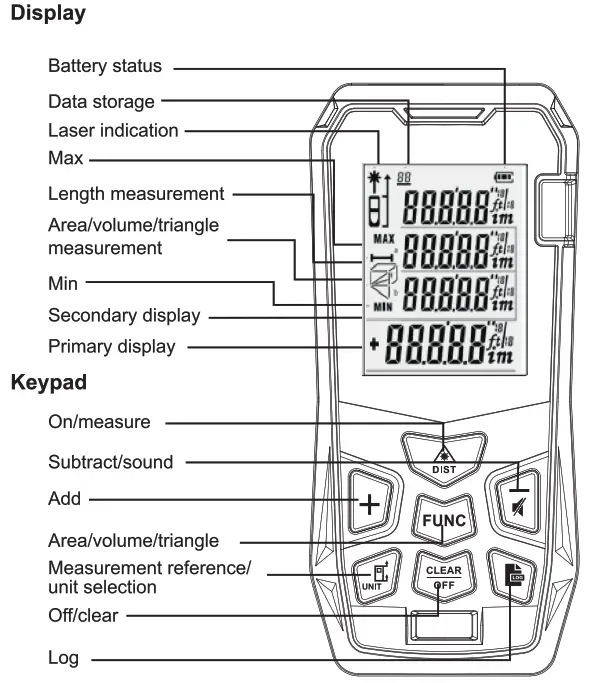
Long press It to enter the unit setting state and the current unit can be reset. The default unit of the meter is 0.000m. There are 6 optional units.
Measurement units:Length Area Volume 1 0.000 m 0.000 m2 0.000 m3 2 0.00 m 0.00 m2 0.00 m3 3 0.0 in 0.00 ft2 0.00 ft3 4 0 1/16 in 0.00 fe 0.00 ft3 5 0’00” 1/16 0.00 ft2 0.00 ft3 6 0.00 ft 0.00 fe 0.00 ft3 - Measurement Reference Settings
Short pressuwto measure from front or end. The default setting is the end measurement. - Backlight
The backlight is automatically turned on and off. It will turn on for 15 seconds when any button is pressed. The backlight will automatically turn off if there is no operation after 15 seconds to save power. - Sound
Long press to turn on or off the sound of the beeper.
 - Self-Calibration
The self-calibration function can ensure measurement accuracy.
Calibration method: In the shutdown state, press and hold”, and then short press to turn on the meter. When the screen shows’ CAL’ with a flashing number at the bottom, the meter enters self-calibration mode. At this time, users can press  to calibrate values according to the error of the meter.
Calibration range: -9∼9mm
Examples: The actual distance is 3.780m.
If the measured value is 3.778m, which is 2mm smaller than the actual value, press + to increase the calibration value by 2mm.
If the measured value is 3.783m, which is 3mm larger than the actual value, pressto lower the calibration value by 3mm.
After adjustment, press to save the calibration results.
Measurement Modes
- Single Measurement
While the meter is on, pressto transmit the laser. Press again to make the distance measurement. The measurement results will show on the primary display. - Continuous Measurement
While the meter is on, long pressto enter the continuous measurement state. The maximum and minimum values during the measurement will show on the secondary display. The measurement results will show on the primary display. Short press or to exit the continuous measurement. - Area Measurement
Press FUNC 1x. The symbol will appear on the display and one side of the rectangle will flash.
Press,to make the first measurement (length).
Press again to make the second measurement (width).
The meter will automatically calculate the area, and the result will show on the primary display. The length and width will show on the secondary display. During the measurement process, press to clear the measurement result and re-measure it. Pressto exit the area measurement and enter the length measurement mode. - Volume Measurement
Press FUNC 2x. The symbols will appear on the display.
Pressto make the first measurement (length).
Pressagain to make the second measurement (width).
Press again to make the third measurement (height).
The meter will automatically calculate the volume, and the result will show on the primary display.
The length, width, and height will show on the secondary display.
During the measurement process, pressto clear the measurement result and re-measure. Press to exit the volume measurement and enter the length measurement mode. - Indirect Measurement

The meter has four modes that use the Pythagorean theorem to measure the distance of one side of a triangle, which is convenient for users to perform indirect measurements in a complex environment.
(1) Measure the hypotenuse and base-side, indirectly measure the height
Press FUNC 3x.
Press to measure the length of the hypotenuse (a).
Pressto measure the length of the base-side (b).
The meter will automatically calculate the length of the leg (x).
(2) Measure the leg and base-side, indirectly measure the hypotenuse
Press FUNC 4x,
Press to measure the length of the leg (a).
Pressto measure the length of the base-side (b).
The meter will automatically calculate the length of the hypotenuse (x).
(3) Press FUNC 5x, and the hypotenuse flashes
Pressto measure the length of the hypotenuse (a).
Press to measure the length of another hypotenuse (b).
Pressto measure the length of the base-side C.
The meter will automatically calculate the length of the leg (x).
(4) Press FUNC 6x, and the hypotenuse flashes
Press to measure the length of the hypotenuse (a).
Pressakr, to measure the length of the base-side (b).
Press, to measure the length of another hypotenuse©.
The meter will automatically calculate the length of the leg (x).
In the Pythagorean measurement mode, the length of the leg must be less than the length of the hypotenuse; otherwise, the meter will display an error signal prompt. In order to ensure the measurement accuracy, users should make sure to measure from the same starting point and in the order of hypotenuse and leg. - Addition/Subtraction
The single distance measurement values can be added or subtracted. After getting the result when taking a single distance measurement, press to enter the addition/subtraction mode.
Short press the “+” symbol will show on the primary display, and then it will enter the addition mode. The added value of the last and the current measurement values will show on the display. Short press the ” – symbol will show on the primary display, and then it will enter the subtraction mode. The subtraction value of the last and the current measurement values will show on the display.
Not only the distance can be added and subtracted, but also the area and the volume.
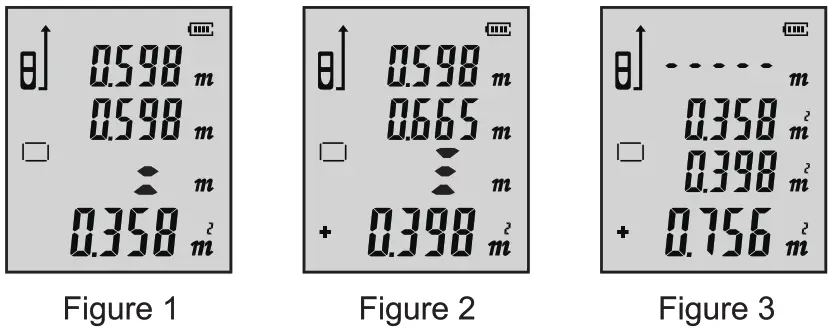
Area addition: Measure the first area and get the result, as shown in Figure 1 below. Then press to measure the second area and get the result, as shown in Figure 2 below, and a plus sign will be displayed in the lower left corner. Finally, press to get the result of adding these two areas, as shown in Figure 3. The addition and subtraction of volume are similar to it.
- Data Storage
If the current data is valid when measuring, press and hold for 3 seconds, and the data will be automatically stored in the meter memory. In the area, volume, and indirect measurement modes, the data can also be stored after all the tests are over. At this time, the meter will store the complete measurement record under this model. - View/Delete Data
Short press to query the stored data. Press + to scroll forwards, and press to scroll backward. When viewing data, short press C LEFAr to delete the current record, and long press to delete all records. Press . or to exit.

| Code | Cause | Resolution |
| Err | Out of distance measurement range | Use the meter in designated environments. |
| Earl | Signal too weak | Measure the target point with strong reflection ability. |
| Err2 | Signal too strong | Measure the target point with weak reflection ability. |
| Err3 | Battery power too low | Replace batteries. |
| Err4 | Out of operating temperature range | Use the meter within the range e. |
| Err5 | Pythagorean measurement error | Re-measure to ensure that the hypotenuse is longer than the leg. |
Specifications
| Items | LM50A | LM70A | LM100A | LM120A |
| Measurement range | 50m | 70m | 100m | 120m |
| Measurement accuracy | ±(2mm+5*10-5D) | |||
| Continuous measurement | ✓ | |||
| Area/volume measurement | ✓ | |||
| Pythagorean measurement | ✓ | |||
| Addition/subtraction | ✓ | |||
| Area/volume addition/subtraction | ✓ | |||
| Max/min | ✓ | |||
| Self-calibration | ✓ | |||
| Laser class | Class II | |||
| Laser type | Class 2 630-670nm, <1mW | |||
| Data storage | 99 groups | |||
| Auto laser off | 20$ (single measurement) | |||
| Auto power off | About 1505 | |||
| Battery life | Up to 8000 measurements | |||
| Sound prompt | ✓ | |||
| Storage temperature | -20°C-60°C | |||
| Operating temperature | 0’C-40°C | |||
| Storage humidity | 20%-80%.R1-1 | |||
| Batteries | 1.5V 2xAAA | |||
| Product size | 112x50x25mm | |||
* “d” means actual distance Under harsh environments, such as excessive sunlight and ambient temperature fluctuations, weak reflection on reflective surfaces, and insufficient battery power, the measurement results will have errors. At this time, using the target reflector can improve the measurement accuracy.
Maintenance
Do not place the meter in a high temperature and humidity environment for a long time. When not using the meter for a long time, please take out the battery and put the meter in the carrying bag, and store it in a cool and dry place.
Remove dirt with a moist, soft cloth. Do not use aggressive detergents or solutions. The laser window and focusing lens can be wiped according to the method of wiping the optical device.
Packing List
All accessories are shown in the table below.
| Items | Accessories | Quantity |
| 1 | Meter | 1 |
| 2 | Carrying bag | 1 |
| 3 | AAA batteries | 2 |
| 4 | User manual | 1 |
| 5 | Gift box | 1 |
![]() UNI-TREND TECHNOLOGY (CHINA) CO., LTD.
UNI-TREND TECHNOLOGY (CHINA) CO., LTD.
No.6, Gong Ye Bei 1st Road,
Songshan Lake National High-Tech Industrial
Development Zone, Dongguan City,
Guangdong Province, China![]()


