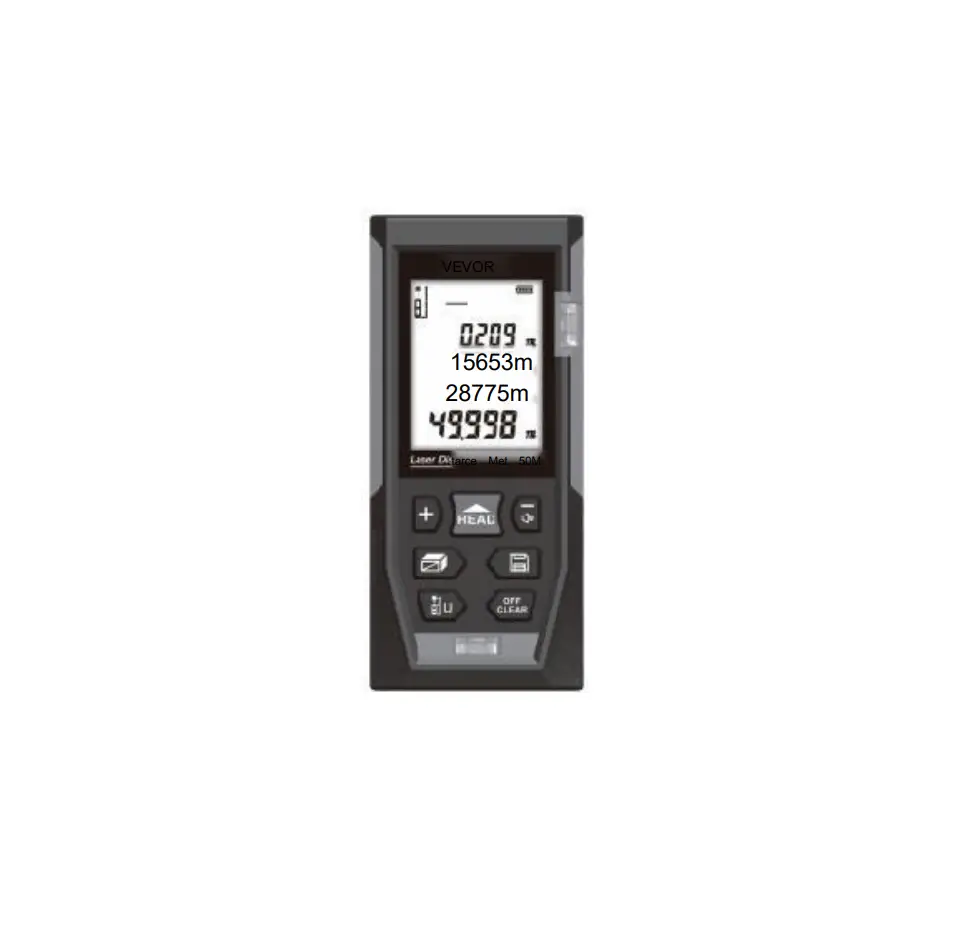
VEVOR H-D510 Laser Distance Meter
We continue to be committed to provide you tools with completive price. “Save Half, Hal Price’ or any other similar expressions used by us only represents an estimate of savings you might benefit from buying certain tools with us compared to the major top brands and doses not necessary mean to cover al categories of tools offered by us. You are Kindly reminded to verify carefully when you are placing an order with us if you are actually saving hal in comparison with the top major brands.
This is the original instruction, Please read all manual instructions carefully before operating. VEVOR reserves clear interpretation of our user manual. The appearance of the product shall be subject to the product you received. Please forgive us that we won’t inform you again if there is any technology or software updates on our product.
Safety regulations
Please read the safety regulations and operation guide carefully before operating.
- Please read all of the operational guide and safety regulations in this manual before operation. Improper operations without complying with this manual guided could cause damage to the device, influence on measurement result or body injury to the user. The instrument is not allowed to disassemble or repair in any ways. It is forbidden to do any illegal modification or performance change for laser emitter. Please keep it out of reach of children and avoid using by any irrelevant personnel.
- it is strictly prohibited to shoot eyes or other parts of body with the laser; it is not allowed take the laser to shoot any objects’ surface with strong reflecting.
- Due to electromagnetic radiation interference to other equipment and devices, please don’t use the meter in the plane or around medical equipment, don’t use it in inflammable, explosive environment.
- Discarded batteries or meter device shall not processed just like household garbage, please handle the minline with related law and regulations.
- Any quality issues or any questions on the meter, please contact local distributors or manufacturer in time, we are ready to offer solutions for you.
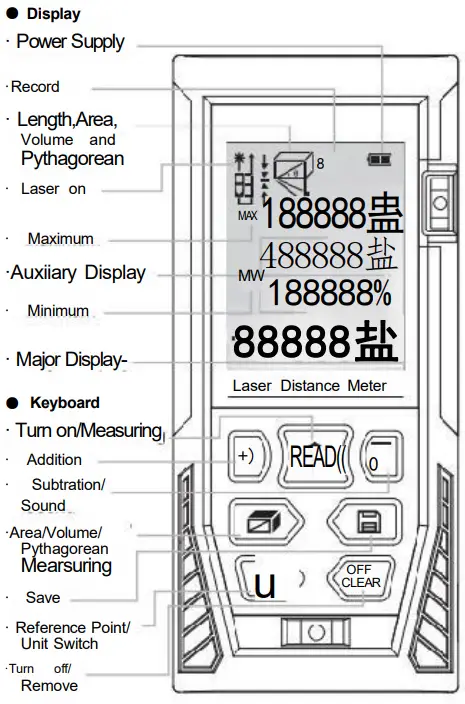
Display/keyboard
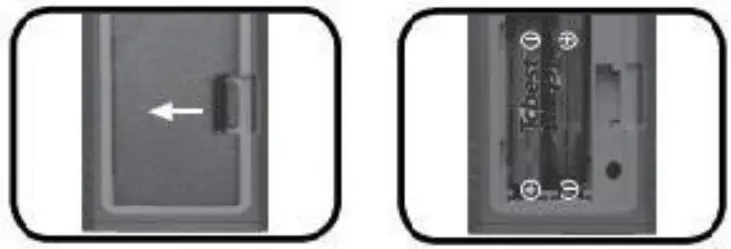
Batteries Installation
- Battery Installation and Replacement

- Discharge the battery door on the back of device, and place battery according to correct polarity, then cover the battery door.
- Only 1.5 V AAA alkaline battery is applied to the meter.
- If not used or a long time, please take out the battery to avoid battery corrosion to meter body.
- Turn on/off the Instrument
Under off status, press button , device and laser get starting simultaneously and stand by for measurement
Under on status, long press button for 3 seconds to turn the device off. The device can also be shut off without any operation for 150 seconds. - Unit setting
Long press button tio , reset current measurement unit, the default unit is: 0. 0 0 0 m There are 6 units for selection
Units:Length Area Volume 0.000m 0.000m² 0.000m³ 0.00m 0.00m² 0.00m³ 0.0in 0.00ft² 0.00ft³ 0.00ft 0.00f² 0.00ft³ 01/16 in 0.00n² 0.00ft³ 0’00°1/16 0.00m² 0.00ft³
- Changing Reference Point
Short press key to change the reference point. The device reference point by default is rear. - Back Light On/Off
The back light is set to turn on and off automatically. Th e back light can be on for 15 s while operating , and it will be shut off automatically in 15s when there is no operation to the device. - Sound On/Off
The instrument provides artificial voice broadcast function, users ca n operate the instrument according to the voice. Long press to turn off the voice function, then long press to turn on the voice function.
Self-Calibration
This function can keep the precision of the device. Instruction: Power off, Long press button ,and then press 血. Release the button 血, then “CAL” and a figure shows on the screen. User can adjust the figure with button + according to the accuracy of the meter. Adjusting range:-9 to 9mm, then, long press button ![]() to save the calibration result.
to save the calibration result.
Length Measurement & Calculation
- Single Distance Measuring:
Tum on the laser beam by short press of the button under measuring mode, press the button again for single measurement of length, then the measured results displayed in the major display area. - Continuous Measuring:
Long press button 血under measuring mode and enter into continuous measuring mode Maximum measuring result displays in auxiliary display area, present result displays in major display area. Short press button or to exit continuous measuring mode.
Area Measurement:
Press till you see __ ,please follow the below instructions for area measuring:
Press once for length
Press again for width
The device calculates and shows the result in the major display area.
The measured values of the length and width of the rectangle are displayed in the auxiliary display area. Press , dear off the result and measuring again if necessary.
Press again to exit the mode. - Volume Measurement
Press till you see, please follow the below instruction for volume measuring:
Press for Length
Press 血again for Width
Press 血thirdly for height
The device calculates and shows the result in the major display area.
Press ,clear off the result and measuring again if necessary.
Press again to exit the mode.
Pythagoras
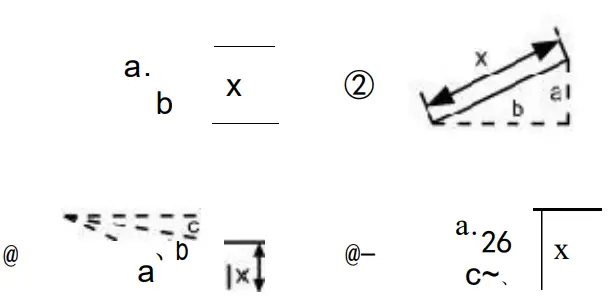
There are four Pythagoras modes in case that user gets hard to reach the target.
- Calculate the second leg by measuring the hypotenuse and another leg.
Press till you see ∠, the hypotenuse of blinking.
Press m, measure the length of hypotenuse (a)
Press , measure the length of one leg (b)
Device calculates the length of another leg (x) - Calculate the hypotenuse by measuring the length of two legs. Press till you see ne leg o blinking.
Press 血,measure the length of one leg (a)
Press, measure the length of another leg(b)
Device calculates the length of hypotenuse (x) - Press till you see
Press , measure the length of one side (a)
Press 血, measure the length of the median line (b)
Press m, measure the length of another side (c)
Device calculates the length of the leg in full line (x) - Press ③till you see
Press , measure the length of one hypotenuse (a)
Press m, measure the length of another hypotenuse (b)
Press ,measure the length of one leg(c)
Device calculates the length of the leg in full line (x)
Legs must short than hypotenuse, or there will be “er” shows on screen. In order to guarantee the accuracy, please make sure all measurements are start from the same point.
- Addition / subtraction
The device can be used for length addition and subtraction. Press to select the function once get the length measuring result.
Short press ,”+” shows in the major display area, entering cumulation mode. Value of last measurement and the result of cumulation will be showed on the screen.
Shor press ,”” shows in the major display area, entering regressive mode. Value of last measurement and the result of cumulation will be showed on the screen.
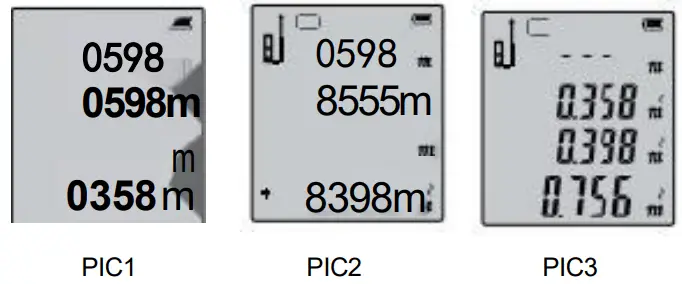
Not only length can be calculated in addition and subtraction, but area and volume can do the calculation as well. Take area as sample:
Area cumulative function: Measure the first area as showing in PI C1 . Then press but ton ,and measure the second area as showing in PIC2, there is a”+” in the left bottom . At last , press button to get the summation result of these two areas which is showing in PIC3.
Record Function
Long press button for 3s to record your measuring result under measuring mode. It can also record the result under Area, Volume and Pythagoras mode. All the calculating records can be saved by the device.
- Read/Delete the Record:
Short press button , read the records by press button . Short press to delete recent record and long press to clear up all the records. Press 日or to exit record mode.
Tips
You may get some warning information as below:
| Info message | Cause | Solution |
| Em | Out of distance measurement range | Use the device within the range |
| Em1 | Signal is too weak | Chose the surface with stronger reflectance. Use the reflecting plate. |
| Err2 | Signal is too strong | Chose the surface with weaker reflectance. Use the reflecting plate. |
| Err3 | Low battery voltage | Change the power supply. |
| Err4 | The working temperature is out of working range | Use the device in the specified temperature. |
| Err5 | Pythagoras measuring error. | Re-measure and ensure that Hypotenuse is bigger than Catheters. |
Technology specifications
| Item | Specifications |
| Working Range | 0.05-50m |
| Distance measurement precision | ±2mm* |
| Measurement unit options | m/in/ft |
| Continuous measurement function | yes |
| Area measurement function | yes |
| Volume measurement function | yes |
| Pythagorean proposition measurement function | Full mode |
| Add and subtract measurement function | yes |
| Min/Max value | yes |
| Max storage | 99 units |
| Automatic backlight | yes |
| Buttons/Keys sound | yes |
| Laser level | Ⅱ |
| Laser type | 630-670nm,<1mW |
| Automatically cut off laser | 20s |
| Automatic shutdown | 150s |
| Storage temperature | -20℃~60℃ |
| Working temperature | 0℃~40℃ |
| Storage humidity | 20%-80%RH |
| Battery | 2×1.5V AAA |
| Battery life | 8000 times for single measurement |
| Weight (including battery) | 110g |
| Dimension | 112x50x25mm |
Note: Use a target plate to increase the measurement range during daylight or if the target has poor reflection properties. Low power supply can also cause wrong measuring results.
* Typical Tolerance:±2mm, when reflectivity 100% (white surface), environment light <2000LUx.25 ℃ Tolerance is usually affected by the distance, reflectivity, and environment light etc. It probably gets tolerance around ±(2mm+0.2mm/m).
FCC Declaration: This device complies with Part 15 of the FCC Rules. Operation is subject to the following two conditions:(1)This device may not cause harmful interference, and (2)this device must accept any interference received, including interference that may cause undesired operation.
Instrument Maintenance:
- The meter should not be stored in high temperature and strong humidity environment for long time; if it is not used very of ten, please take out the battery and place the meter in the allocated potable bag and store in cool and dry place .
- Please keep the device surface cleaning . Wet soft cloth is applied to clean dust, but erosion liquid is never allowed to use for the meter maintenance. Laser output window and its focus lens can be maintained according to maintenance procedures for optical device.
Delivery Package
Please check if the accessories are completed according to the below list.
| NO. | Item | Unit | QTY | Note |
| 1 | Laser distance meter | pc | 1 | |
| 2 | Power supply AAA | pc | 2 | |
| 3 | User manual | pc | 1 | |
| 4 | Velvet Pouch | pc | 1 | |
| 5 | Hand strap | pc | 1 | |
| 6 | Gift box | pc | 1 |
Customer Support
Technical Support and E-Warranty Certificate
www.vevor.com/support
Dongguan Sndway Electronic Co.,Ltd.
Add: Sndway Science & Technology Industrial Park,58
Tuanjie Road, Humen 523930, Dongguan, China
Services Hotine: 400-125-6969
E-mail: [email protected]


