
ClearOne UNITE 160 4K USB PTZ Camera
![]()
FCC Notices
(Class A)
 This device complies with Part 15 of the FCC Rules. The operation is subject to the following two conditions: (1) this device may not cause harmful interference, and (2) this device must accept any interference received, including interference that may cause un-desired operation
Note:This equipment has been tested and found to comply with the limits for a Class A digital device, pursuant to Part 15 of the FCC Rules. These limits are designed to provide reasonable protection against harmful interference in a residential installation. This equipment generates uses and can radiate radio frequency energy and, if not installed and used in accordance with the instructions, may cause harmful interference to radio communications. However, there is no guarantee that interference will not occur in a particular installation. If this equipment does cause harmful interference to radio or television reception, which can be determined by turn-ing the equipment off and on, the user is encouraged to try to correct the interference by one or more of the following measures:
- Reorient or relocate the receiving antenna.
- Increase the separation between the equipment and receiver.
- Connect the equipment into an outlet on a circuit different from that to which the receiver is connected.
- Consult the dealer or an experienced radio/television technician for help.
Class A ITE
Class A ITE is a category of all other ITE which satisfies the class A ITE limits but not the class B ITE limits. Such equipment should not be restricted in its sale but the following warning shall be included in the instructions for use:
Warning:
Operating this equipment in a residential environment may cause radio interference.
European Community Compliance Statement (Class A)
 This product is herewith confirmed to comply with the requirements set out in the Council Directives on the Approximation of the laws of the Member States relating to Electromag-netic Compatibility Directive 2014/30/EU.
Safety Precautions
- During the installation and operation, all electrical safety regulations of the country and region of use must be strictly observed.
- Please use the power adapter that comes standard with this product.
- Do not connect multiple devices to the same power adapter (exceeding capacity of the adapter may generate excessive heat or cause fire).
- Do not rotate the camera by hand, otherwise it may cause mechanical failure.
- When installing this product on a wall or ceiling, make sure the device is installed securely and there are no obstacles within the rotation range; Do not power on until all installation steps are completed.
- To avoid heat build-up, please keep adequate ventilation around the device.
- If the device smokes, smells, or makes noises, please turn off the power and unplug the power cord immediately, and then contact the dealer.
- This device is not waterproof, please keep the device dry.
- This product has no user serviceable parts, damage caused by disassembly by the user is not covered by the warranty.
Notice
Specific frequencies of electromagnetic field may affect the image of the camera!
Packing List
| No. | Product Description | Quantity |
| 1 | Camera | 1 |
| 2 | Power Adapter | 1 |
| 3 | RS232 Cable | 1 |
| 4 | USB Cable | 1 |
| 5 | Remote Control | 1 |
| 6 | User Manual | 1 |
Product Information
Features
- Full Function USB Interface
Full function USB interface, compatible with USB3.0 and USB2.0, supports UVC v1.1 and UAC 1.0 protocol, supports raw video image and encoded output. - 4K UHD
Includes a high-quality 1/2.5-inch UHD CMOS sensor with 8.51 million effective pixels for ultra-high resolution high-quality images up to 4K (3840×2160), downward compatible with 1080P, 720P and other resolutions. - AI Tracking and Framing
Built-in artificial intelligence processor, using deep learning algorithms. AI tracking can achieve smooth tracking of the human body no matter where the face is, which is perfect for object tracking scenarios in lectures, teaching and other activities. AI framing with automatic zoom and PTZ functions, captures participants at the best size and position in the video. - 71° Wide-angle-lens
Exclusively customized high-quality with ultra-wide-angle-lens, with a horizontal field of view up to 71°. - Low Illumination
CMOS image sensor with ultra-high SNR can effectively reduce image noise under low illumination. The application of 2D and 3D noise reduction algorithms greatly reduces image noise even under the condition of ultra-low illumination, it keeps the picture clean and clear, and the SNR of image is as high as 55dB. - Remote Control
The camera can be controlled remotely through the RS232, RS485 and USB port.
Product Specifications
| No. | Camera | Description |
| 1 | Sensor | 1/2.5-inch, CMOS, Effective Pixels: 8.51M |
| 2 | Scanning Mode | Progressive |
| 3 | Lens | 12x, f=4.4mm ~ 52.8mm, F1.8 ~ F2.6 |
| 4 | Minimum Illumination | 0.5 Lux @ (F1.8, AGC ON) |
| 5 | Shutter | 1/30s ~ 1/10000s |
| 6 | White Balance | Auto, Indoor, Outdoor, One Push, Manual, VAR |
| 7 | Backlight Compensation | Supported |
| 8 | Digital Noise Reduction | 2D&3D Digital Noise Reduction |
| 9 | SNR | ≥55dB |
| 10 | Horizontal FOV | 71° ~ 8.2° |
| 11 | Vertical FOV | 42.7° ~ 4.5° |
| 12 | Pan Angle | ±170° |
| 13 | Tilt Angle | -30° ~ +90° |
| 14 | Pan Speed | 2.7° ~ 35.7°/s |
| 15 | Tilt Speed | 2.7° ~ 31.5°/s |
| 16 | Image Flip | Supported |
| 17 | Image Freeze | Supported |
| 18 | Preset Position | 255 |
| 19 | Preset Accuracy | 0.1° |
| No. | USB Features | |
| 1 | Operating System | Windows 7 and later, Mac OS X, Linux, Android |
| 2 | Color System/Compression | MJPEG/YUY2 |
| 3 | Video Format | YUY2: 1080P@30fps (max.) MJPEG: 2160P@30fps (max.) |
| 4 | USB Audio | Supported |
| 5 | USB Video Communication Protocol | UVC v1.1 |
| 6 | UVC PTZ | Supported |
| No. | Interfaces | |
| 1 | USB Interface | 1 x USB3.0: Type-C |
| 2 | Audio Interface | 1 x LINE IN: 3.5mm audio interface |
| 3 | Communication Interface | 1 x RS232: 8pin Min DIN; Max. Distance: 30m; Protocol: VISCA/Pelco-D/Pelco-P |
| 1 x RS485: 2pin phoenix port; Max. Distance: 1200m; Protocol: VISCA/Pelco-D/Pelco-P | ||
| 4 | Power Jack | JEITA type (DC IN 12V) |
| No. | General Specifications | |
| 1 | Input Voltage | DC 12V |
| 2 | Input Current | 1.0A (max.) |
| 3 | Operating Temperature | 0°C ~ 40°C |
| 4 | Storage Temperature | -40°C ~ 60°C |
| 5 | Power Consumption | 12W (max.) |
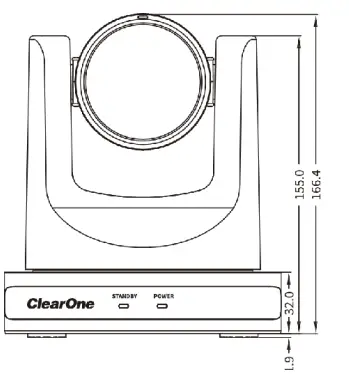
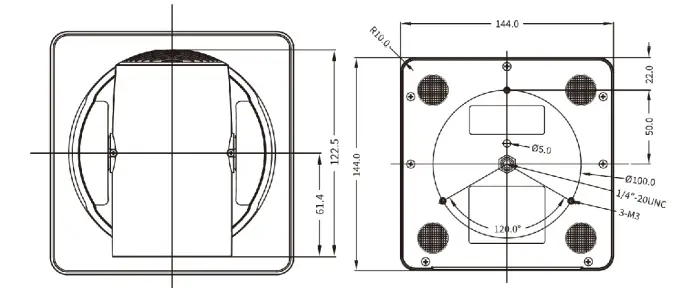
| 6 | Dimension | 144mm x 144mm x 168.3mm |
| 7 | Net Weight | About 1.6Kg |
Note: Product features and specifications are subject to change without notice.
Interfaces and Buttons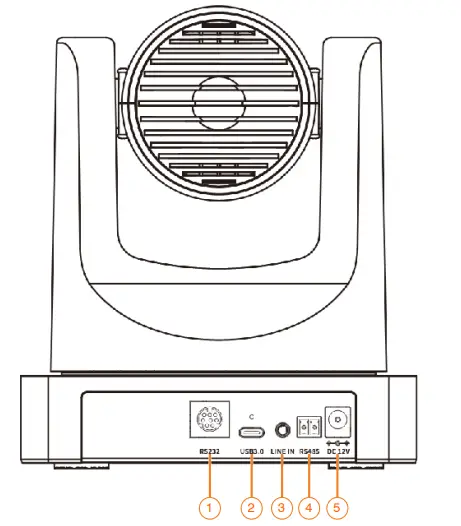
| No. | Interface |
| 1 | RS232 Interface |
| 2 | USB3.0 Interface |
| 3 | LINE IN Interface |
| 4 | RS485 Interface |
| 5 | DC 12V Interface |
Dimensions

Installation

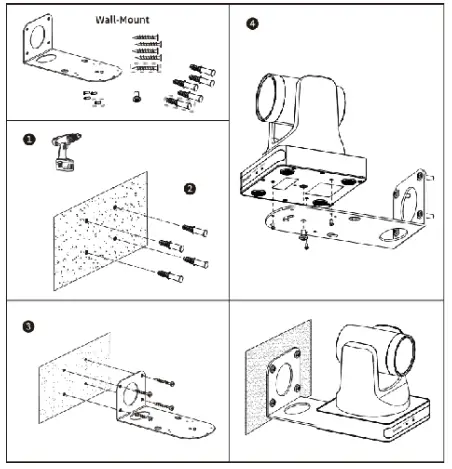
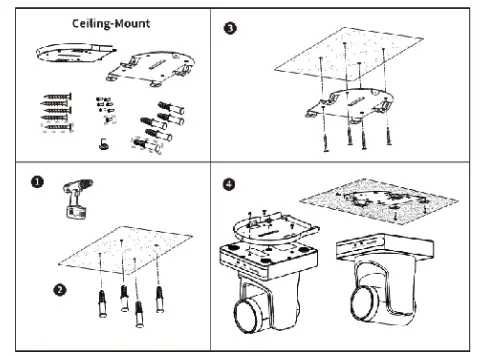
Note: The installation diagram is for reference only. The brackets and screws are not standard. For packing accessories, please refer to the actual product.
Remote Control
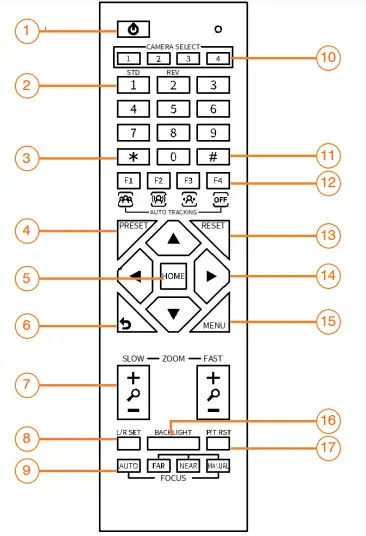
Shortcut Set
- F1: Short press to open One Push Framing mode / Long press 2s to open Auto Framing mode
- F3: Short press to open Auto Tracking mode
- F4: Long press 2s to close Auto Framing or Auto
- Tracking mode/Short press to stop Auto
- Framing or Auto Tracking
- [*] + [#] + [1]: OSD menu default English
- [*] + [#] + [3]: OSD menu default Chinese
- [*] + [#] + [4]: Display current IP address
- [*] + [#] + [6]: Quickly recover the default
- [*] + [#] + [8]: Check the camera version
- [*] + [#] + [9]: Quickly set up inversion
- [*] + [#] + [MANUAL]: Restore to default IP address.
| No. | Name | Function Description |
| 1 | Standby Key | Press to enter standby mode |
| 2 | Number Key | To set preset or call preset |
| 3 | *Key | Use with other keys |
| 4 | Preset Key | Preset: Setting Preset + Number key(0-9) |
| 5 | HOME Key | Confirm selection or press to turn PTZ back to the middle position |
| 6 | Return Key | Press to return to the previous menu |
| 7 | Zoom Key | • SLOW: Zoom In [+] or Zoom Out [-] slowly • FAST: Zoom In [+] or Zoom Out [-] fast |
| 8 | L/R Set Key | • Standard: Simultaneously press L/R SET + 1 • Reverse: Simultaneously press L/R SET + 2 |
| 9 | Focus Key | Auto/Manual/Far/Near focus |
| 10 | Camera Select Key | Press to select and control the camera |
| 11 | #Key | Use with other keys |
| 12 | IR Remote Control Key | [*] + [#] + [F1]: Address 1 [*] + [#] + [F2]: Address 2 [*] + [#] + [F3]: Address 3 [*] + [#] + [F4]: Address 4 |
| 13 | Reset Key | Clear the preset position: [RESET] + Number key (0-9) |
| 14 | PTZ control keys | PTZ moved according to the arrow indicates |
| 15 | Menu Key | Enter or exit OSD MENU |
| 16 | Backlight Key | Backlight ON/OFF: Press repeatedly to enable or disable the backlight compensation. NOTE: • Effective only in auto exposure mode. • If there is a light behind the subject that causes the subject to become dark, press the backlight key to enable backlight compensation. Press again to disable this function. |
| 17 | P/T RST (PTZ Reset) Key | Press to preset Pan/Tilt self-test. |
GUI Settings
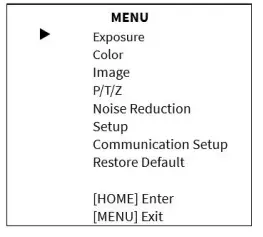 Menu
Menu
Press the [MENU] key to display the main menu on the screen. Use the arrow key to move the cursor to a desired item and press the [HOME] key to confirm and enter the corresponding sub-menu.
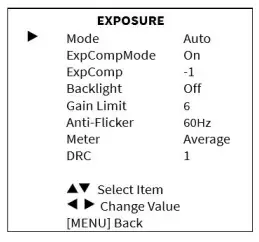 Exposure
When in the main menu page, move the cursor to [Exposure] and press the [HOME] key to confirm and enter the Exposure page as shown here.
- Mode: Auto, Manual, SAE, AAE, Bright. ExpCompMode: (Exposure Compensation Mode): On, Off (Effective only in Auto mode). ExpComp: (Exposure Compensation Value):
- -7 ~ +7 (Effective only in ExpCompMode On). Backlight: On, Off (Effective only in Auto mode). Gain Limit: 0 ~ 15 (Effective in Auto, SAE, AAE, Bright mode).
- Anti-Flicker: Off, 50Hz, 60Hz (Effective in Auto, AAE, Bright mode).
- Meter: Average, Center, Smart, Top (Effective in Auto, SAE, AAE, Bright mode).
- Iris: F1.8, F2.0, F2.4, F2.8, F3.4, F4.0, F4.8, F5.6, F6.8, F8.0, F9.6, F11.0, Close (Effective in Manual, AAE mode).
- Shutter: 1/30, 1/60, 1/90, 1/100, 1/125, 1/180, 1/250, 1/350, 1/500, 1/725, 1/1000, 1/1600, 1/2000, 1/3000, 1/4000, 1/6000, 1/10000 (Effec-tive in Manual, SAE mode).
- Gain: 0 ~ 7 (Effective only in Manual mode). Bright: 0~17 (Effective only in Bright mode). DRC: 0 ~ 8.
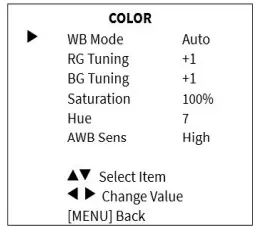 Color
Color
When in the main menu page, move the cursor to [Color] and press the [HOME] key to confirm and enter the Color page as shown here.
- WB-Mode: (White Balance Mode): Auto, Indoor, Outdoor, One Push, Manual, VAR.
- RG (Red Gain): 0~255 (Effective in Manual mode).
- BG (Blue Gain): 0~255 (Effective in Manual mode).
- RG Tuning: (Red Gain Tuning): -10 ~ +10 (Ef-fective in Auto, One Push, VAR mode).
- BG Tuning: (Blue Gain Tuning): -10 ~ +10 (Ef-fective in Auto, One Push, VAR mode). Saturation: 60% ~ 200%.
- Hue: 0 ~ 14.
- Color Temp: 2500K ~ 8000K (Effective only in VAR mode).
- AWB Sens: (The White Balance Sensitivity): Low, Middle, High (Effective in Auto, One Push mode).
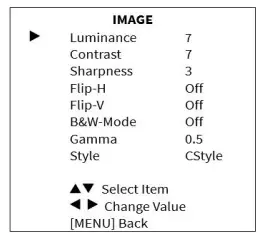 Image
Image
When in the main menu page, move the cursor to [Image] and press the [HOME] key to confirm and enter the Image page as shown here.
- Luminance: 0 ~ 14.
- Contrast: 0 ~ 14.
- Sharpness: Auto, 0 ~ 15.
- Flip-H: On, Off.
- Flip-V: On, Off.
- B&W-Mode: On, Off.
- Gamma: Ext, Default, 0.45, 0.5, 0.56, 0.63.
- Style: Norm, Clarity, Bright, CStyle.
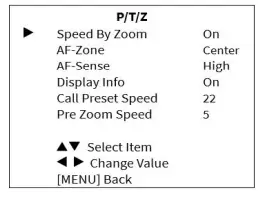 P/T/Z
P/T/Z
When in the main menu page, move the cursor to [P/T/Z] and press the [HOME] key to confirm and enter the P/T/Z page as shown here.
- Speed By Zoom (The Depth of Field Ratio): On, Off.
- AF-Zone (Auto Focus Area): Front, Top, Center, Bottom.
- AF-Sense (Auto Focus Sensitivity): Low, Normal, High.
- Display Info: On, Off.
- Call Preset Speed: 1 ~ 24.
- Pre Zoom Speed: 0 ~ 7.
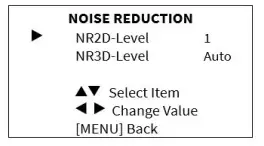 Noise Reduction
When in the main menu page, move the cursor to [Noise Reduction] and press the [HOME] key to confirm and enter the Noise Reduction page as shown here.
- NR2D-Level (2D Noise Reduction): Auto, Off, 1 ~ 5.
- NR3D-Level (3D Noise Reduction): Auto, Off, 1 ~ 8.
 Setup
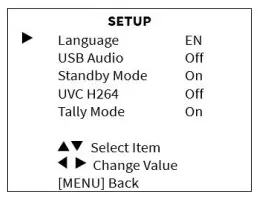
Setup
When in the main menu page, move the cursor to [Setup] and press the [HOME] key to confirm and enter the Setup page as shown here.
- Language: English, Chinese, Russian.
- USB Audio: On, Off.
- Standby Mode: BULK, ISOC.
- UVC H264: On, Off.
- Tally Mode: On, Off.
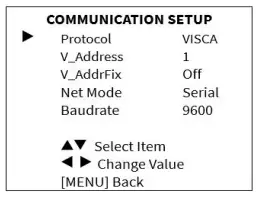 Communication Setup
When in the main menu page, move the cursor to [Communication Setup] and press the [HOME] key to confirm and enter the Communication Setup page as shown here.
- Protocol: Auto, VISCA, PELCO-D, PELCO-P.
- V_Address: 1 ~ 7 (Effective in Auto, VISCA protocol).
- V_AddrFix: On, Off (When set to On, the 88 30 01 FF command does not work. Effective in Auto, VISCA protocol).
- P_D_Address: 0 ~ 254 (Effective in Auto, PEL-CO-D protocol).
- P_P_Address: 0 ~ 31 (Effective in Auto, PEL-CO-P protocol).
- Net Mode: Serial, Paral (Effective in Auto, VISCA protocol).
- Baudrate: 2400, 4800, 9600, 38400.
 Restore Default
When in the main menu page, move the cursor to [Restore Default] and press the [HOME] key to confirm and enter the Restore Default page as shown here.
Restore: Yes, No.
Notice
When “Yes” is selected and confirmed with the [HOME] key, all parameters will be restored to their default values, including the IR Remote address and VISCA address.
Note: GUI menu and parameters are subject to change without notice.
Troubleshooting
Image
- The monitor shows no image
- Verify that the camera’s power supply is connected, the voltage is normal, and the power indicator is always on.
- Turn off the power switch to check whether the camera is self-testing.
- Check all cables to verify that they are connected correctly.
- Image jitters after the camera is properly connected
- Verify that the camera’s installation position is stable.
- Verify that there is no vibrating machinery or other object near the camera.
Control
- Remote control does not work
- Verify that the batteries are not depleted. If they are, replace them with new batteries.
- Verify that the camera is working normally.
- Verify the address key of remote control can match the camera.
- Serial port cannot control
- Check the protocol, address and bit rate of the camara are consistent.
- Check the control cable is properly connected.
| Problem | Cause | Resolution |
| There is no power to the camera | USB Port is not supplying proper power | Test another USB port |
| USB Cable is Disconnected | Ensure cable connections are secure | |
| Camera will not connect to the PC via USB | USB cable is faulty | Try new USB Cable |
| Camera connects sometimes. | Test another USB port and ensure you are not using a USB extender or USB hub | |
| Camera is unable to pan or Tilt | Menu is currently displayed on the screen | Retry after exiting the menu |
| No electronic zoom has been performed | Zoom first then try panning or tilting | |
| Remote control not working | The “camera select” button on the remote control is not set to match the “IR select” switch number set on the camera | Choose the correct “IR select” number to match camera settings |
| Camera is unable to Zoom | EPTZ is not enabled in the OSD | Make sure EPTZ has been enabled in the OSD |
| Digital Zoom limit is 1x | Increase Digital Zoom range via OSD | |
| The Camera is not working at all | No response or image from camera | Disconnect power, and wait a few minutes, then connect the power again. Retry. |
ClearOne® Contacts
Headquarters
5225 Wiley Post Way Suite 600 Salt Lake City, UT 84116
Sales
Tel: +1.801.975.7200
[email protected]
Headquarters
Tel: +1.801.975-7200
Technical Support
Tel: +1.801.974.3760 [email protected]
Notices
© 2022 ClearOne, Inc. All rights reserved.
Information in this document is subject to change without notice. Document: DOC-0501-001v1.0 November 2022


