
![]() Model 26-500
Model 26-500
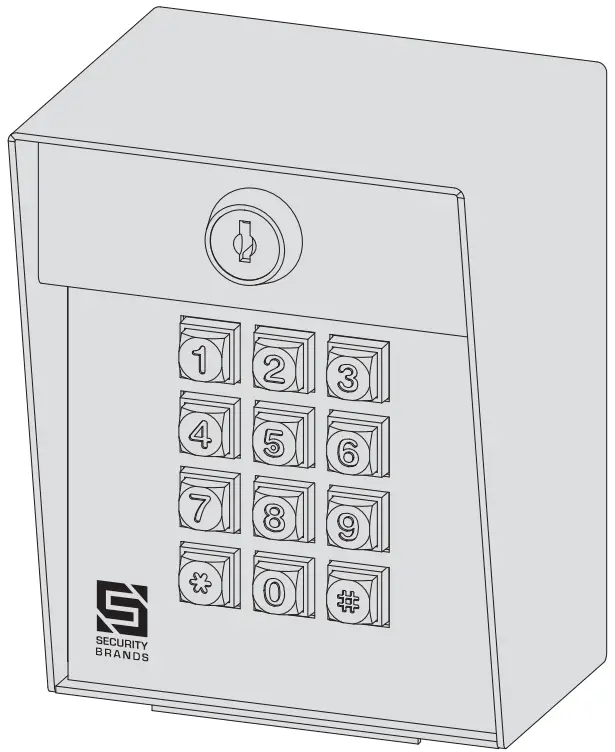
Advantage DKE
26-500
QUICK START GUIDE ADVANTAGE DKE


![]() WARNING!
WARNING!
AUTOMATIC GATES CAN CAUSE SERIOUS INJURY OR DEATH! ALWAYS CHECK that the GATE PATH IS CLEAR BEFORE OPERATING!
REVERSING or other SAFETY DEVICES SHOULD ALWAYS BE USED!

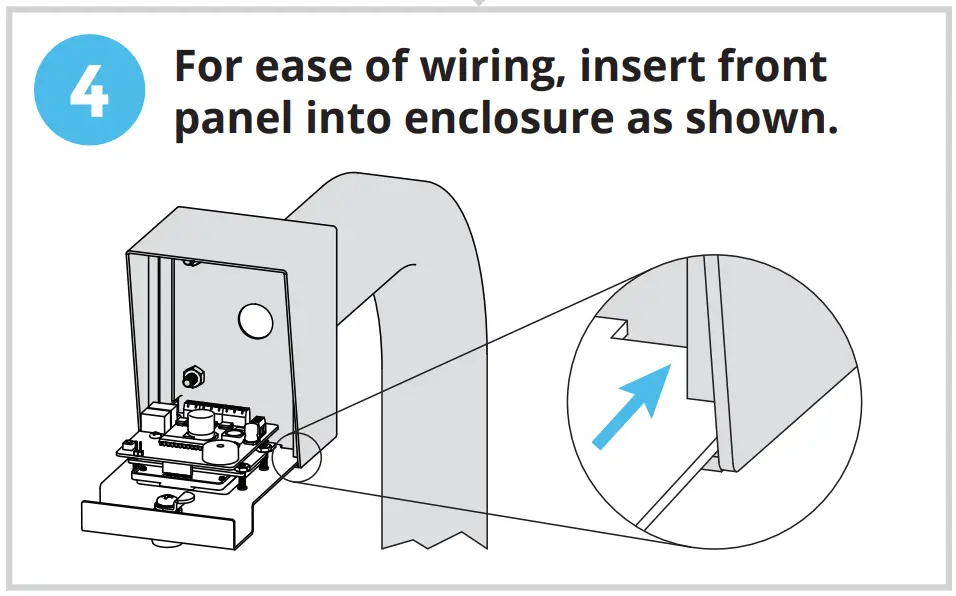
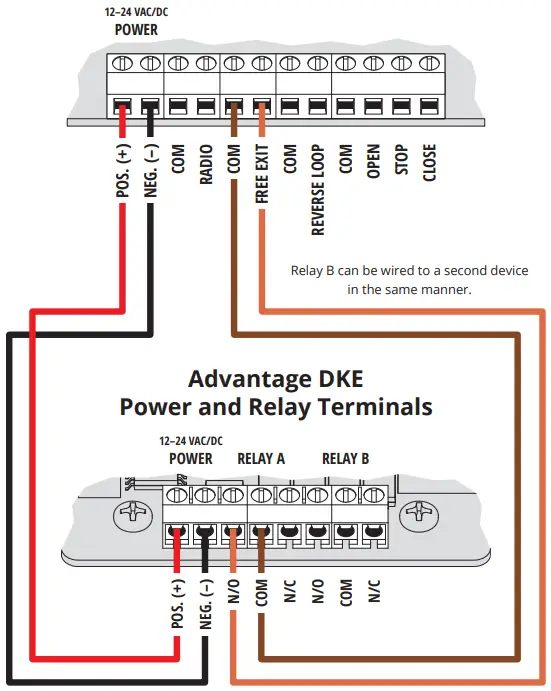
Make the connections
Wiring for Gate Operator or Door Opener Gate Operator / Door Opener
Make the connections
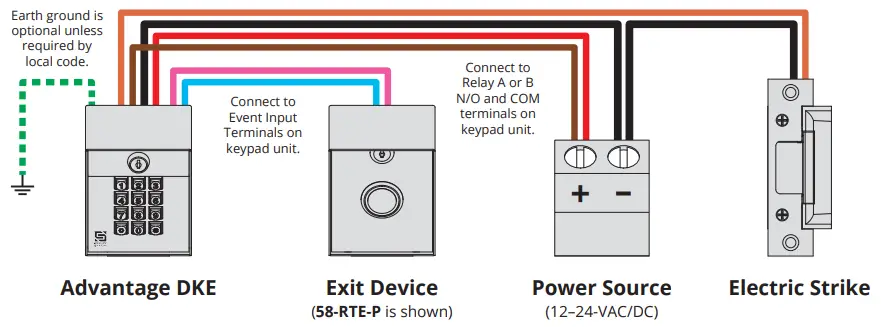
Wiring for Electric Door Strike and Exit Device
Make the connections
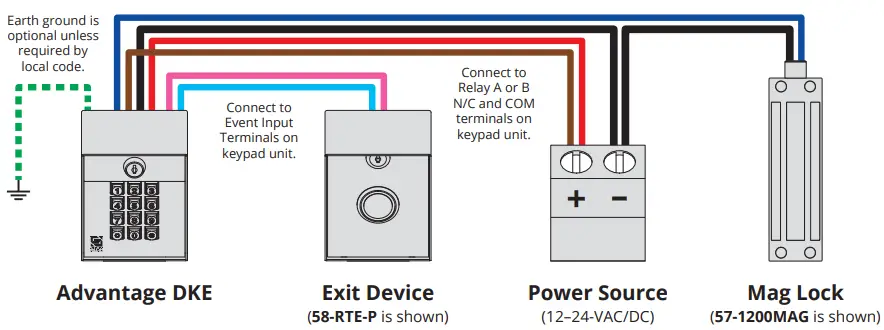
Wiring for Mag Lock and Exit Device
Add Access Code(s) to Relay A.
(To add multiple codes, enter each of them before pressing the pound key)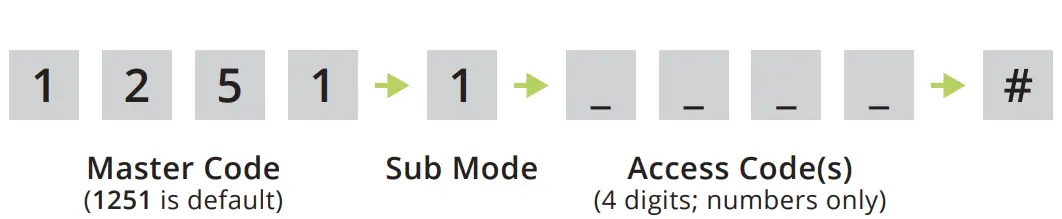
Make sure the gate path is clear; then enter the access code on the keypad and the confirm gate opens.


INSTALLATION COMPLETE!
Your system is ready to use.
Additional Programming
Delete Code(s)
(To delete multiple codes, enter each of them before pressing the pound key)

Change Master Code

Set Latch Code

Things to Know
The Star Key (*)
The star key deletes your current entry. If you happen to make a mistake keying in a code, simply press the star key to delete the entire entry and start over.
The Pound Key (#)
The pound key is good for one thing and one thing only: exiting Programming Mode. Whenever you’re in Programming Mode, simply press the pound key to get out.
Reset Procedures
If for some reason the Master Code is forgotten or the unit needs to be reset to factory defaults, two reset procedures are available: Master Reset and Unit Reset. These procedures can be found on page 5 of this guide.
NOTE: Green arrow indicates a “good” tone on the keypad. Always wait for a good tone before moving on.
Programming Sub Modes
- Add Access Code(s) to Relay A
- Delete Code(s)
- Change Master Code
- Set Latch Code (Relay A ONLY)
- Set Relay Output Time
- Add Access Code(s) to Relay B
- Configure Event Input
- Delete All Codes
Additional Programming (continued)
Set Relay Output Time
Add Access Code(s) to Relay B
(To add multiple codes, enter each of them before pressing the pound key)

Delete All Codes (Cannot Be Undone)

NOTE: Green arrow indicates a “good” tone on the keypad. Always wait for a good tone before moving on.
Configure Event Input
(Allows an external device to affect keypad operation or trigger a relay)
Modes
Mode 1 – Remote Inactive Mode
Disables all Relay A codes when input is received from an external device
Mode 2 – Arming Circuit Mode
Turns on keypad unit when input is received from an external device
Mode 3 – Remote Open Mode
Triggers either Relay A or Relay B when input is received from an external device
Mode 0 – Event Input Disabled
Set Mode 1, Mode 2, Disable or Check Current Mode

Set Mode 3

Reset Procedures
NOTE: If an error is made during these procedures, an “error” tone will sound and you must start again from the beginning.
Master Reset
(Used if the Master Code is unknown if the Latch Code is unknown and the unit is in Latch Mode, or if the Sleep Code is unknown and the unit is in Sleep Mode. All other codes will be retained after completing this procedure.)
Step 1 – Open the front panel on the unit.
Step 2 – Disconnect power.
Remove one power wire from the screw terminal on the circuit board by unscrewing and removing.
Step 3 – Press and hold Reset Button; reconnect power; then release Reset Button.
Insert removed power wire back into screw terminal and screw down to secure. The unit will sound one (1) tone. Release Reset Button after you hear the tone.
Step 4 – Press Star key (*) on the keypad three (3) times.
Step 5 – Close the front panel on the unit.
The Master Code is now reset to default (1251).
Unit Reset
(Used to reset the unit to factory default settings. All codes are erased in this procedure.)
CAUTION: FOLLOWING THIS PROCEDURE WILL DELETE ALL CODES!
Step 1 – Open the front panel on the unit.
Step 2 – Disconnect power.
Remove one power wire from the screw terminal on the circuit board by unscrewing and removing.
Step 3 – Press and hold Reset Button; reconnect power; then release Reset Button.
Insert removed power wire back into screw terminal and screw down to secure. The unit will sound one (1) tone. Release Reset Button after you hear the tone.
Step 4 – Enter Pound (#) Star (*) Pound (#) on the keypad. (Unit will sound “good” tone.)
Step 5 – Enter 1251 (Master Code) on the keypad. (Unit will flash status LEDs and beep.)
Step 6 – While the unit is beeping, disconnect and reconnect power.
Do this the same way as before. The unit will then go through a power-up procedure.
Step 7 – Close the front panel on the unit.
The unit is now reset to factory default settings.
Notes…………
 NEED HELP
![]()
Call (972) 474-6390
Email [email protected]
We are available Mon–Fri / 8 am–5 pm Central


