![]() 321879 Square 200PZ 200W LED Profile Spot Light
321879 Square 200PZ 200W LED Profile Spot Light
User Manual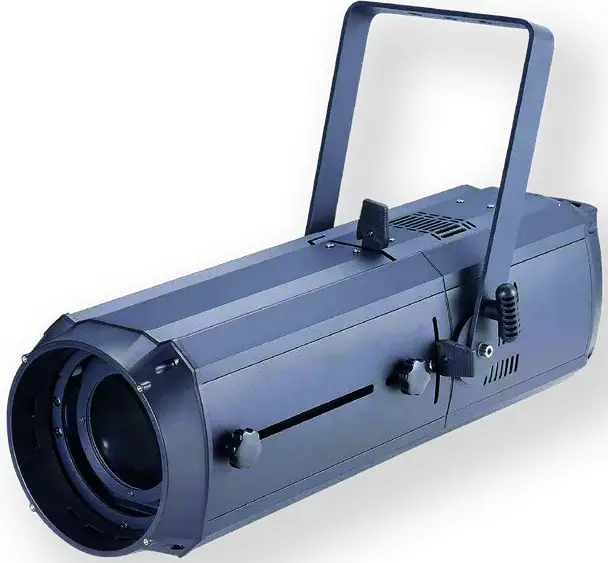
Square 200PZ
200W Led Profile Spot Light with Zoom, Beam Shaping Shutters & Gobo Slot
Carefully read this manual and properly take care of it
Dear customer,
First of all thanks for purchasing a CENTOLIGHT® product. Our mission is to satisfy all possible needs of light designers and professionals in entertainment lighting, by offering a wide range of products based on the latest technologies.
We hope you will be satisfied with this fixture and, if you want to collaborate, we are looking for feedback from you about product operation and possible improvements to be introduced in the next future. Go to our website www.centolight.com and send an e-mail with your opinion; this will help us to build equipment ever closer to professional’s real requirements.
The CENTOLIGHT Team
Before you begin
Thank you for purchasing SQUARE 200PZ. Enjoy your new equipment and make sure to read this manual carefully before the operation! This user manual is made to provide both an overview of controls, as well as information on how to use them.
1.1. What is included
Package includes:
- 1x CENTOLIGHT SQUARE 200PZ Profile Light
- 1x 1.5m (59in ca.) Powercon to Europlug power cable
- 1x Powercon Connector (Grey, for mains link)
- 1X 1.5m (59in ca.) DMX Cable 3-pin XLR-M to 3-pin XLR-F
- This User Manual
![]() ATTENTION: A packaging bag is not a toy! Keep out of reach of children!!! Keep in a safe place the original packaging material for future use.
ATTENTION: A packaging bag is not a toy! Keep out of reach of children!!! Keep in a safe place the original packaging material for future use.
1.2. Unpacking Instructions
Carefully unpack the product immediately and check the content to make sure all the parts are in the package and are in good condition. If the box or the contents (the product and included accessories) appear damaged from shipping or show signs of mishandling, notify the carrier or dealer/seller immediately. In addition, keep the box and contents for inspection.
If the fixture must be returned to the manufacturer, it is important that it is returned in the original manufacturer box and packing. Please do not take any action without first contacting your dealer or getting in touch with our after-sales support service (visit www.centolight.com for details).
1.3. Accessories
CENTOLIGHT can supply a wide range of quality accessories that you can use with your SQUARE Series equipment, like Cables, Splitters, DMX controllers, and a wide range of other fixtures. In particular, there are some specific accessories specifically addressed to SQUARE 200PZ.
| SKU | Model | Description |
| J812J | SQUARE GOBO-200PZ | Gobo Holder for SQUARE 200PZ Profile |
| J813J | SQUARE IRIS-200PZ | Manual Iris for SQUARE 200PZ Profile |
Ask your CENTOLIGHT dealer or check out our website www.centolight.com for any accessories you could need to ensure the best performance of the product. All products in our catalog have been long tested with this device, so we recommend you to use Genuine CENTOLIGHT Accessories and Parts.
1.4. Disclaimer
The information and specifications contained in this Manual are subject to change without notice. CENTOLIGHT assumes no responsibility or liability for any errors or omissions and reserves the right to revise or to create this manual at any time.
Copyright© 2021 CENTOLIGHT. All rights reserved.
Safety instructions
- Read these instructions
- Keep these instructions
- Heed all warning
- Follow all instructions
2.1 Symbols Meanings
 | The symbol is used to indicate that some hazardous live terminals are involved within this apparatus, even under normal operating conditions, which may be sufficient to constitute the risk of electric shock or death. |
 | The symbol is used to describe important installation or configuration problems. Not following advice and information on how to avoid such problems may lead to product malfunction. |
| This symbol indicates a protective grounding terminal. | |
| WARNING | Describes precautions that should be observed to prevent the danger of injury or death to the operator. |
| To protect the environment, please try to recycle packing material and exhausted consumables as much as possible. | |
| This symbol indicates that the fixture is intended for indoor use only. Keep the machine dry and do not expose it to rain and moisture. | |
| Don’t throw this product away just as general trash, please deal with the product following the abandoned electronic product regulation in your country. |
Mounting and rigging
![]() Pay attention to safety! Please respectively consider the EN 60598-2-17 and the national standard during the installation. Only authorized technicians can carry out the installation.
Pay attention to safety! Please respectively consider the EN 60598-2-17 and the national standard during the installation. Only authorized technicians can carry out the installation.
3.1. Rigging
- The installation of the fixture has to be built and constructed in a way that it can hold 10 times the weight for 1 hour without any harmful demolition. The installation must always be secured with a secondary safety attachment, e.g. an appropriate catch net. This secondary safety attachment must be constructed in a way that no part of the installation can fall down if the main attachment fails.
- When rigging, de-rigging, or servicing the fixture staying in the area below the installation place, on bridges, under high working places, and in other endangered areas is forbidden. The operator has to make sure that the safety measure and the machine’s technical installation are approved by an expert before taking it into operation for the first time and after changes before taking it into operation another time. He has also to make sure that an expert approves safety measures and the machine’s technical installation once a year. IMPORTANT: Overhead rigging requires extensive experience, including (but not limited to) calculating working load limits, installation material being used, and periodic safety inspection of all installation material and the projector. If you lack these qualifications, do not attempt the installation yourself, but instead use a professional structural rigger. Improper installation can result in bodily injury or property loss.
- If the fixture shall be lowered from the ceiling or high joists, professional trussing systems have to be used. The fixture must never be fixed swinging freely in the room.CAUTION: Use appropriate clamps to rig the fixture on the truss. Make sure that the device is fixed properly! Ensure that the structure (truss) to which you are attaching the fixtures is secure.
3.2. Water / Moisture
- The product is for indoor use. In order to prevent the risk of fire or electric shock, do not expose to rain or moisture
- The unit can not be used near water; for example near a bathtub, a kitchen sink, a swimming pool, etc.
3.3. Heat
- Do not use it in a confined space. Always install the product in a location with adequate ventilation, at least 20in (50 cm) from adjacent surfaces. Be sure that no ventilation slots on the product’s housing are blocked.
- The apparatus should be located away from heat sources such as radiators, stoves, or other appliances that produce heat.
![]() Do not use it when the maximum ambient temperature is higher than 50°C. Work temperature ranges from -20°C to 55°C (-4°F to 131°F).
Do not use it when the maximum ambient temperature is higher than 50°C. Work temperature ranges from -20°C to 55°C (-4°F to 131°F).
3.4. Servicing
- Do not implement any servicing other than those means described in the manual. Refer all servicing to qualified service personnel only. The internal components of the equipment must be purchased from the manufacturer. Only use accessories/attachments or parts recommended by the manufacturer.
Introduction
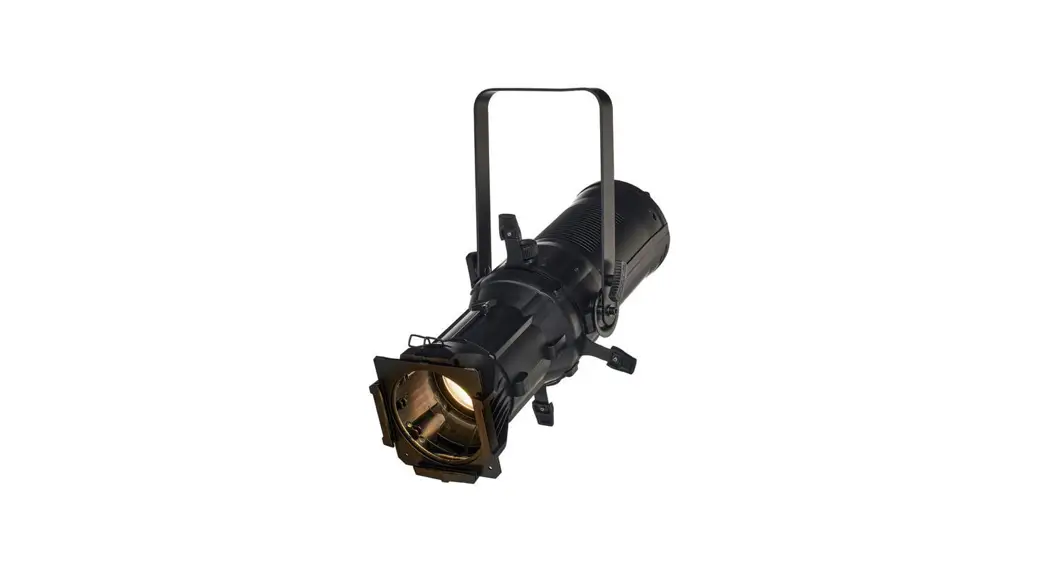
Centolight SQUARE 200PZ is a professional LED Profile with an adjustable beam from 15° to 36° via manual zoom and focus. It is designed for theaters and fixed installations where high LED chip reliability and warm white lighting (approx. 3.200K) are required.
The light source is a 200W CITILED® LED with CRI ≥90 to allow excellent color rendering, especially in indoor venues like TV studios, theaters, and museums.
Great attention is paid to the quality of dimmer control and chip temperature, to minimize the consequences of using LEDs instead of traditional lamps. The cooling system uses high-precision fans in order to keep noise within 25dB @ 1m. The 4 beam-shaping shutter system allows both radial and angled adjustment of the beam. The fixture is equipped with a compartment for gobos and manual iris (both optional), as well as the front color-frame holder (included).
4.1. Features
- LED Profile Spot with Manual Zoom from 15° to 36° & Focus
- Radial/Angled Blade-Framing System
- 200W Warm-White CITILED® LED with over 50,000h lifetime
- Color Temperature: 3100±150K
- Luminous Flux (15°-36°): 2146-589lux/5m
- CRI: WW≥90
- Smooth 16-bit Dimmer
- Flicker-Free Operation
- Low-Noise Cooling System
- Gobos/Iris Slot
- Color Frame Holder included
4.2. Product Dimensions and Overview
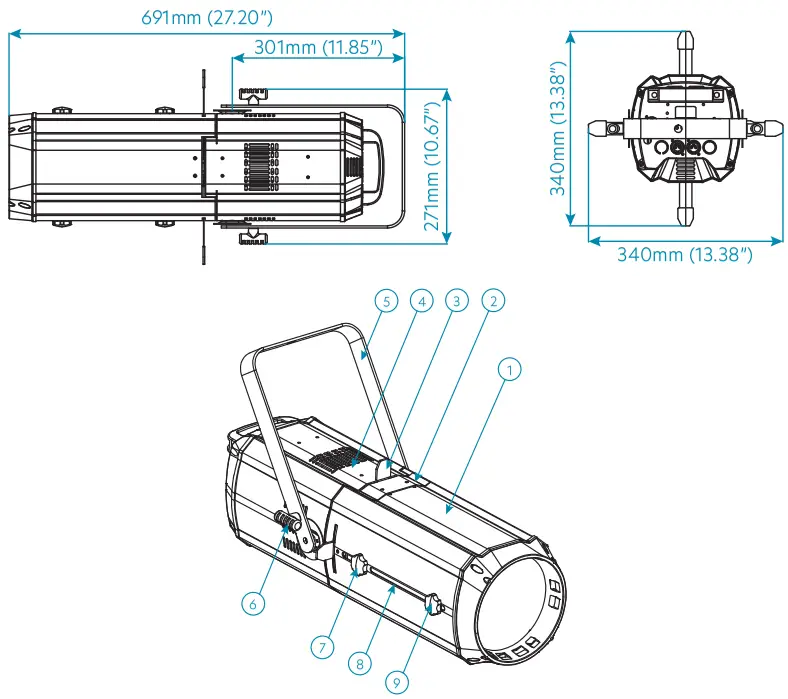
| 1. Profile Tube 2. Slots for Iris and Gobo 3. Beam Adjustment Flake 4. Light Emitting Section 5. Handle | 6. Nut for Suspension Loop 7. Focusing Slot & Adjustment Nut 8. Zooming Slot 9. Zooming Adjustment Nut |
Product Setup
5.1. Rear Panel Description
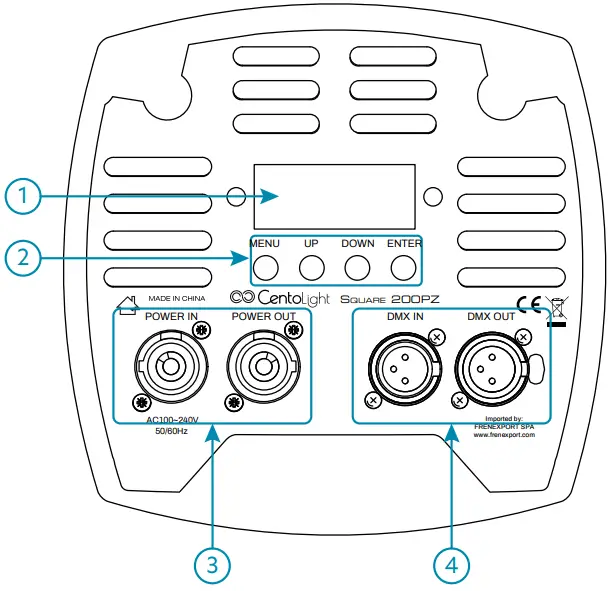 The operation panel includes a 2×8 characters LCD display and control button operation area.
- LED Display
It shows the operating mode and all system information. Read “7 – Menu Operation” on page 14 for details on all menus. - Control Buttons
MENU Button – Short-press it to switch the setting pages.
UP Button – It scrolls up individual items in the selection menu and sub-menus for system settings (DMX address, Operation Mode, etc.), and increases values/settings of parameters.
DOWN Button – It scrolls down individual items in the selection menu and submenus for system settings (DMX address, Operation Mode, etc.), and increases values/settings of parameters.
ENTER Button – Press ENTER to access menu levels and confirm parameter value changes. - Power Input/Output Sockets
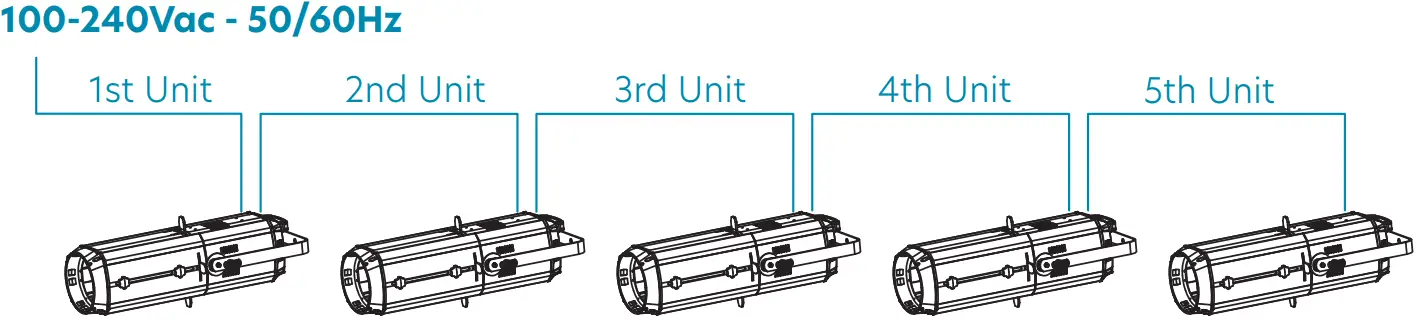
Plug the power cord included with SQUARE 200PZ into an AC socket properly configured for this fixture. Please read “5.2. About Power Connection” on page 10 for details. This fixture is also equipped with an output power connector to be used as a power mains source in case of cascade connection up to a maximum of 5 fixtures.
Power Input
- DMX Input/Output Sockets
DMX Input is a 3-pin male XLR socket for connection to a DMX control device. DMX output is an a3-pin female socket for sending the DMX control signal to other units. Please read “5.3. About Dmx Connection” on page 11 for details on how to manage DMX connections.
5.2. About Power Connection
- Always make sure that the voltage of the outlet you are connecting the product to is within the range stated in paragraph “10 – Specification” on page 18 or the rear panel of the product (AC110V-240V 50/60Hz).
- Make sure the power cord is not crimped or damaged. Never connect this product to a dimmer pack or rheostat.
- Never disconnect the product from the power cord by pulling or tugging on the cord.
- To avoid electric shock, all fixtures must be connected to circuits with a suitable ground and circuit breaker.
- Wire correspondence is as follows:
Cable (EU) Pin International Brown Live L Blue Neutral N Yellow/Green Earth 
![]() Earth must be connected! Always pay attention to safety! Before taking into operation for the first time, the installation has to be approved by an expert.
Earth must be connected! Always pay attention to safety! Before taking into operation for the first time, the installation has to be approved by an expert.
5.3. About Dmx Connection![]() When using a DMX controller, please make sure that there are no interference sources (e.g. intercom, high-frequency radio waves, and radiation source).
When using a DMX controller, please make sure that there are no interference sources (e.g. intercom, high-frequency radio waves, and radiation source).
DMX machines are designed to receive data through a serial Daisy Chain. A Daisy Chain connection is where the DATA OUT of one fixture connects to the DATA IN of the next fixture. The order in which the machines are connected is not important and has no effect on how a controller communicates to each of them. Use an order that provides for the easiest and most direct cabling.
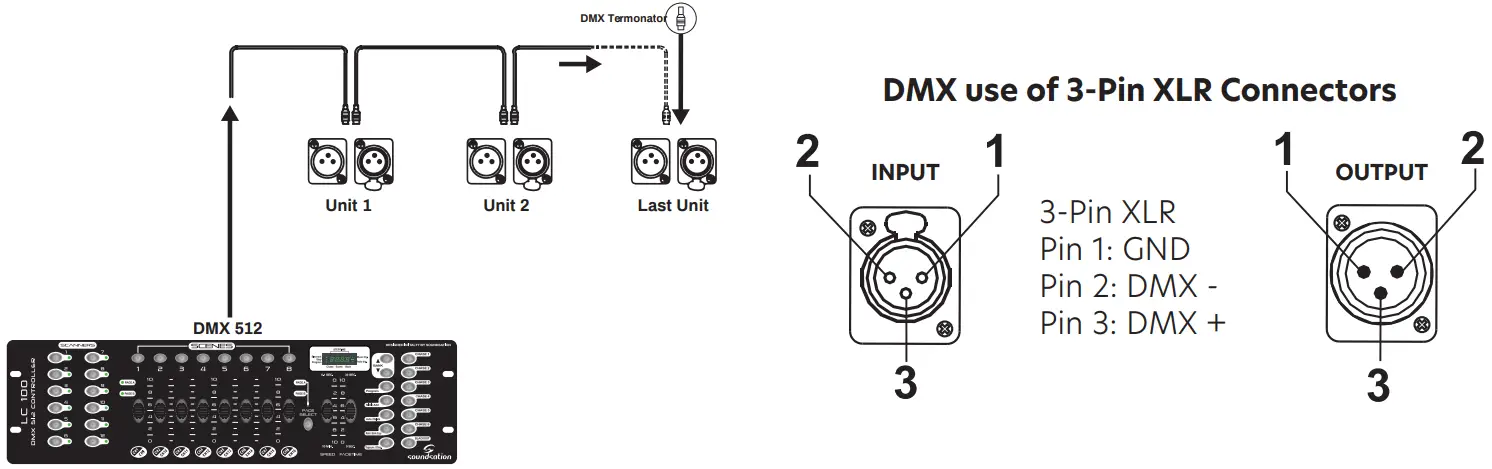
Connect machines using shielded 2-conductor twisted pair cable with 3-pin XLR male to female connectors. The shield connection is pin 1, while pin 2 is Data Negative (S-), and pin 3 is Data positive (S+).![]() CAUTION: Wires must not come into contact with each other; otherwise the fixtures will not work at all, or will not work properly.
CAUTION: Wires must not come into contact with each other; otherwise the fixtures will not work at all, or will not work properly.
5.4. DMX Terminator
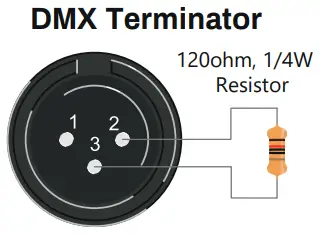
DMX is a resilient communication protocol, however, errors still occasionally occur. In order to prevent electrical noise from disturbing and corrupting the DMX control signals, a good habit is to connect the DMX output of the last fixture in the chain to a DMX terminator, especially over long signal cable runs.
The DMX terminator is simply an XLR connector with a 120Ω (ohm), 1/4 Watt resistor connected across Signal (-) and Signal (+), respectively, pins 2 and 3, which is then plugged into the output socket on the last projector in the chain. The connections are illustrated below.![]() A complimentary signal cable can transmit signals to 20-unit fixtures at most. A signal amplifier is a must to connect more fixtures.
A complimentary signal cable can transmit signals to 20-unit fixtures at most. A signal amplifier is a must to connect more fixtures.
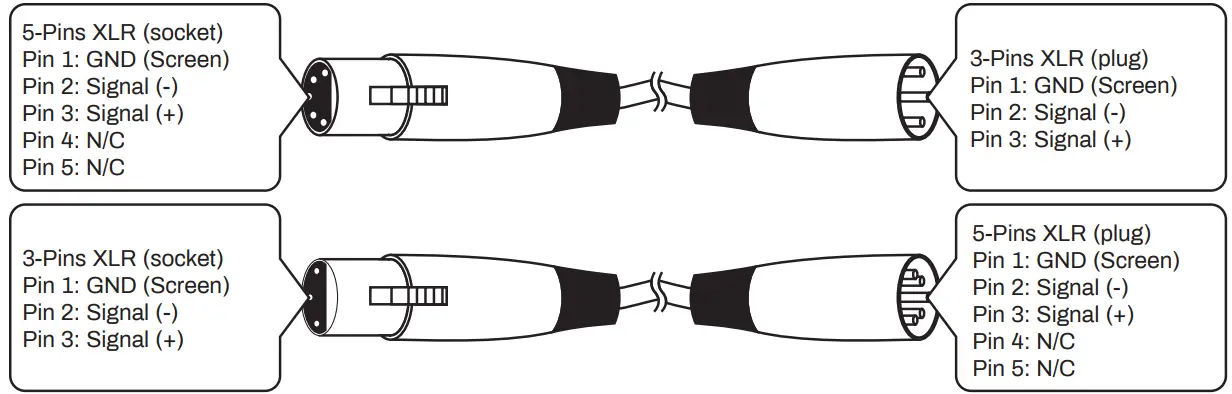
5.5. 3-Pin vs 5-Pin DMX cables
DMX connection protocols used by controllers and fixtures manufacturers are not standardized around the world. However, two are the most common standards: 5-Pin XLR and the 3-Pin XLR systems. If you wish to connect this fixture to a 5-Pin XLR input fixture, you need to use an adapter cable or make it by yourself. Below you can see the wiring correspondence between 3-Pin and 5-Pin plug and socket standards
Profile use
6.1. Beam Shape, Zoom, and Focus Adjusting
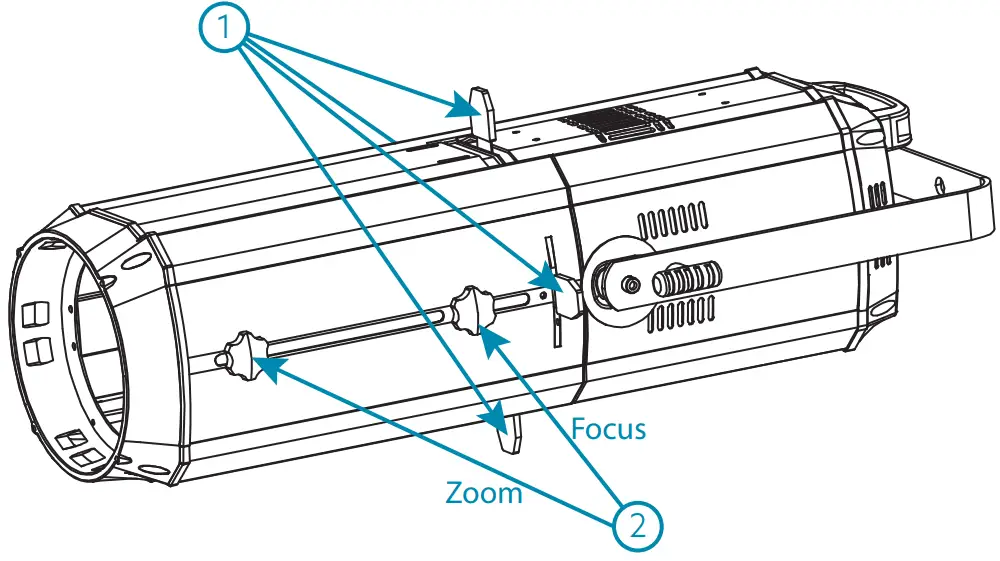
After fixing or hanging the fixture, having connected Power In/Out and DMX In/Out cables,
- Draw out the 4 beam-adjustment flakes.
- Power on the unit and loosen the zoom and focus adjustment nuts.
- Adjust the zoom first from 15° to 36°, then the focus by moving respectively on the focusing and zooming slots.
6.2. Use of Gobo
If want to get the Gobo effect on your Square 200PZ Profile, you need to purchase first the gobo-holder listed below:
| SKU | Model | Description |
| J812J | SQUARE GOBO-200PZ | Gobo Holder for SQUARE 200PZ Profile |
Ask your CENTOLIGHT dealer or check out our website www.centolight.com for further information.
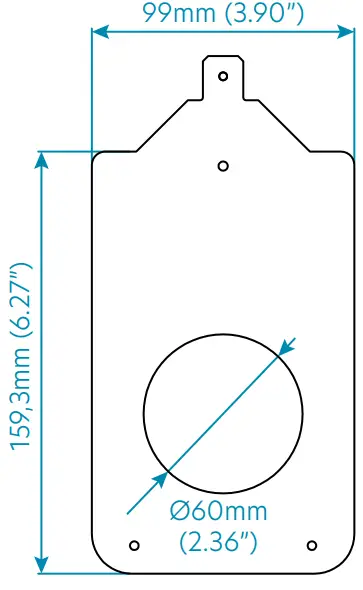
You have then to make a Ø60mm (2.36”) gobo with the inverse image of the picture you want to show through the SQUARE 200PZ.
Refer to the drawing beside for all details on minimum/maximum gobo size.
Both metal and glass can be used with the SQUARE series LED Profiles.
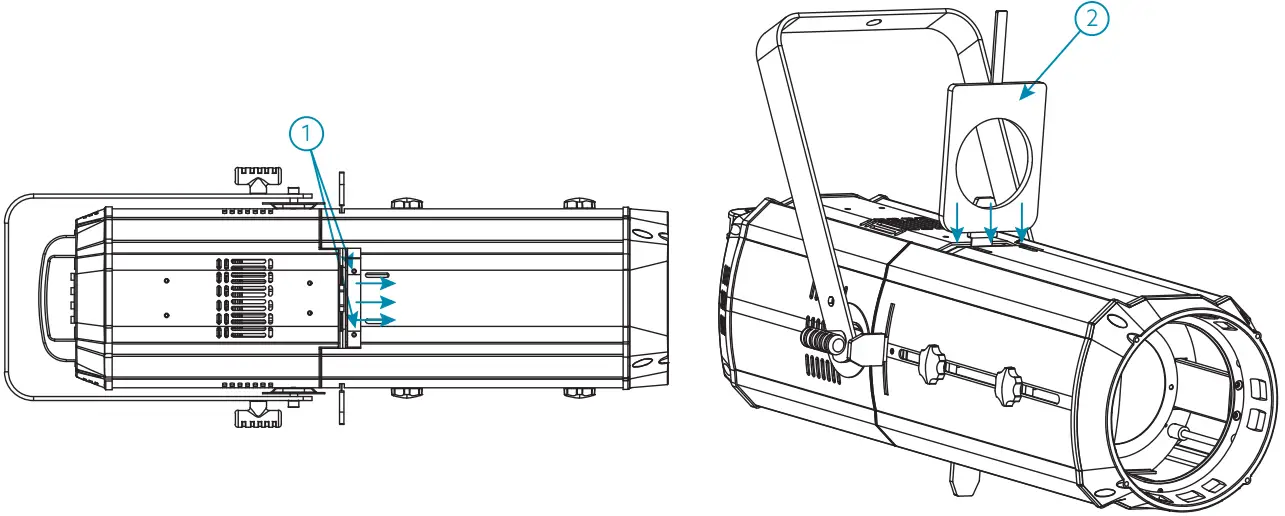
- Loosen the nut for the gobo/iris flake and then move it forward to open the slot.
- Insert the gobo holder with the gobo inside.
- Tum on the light and adjust Zoom and Focus knobs until you get the requested size and the clearest gobo projection.
6.3. Use of Iris
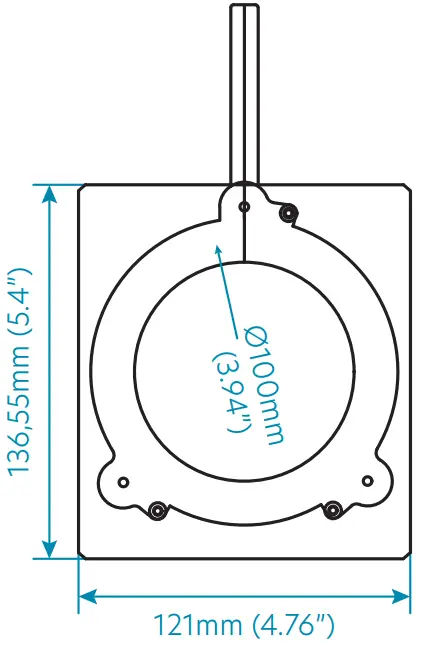
Sometimes it is requested to reduce the diameter of the beam even below the minimum allowed by the manual zoom (15°). In these cases, you can use the SQUARE IRIS-200 iris – listed below – to reduce the diameter up to 0°.
| SKU | Model | Description |
| J813J | SQUARE IRIS-200PZ | Manual Iris for SQUARE 200PZ Profile |
The manual iris is installed in the same slot used for the gobos. Of course, you have to choose between iris or gobo as they cannot be used simultaneously.
- Loosen the nut for the gobo/iris flake and then move it forward to open the slot.
- Insert the iris inside the slot.
- Tum on the light, and adjust Zoom and Focus knobs until you get the requested beam size.
- Use the manual iris to reduce the beam up to 0°.
By pressing the MENU button, the display will cycle through 8 menus. Press ENTER button to enter the corresponding menu, and press UP or DOWN to modify the current parameter value. Then, press ENTER button again to save the current value.
| No. | MENU | Function | Description |
| 1 | A001 – A512 | DMX512 address setting | It ranges from 1 to 512. Press UP and DOWN keys to adjust the address; press ENTER to confirm. |
| 2 | L000 – L255 | LED brightness control | It ranges from 1 to 255. Press UP and DOWN keys to adjust the brightness; press ENTER to confirm. |
| 3 | P000 – P255 | Strobe Speed | It ranges from 1Hz to 20Hz. Values range from 1 to 255. Press UP and DOWN keys to adjust speed, then press ENTER to confirm. |
| 4 | EP-0 – EP-1 | DMX 512 Signal Hold On | It can be 0 or 1. When this function is 0, if you disconnect the DMX cable, the LED will automatically turn off. When it is 1, if you disconnect the DMX cable, the LED will keep on. Press UP and DOWN keys to choose 0 or 1, then press ENTER to confirm. |
| 5 | PI-0 – PI-1 | DMX 512 Controlling Priority | It can be 0 or 1. When it is 1, the profile is prioritized to DMX controls, therefore independently of the current mode (manual, strobe, etc.) will automatically switch to DMX mode and respond to the DMX commands. When it is 0, there is no DMX priority on operative mode. Press UP and DOWN keys to choose 0 or 1, then press ENTER to confirm. |
| 6 | DP-0 – dP-1 | Display Backlight | When it is 1, the LED display will be off after about 30 seconds. When it is 0, the display will be always ON. Press UP and DOWN keys to choose 0 or 1, then press ENTER to confirm. |
| 7 | Nt50 | Internal Temperature | It shows the internal temperature. It should not exceed. When it is over 50°C (122°F) the fan starts to run. It normally does not exceed 60° (140°F). |
| 8 | Disp | Display Inversion | Press the UP and DOWN keys to change upside down the display; press ENTER to confirm. |
7.1. Setting the DMX Address
When selecting a starting DMX address, always consider the number of DMX channels. If you choose a starting address that is too high, you could restrict access to some of the product channels. SQUARE 200PZ uses 2 DMX channels, which defines the highest configurable address to 511 to have all channels controllable. This allows you to control up to 256 units in the 2-channel control mode.
7.2. DMX Channel Assignments and Values
When using DMX control, the system takes 2 channels. Below you can see the channel assignments.
1) 2-ch DMX512 Channel Chart
| CHANNEL | FUNCTION | DESCRIPTION |
| Channel 1 | Dimmer | 0-255: Total dimming linear dimming, from Dark to Bright. |
| Channel 2 | Strobe | 0-255: Strobo speed adjustment |
![]() NOTE: Under DMX conditions, without a DMX controller and in daisy-chain connection of multiple Profiles (read the paragraph “5.2. About Power Connection” on page 10 to see how to make), you can achieve the Master-Slave mode.
NOTE: Under DMX conditions, without a DMX controller and in daisy-chain connection of multiple Profiles (read the paragraph “5.2. About Power Connection” on page 10 to see how to make), you can achieve the Master-Slave mode.
It means that the first machine of the chain controls all the other fixtures, and they follow the master one. Of course, both master and slaves must be set on the same DMX address.
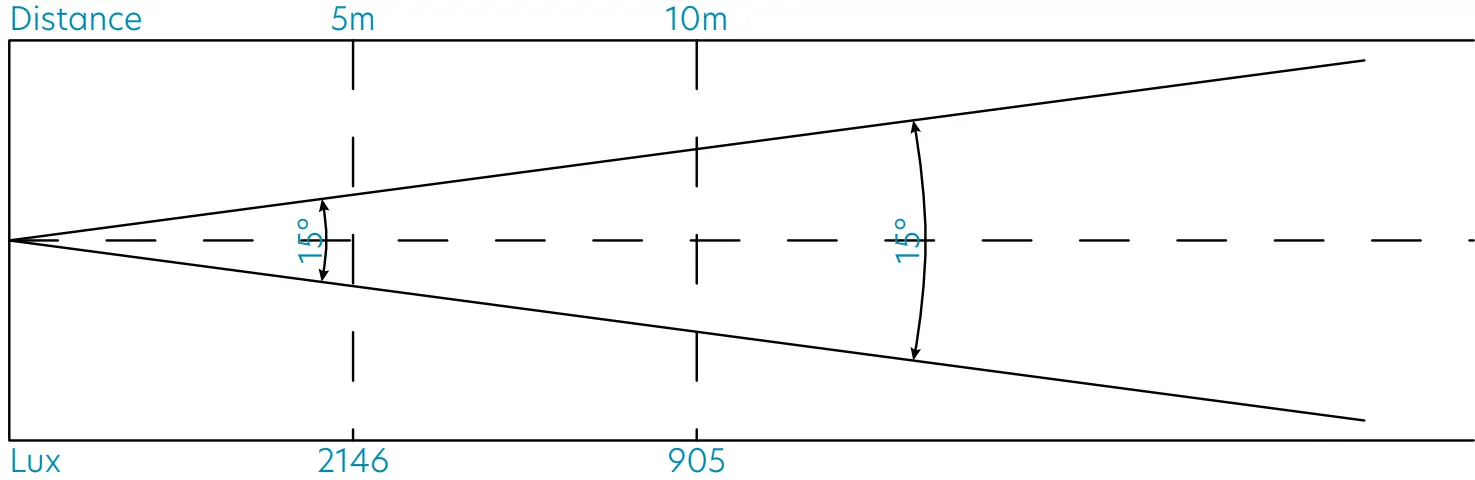
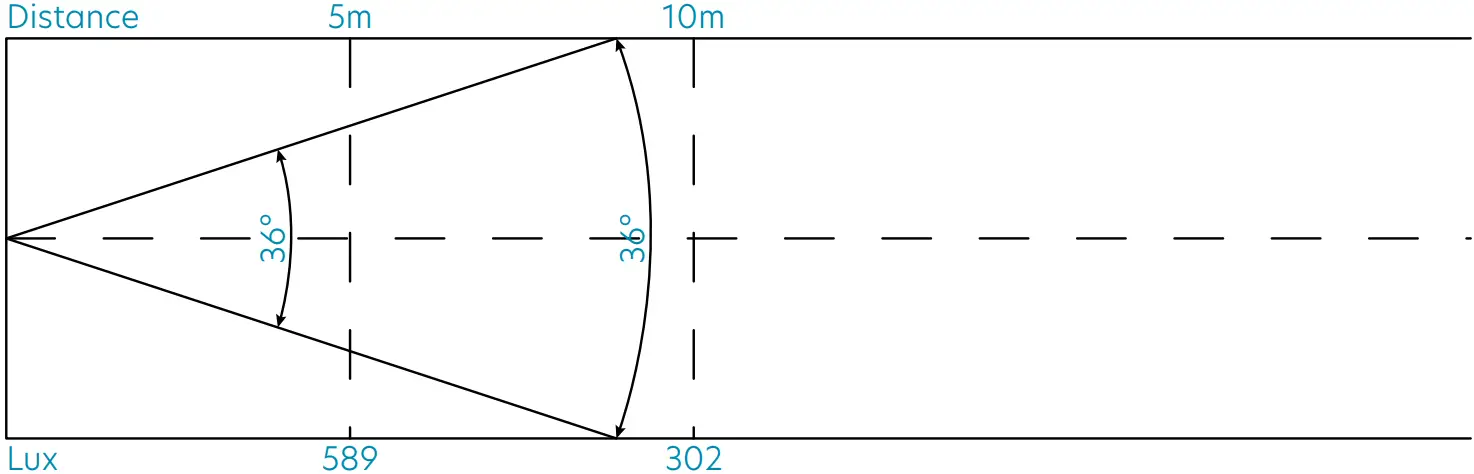
Lux Chart
- Lux Chart at 15°

- Lux Chart at 36°

Troubleshooting
| Problem | Probable Cause(s) | Remedy |
| No response from the fixture when power is applied | No power to fixture | Check power cables |
| Check mains plug | ||
| The fixture does not reset correctly | Electronic failure | Contact service technician* |
| No light, LED cuts out intermittently or burns out too quickly | LED missing or blown | Disconnect the fixture and replace the LED |
| The fixture or LED is too hot | Allow mixture to cool. If the problem persists, contact the service technician* | |
| The fixture resets but does not respond correctly to the controller (DMX mode operation) | Controller not connected | Connect controller |
| Incorrect addressing of the fixtures | Check address setting on fixture and controller | |
| Bad data link connection | Inspect cables and correct poor connections and/or broken cables. | |
| The fixture resets but does not respond correctly to the controller (DMX mode operation) | The conflict between tracking and vector control | Eliminate scene cross-fade on the controller |
| Data link not terminated | Insert termination plug-in output of last fixture** | |
| A defective fixture on 2 devices transmitting on link | Bypass fixtures one at a time until normal operation is regained: unplug both connectors and connect them directly together |
* To contact CentoLight service, see “11 – Warranty And Service” on page 19 or visit www.centolight.com
** For instructions on how to install a DMX terminator, see “5.4. DMX Terminator” on page 11.
Specification
| Light Source | 1 x 200W Warm White CITILED® |
| Chip Life | over 50,000h |
| CCT (Color Temperature) | 3100±150K |
| Beam Angle | 15°-36° |
| Luminous Flux | 2146 (15°) / 589(36°) lux/5m, 905 (15°) / 302 (36°) lux/10m |
| CRI | WW≥90 |
| Refresh Rate | Over 15.000Hz (Flicker-Free) |
| Framing System | 4 Blade-Framing System adjustable for radial and angle position |
| Zoom | Manual from 15° to 36° |
| Focus | Manual |
| Lens Material | High-Quality Glass |
| Dimmer | 16-Bit Smooth Linear Dimming |
| Strobe | 0-20Hz |
| Cooling System | Quiet Fan (under 25dB @1m) |
| DMX Channel Modes | 2-Channels (RDM Included) |
| Control Modes | DMX, Strobo, Manual Dimming |
| Control Panel | 4 Buttons and LED Display |
| IP rate | IP20 |
| DMX In/Out | 3-pin XLR |
| Power Socket | Powercon In/Out |
| Voltage | 100~240V 50/60Hz |
| Max Power Consumption | 220W |
| Working Temperature | -30÷55°C |
| Color Frame | Included |
| Max. Fixture Size (WxDxH) | 691 x 340 x 340 mm – 27.20 x 13.38 x 13.38 in (C-bracket included) |
| Net Weight | 9,8kg – 21.60 lbs. |
| Packing Size (WxDxH) | 785 x 380 x 380 mm – 30.90 x 14.96 x 14.96 in |
| Packing Weight | 12,0kg – 26.45 lbs. |
Note: Our products are subject to a process of continuous further development. Therefore modifications to the technical features remain subject to change without further notice.
Warranty and service
All CENTOLIGHT products feature a limited two-year warranty. This two-year warranty starts from the date of purchase, as shown on your purchase receipt. The following cases/components are not covered by this warranty:
- Any accessories supplied with the product
- Improper use
- Fault due to wear and tear
- Any modification of the product affected by the user or a third party
CENTOLIGHT shall satisfy the warranty obligations by remedying any material or manufacturing faults free of charge at CENTOLIGHT’s discretion either by repairing or exchanging individual parts or the entire appliance. Any defective parts removed from a product during the course of a warranty claim shall become the property of CENTOLIGHT.
While under warranty, defective products may be returned to your local CENTOLIGHT dealer together with the original proof of purchase. To avoid any damages in transit, please use the original packaging if available. Alternatively, you can send the product to CENTOLIGHT SERVICE CENTER – Via Enzo Ferrari, 10 – 62017 Porto Recanati – Italy. In order to send a product to the service center, you need an RMA number. Shipping charges have to be covered by the owner of the product.
For further information please visit www.centolight.com
Warning
PLEASE READ CAREFULLY – EU and EEA (Norway, Iceland, and Liechtenstein) only

This symbol indicates that this product is not to be disposed of with your household waste, according to the WEEE Directive (2012/19/UE) and your national law.
This product should be handed over to a designated collection point, e.g., on an authorized one-for-one basis when you buy a new similar product or to an authorized collection site for recycling waste electrical and electronic equipment (WEEE).
Improper handling of this type of waste could have a possible negative impact on the environment and human health due to potentially hazardous substances that are generally associated with EEE. At the same time, your cooperation in the correct disposal of this product will contribute to the effective usage of natural resources.
For more information about where you can drop off your waste equipment for recycling, please contact your local city office, waste authority, approved WEEE scheme, or your household waste disposal service.
![]() www.centolight.com
www.centolight.com
This product is imported in EU by Questo prodotto viene importato nella UE da
FRENEXPORT SPA – Via Enzo Ferrari, 10 – 62017 Porto Recanati – Italy
CentoLight® is a registered trademark of FRENEXPORT SPA – Italy![]() MADE IN CHINA
MADE IN CHINA
Ver. 1.1 – May 2022


