![]()
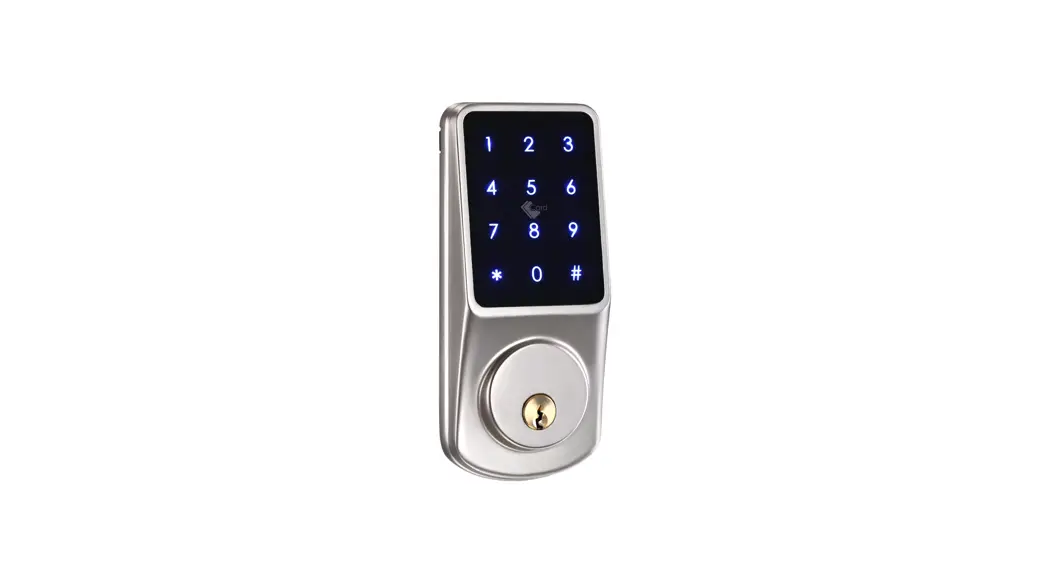
Series Smart Deadbolt Lock
User Manual
Scan the QR code below to download the APP.
 https://play.google.com/store/apps/details?d=com.tongtongsuo.app https://play.google.com/store/apps/details?d=com.tongtongsuo.app |  https://itunes.apple.com/cn/app/id1033046018 https://itunes.apple.com/cn/app/id1033046018 |
Search Google play or APPLE Store with TTLOCK.
Smart your life!
Version 2.0 Edition 2021
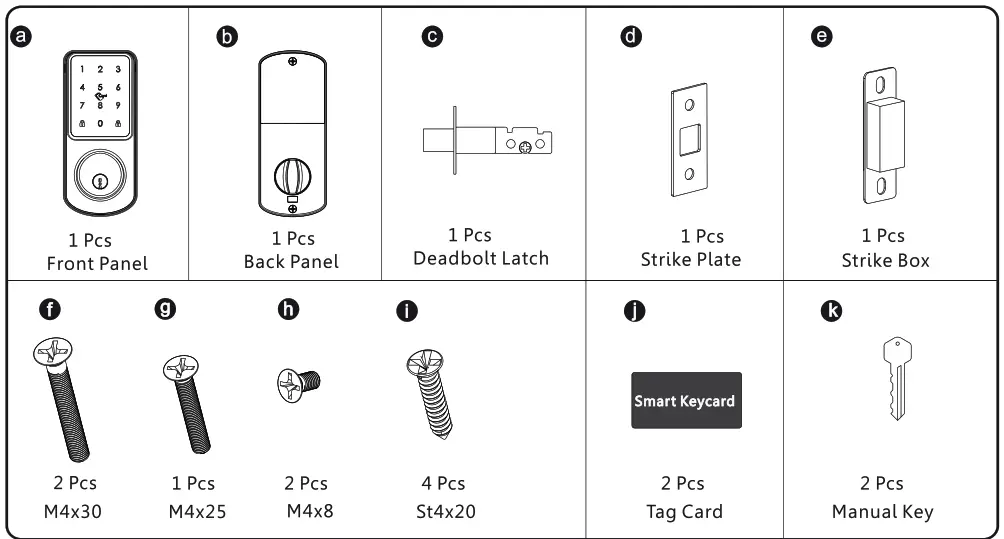
LOCK ACCESSORIES
Please check the packing box and accessories when you got the lock in hand.
PRODUCT SPECIFICATION

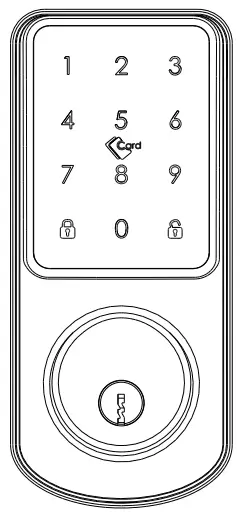
TO OPEN AND CLOSE![]() Press this button to close the door.
Press this button to close the door.![]() Enter the valid passcode, press this button to unlock the door.
Enter the valid passcode, press this button to unlock the door.
SYSTEM INTRODUCTAION
| Material | Aluminum,ABS,Arcylic |
| Color | Black Nickel / Satin Nickel |
| Door Thickness | 35-55mm |
| Communication | Bluetooth 5.0 |
| Support OS | iOS 7.0 or above, Android 4.4 or above |
| Battery Life | 10000 times normal unlock(Around 12 months) |
| Power Supply | DC6V:4pcs AA alkaline batteries(not included) |
| Static Current | <50uA |
| Dynamic Current | <200mA |
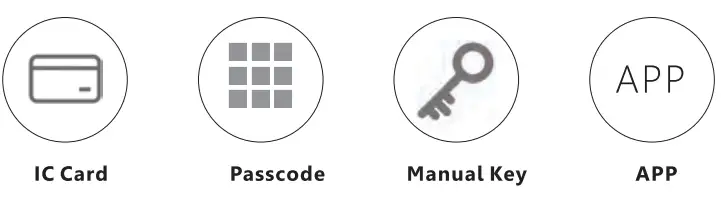
| Unlock Way | IC Card,passcode,APP,wristband,manual key |
| Unlock Time | 1-1.5 seconds |
| Working Temperature | -20-50 degree |
| Working Humidity | 10%-95% |
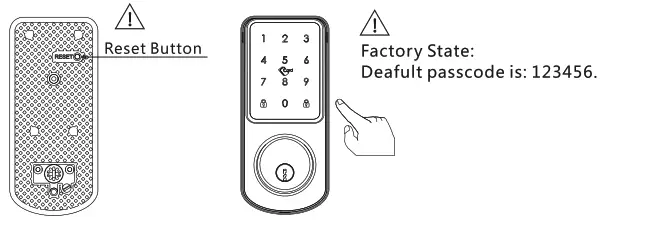
| Factory Passcode | 123456,after setting,factory passcode will be invalid |
| Mortise Type | 60/70 adjustable deadbolt mortise |
| WiFi Gateway | Available for remote unlock(OptionaLrefer page 10) |
| Packing Box | Carton box with PE foam inside |
RESET TO FACTORY STATE![]()
ATTENTIONThere is one Reset button on the back of front panel. You can press this button for 2 seconds with two didi sound, then the lock is under factory state, the default passcode is: 123456.
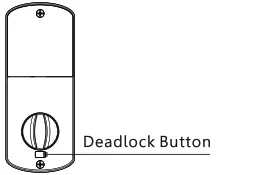
DEAD LOCK FUNCTION
![]()
ATTENTION There is one deadlock button under the thumb Knob. You can press this button for 2 seconds with two didi sound, then the lock is dead locked inside, only the admin passcode can access the door, other user passcode or card will be invalid. And you can long press the button 2 seconds with two didi sound to cancel this function.
INFORMATION AND SAFETY WARNINGS:
5.1 Introduction
This user manual will guide you through the functions and usages of our A220 smart lock. It is important that you follow the instructions and regard all notes that appear throughout this manual. Consult this manual before you attempt to use this lock. If you have any questions that not answered by this manual or on need of non-routine service, please call our customer service hotline or send FAQ to us.
5.2 Safety Warnings:![]() When reading this manual, note these icons: notes with the icon Must be read, understood and obeyed to prevent injury or damage to the lock.
When reading this manual, note these icons: notes with the icon Must be read, understood and obeyed to prevent injury or damage to the lock.![]() General Usage
General Usage
- This lock shall only be used as described in this manual.
- Verify that all parts of the lock are accounted for. If any parts are missing, please contact our service person.
- There is protective film on the front touch panel, if there are some scratches on the film, please remove the film if you need.
- Please use 4pcs AA batteries. Do not mix old and new batteries or other Zn/Mn batteries. Never insert objects into the lock other than batteries as described in this manual.
- Verify all surfaces are flat and level before beginning installation, installation on doors or surface with anytypes of deformity such as gaps or warping may cause the lock to malfunction or fail to operate entirely.
- Never apply any cleaner directly to any part of this lock. Only use clean water or mild cleaner on a soft non-abrasive cloth when cleaning.
- The lock must be used with TTLOCK APP. The lock will function without the APP but full functionality may only be achieved when the APP is on use.
5.3 SALES AND SERVICE TERMS
- Please read the manual carefully before use! Limited 1-year Electronic Warranty Limited Lifetime Mechanical and Finish Warranty
- This A220 product comes with a 1-year Limited Warranty on Electronic Parts and a Limited lifetime. Mechanical and Finish Warranty against defects in materials and workmanship under normal use to the original residential user. Proof of purchase and ownership is required for the warranty to be in effect.
- Any error or question in our manual or sales term, please feel free to contact with us.
- For any wrong operation or installation to the user, we do not responsible for the duty.
- For the damage caused by anthropic factor or inevitable reason, we do not pay for the loss or maintain for free, please check our after sale service terms.
- Please do not take apart the lock if you are not technician, if necessary, please make the operations under the guide of technician.
- Notice: there maybe a little difference for product pictures with real product, please subject to our real products.
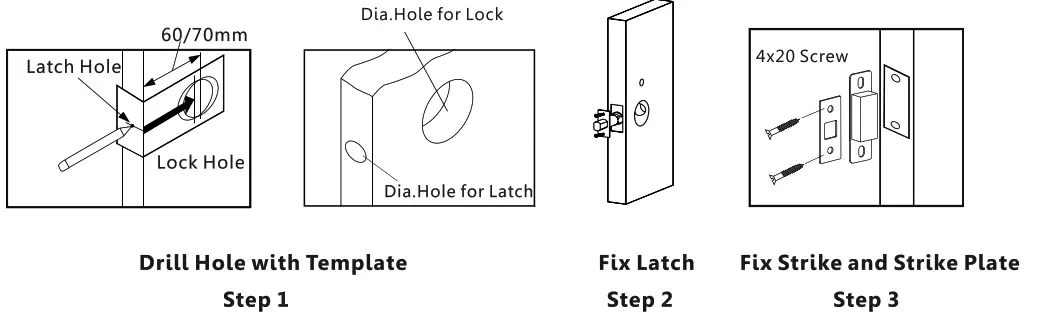
PREPARING TO INSTALL
6.1 Line Drawing
Draw a horizontal center line on the door at 1 meter from the ground. Fold the template, make the center line align the horizontal center line, then draw out the hole lines on the door front and side position.
Drawing Center Line
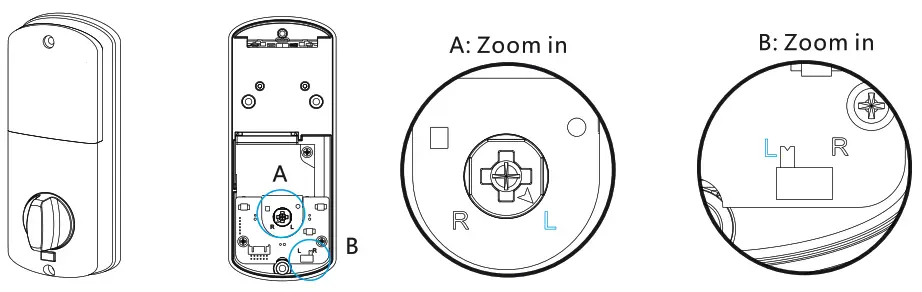
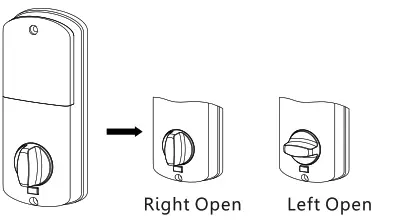
6.2 Adjust Directio
- Adjust to Left from Right Direction Refer A: Zoom in
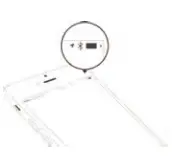
1.1 Turn the clutch on the back panel and make the arrow point to the “L”. Refer B: Zoom in
1.2. Turn the switch to ‘I:position on the PCB board.
- Turn the Thumb knob to Left/Right Direction

 Notice the thumb knob position
INSTALL THE LOCK
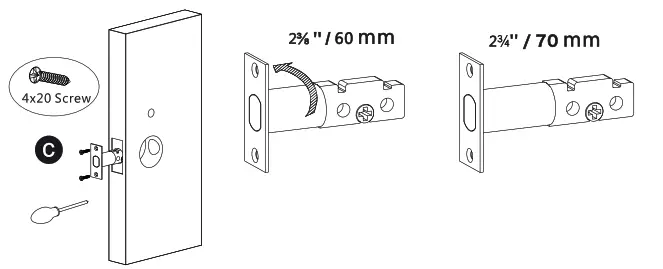
- Assemble the Mortise
Assemble the mortise(c) into the slot which is drilled according to the template. Remember to turn the faceplate and pull to extend the deadbolt to right size.
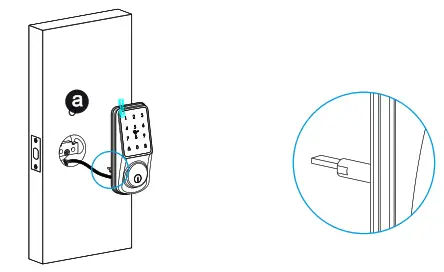
- Assemble the Front Panel
Fix the front panel(a) on the door and cross the cable through the hole. Make sure the cylinder ring shall be horizontal position.
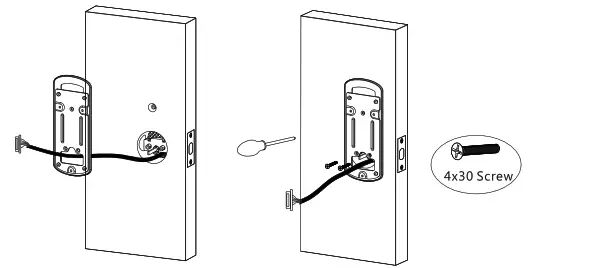
- Assemble Gasket Cross the cable through the mounting plate,and fix the gasket with the front panel.

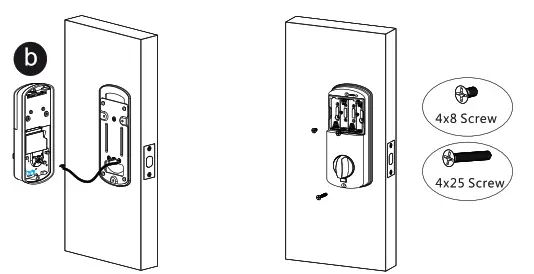
- Assemble the Back Panel Connect the cable with the connector on the PCB board. Fix the back panel with the screw as the photo.

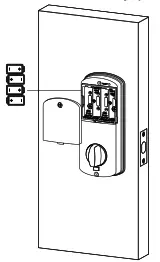
- Assemble the Battery Put 4pcs AA alkaline batteries into the battery box, notice the polarity(+/-) and test with factory passcode or APP .

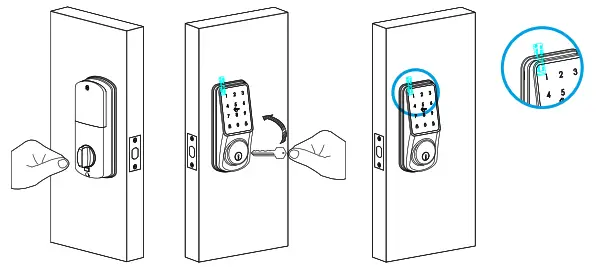
- Adjust the Lock Panel After finishing installation, please turn the thumb knob and adjust the tightness. Try the manual key to unlock the door and tight the screws accordingly. Also remember to remove the protection film for daily use.

TTLOCK APP OPERATION STEPS
Search Google play or APPLE Store with TTLOCK to download the APP. Install it or scan the below QR code we provided to install the APP program. You can also turn to us to download the application. please read the manual carefully before installation and keep it properly.
 https://play.google.com/store/apps/details?id=com.tongtongsuo.app https://play.google.com/store/apps/details?id=com.tongtongsuo.app |  https://play.google.com/store/apps/details?id=com.tongtongsuo.app https://play.google.com/store/apps/details?id=com.tongtongsuo.app |

ATTENTIONPlease turn on your phone’s Bluetooth function before any operation.
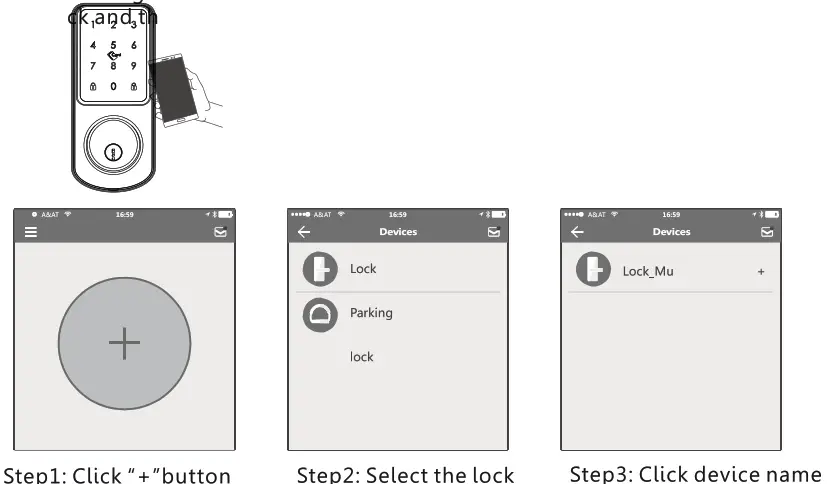
- one smart oc on our phone
 When addin the door lock, operations must be completed near the lo ,ag e keypad is activated during paring. • S I
• In step 3: there will be on “+”button after the name of the door lock, notice the door lock can not be added if there I no sign. The interface will jump back to the key list after adding successfully.
• If the operation is failed, please repeat the above steps and view the device list in steps 3. Make sure your mobile is turned on with bluetooth feature and door lock is powered with the battery already.
• If you are not able the lock administrator, please contact the device administrator and ask for the secondary authorization for this lock. This feature requires the receivers to install the APP in their phone and register one account already. - Send one Permanent eKey

- Send one timed eKe
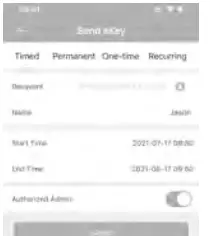
 During the authorized period of time, the receiver can unlock the door without times limit, after the limitation of time, it will be invalidated automatically
 - Send a timed passcode
 • Passcode is with four types:permanent,timed,cylic and one-time, you can set the passcode accordingly and share to the receiver by mail/wechat/whatsapp etc.
. Permanent passcode will not expire, but the administrator can delete them in the user list at any time. • Notice: The passcode shall be used once within 24 hours after the start time, otherwise it will be invalid for security reason.
 Notice: The recurring passcode is one week and can be used cyclically for one defined period of time. For example.if the time is valid when setting to 10:00-20:00 every weekend, the user can only open the door at the setting time every weekend and can not open the door at any other time. Also this passcode shall be used once within 24 hours after the start time, or it will be invalid.
 • The one- time is only valid for 6 hours after the start time, or it will be invalid for security reason. This passcode can only be used for one time.
 - Issue IC Card
 • There is tag card for this lock, which you can issue the IC card next the door lock, also you can clear the IC card upon your requirement.
 - Unlock Record suer
 Each time the ordinary user unlocks the door lock with the ekey sent by the
• administrator,one record will be generated automatically and send to the administrator’s phone APP. ATTENTION
• If one lock has been added by one phone, it can not be added by another new phone unless: 1.The previous administrator delete it from his APP next to the lock. . 2.The reset button on the lock is long pressed for initialization(2 seconds).
• Deleting the passcode must be operated next to the lock. Enter the software interface and click the “=.” button to add the Lock as APP suggest. - Lock Settings
 • Enter the device interface and click to check the “Setting” button to check the device information. you can check the lock information for lock clock/diagnosis / unlock records and firmware update operations etc. More information you can refer the below photos:
 - system Settings
 • Enter the interface and click the “=”button, the options can be selected in the pop-up users.
 - Wi-Fi Gatewa (G2 / 0 optional)
The new version Wi-Fi gateway is with improved performance and long communication distance. please refer to the below parameters and operations:
Model: G2
Dimension: 70x70x26mm
Network: Wi-Fi 2.4G
IEEE Standard: 802.11b/g/n
Power Interface: Type C USB
Power Input: DC5V/500mA
Light Status: When the gateway is powered on:
 Light flashes alternately with red and blue: Stand-by mode,ready for connection Blue light: working mode Red light: network failure
 When addin the door lock, operations must be completed near the lo ,ag e keypad is activated during paring. • S I
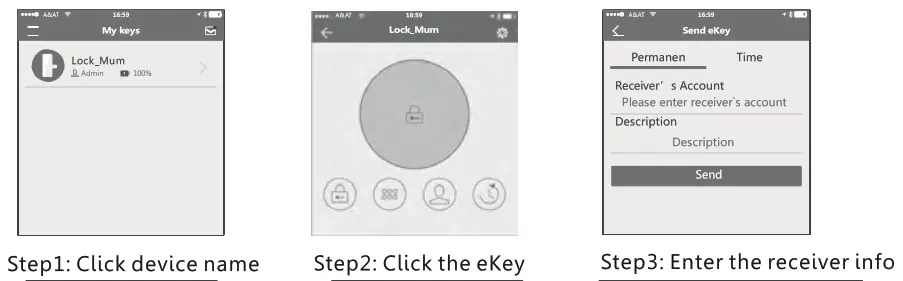
 During the authorized period of time, the receiver can unlock the door without times limit, after the limitation of time, it will be invalidated automatically
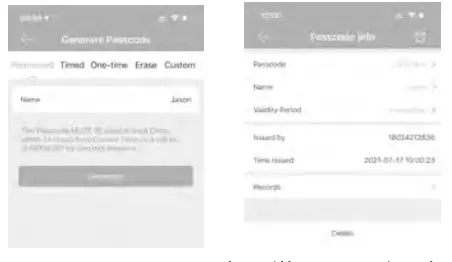 • Passcode is with four types:permanent,timed,cylic and one-time, you can set the passcode accordingly and share to the receiver by mail/wechat/whatsapp etc.
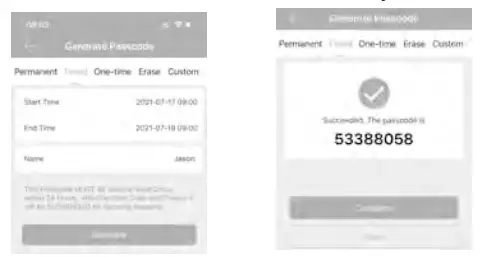 • Notice: The passcode shall be used once within 24 hours after the start time, otherwise it will be invalid for security reason.
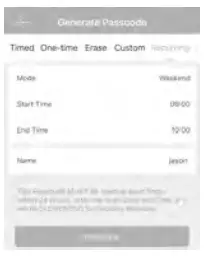 Notice: The recurring passcode is one week and can be used cyclically for one defined period of time. For example.if the time is valid when setting to 10:00-20:00 every weekend, the user can only open the door at the setting time every weekend and can not open the door at any other time. Also this passcode shall be used once within 24 hours after the start time, or it will be invalid.
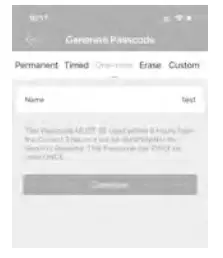 • The one- time is only valid for 6 hours after the start time, or it will be invalid for security reason. This passcode can only be used for one time.
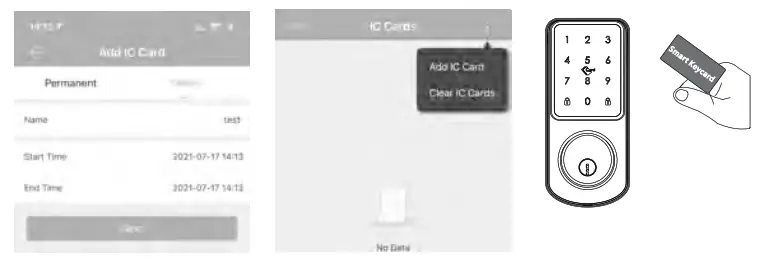 • There is tag card for this lock, which you can issue the IC card next the door lock, also you can clear the IC card upon your requirement.
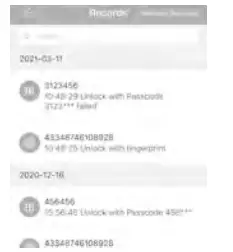 Each time the ordinary user unlocks the door lock with the ekey sent by the
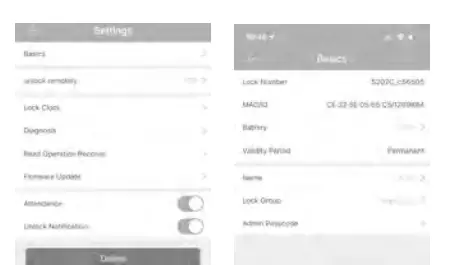 • Enter the device interface and click to check the “Setting” button to check the device information. you can check the lock information for lock clock/diagnosis / unlock records and firmware update operations etc. More information you can refer the below photos:
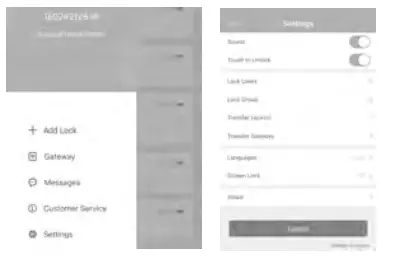 • Enter the interface and click the “=”button, the options can be selected in the pop-up users.
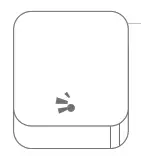 When the gateway is powered on:
Pair the Gateway with APP
 Activate the APP Activate the APP | 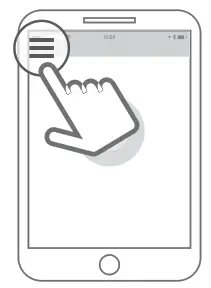 Press the button ≡ Press the button ≡Press the + sing | 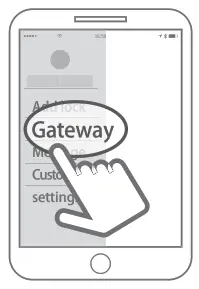 Select the [Gateway) Select the [Gateway) | 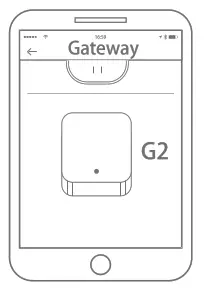 Select the [G2] Select the [G2] |
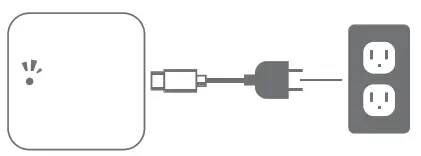 Plug the gateway and power . Press the “+”. ‘ on it, light flashes alternately with red and blue Plug the gateway and power . Press the “+”. ‘ on it, light flashes alternately with red and blue | 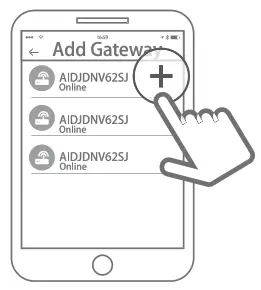 Press the + Press the + |  Add Gateway Add Gateway | 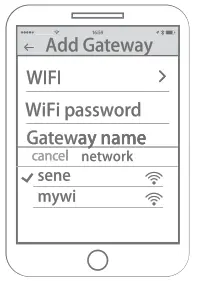 Select Wi-Fi and enter password n Finish paring gateway Select Wi-Fi and enter password n Finish paring gateway |
This device complies with part 15 of the FCC Rules. Operation is subject to the following two conditions: (1) thi s device may not cause harmful interference, and (2) t h
s device mu st accept any interference received, including interference that may cause undesired operation. Any changes or modifications not expressly approved by the party esponsible for compliance could void the user’s authority t o operate the equipment.
NOTE: This equipment has been tested and found to comply with the limits for a Class B digital device, pursuant to Part 15 of the FCC Rules. These limits are designed to rovide reasonable protection against harmful interference in a residential installation. This equipment generates, uses and can radiate radio frequency energy and, if not installed nd used in accordance with the instructions, may cause harmful interference to radio communications. However, there is no guarantee that interference will not occur in a articular installation. If this equipment does cause harmful interference to radio or television reception, which can be determined by turning the equipment off and on, the user is encouraged to try to correct the interference by one or more of the following measures:
— Reorient or relocate the receiving antenna.
— Increase the separation between the equipment and receiver.
— Connect the equipment into an outlet on a circuit different from that to wh ich t he receiver is connected.
— Consult the dealer or an experienced radio/TV technician for he lp.
The device has been evaluated to meet general RF exposure requirement. The device can be u sed in portable exposure condition without restriction .


