
![]()
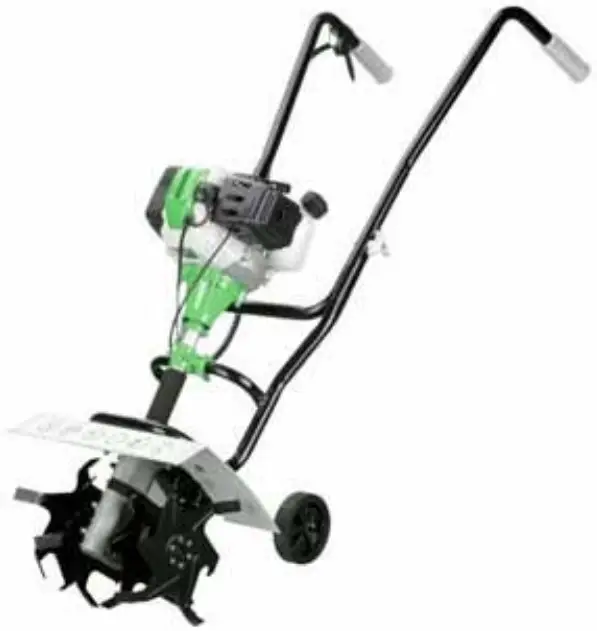
OPERATOR’S MANUAL AND PARTS LIST PETROL MINI TILLER – THPMT
Sales & Helpline 01793 333220
www.thehandy.co.uk
Before use please read & understand this manual, paying particular attention to the safety instructions.
SAFETY INSTRUCTIONS
![]() Read and understand the owner’s manual and labels affixed to the tiller. Learn its application and limitations as well as the specific potential hazards. Retain these instructions for reference.
Read and understand the owner’s manual and labels affixed to the tiller. Learn its application and limitations as well as the specific potential hazards. Retain these instructions for reference.
- Use sturdy footwear and protect exposed parts of your body. Wear heavy-duty gloves, preferably made of leather. You may wish to also have eye and ear protection.
- Do not operate the tiller if you are tired, ill or under the influence of alcohol or drug
- Do not smoke when using the tiller and ensure caution when handling fuel. We recommend you fuel the machine at least 3m away from where you wish to work in case any spilled fuel ignites when starting the engine
 Ensure that bystanders, children, and pets keep well away when starting or cutting – at least 15m.
- Inspect the tiller, and in particular the tilling tines, before use for any worn or damaged parts. Do not use it until the parts are repaired or replaced.
- Before starting the engine make sure you have a clear work area and secure footing.
- always carry the tiller with the engine stopped and never walk away and leave the engine running.
- Never lay the hot tiller down on dry grass or any combustible material where there is a fire risk from the hot engine.
- Only use the tiller in good light and visibility. Do not use it on frozen ground.
 Please recycle the cardboard packaging in which the tiller is delivered.
Always shut off the engine before setting it down.
MAJOR PARTS
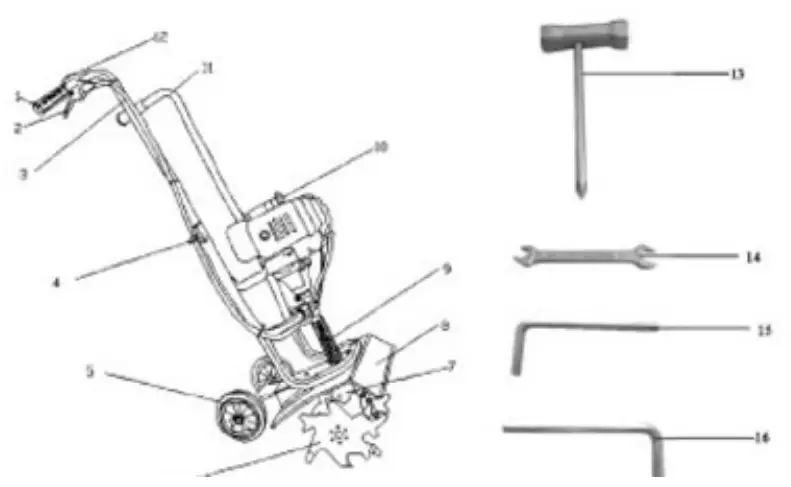
| 1 | Hand Grip |
| 2 | Throttle Control |
| 3 | Throttle Cable and Switch Wire |
| 4 | Handlebar Knob |
| 5 | Wheel |
| 6 | Tines |
| 7 | Gearbox |
| 8 | Tine Guard |
| 9 | Shaft Tube Grip |
| 10 | Starter Rope Grip |
| 11 | Handlebar |
| 12 | On/Off Control |
| 13 | Spark Plug Socket Wrench |
| 14 | Open Wrench |
| 15 | Hexagon Wrench 4mm |
| 16 | Hexagon Wrench 5mm |
FUEL
 Petrol is very flammable. Avoid smoking or fuelling the tiller anywhere near a flame or sparks. Allow the engine to cool before re-fuelling. Fuel the engine at least 3m away from your work area.
- Use a mixture of 25 parts unleaded petrol to 1 part 2-stroke engine oil (25:1) and mix in the mixing bottle provided. Agitate we
- Unscrew the fuel cap, and fuel the machine to 80% capacity. Fasten the fuel cap tightly and wipe up any spillage. Make sure the tiller is in a horizontal position when fuelling.
- Ensure that any stored petrol/oil mixture ( 2-stroke) is clearly marked in the separate can and only stored for 4-6 weeks. If the tiller is not going to be used for a long period, drain the mixture from the fuel tank, start the engine and drain the carburetor of any remaining fuel.
- Dispose of any unwanted 2-stroke mixture at an authorized recycling point.

SPECIFICATION
| Model | PMT |
| Engine | 1.2kw Air cooled low maintenance |
| Displacement | 42.7cc/1.6hp |
| Fuel Tank Capacity | 1200ml |
| Usage Time for Full Tank | Approx 60 mins |
| Tines | 6 teeth/22.5cm diameter |
| Tilling Width | 25cm |
| Tilling Depth | 20cm |
| Petrol Oil Mixture | 25:01:00 |
| Starting System | Recoil |
| Low Noise | <105dB(A) |
| Net Weight | 15kg |
ASSEMBLY
Before commencing assembly unpack the contents of the box and check carefully that nothing is damaged.
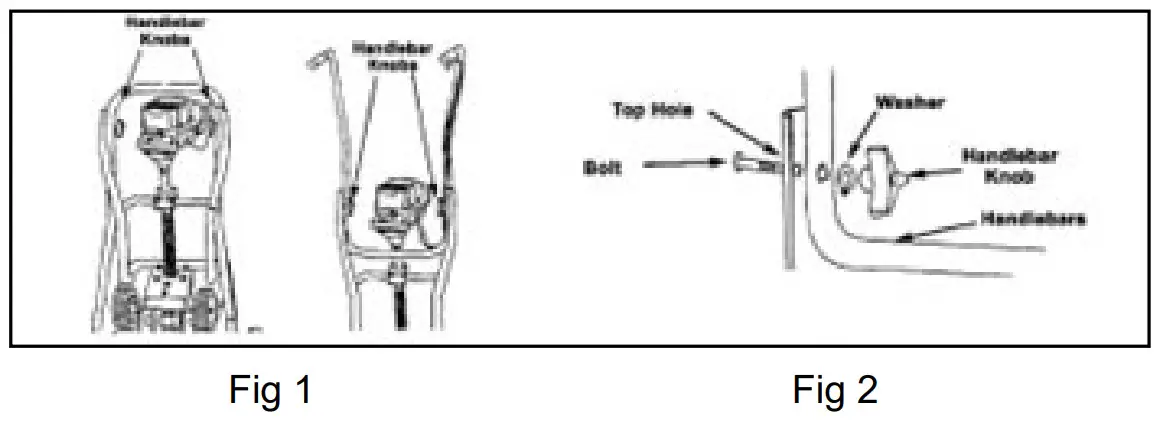
Handlebars:
- Loosen the two knobs on the inside of the handlebars (Fig 1).
- With the unit upright, swing the handlebars up into the operating position, taking care not to pinch the throttle cable or switch wires.
- Tighten the knobs to secure in place.
- Readjust the throttle cable and switch wires so that they are smooth and tight against the handlebar assembly.
To adjust the handlebar height:
- Remove the knobs and mounting bolts and reinstall them through either the top or bottom holes in the handlebar assembly (Fig 2).
- Ensure that you tighten the knobs again securely.
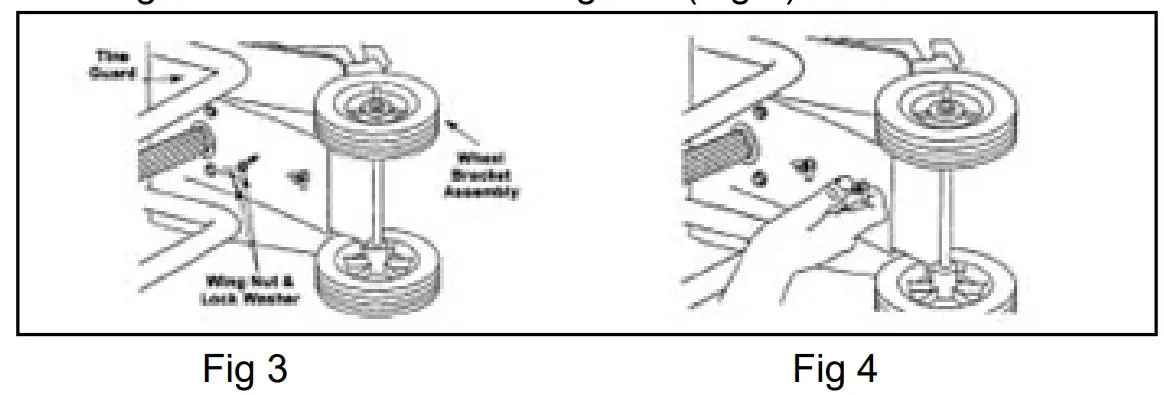
Wheel Bracket Assembly:
- If the wheel bracket assembly is not already fixed, follow these guidelines.
- With the unit on its side, place the wheel bracket assembly on the underside of the tine guard (Fig 3).
- Feed a carriage bolt through each of the slotted holes in the wheel bracket and into the tine guard.
- On the top side of the tine guard, fix a lock washer and wing nut onto each of the bolts.
- Make sure the square shoulder of the bolts is pushed through the slotted holes in the wheel bracket.
- Tighten the wing nuts – but do not over-tighten (Fig 4).
OPERATION
Move the tiller to the work area before starting the engine. Transport by pushing on the wheels, not the tines.
Starting the Engine:
- Lay the tiller on the ground in a horizontal position.
- Move the On/Off Switch on the right handlebar to ON
- Move the choke lever on the left side of the engine to OFF ( towards you)
- Press the primer bulb 6-8 times until you see fuel flow through the transparent hose from the fuel tank to the carburetor.
- Put your left foot on the frame (if right-handed) to help steady the machine and pull on the starter rope until the engine fires – it should take just a few pulls.
- Allow the engine to run for 5 seconds, then move the choke lever halfway back towards the ON position. Allow the engine to run for another 5 seconds to warm up , then move the choke lever to the ON position
- To start the engine from warm, there is no need to prime the engine and the choke lever should be left in the ON position.
With the engine running and the tines off the ground, gradually increase the engine speed by pulling up the throttle control lever. Holding the handlebars firmly, lower the tiller onto the soil. As the tines rotate, pull back on the handles so that the tines can penetrate the soil. Once the ground has been broken, continue at a moderate pace until you are familiar with the controls and the handling of the tiller. Pull the tiller backward to improve the depth of cultivation and reduce your effort. If the tines are digging too deep or not enough, adjust following the guidelines below: 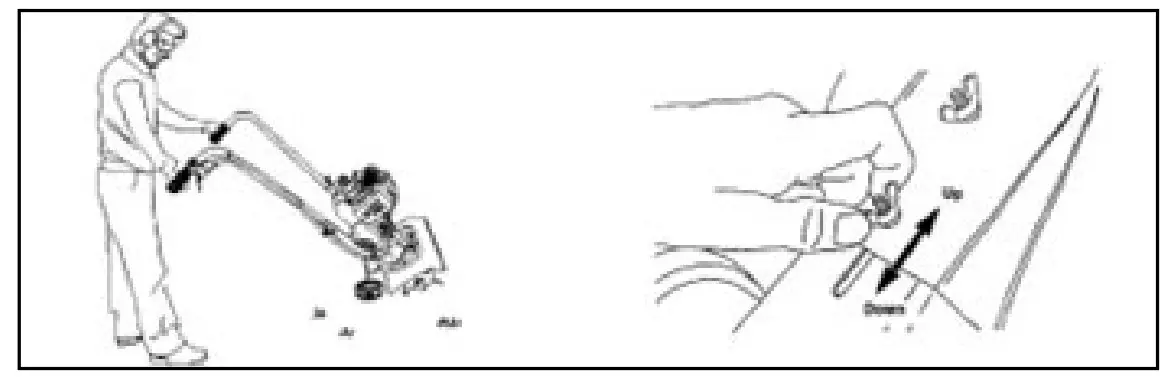
Tine adjustment will vary depending on the type of soil being cultivated and how it will be used.
- Stop the engine and loosen the two wing nuts on the tine guard.
- Slide the wheel bracket assembly down for shallower digging and up for deeper.
- Tighten the wing nuts again, making sure the carriage bolts are properly seated through the bracket.
- To transport, slide the wheel bracket assembly all the way down, tilt the unit back so that the tines clear the ground and push to the next location using the wheels.
MAINTENANCE
Keeping your tiller in top running condition will prolong its life and help you obtain optimum performance whenever you wish to till your garden. Clean the tiller underneath the tine shield after each use. It is easier to clean off immediately after use before it has had time to dry. Turn the engine off and allow to cool down before cleaning off the tines and wiping with an oily cloth.
Air Filter:
Check and clean the Air Filter regularly to ensure optimum performance. Remove the air filter cover, take out the filter and wash in lukewarm water. Allow to dry completely and then replace.
Spark Plug:
Check the spark plug periodically and ensure that the gap between the electrodes is 0.0020in/0.5mm Adjust where necessary using the universal wrench supplied. If the spark plug is clogged with carbon, clean thoroughly or replace with a Champion RDJ7Y or equivalent. Take care not to allow dirt into the cylinder whilst the plug is removed. Plug the hole with a clean rag ( not tissue) during the operation.
Idle Adjustment Screw:
The tines should not rotate when the engine is idling. If they do, turn the adjustment screw anti-clockwise a tiny amount. The adjuster is located just above and to the right of the primer bulb.
Storage:
When storing the tiller for any length of time it is important to drain down the fuel, both in the tank and the carburetor. Either drain the fuel manually or run the engine until it uses up all the fuel. Remove the spark plug and add a few drops of oil into the spark plug hole. Pull the starter cord gently to confirm that a film of oil covers the engine inside. Tighten the spark plug. Clean dirt or dust from the cutter blade and the outside of the machine and wipe with an oily cloth. Store in a dry place.
Adjusting and Changing the Tines:
Replace all four tines at the same time because they will wear evenly during normal use. Work on one side at time.
- Put the On/Off switch in the STOP position and disconnect the spark plug lead.
- Remove the clevis pin clips and clevis pins (Fig 1)
- Remove the tines and felt washers from the shaft.
- Clean and oil the shaft
- The tines are stamped R or L to identify their position on each side of the gearbox when facing the front of the unit.
- Replace the tines and felt washers onto the shaft with the hubs of the tines facing each other.
- Before you reinstall the clevis pins and pin clips, ensure that the tips on the tines are staggered when compared to each other (Fig 2).
- Repeat this procedure on the opposite side.
When installed correctly, there will be a R and L tine on both sides of the gearbox and the tips of these tines; these letters will line up in the same direction for each side.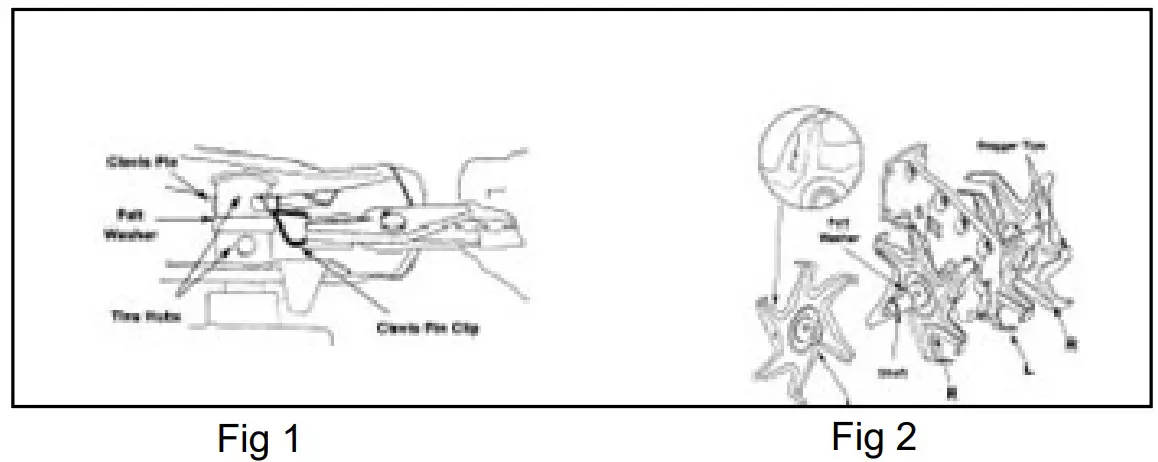
PARTS DIAGRAM- MACHINE
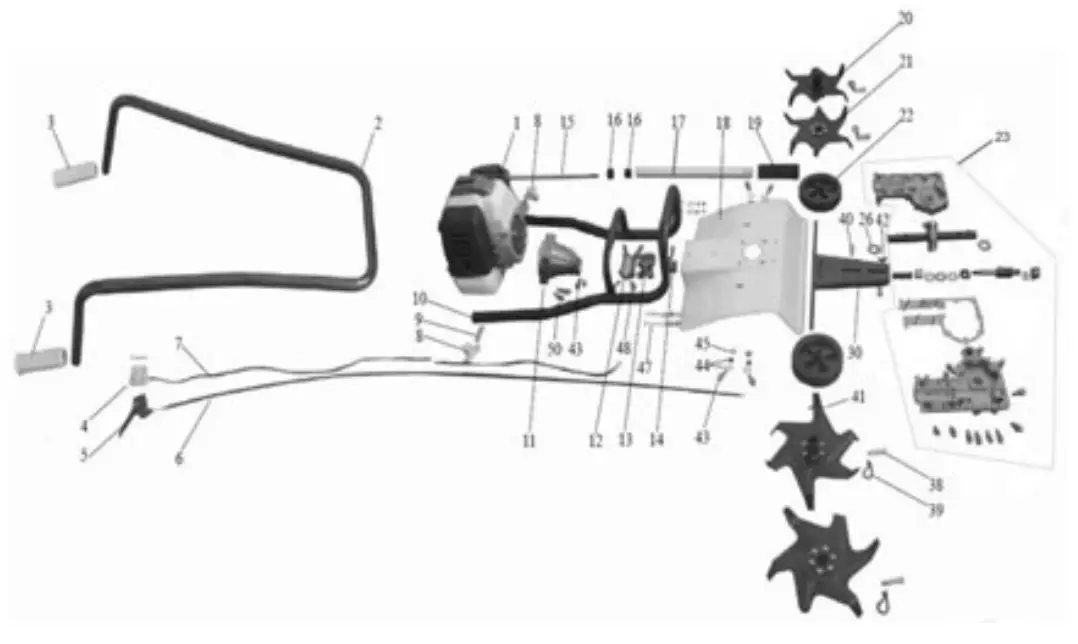
| No | Part No | Description | Qty | No | Part No | Description | Qty |
| 1 | TH127-1 | Engine | 1 | 19 | TH127-19 | Sponge Cover | 1 |
| 2 | TH127-2 | Handle | 1 | 20 | TH127-20 | Outer Blade | 2 |
| 3 | TH127-3 | Handle Set | 2 | 21 | TH127-21 | Inner Blade | 2 |
| 4 | TH127-4 | Switch | 1 | 22 | TH127-22 | Wheel | 2 |
| 5 | TH127-5 | Throttle Trigger | 1 | 23 | TH127-23 | Gearbox Assy | 1 |
| 6 | TH127-6 | Throttle Cable | 1 | 30 | TH127-30 | Wheel Axle | 1 |
| 7 | TH127-7 | Switch Wire | 1 | 38 | TH127-38 | Pin | 4 |
| 8 | TH127-8 | Star Nut | 2 | 39 | TH127-39 | “R” Clip | 4 |
| 9 | TH127-9 | Round Sq Neck Bolt M6x40 | 2 | 40 | TH127-40 | Round Sq Neck Bolt M6x25 | 2 |
| 10 | TH127-10 | Bracket | 1 | 41 | TH127-41 | E-Type Card Ring+Flat Pad 10 | 2+4 |
| 11 | TH127-11 | Clutch Housing | 1 | 42 | TH127-42 | M6 Nut Dish | 2 |
| 12 | TH127-12 | Holder on Splint | 1 | 43 | TH127-43 | Hex Bolt M6x25 | 5 |
| 13 | TH127-13 | Holder | 1 | 44 | TH127-44 | Flat Pad+Elastic Pad 6 | 8+8 |
| 14 | TH127-14 | Holder under Splint | 1 | 45 | TH127-45 | Hex Bolt M6x16 | 5 |
| 15 | TH127-15 | Shaft | 1 | 46 | TH127-46 | Nut M6 | 8 |
| 16 | TH127-16 | Oil Bearing | 2 | 47 | TH127-47 | Round Sq Neck Bolt M6x35 | 4 |
| 17 | TH127-17 | Aluminium | 1 | 48 | TH127-48 | Hex Screw M5x25 | 6 |
| 18 | TH127-18 | Guard | 1 | 50 | TH127-50 | Hex Screw M6x30 | 4 |
PARTS DIAGRAM- ENGINE
| No | Part No | Description | Qty | No | Part No | Description | Qty |
| 1 | TH127-1E | Bolt M5x16 | 1 | 36 | TH127-36E | Bolt M5x20 | 1 |
| 2 | TH127-2E | Ait Filter Cover | 1 | 39 | TH127-39E | Engine Cowl | 1 |
| 3 | TH127-3E | Filter Cover | 1 | 39a | TH127-39EA | Bolt M5x12 | 1 |
| 4 | TH127-4E | Fiter | 1 | 43 | TH127-43E | Spark Plug | 1 |
| 5 | TH127-5E | Bolt M5x55 | 1 | 45 | TH127-45E | Muffler Gasket | 1 |
| 6 | TH127-6E | Air Filter Comb Assy | 1 | 46 | TH127-46E | Muffler | 1 |
| 7 | TH127-7E | Carburettor | 1 | 47 | TH127-47E | Washer | 1 |
| 8 | TH127-8E | Carburettor Gasket | 1 | 48 | TH127-48E | Bolt M6x55 | 1 |
| 9 | TH127-9E | Boot Intake | 1 | 49 | TH127-49E | Muffler Cover | 1 |
| 11 | TH127-11E | Gasket Intake | 1 | 50 | TH127-50E | Washer | 1 |
| 17 | TH127-17E | Clutch Assy | 1 | 57 | TH127-57E | Rubber Gasket | 1 |
| 21 | TH127-21E | Coil | 1 | 58 | TH127-58E | Fuel Tank Connect Plate | 1 |
| 33 | TH127-33E | Housing-Starter Assy | 1 | 59 | TH127-59E | Fuel Tank | 1 |
| 34 | TH127-34E | Starter Gasket | 1 | 60 | TH127-60E | Bolt M5x20 | 1 |
| 35 | TH127-35E | Starter Assy | 1 | 61 | TH127-61E | Fuel Tank Protector Plate | 1 |
EC DECLARATION OF CONFORMITY
Declaration of Conformity
Pursuant to the regulations of the following EC Directives:
- Electromagnetic Compatibility Directive 2004/108/EC
- Machinery Directive 2006/42/EC
Handy Distribution Ltd hereby declares that the product:
Machine Type: Petrol Mini Tiller
Machine Model: THPMT
Engine Displacement: 42.7cm3
Mass in Kg: 15kg
Cutting Width: 300mm
Max Engine Speed: 8000/min
Engine Power: 1.2kW
Conforms to the main safety requirements of the EC Directives listed Above.
This conformity is based on the following standards and normative documents:
EN709: 1997+A1:1999+A2:2009
Measured Sound Power Level: 107.47 dB(A)
Guaranteed Sound Power Level: 110 dB(A)
The responsible person, based within the EC, is identified below
Name: Mr Simon Belcher
Title: Managing Director
Company: Handy Distribution Ltd
Address: Hobley Drive, Stratton St Margaret, Swindon, Wiltshire. SN3 4NS
Signature: Date 15th November 2009
To order spare parts and see the complete range of garden machinery and garden equipment from Handy, visit: www.thehandy.co.uk
![]()


