
![]()
INSTRUCTION MANUAL
TWO STROKE PETROL MINI TILLER
MODEL NO: THPMT — PRODUCT NO: 193820002
ORIGINAL INSTRUCTIONS
ASSEMBLY REQUIRED SAVE THESE INSTRUCTIONS SPARES & SUPPORT: 01793 333212
![]()
FOR YOUR SAFETY
WARNING: ENSURE THE SAFETY INSTRUCTIONS ADHERED TO AT ALL TIMES.
Please read & understand this manual, paying attention to the safety instructions, before use.
Incorrect use of the product could put the operator or machine in danger. Whilst every effort has been made to ensure the accuracy of information contained in this manual, our policy of continuous improvement determines the right to make modifications without prior warning.
Images used are for illustration purposes only
V6 20-08-2021
Copyright Notice
Copyright © Handy Distribution
Permission is granted to reproduce this publication for personal & educational use only. Commercial copying, redistribution, hiring or lending is prohibited. No part of this publication may be stored in a retrieval system or transmitted in any other form or means without written permission from Handy Distribution.
In all cases this copyright notice must remain intact.
ASSEMBLY IS REQUIRED
This product requires assembly before use. See the “Assembly” section for instructions. Please check that all parts required for the assembly of this spreader are included. If for any reason you believe a part for the assembly is missing or damaged, please contact us.
SPECIFICATION
The manufacturer reserves the right to change the product specification and livery according to continued product improvements.
| Model | THPMT |
| Product Number | 193820002 |
| Engine | 1.2kw Air Cooled Low Maintenance |
| Displacement | 42.7cc |
| Fuel Tank Capacity | 1200m1 |
| Usage Time for Full Tank | Approx. 60mins |
| Tines | 6 Teeth/22.5cm Diameter |
| Tilling Width | 25cm |
| Tilling Depth | 20cm |
| Unleaded Petrol / 2-Stroke Oil Mixture | Synthetic or Semi Synthetic Oil – 50:1 Mineral Oil – 25:1 |
| Starting System | Recoil |
| Guaranteed Sound Level (LwA) | <110dB(A) |
| Net Weight | 15kg |
Consistent with our policy of continuous improvement, The Handy reserves the right to change the design and configuration of any of its products without notice or obligation. Therefore, please treat the text and images in this manual for illustrative purposes only. They may in no case serve as a basis for any legal claim. If you require any assistance with regards to the contents or operation of your machine, please contact us:
Tel: 01793 333212, option 2
Email: [email protected]
Opening Hours Weekdays: (CLOSED WEEKENDS & BANK HOLIDAYS)
February to October 8:30am – 5:30pm – November to January 8:30am – 5:00pm
IMPORTANT INFORMATION
INTENDED USE
The basic version of the equipment is a tiller intended for private use, i.e. for use in home gardening environments. The tiller is designed for cultivating, turning and loosening soil on small to medium vegetable gardens, flower beds or allotment plots. It is not designed to remove turf, dig holes, trenches or excavate areas. For private use, whose annual operating time generally does not exceed 2 hours on each use, during which the machine is primarily used to maintain small-scale, residential gardens or allotments. Public facilities, sporting halls, and agricultural / forestry applications are excluded. These operating instructions must be kept & referred to in order to ensure that the equipment is properly used & maintained. The instructions contain valuable information on operating, maintenance & servicing conditions.
![]() WARNING
WARNING
Due to the high risk of bodily injury to the user, the equipment may not be used to remove turf. For safety reasons, the tiller may not be used as a drive unit for other equipment or toolkits of any kind,
unless specifically advised to do so by the manufacturer. The equipment is to be used only for its prescribed purpose. Any other use is deemed to be a case of misuse. The user/operator and not the manufacturer will be liable for any damage or injuries of any kind caused as a
result of this. Please note that our equipment has not been designed for use in commercial, trade or industrial applications. Our warranty will be 90 days from the original date of sale for commercial, trade or industrial
businesses or for equivalent purposes.
GENERAL SAFETY INSTRUCTIONS
Read and understand the owner’s manual and labels affixed to the product. Learn its application and limitations as well as the specific potential hazards. Retain these instructions for future reference. The operator is responsible for following the warnings & instructions in this manual and on the product.
SAFETY SYMBOLS
| Read & understand operator’s manual before using the machine. Failure to follow instructions could result in death or serious injury. Please keep in a safe place for future reference. | Always wear eye and ear protection | ||
| Keep all bystanders & animals awayfrom the machine during operation.If approached, stop the machine immediately. | Always wear gloves to protect your hands. SHARP ROTATING TINES | ||
| Risk of Carbon Monoxide Poisoning. Ensure working area is correctly ventilated. | Wear foot protection or sensible shoes when using the machine | ||
| Fire Risk Fire and its vapors are extremely flammable & explosive. Fire or explosion can cause severe burns or death. | Do not expose to rain or damp conditions. | ||
| No smoking | Do not use near a flame, or sparks | ||
| Hot Surface. Running engines produce heat. Engine parts, especially the exhausbecome extremely hot. Severe thermal burns can occur on contact | Moving Parts Rotating parts can contact or entangle hands, feet, hair, clothing or accessories. Traumatic amputation or severe laceration can result | ||
| Keep guards in place and in working order. Replace damaged, missing or failed parts before using it. | Safety alert symbol. Used to alert you to potential personal injury hazards. Obey all safety messages that follow this symbol to avoid possible injury. | ||
| Indicates an imminently hazardous situation which, if not avoided, will result in serious injury | Indicates a potentially hazardous situation which, if not avoided, could result in serious injury | ||
| Indicates a potentially hazardous situation which, if not avoided, mayresult in minor or moderate injury. | CAUTION | Used without the safety alert symbol indicates a potentially hazardous situation which, if not avoided, may result in property damage. | |
| CE & UKCA Marking – the product meets demand and regulations set by the EU & UK | Noise Level – See label on machine |
![]() Before you put the machine into operation, you must read this instruction manual.
Before you put the machine into operation, you must read this instruction manual.![]() When using this machine, observe the following safety instructions to exclude the risk of personal injury or material damage. Please also observe the special safety instructions in the respective chapters. Where applicable, follow the legal directives or regulations for the prevention of accidents in relation to the use of this machine.
When using this machine, observe the following safety instructions to exclude the risk of personal injury or material damage. Please also observe the special safety instructions in the respective chapters. Where applicable, follow the legal directives or regulations for the prevention of accidents in relation to the use of this machine.![]() WARNING When using petrol tools, basic safety precautions, including the following, should always be followed to reduce the risk of serious personal injury and/or damage to the unit.
WARNING When using petrol tools, basic safety precautions, including the following, should always be followed to reduce the risk of serious personal injury and/or damage to the unit.
TRAINING![]() The operator must receive proper training in the use, adjustment and operation of the machine, including prohibited operations.
The operator must receive proper training in the use, adjustment and operation of the machine, including prohibited operations.
- Read the instructions carefully. Be familiar with the controls & proper use of the equipment. Spend time to familiarise yourself with your machine before each use.
- Never allow children or people unfamiliar with these instructions to use the machine. Local regulations can restrict the operator age.
- This machine is not intended for use by persons (including children) with reduced physical, sensory or mental capabilities, or lack of experience and knowledge, unless they have been given supervision or instruction concerning use of the machine by a person responsible for their safety.
- Never work while people, especially children, or pets are nearby.
- Keep in mind that the operator or user is responsible for accidents or hazards occurring to other people or their property.
SAFETY INSTRUCTIONS FOR WORKING WITH THE TILLER
- Do not leave engines running in enclosed spaces, where dangerous carbon monoxide could accumulate.
- Operate in daylight or good artificial lighting. If possible, do not use on overly wet ground.
- Ensure good stability on slopes. Always operate across the slope, never up and down.
- Be particularly careful if changing direction of travel on the slope.
- Do not operate on steep slopes.
- Operate whilst walking, do not run.
- Be particularly careful when you turn or when you pull the machine towards you.
- Stop the engine and in turn the tines if it is to travel across other areas and must be transferred to/from working area.
- Never use the machine with damaged safety protection guards.
- Do not change the engine regulation set up.
- Carefully start the engine. Keep your feet clear of the tines.
- Never reach behind or under the rotating parts with hands or feet.
- Never lift or carry the machine while the engine is on.
- Switch the engine off and pull the spark plug cap off before unblocking or removing obstacles from the tines:
- Before releasing blockages.
- Before inspecting, cleaning or working on the machine.
- After hitting an obstruction. Before restarting, search for damage on the machine and make repairs as necessary. If the machine starts vibrating unusually, it should be inspected immediately by an Approved Service Dealer.
- Before refueling.
- When switching off the engine, the engine switch needs to be in position OFF (position OFF or O).
WORK AREA
- Keep work area clean and well lit. Cluttered and dark areas invite accidents.
- Check the landscape where the machine will be used and remove all objects such as stones, toys, sticks and wires, which could be caught and thrown away from the work area. Damage of the machine or operator’s injury could be caused.
- Do not operate this machine in explosive atmospheres, in the presence of flammable liquids, gases or dust. Machines create sparks which may ignite the dust or fumes.
- Keep children & bystanders away while operating the machine. Distractions can cause you to lose control.
PERSONAL SAFETY
- This machine is not intended for use by persons (including children) with reduced physical, sensory or mental capabilities, or lack of experience and knowledge, unless they have been given supervision or instruction concerning use of the machine by a person responsible for their safety.
- Children should be supervised to ensure that they do not use or play with the machine.
- Stay alert, watch what you are doing and use common sense when operating this machine.
- Do not use this machine while you are tired, ill or under the influence of drugs, alcohol, or medication. A moment of inattention while operating this machine can cause you to lose control & may result in series personal injury.
- Do not overreach. Always keep proper footing and balance. This enables better control of the tool in unexpected situations.
- Remove any adjusting tools before turning the machine on. A tool that is left attached to a rotating part of the machine may result in personal injury.
- Use safety equipment. Always wear eye, ear and foot protection. Safety equipment such as a dust mask, non-skid safety shoes, hard hat, or hearing protection used for appropriate condition will reduce personal injuries.
- Dress properly. Do not wear loose clothing or jewellery. Keep your hair, clothing & gloves away from moving parts. Loose clothes, jewellery or long hair can be caught in moving parts.
- Prolonged use of the machine may lead to disorders of blood circulation in hands caused by vibration. These effects can be worsened by low ambient temperatures and/or by gripping the handgrips excessively tightly. Period of use you can extend with appropriate gloves or regular breaks. Take frequent work breaks. Limit the amount of exposure per day.
PETROL TOOL USE AND CARE![]() WARNING!
WARNING!
Petrol is highly flammable and explosive.
- Never use fuel which is over 30 days old from the date of purchase.
- Store petrol in containers specifically designed for this purpose, preferably not excessively old metal versions.
- Refuel outdoors only and do not smoke while refueling.
- Add the correct fuel mixture before starting the engine. Never remove the cap of the tank or add fuel mixture while the engine is running or when the engine is hot.
- If petrol is spilled, do not attempt to start the engine but move the machine away from the area of spillage and avoid creating any source of ignition until petrol vapors have dissipated.
- Replace fuel tank & container caps securely.
- Do not operate the engine in a confined space where dangerous carbon monoxide can collect.
- Do not force the machine. Use the correct machine for your application. The correct machine will do the job better and safer at the rate for which it was designed.
- Do not use the machine if the main ON/OFF switch does not work. Any machine that cannot be controlled with the main ON/OFF switch is dangerous and must be repaired.
- Turn machine off completely before making any adjustments, changing accessories, or storing. Such preventive safety measures reduce the risks of starting the petrol tool accidentally.
- Store idle machines out of the reach of children and do not allow persons unfamiliar with the machine or these instructions to operate. Petrol machines are dangerous in the hands of untrained users.
- Maintain your machine. Check for misalignment or binding of moving parts, breakage of parts & any other condition that may affect the operation. If damaged, have the machine repaired by an Approved Service Dealer immediately. Many accidents are caused by poorly maintained machines.
- Use the machine, accessories and tool bits etc., in accordance with these instructions and in the manner intended for the particular type of petrol machine, taking into account the working conditions and the work to be performed. Use of the machine for operations different from intended could result in a hazardous situation.
PERSON PROTECTION
- In case of any injury always proceed in accordance with the principles of first aid.
- If someone is cut, cover the wound with a clean cloth & press hard to stop the flow of blood.
- Do not let petrol or oil come in contact with your skin. Keep petrol and oil away from the eyes. If petrol or oil come into contact with the eyes, wash them immediately with clean water. If irritation is still present, see a doctor immediately.
- Individuals with poor circulation who are exposed to excessive vibration may experience injury to blood vessels or the nervous system. Vibration may cause the following symptoms to occur in the fingers, hands or wrists: numbness, tingling, pain, stabbing sensation, alteration of skin colour or of the skin. If any of these symptoms occur, see a doctor. Put safety first in the case of fire:
a. If fire comes from the engine or smoke appears from anywhere other than the exhaust vent, at first distance yourself from the product to ensure your physical safety.
b. Use a dry powder fire extinguisher on the fire to prevent it from spreading.
c. A panicked reaction could result in the fire and other damage becoming more extensive.
FUELING
![]() WARNING
WARNING
YOUR MACHINE IS SUPPLIED WITHOUT ENGINE OIL OR PETROL
Operating the engine with insufficient oil within your fuel mixture, can have catastrophic consequences. Any failure caused by insufficient oil, will not be covered by the manufacturer’s warranty.
Read instructions carefully.
If you are not in receipt of your engine manual at any time, contact us prior to starting the engine.
![]()
Fuel & its vapors are very flammable. Do not use or fuel the machine near a flame, sparks, or while smoking. Allow the engine to cool for more than 3 minutes, before refueling. Never fuel the machine with engine running. Fuel the engine at least 15 metres away from your work area. Always fuel your machine outdoors.
IMPORTANT:
Fuel which is older than 30 days old can become stale and cause acid & gum deposits in the fuel system or essential carburettor components. This could result in starting issues which would not be covered by your manufacturer’s warranty. Ensure that any stored petrol/oil mixture is clearly marked in a separate appropriate canister for a maximum of 30 days if not mixed with a fuel additive. If the machine is not going to be used for a long period, drain the mixture from the fuel tank, start the engine and drain the carburettor of any remaining fuel.
TWO STROKE ENGINE OIL – FUEL MIXTURE
- Only use 2-stroke air cooled engine oil. DO NOT USE automotive or marine oil.
- Use good quality unleaded fuel. Your engine will operate with E10 graded petrol
- The machine has been designed to use unleaded petrol mixed with 2-stroke air cooled engine oil. Check the oil manufacturers guidelines to determine the correct ratio. The fuel mixture should be shaken prior to entering the machine fuel tank. The tables below indicated the mixtures required using Handy Oil. It is recommended that you use a Fuel Mixing Bottle, to ensure the correct fuel mixture is used with your machine. We recommend HANDY PARTS FUEL MIXING BOTTLE (HP-120).
| 50:1 Fuel:Oil Mixture Ratio | 25:1 Fuel:Oil Mixture Ratio | ||
| Unleaded E10 Petrol (Litre) | 2-Stroke Synthetic or Semi Synthetic Oil (ml) | Unleaded HO Petrol (Litre) | 2-Stroke Mineral Oil (ml) |
| 1 | 20 | 1 | 40 |
| 2 | 40 | 2 | 80 |
| 3 | 60 | 3 | 120 |
| 4 | 80 | 4 | 160 |
| 5 | 100 | 5 | 200 |
- Unscrew the fuel cap slowly and fill the fuel tank with your fuel mixture to a maximum of 80% capacity. This will allow the fuel tank expansion.
- Fasten the fuel cap tightly, being careful not to cross-thread. This will also prevent loosening through vibration during use. Wipe away any spillage, with an appropriate material.
- If the machine has continued leaks, the product should not be started. Never use the machine with damaged ignition cable or spark plug cap, as there is a risk of sparks.
- Fuel which is older than 30 days old can become stale and cause acid & gum deposits in the fuel system or essential carburetor components. This could result in starting issues which would not be covered by your manufacturer’s warranty.
IMPORTANT
✓ Ensure that any stored petrol/oil mixture is clearly marked in a separate appropriate canister for a maximum of 30 days.
✓ If the machine is not going to be used for a long period, drain the mixture from the fuel tank, start the engine and drain the carburettor of any remaining fuel. (See Maintenance for further instruction), dispose of any unwanted 2-stroke mixture at an authorised recycling point.
ASSEMBLY
Before commencing assembly, unpack the contents of the box and check that nothing is damaged.
![]() WARNING
WARNING
Unplug the spark plug before any repairs or maintenance operations.
DO NOT attempt to start this machine without it first being FULLY assembled.
HANDLE BARS
- Attach the upper handle to the lower handle frame. and fasten with the two handle knobs, bolts and washers. The handle knob & washer should be located on the inside with the bolt on the outside of the handlebars.
- Take care not to pinch the throttle cable or switch wires.
- Tighten the handle knobs to secure in place.
- Readjust the throttle cable so that they are smooth and tight against the handlebar assembly and ensure that the switch wires are fully connected.
WHEEL BRACKET ASSEMBLY
If the wheel bracket assembly is not already fixed, follow these steps.
- With the unit on its side, place the wheel bracket assembly on the underside of the tine guard.
- Make sure the square shoulder of the fixing bolts is pushed through the slotted holes in the wheel bracket.
- Tighten the handlebar knob – but do not over-tighten.
- Remove the rubber tine end protectors.
OPERATION
Move the tiller to the work area before starting the engine. Transport by pushing on the wheels, not the tines.
GEARBOX OIL
Oil is supplied in the machines gearbox at the factory. After the first 25 hours of use, and then after every 50 hours of use, we recommend that the gearbox oil level is checked and topped up with SW15-40 oil. The gearbox holds a maximum of 100ml of oil. Regularly check for oil leaks coming from thegearbox.
STARTING THE ENGINE:
- Move the On/Off Switch on the right handlebar to ON.
- Move the choke lever to the Choke Closed position
- Press the primer bulb 6-8 times until you see fuel flow through the transparent hose from the fuel tank to the carburetor.
- Put your left foot on the frame (if you are right-handed) to help steady the machine and pull the starter rope until the engine fires – it should only take a few pulls.
- Allow the engine to run for 5 seconds and then move the choke lever halfway back towards Choke Open position . Allow the engine to run for another 5 seconds to warm up, then move the choke lever fully to the Choke Open position.
- When starting a warm engine, there is no need to prime the engine and the choke lever should be left in the Choke Open position.
USING THE MACHINE
- With the engine running and the tines off the ground, gradually increase the engine speed by pulling up the throttle control lever.
- Holding the handlebars firmly, lower the tiller tines onto the soil. As the tines rotate, pull back on the
handles so that the tines can penetrate the soil. Once the ground has been broken, continue forwards at a moderate pace until you are familiar with the controls and the handling of the tiller. - Pull the tiller backwards to improve the depth of cultivation and reduce your effort, being mindful not to pull the machine on to yourself.
TINE / WHEEL BRACKET DEPTH ADJUSTMENT
If the tines are digging too deep or not enough, adjust following the below guidelines:
- Tine adjustment will vary depending on the type of soil being cultivated and how it will be used.
- Stop the engine and loosen the two handlebar knobs on the tine guard.
- Slide the wheel bracket assembly down for shallower digging and up for deeper.
- Tighten the wing nuts again, making sure that the carriage bolts are properly seated through the bracket.
- To transport, slide the wheel bracket assembly all the way down, tilt the unit back so that the tines clear the ground and push to the next location using the wheels.
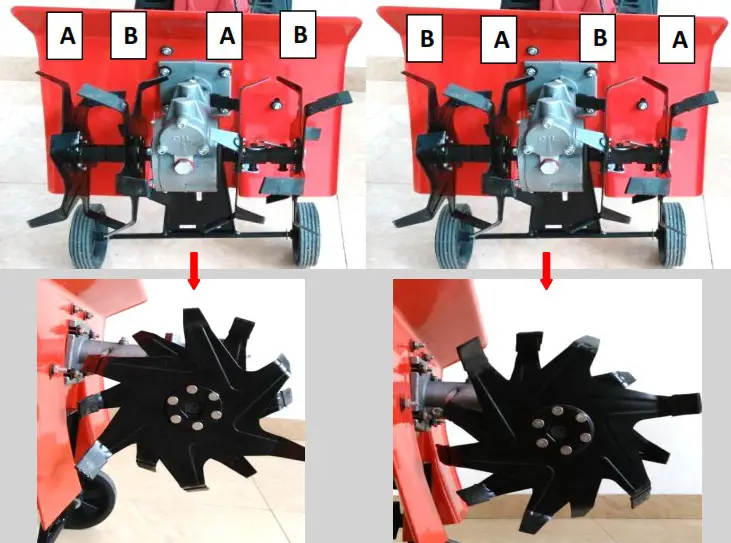
The tines are marked A for right and B for left. The difference is the rotation direction of blade.
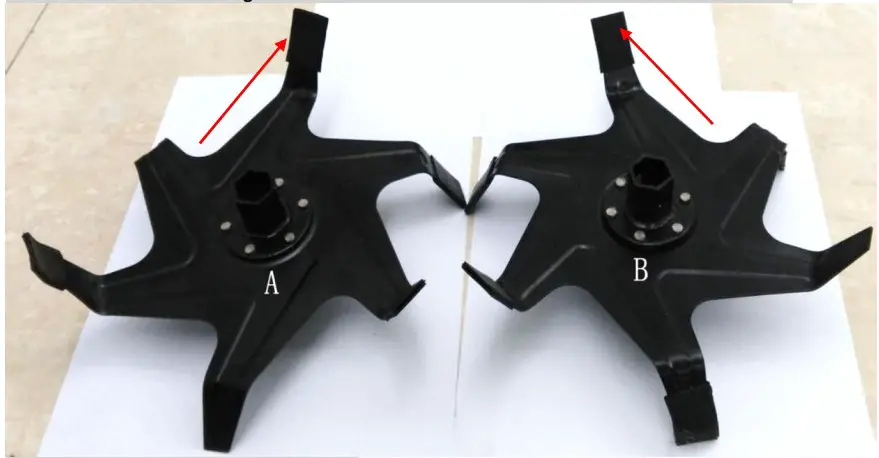
You can assembly the blades in two ways.
TO ADJUST THE HANDLE BAR HEIGHT
- Remove the knobs and mounting bolts and reinstall them through either the top or bottom holes in the handlebar assembly.
- Ensure that you tighten the handle knobs again securely.
HANDLING TIPS
- Adjust the handlebar height to a comfortable position (usually waist height is recommended).
- If the machine jerks forward while tilling, press downwards on the handlebars; if the machine will not move forward, move the handlebars from side to side.
Turn: The proper method of negotiating a turn is to lower the handlebars to make the gravity of the tiller move backward-centre, towards the rear and then make the turn. This will permit a turn with relative ease.
![]() CAUTION
CAUTION
Operating the tiller on gradients could cause the tiller to tip over. Allowing anyone to operate this tiller without proper instruction may result in injury. Wear sturdy, full coverage footwear. Operating this tiller with bare feet, or with open toe shoes or sandals
increases your risk of injury. Wear eye and eye PPE.
Do not use the tiller at night or in poor light. Be sure to transport the tiller from one place to another by two people, if a carrier is not available. When the tines are clogged with mud, stones etc, immediately stop the engine and clean the tines in a safe place.
Be sure to wear heavy gloves when cleaning the tines. To prevent damage, check the tiller for any signs of damage or other faults when the tiller is operated.
MAINTENANCE
Keeping your tiller in top running condition will prolong its life and help you obtain optimum performance whenever you wish to till your garden.
CLEANING
![]() CAUTION Do not use a water hose or pressure washer to clean the engine. Water can damage the engine or contaminate the fuel system.
CAUTION Do not use a water hose or pressure washer to clean the engine. Water can damage the engine or contaminate the fuel system.
- Keep your machine clean. Thoroughly clean the machine at the end of each use, paying attention to stones or mud in and around the tines.
- Clean the engine regularly with a cloth or brush. Keep the cooling system (blower housing area) clean to
permit proper air circulation which is essential to engine performance and life. Be certain to remove all dust, dirt and combustible debris from exhaust area.
AIR FILTER
A dirty air filter will block air flow into the carburettor. To prevent carburettor malfunction, service the air filter regularly. Service more frequently when operating the engine in extremely dusty areas.
![]() WARNING
WARNING
Never use gasoline or low flash point solvents to clean the air cleaner element. A fire or explosion could occur.
![]() CAUTION
CAUTION
Never run the engine without air filter or rapid engine wear will be the result.
- Check and clean the Air Filter regularly to ensure optimum performance.
- Remove the air filter cover, take out the filter and wash in lukewarm water. Allow to dry completely and then refit. If the air filter is damaged in any way, replace with an authorised replacement part.
SPARK PLUG
Check the spark plug periodically.
To ensure proper engine operation, the spark plug must be properly gapped and free of deposits.
- Remove the spark plug cap. Remove the spark plug with a suitably size spanner or spark plug spanner. Take care not to allow dirt into the cylinder whilst the spark plug is removed. Plug the hole with a clean rag (not tissue) during the operation.
 WARNING If the engine has been running, the exhaust (muffler) will be very hot. Be careful not to touch the exhaust (muffler).
 - Visually inspect the spark plug. Discard it if the insulator is cracked or chipped. If the spark plug is clogged
with carbon, clean thoroughly with a wire brush or replace with a Champion RDJ7Y or equivalent spark plug. - Measure the plug gap with a feeler gauge. The gap should be 0.50 (0.020 in), correct as necessary by bending the side electrode. 0.50mm
- Attach the plug washer, thread the plug in by hand to prevent cross-threading. 5. When mounting a new spark plug, you should screw 1/2 more thread with the wrench after the washer is compressed. If you are mounting an old one, you should only screw 1/8-1/4 more thread.
CAUTION The spark plug must be securely tightened. An improperly tightened plug can become very hot and possibly damage the engine. Never use a spark plug with an improper heat range.
IDLE ADJUSTMENT SCREW
The tines should not rotate when the engine is idling (throttle control lever not in use). If they do, turn the adjustment screw anti-clockwise a few degrees. The adjuster is located just above and to the right of the primer bulb. If after adjustment, the tines still rotate, it is recommended that the machine is inspected by your local approved service/warranty dealer.
STORAGE & TRANSPORT
The following steps should be taken to prepare your tiller for storage.
- Empty the fuel tank.
a. Empty the fuel tank with a suction pump. CAUTION Do not drain the petrol in enclosed spaces, in close proximity of open fire, etc.
Do not smoke! Petrol fumes can cause explosion or fire.
b. Start the engine and let it run until it has used up all remaining petrol and stalls.
c. Remove the spark plug. Use an oil can to fill approx. 20 ml oil into the combustion chamber. Operate the starter to evenly distribute the oil in the combustion chamber. Replace the spark plug. - Clean dirt or dust from the cutter blade and the outside of the machine and wipe with an oily cloth. Store in a dry place.
- Store in a dry, clean and frost-protected place, out of reach of unauthorised persons and also direct sunlight.
![]() CAUTION
CAUTION
The engine must have completely cooled down before storing.
NOTE: When storing any type of power equipment in an unventilated or material storage shed,
- Care should be taken to rust-proof the equipment. Using a light oil or silicone, coat the equipment, especially cables and all moving parts.
- Be careful not to bend or kink cables.
DO NOT STORE fuel for longer than 30 days. Fuel can become stale and cause damage to the engine carburettor, which is not covered by the machines manufacturer’s warranty.
ADJUSTING AND CHANGING THE TINES
Replace all four tines at the same time because they will wear evenly during normal use. Work on one side at a time.
- Put the On/Off switch in the STOP position and disconnect the spark plug lead.
- Remove the clevis pin clips and clevis pins from the tine.
- Remove the tines from the shaft.
- Clean and using maintenance oil, lubricate the shaft.
- The tines are stamped L or R to identify their position on each side of the gearbox when facing the front of the unit.
- Replace the tines onto the shaft with the hubs of the tines facing each other.
- Before you reinstall the clevis pins and pin clips, ensure that the tips on the tines are staggered when compared to each other.
- Repeat this procedure on the opposite side. When installed correctly, there will be an R and L tine on both sides of the gearbox; these letters will line up in the same direction for each side.
ONLY USE MANUFACTURER APPROVED PARTS
If a part needs replacing, only use the manufacturer’s original parts. Non-original replacement parts will invalidate your warranty and may result in a safety hazard or poor operation.
TOUBLE SHOOTING
| PROBLEM | POSSIBLE CAUSES | REMEDIAL ACTION |
| Engine does not start | Throttle choke is not in the correct position | Move throttle choke to correct position. |
| Fuel tank is empty. | Fill tank with fuel: refer to ENGINE OWNERS MANUAL. | |
| Spark plug loose. | Tighten spark plug. | |
| Spark plug wire loose or disconnected from plug. | Install spark plug wire on spark plug. | |
| Spark plug gap is incorrect | Set correct gap between electrodes. | |
| Spark plug is defective. | Install new, correctly gapped plug. | |
| Carburettor is flooded with fuel. | Remove air cleaner element and pull starter rope continuously until carburettor clears itself and install air cleaner element. | |
| Motor speed drops off | Depth of cultivation is too great | Set to smaller depth of cut |
| Tines blocked | Pull out spark plug connector, remove blockage. | |
| Air filter clogged | Clean air filter: refer to relevant section in manual | |
| Clutch not working | Engine speed is too low | Open throttle, increase engine speed. |
| Belt too long service dealer | Replace – visit local approved | |
| Spring failure | Replace – visit local approved service dealer | |
| Bearing inside gearbox failed | Replace – visit local approved service dealer | |
| Abnormal noise from gearbox | Faulty | Replace – visit local approved service dealer |
| Tines stop rotating | Belt has come off pulley | -Refit belt to pulley visit local approved service dealer. |
PARTS DIAGRAM – MACHINE
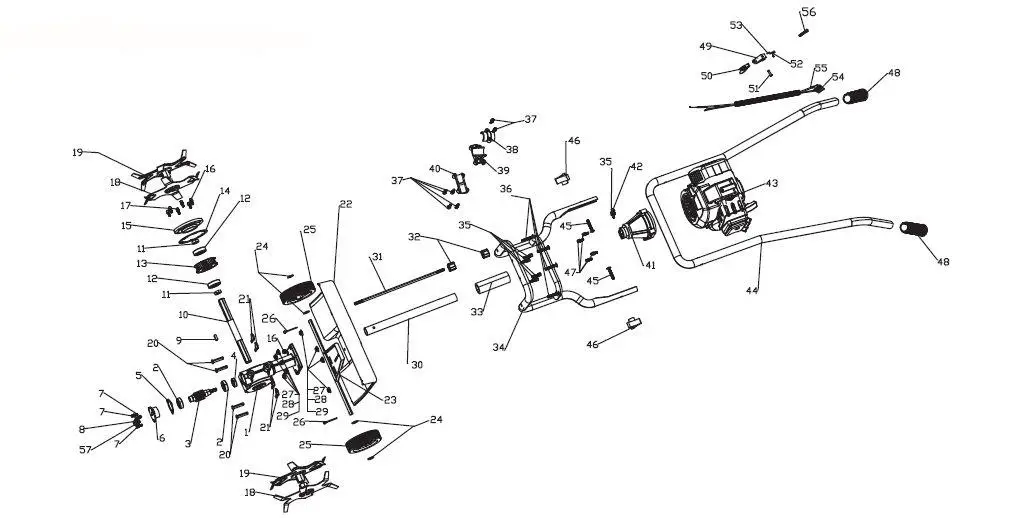
PARTS LIST MACHINE
| NO | PART NO | DESCRIPTION | QTY | NO | PART NO | DESCRIPTION | QTY |
| 1 | TH127-23 | Gearbox | 1 | 30 | TH127-17 | Aluminium Outer Shaft | 1 |
| 2 | TH205-37 | Bearing 6003 | 2 | 31 | TH127-15 | Driveshaft | 1 |
| 3 | TH205-38 | Worm | 1 | 32 | TH127-16 | Oil Bearing | 2 |
| 4 | TH205-39 | Oil Seal | 1 | 33 | TH127-19 | Sponge Cover | 1 |
| 5 | TH205-40 | Worm Cover Gasket | 1 | 34 | TH127-10 | Front Bracket | 1 |
| 6 | TH205-41 | Worm Cover | 1 | 35 | TH127-43 | Hex Bolt M6x25 | S |
| 7 | TH205-42 | Hex Bolt M5x16 | 3 | 36 | TH127-47 | Square Neck Bolt M6x35 | 4 |
| 8 | TH205-43 | Hex Bolt M12x12 | 1 | 37 | TH127-48 | Hex Bolt M5x25 | 6 |
| 9 | TH205-44 | Flat Key | 1 | 38 | TH127-13 | Holder Under Splint | 1 |
| 10 | TH205-45 | Cutter Shaft | 1 | 39 | TH127-12 | Holder | 1 |
| 11 | TH205-46 | Oil Seal | 2 | 40 | TH127-14 | Holder On Splint | 1 |
| 12 | TH205-47 | Bearing 6004 | 2 | 41 | TH127-11GM | Clutch Housing | 1 |
| 13 | TH205-48 | Worm Gear | 1 | 42 | TH2OS-57 | Hex Bolt M5x12 | 1 |
| 14 | TH205-49 | Worm Gear Cover Gasket | 1 | 43 | Engine | See Engine Parts List | 1 |
| 15 | TH205-50 | Worm Gear Cover | 1 | 44 | TH127-2GM | Rear Bracket | 1 |
| 16 | TH205-51 | Hex Bolt M6x20 | 6 | 45 | TH205-58 | Square Neck Bolt M6x45 | 2 |
| 17 | TH205-52 | Hex Bolt M6x18 | 1 | 46 | TH127-8 | Handle Star Nut | 2 |
| 18 | TH127-20 | Left Tine A | 2 | 47 | TH127-50 | Hex Bolt M6x30 | 4 |
| 19 | TH127-21 | Right Tine B | 2 | 48 | TH127-3GM | Handle Grip | 2 |
| 20 | TH127-38 | Pin | 4 | 49 | TH205-59 | Throttle Switch Holder | 1 |
| 21 | TH127-39 | R Clip | 4 | 50 | TH127-50 | Throttle Switch | 1 |
| 22 | TH127-18 | Front Cover | 1 | 51 | TH205-60 | Retainer Pin | 1 |
| 23 | TH127-30 | Wheel Axle | 1 | 52 | TH205-61 | Return Spring | 1 |
| 24 | TH205-53 | Washer | 4 | 53 | TH205-62 | E-Type Clip | 1 |
| 25 | TH127-22 | Wheel Axle | 2 | 54 | TH127-4 | Ignition Switch Assembly | 1 |
| 26 | TH205-54 | Split Pin | 2 | 55 | TH127-6 | Throttle Cable Assembly | 1 |
| 27 | TH205-55 | Washer | 8 | 56 | TH205-63 | Hex Bolt M5x35 | 1 |
| 28 | TH205-56 | Spring Washer | 8 | 57 | TH205-64 | Gasket | 1 |
| 29 | TH127-46 | Nut M6 | 8 | ||||
NOTE: Parts Lists are supplied for information purposes only, not all parts are stocked individually & we recommend you contact our Spares Team on 01793 333212 for expert advice.
PARTS DIAGRAM – ENGINE
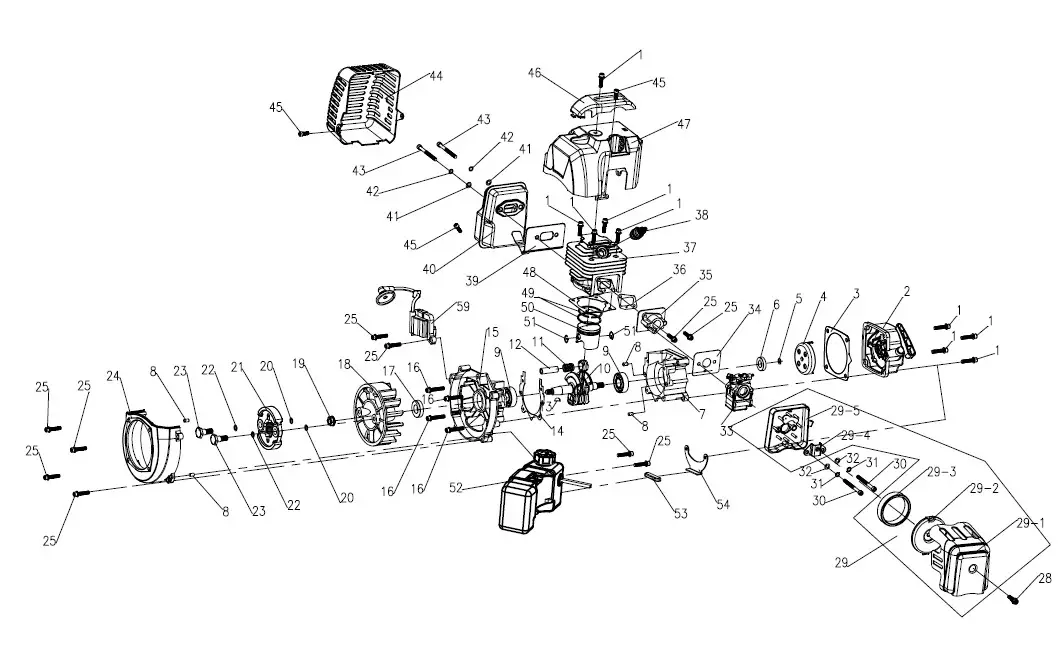
PARTS LIST – ENGINE
| NO | PART NO | DESCRIPTION | QTY | NO | PART NO | DESCRIPTION | QTY |
| 1 | TH127-60E | Hex Bolt M5x20 | 9 | 29-1 | TH127-2E-1 | Air Filter Housing | 1 |
| 2 | TH127-35E | Starter Assembly | 1 | 29-2 | TI-1127-3E | Air Filter Cover | 1 |
| 3 | TH127-34E | Starter Gasket | 1 | 29-3 | TH127-4E | Air Filter | 1 |
| 4 | TH205-1 | Starter Pawl | 1 | 29-4 | TH205-23 | Air Filter Bracket | 1 |
| 5 | TH205-2 | Washer | 1 | 29-5 | TH127-6E | Air Filter Base | 1 |
| 6 | TH205-3 | Oil Seal 12x22x7 | 1 | 30 | TH127-SE | Hex Bolt MSxSS | 2 |
| 7 | TH205-4 | Engine Case (Right) | 1 | 31 | TH205-24 | Spring Washer 5 | 2 |
| 8 | TH205-5 | Pin 5×10 | 4 | 32 | TH205-25 | Flat Washer | 2 |
| 9 | TH205-6 | Bearing 6202 | 2 | 33 | TH127-7E | Carburettor Assembly | 1 |
| 10 | TH205-7 | Crankshaft Assembly | 1 | 34 | TH127-8E | Carburettor Gasket | 1 |
| 11 | TH205-8 | Needle Roller Bearings 10x13x18 | 1 | 35 | TI-1205-26 | Intake Pipe | 1 |
| 12 | TH205-9 | Piston Pin | 1 | 36 | TH127-11E | Intake Gasket | 1 |
| 13 | TH205-10 | Woodruff Key 3x5x12 | 1 | 37 | TH205-27 | Cylinder | 1 |
| 14 | TH205-11 | Crankshaft Gasket | 1 | 38 | WPL7T | Spark Plug | 1 |
| 15 | TH205-12 | Engine Case (Left) | 1 | 39 | TH127-45E | Muffler Gasket | 1 |
| 16 | TH205-13 | Hex Bolt M5x35 | 4 | 40 | TH127-46E | Muffler | 1 |
| 17 | TH205-14 | Oil Seal 15x30x7 | 1 | 41 | TI-1127-47E | Washer | 2 |
| 18 | TH205-15 | Flywheel | 1 | 42 | TH205-28 | Spring Washer 6 | 2 |
| 19 | TH205-16 | Hex Bolt M8x1.25 | 1 | 43 | TH127-48E | Hex Bolt M6x55 | 2 |
| 20 | TH205-17 | Flat Washer | 2 | 44 | TH127-49E | Muffler Cover | 1 |
| 21 | TH127-17E | Clutch Assembly | 1 | 45 | TH127-39EA | Hex Bolt M5x12 | 3 |
| 22 | TH205-18 | Washer | 2 | 46 | TH205-29GM | Top Cover | 1 |
| 23 | TH205-19 | Screw M8x24 | 2 | 47 | TH127-39EA | Cylinder Cover | 1 |
| 24 | TH205-20 | Clutch Cover | 1 | 48 | TH205-30 | Cylinder Gasket | 1 |
| 25 | TH205-21 | Hex Bolt M5x25 | 10 | 49 | TH205-31 | Piston Ring | 2 |
| 28 | TH127-1E | Hex Bolt M5x16 | 1 | 50 | TH205-32 | Piston | 1 |
| 29 | TH205-22-1 | Air Filter Assembly | 1 | 51 | TH205-33 | Piston Pin Retaining Ring | 2 |
| 52 | TH205-34 | Fuel Tank | 1 | ||||
| 53 | TH205-35 | Tank Plate Rubber | 1 | ||||
| 54 | TH205-36 | Tank Plate | 1 | ||||
NOTE: Parts Lists are supplied for information purposes only, not all parts are stocked individually & we recommend you contact our Spares Team on 01793 333212 for expert advice.
GJ HANDY & CO LTD USER WARRANTY POLICY
Users Statement of Warranty
Each new machine is warranted against defective material or assembly of material under normal usage. The warranty applies to the original purchaser and covers faulty parts and the labour involved in replacing and repairing those parts, which are of original manufacture.
Period of Warranty
The Handy (Petrol & Electric only), Webb (excludes Dynamic, Heritage, Legacy), Sanli Engine
a) 2 years from the original date of sale to the first domestic user.
b) 90 days from the original date of sale to the professional/commercial user.
c) 90 days from the original date of sale when used for hire.
d) A reduced warranty period of 90 days applies to those items which are subject to normal wear and tear (e.g. but not limited to wheels, tyres, cutter bars, cylinders, cutting blades, blade boss, belts, cables, nylon line & spool, collection bags, spark plugs).
e) Engines are supplied with a separate warranty to the machine. The engine manufacturers warranty statement which will be supplied within the engine instruction manual. All enquiries and warranty repairs should be discussed with the engine manufacturer or approved warranty repair dealer.
f) 90 days from the original date of purchase for Replacement Spare Parts (unless normal wear & tear component, which are covered for 30 days).
g) All machines’ must be serviced within the first 12 months from the original date of purchase to comply with the warranty (if applicable), failure to do so will invalidate the 2nd year of the warranty.
Webb Dynamic, Heritage & Legacy, Handy (All non-Petrol & Electric), Mowerland,
Q-Garden
a) 1 year from the original date of sale to the first domestic user.
b) 90 days from the original date of sale to the professional/commercial user.
c) 90 days from the original date of sale when used for hire.
d) A reduced warranty period of 90 days applies to those items which are subject to normal wear and tear (e.g. but not limited to wheels, tyres, cutter bars, cylinders, cutting blades, blade boss, belts, cables, nylon line & spool, collection bags, spark plugs).
e) Engines are supplied with a separate warranty to the machine. The engine manufacturers warranty statement which will be supplied within the engine instruction manual. All enquiries and warranty repairs should be discussed with the engine manufacturer or approved warranty repair dealer.
f) 90 days from the original date of purchase for Replacement Spare Parts (unless normal wear & tear component, which are covered for 30 days).
All warranty repairs must be undertaken by an authorised service dealer. These dealers have been accredited by GJ Handy & Co Ltd and agree to only use genuine parts and follow our repair procedures.
Not covered by this warranty
a) The warranty policy does not cover any depreciation or damages caused by ordinary wear, rusting or corrosion, lack of correct maintenance or operation, misuse, abuse, lack of transportation or accident.
b) The warranty policy does not cover any costs necessary for the standard periodic maintenance services instructed by the operator’s manual, or service parts replacement which would include oil, filters, tyres, belts, brake linings, fuses, blades, seals and other service parts unless it can be proven that the item has evidence of faulty manufacture.
c) The warranty policy will not cover failure or damage caused as a result of parts or accessories being modified without the written approval of GJ Handy & Co Ltd.
d) The warranty policy will not cover the unit if non-genuine parts have been fitted and as a result damage has occurred to the unit.
e) The warranty policy is non-transferable and is only applicable to the original purchaser.
Disclaimer
a) This warranty is only a remedy for defect of products. GJ Handy & Co Ltd will never warranty in terms of the merchantability or the fitness for a particular purpose.
b) No person is authorised to make any warranties, representations or promises, expressed or implied, on behalf of GJ Handy & Co Ltd, or to modify the terms conditions or limitation of this warranty policy in any way.
c) Neither GJ Handy & Co Ltd nor any company affiliated with GJ Handy & Co Ltd shall be liable in any event or manner whatsoever for incidental or consequential damages or injuries, including, but not limited to, loss of crops, loss of profit, out of pocket expenses or profits, rental of substitute equipment or other commercial losses.
General
a) Most warrantable failures show up within the first few weeks of use. These failures are usually straightforward and warranty assessment is relatively easy.
b) Failures relating to cutter decks and belts need careful investigation, as the cause may not always be straightforward. Look for damage to blades and pulleys especially when the cutter belt or blade boss have snapped or cracked as this could be due to impact damage.
c) Customers should always refer to the operator/instruction manual when any disputed problem arises, you will find most areas covered within the manual.
![]()
DECLARATION OF CONFORMITY
We Handy Distribution Ltd – SN3 5HY (Importer) declare that the product:
Designation: Petrol Mini Tiller
Model(s): THPMT
Product Number: 193820002
Engine Cubic Capacity: 42.7cc
Motor Power: 1.2kW
Max Engine Speed: 8000/min
Type/Serial No. As per rating label on machine
Complies with the following directives:
2006/42/EC – Machinery Directive
2010/26/EU – Emission of Pollutants
2000/14/EC amended by 2005/88/EC – Noise Emission in the Environment by Equipment for Use Outdoors Directive.
Standards and technical specifications referred to:
EN709: 1997 + A4:2009
Name of the Notified Body:
Intertek Testing Services Shanghai
Address:
Building 86, 1198 Qinzhou Road (North), Shanghai, 200233, China
Sound Pressure Level: LPA 91.2 dB(A)
Sound Power Level: LWA 107.4 dB(A)
Guaranteed Sound Power Level: LWA 110 dB(A)
Authorised signatory and technical file holder
Date: 05/10/2021

Signature:
Name: Mr Simon Belcher
Position: Managing Director
Company: Handy Distribution Ltd
Address: Murdock Rd, Swindon, Wiltshire, SN3 5HY.
![]()
We Handy Distribution Ltd – SN3 5HY (Importer) declare that the product:
Designation: Petrol Mini Tiller
Model(s): THPMT
Product Number: 193820002
Engine Cubic Capacity: 42.7cc
Motor Power: 1.2kW
Max Engine Speed: 8000/min
Type/Serial No. As per rating label on machine
Complies with the following directives:
Supply of Machinery (Safety) Regulations 2008
2000/14/EC amended by 2005/88/EC – Noise Emission in the Environment by Equipment for Use Outdoors Directive.
Standards and technical specifications referred to:
EN709: 1997 + A4:2009
Name of the Notified Body:
Intertek Testing Services Shanghai
Sound Pressure Level: LPA 91.2 dB(A)
Sound Power Level: LWA 107.4 dB(A)
Guaranteed Sound Power Level: LWA 110 dB(A)
Authorised signatory and technical file holder
Date: 05/10/2021
Signature:
Name: Mr Simon Belcher
Position: Managing Director
Company: Handy Distribution Ltd
Address: Murdock Rd, Swindon, Wiltshire, SN3 5HY.
For spares or support of your handy product, please contact us:
Tel: 01793 333212
Email: [email protected]
Opening Hours Weekdays:
February to October 8:30am – 5:30pm
November to January 8:30am – 5:00pm
(CLOSED WEEKENDS & BANK HOLIDAYS)
To see our range of garden machinery & equipment visit:
www.thehandy.co.uk
Making gardening easier & affordable since 1938
Distributed by Handy Distribution, Murdock Road, Dorcan, Swindon, SN3 5HY


