![]()
246610 Air Curtain with Remote Control
User Manual
AIR CURTAIN

READ & SAVE THESE INSTRUCTIONS
![]() WARNING
WARNING![]()
- TO REDUCE THE RISK OF FIRE, ELECTRIC SHOCK, OR INJURY TO PERSONS, OBSERVE THE FOLLOWING:
- This product contains chemicals that are known to the state of California to cause birth defects or other reproductive harm.
- This product is not for use in explosive or combustible atmospheres.
- Read and follow all instructions before operating the product. Do not use the product if any part is damaged or missing.
- Do not alter the product’s assembly.
- All electrical connections should be made by a qualified electrician. Installation work and electrical wiring must be done by a qualified person(s) following all local electrical and safety codes in the United States and Canada, as well as the National Electrical Code (NEC) and the Occupational Safety and Health Act (OSHA) in the United States, and the Canadian Electric Code (CEC) in Canada.
- Use OSHA-approved lock-out tag-out devices on the power supply to prevent shock and/or electrocution.
- When cutting or drilling into a wall or ceiling, do not damage electrical wiring and other hidden utilities.
- To reduce the risk of fire or electrical shock, do not expose yourself to water or rain.
- To reduce the risk of fire or electrical shock, do not use this product with any solid-state speed control device.
- To reduce the risk of fire or electrical shock, do not use an extension cord, the unit is intended to be permanently hard-wired to a properly rated electrical service outlet (120V 60Hz).
- To reduce the risk of injury to persons, install the product at least 7 feet (2.1m) above the floor (8 feet in Canada).
- The product frame and motor must be electrically grounded to a suitable electrical ground, such as a grounded water pipe or ground wire system.
- This has a single-speed motor that is equipped with a thermal – protector and will automatically de-energize the product if it overheats for any reason.
RULES FOR SAFE OPERATION:
- Never insert fingers or any other objects through the grill guard when the product is in operation.
- If the power supply cord is damaged, contact your local service center or a qualified electrician to install an appropriate replacement cord to prevent any injury or damage.
- Disconnect the product from its power source when removing guards for cleaning.
- Do not use the product in windows. Rain and moisture may create an electrical hazard.
- 5. Do not place the product near an open flame, cooking or heating appliance, or hot surface.
- This product is for indoor dry applications.
- This product should not be operated outside.
- Periodically clean the propeller, guard, motor, and louver of any accumulated dirt.
- This appliance is not intended for use by persons (including children) with reduced physical, sensory or mental capabilities, or lack of experience and knowledge unless they have been given supervision or instruction concerning the use of the appliance by a person responsible for their safety.
- Children should be supervised to ensure that they do not play with the appliance.
SPECIFICATION
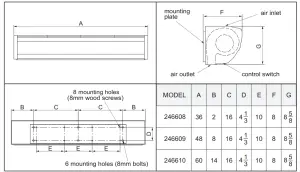
| MODEL | SIZE | LOW | HIGH | ||||||
| Current | Power | Velocity | Noise | Current | Power | Velocity | Noise | ||
| Inch | A | W | m/s | dB | A | W | m/s | dB | |
| 246608 | 36 | 2.10 | 255 | 16 | 56 | 3. | 345 | 20 | 59 |
| 246609 | 48 | 3. | 320 | 16 | 56 | 3.50 | 425 | 20 | 59 |
| 246610 | 60 | 3.60 | 440 | 16 | 56 | 4.80 | 575 | 20 | 59 |
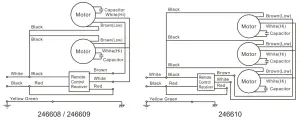
WIRING DIAGRAM
INSTALLATION DIMENSIONS
INSTALLATION METHOD
![]() WARNING
WARNING
- Installation and the electrical connection must be performed by a qualified technician.
- Accessories 6 sets of (M8x60L) Fastening bolts, Washer, Spring Washer, and (M8) Nut.
- Check to ensure the voltage/frequency on the rating label complies with the local power source before use.

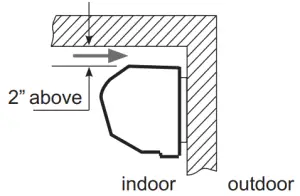
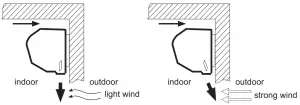
- Follow the right diagram for the installation position.
- Coverage height: 99 inches (for horizontal Air Curtain installation).
- Installation on a concrete wall
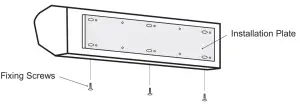
a. Takedown INSTALLATION PLATE (unscrew the fixing screws down the REAR). See the following diagram: b. Install INSTALLATION PLATE on the wall:
 ● Fix position of installation.
● Insert bolts and fill with cement for consolidation.
● After cement solidifies, install INSTALLATION PLATE on bolts and fasten it with washers, spring washers, and nuts. See the diagram on the right.
● Ensure INSTALLATION PLATE is fixed securely.
c. Install the BODY (hang up the BODY onto the INSTALLATION PLATE, check to ensure it is proper and secure, and then tighten the fixing screws). See the following diagram:
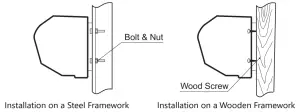
- Other installation methods. See the following diagram:

- Use more than one unit of Air Curtain with appropriate length to fill up the width of the doorway.
- The recommended distance between 2 adjacent units of the Air Curtain is to be 1-2 inches.
 b. Install INSTALLATION PLATE on the wall:
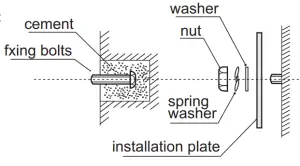 ● Fix position of installation.
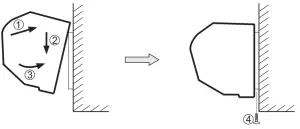
OPERATION INSTRUCTIONS
- Plug into an AC power outlet. (OFF lamp lit with a high tone beep)
- Select a keystroke of LO or HI to set the speed at LOW or HIGH. (or press a relevant function keystroke for the Remote Control device.)
- Adjust AIR DEFLECTOR to the preferred direction. See the following diagram:
CAUTIONS AND MAINTENANCE
- Install at location frmly enough for safety, check installation quality periodically.
- Do NOT install Air Curtain at a location with a water splash, or with permanent exposure to high temperatures and places close to explosive and corrosive gases.
- Have a reliable earthling set when used.
- In case of damage or breakdown, should consult a qualified technician.
- Clean Air Curtain periodically. (Note: Do NOT clean unit with benzene or corrosive liquid.)
![]() WARNING
WARNING
- Please unplug the power cord before cleaning.
REMOTE CONTROL


