![]()
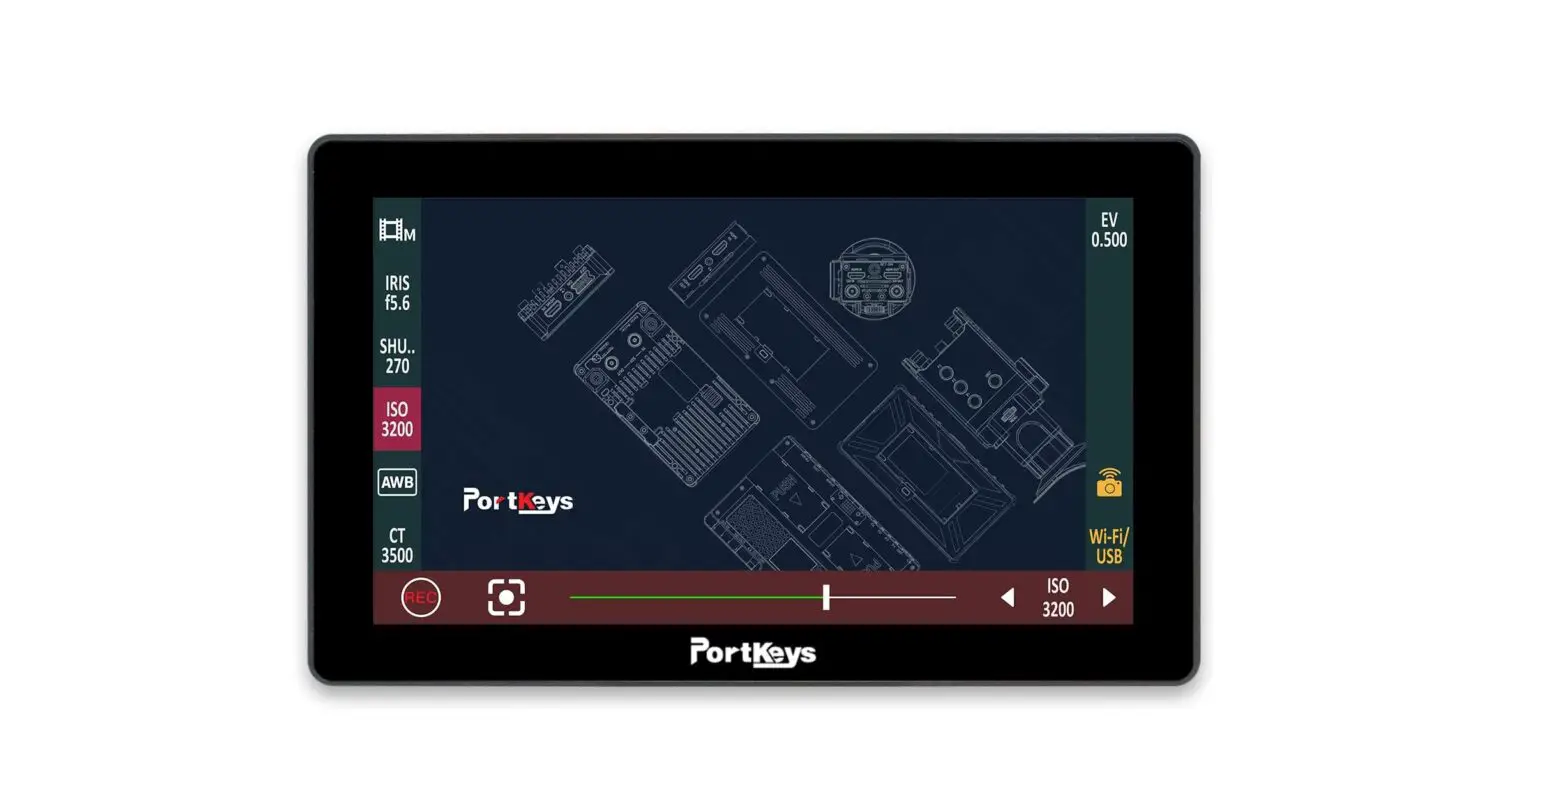
LH5PII
2200nit Wide Color Gamut
Camera Control Monitor
Fearless of bright light, clearly visible in the sunshine

Service Hotline: 18820958861
Email: [email protected]
Website: www.portkeys.com Company Address: 1406, 14th Floor, Block D, Building 3,
Cloud Park, Longgang District, Shenzhen, Guangdong, China
Factory Address: 2nd Floor, Building A, Jingjiang Industrial Park,
NO.101, Shangwei Road, Longhua District, Shenzhen,Guangdong, China
Product Information 1.1
Product Introduction
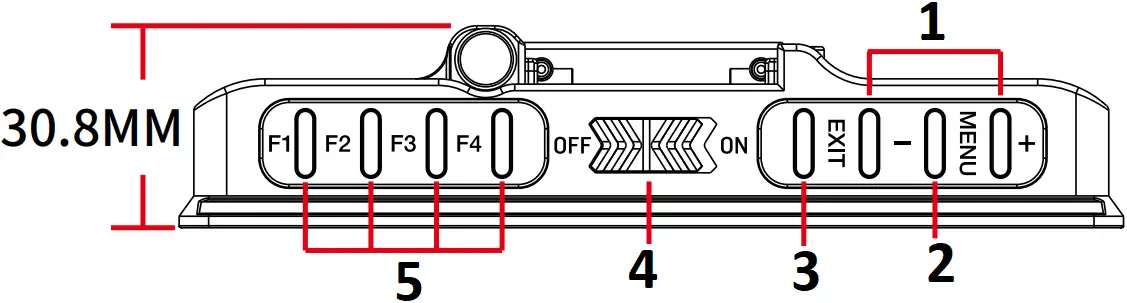
- Function Selection
- MENU
- EXIT / Long press for 3 seconds to switch the state of touch control
- Power Switch
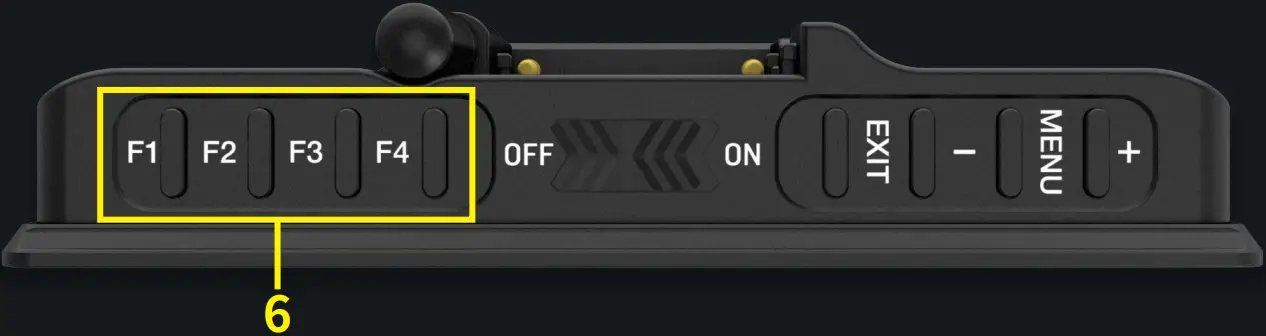
- Custom Function Keys
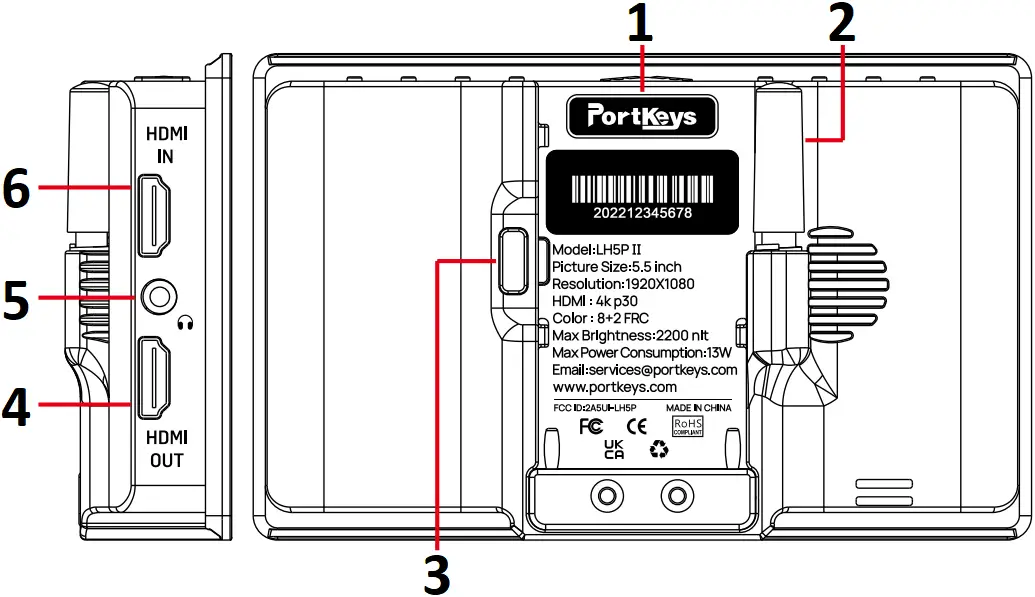
- Silicone Pad
- Antenna
- Battery Plate Lock
- HDMI Output
- Audio Headphone Output
- HDMI Input
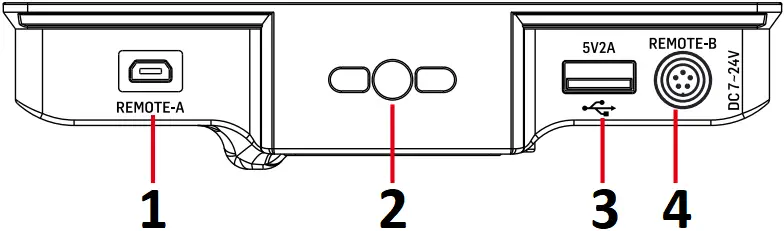
- Camera Control Interface
- 1/4″ Threaded Insert
- USB-A
- DC 7~24V/ Motor Control
![]() Operating temperature range: 0°C ~ 40°C
Operating temperature range: 0°C ~ 40°C
Product Information 1.2
Packing List
LH5PII Monitor X1 U Disk X1
Power Cord (Aviation Safety Box X1
Port to DC) X1 Warm Prompt Card X1
2.4G Straight Head Antenna X1 After Sales Service Card X1
Product Information 1.3
Basic Parameters
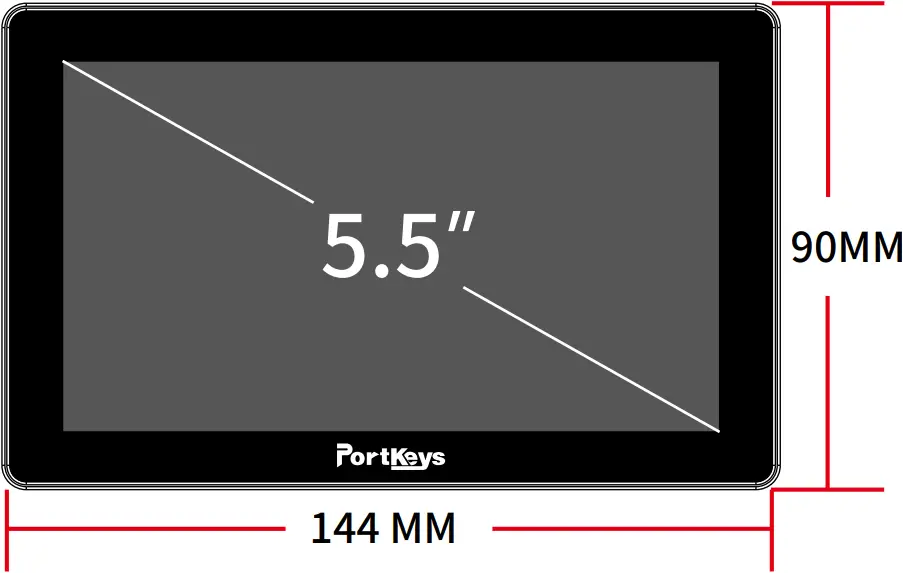
| Size: | 5.5″ |
| Dimension: | 144x90x30.8mm |
| Viewing Angle: | 178°H/178°V |
| Brightness: | 2200nit |
| Resolution: | 1920×1080 |
| Contrast Ratio: | 1000:1 |
| Weight: | 285g |
| Color Depth: | 10bit(8+2 FRC) |
| Material: | Aluminum Alloy+Toughened Glass |
| Input Voltage: | DC 7~24V |
| Maximum Power: | 13W |
| Video Signal Input: | 4K HDMI, HDMI |
| Video Signal Output: | 4K HDMI, HDMI |
| USB-A: | Upgrade Firmware / Load 3D LUT |
| REMOTE-A: | Support wired control the functions of Z CAM, Canon, Sony, Panasonic and BMD |
| REMOTE-B: | Support wired control Tilta Nucleus-N/M |
| Supported Battery Models: | Sony NP-F970/F960/F750/F550 |
| Headphone: | Output |
| Menu Language: | English / Simplified Chinese / Traditional Chinese / Japanese / Russian / French / Spanish |
| Fan: | Yes |
Product Information 1.4
Signal Specifications
Supported input resolution and frame rate
HDMI Signal
4096×2160p@24Hz
3840×[email protected],24Hz,25Hz,29.97Hz,30Hz
1920×[email protected],24Hz,25Hz,29.97Hz,30Hz,50Hz,59.94Hz,60Hz
1920×[email protected],24Hz,25Hz,29.97Hz,30Hz
1920×1080i@50Hz,59.94Hz,60Hz
1280×720p@50Hz,59.94Hz,60Hz
720×576p@50Hz
720×576i@50Hz
720×480p@50Hz,59.94Hz,60Hz
720×480i@50Hz,59.94Hz,60Hz
Supported output resolution and frame rate
HDMI Signal
4096×2160p@24Hz
3840×[email protected],24Hz,25Hz,29.97Hz,30Hz
1920×[email protected],24Hz,25Hz,29.97Hz,30Hz,50Hz,59.94Hz,60Hz
1920×[email protected],24Hz,25Hz,29.97Hz,30Hz
1920×1080i@50Hz,59.94Hz,60Hz
1280×720p@50Hz,59.94Hz,60Hz
720×576p@50Hz
720×576i@50Hz
720×480p@50Hz,59.94Hz,60Hz
720×480i@50Hz,59.94Hz,60Hz
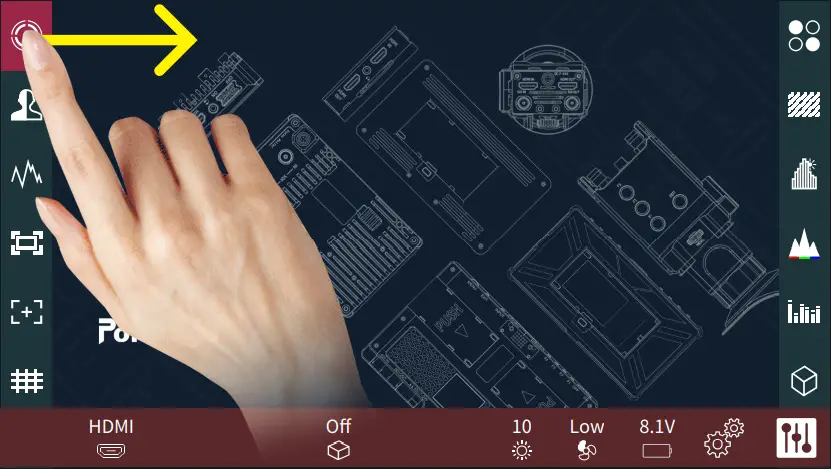
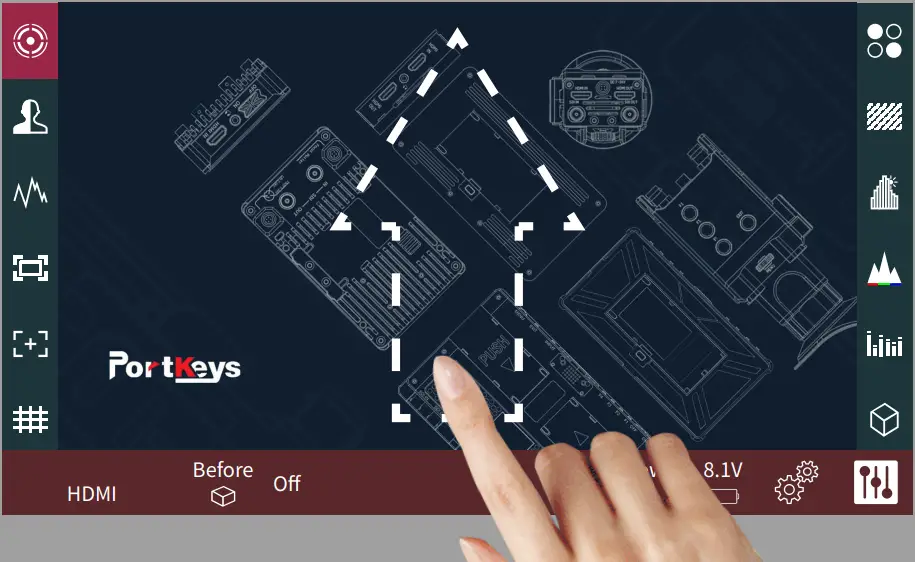
Function Interface 2.1
[Function interface gesture switching]
Swipe right on any interface to toggle to the function setting interface;
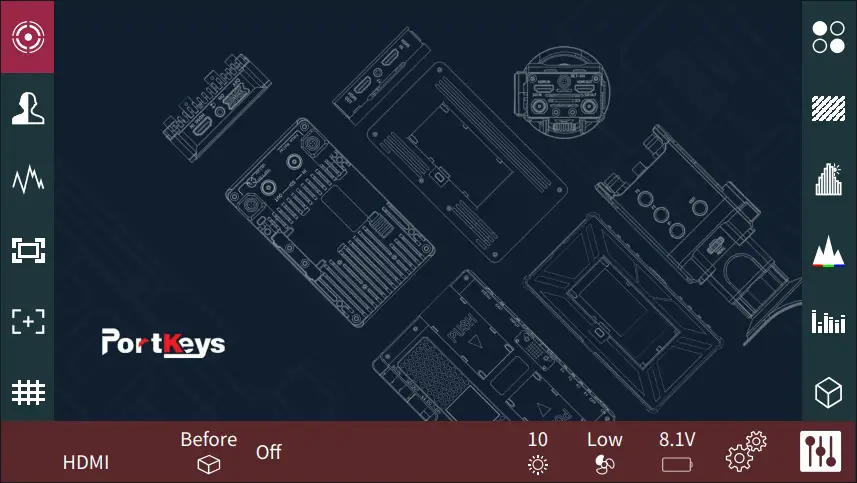
(the function setting interface)
Function Interface 2.2
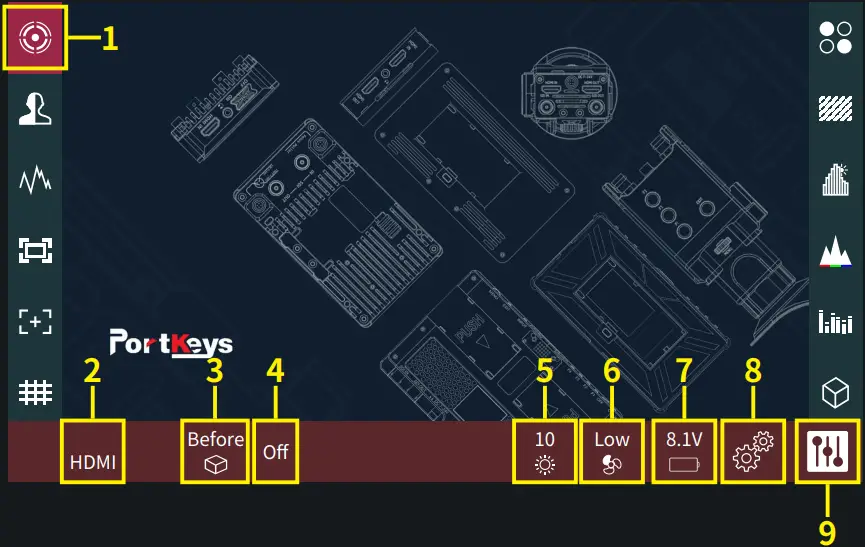
[Function Introduction]
- Software Features;
- HDMI Signal;
- Loading 3D LUT Before and After Data;
- 3D LUT ON/OFF;
- Screen Brightness (1-10);
- Fan Strength (Low / High);
- Battery Level;
- Quickly Enter the Software Function List;
- Quickly Enter the Software Debugging;
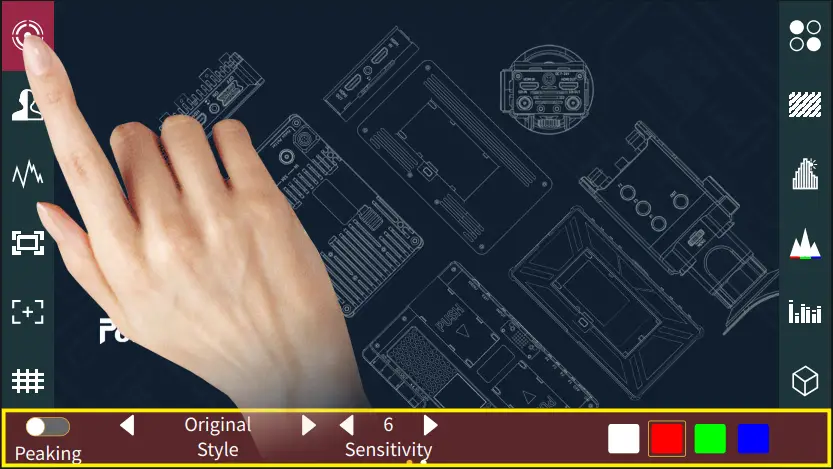
Function Interface 2.3
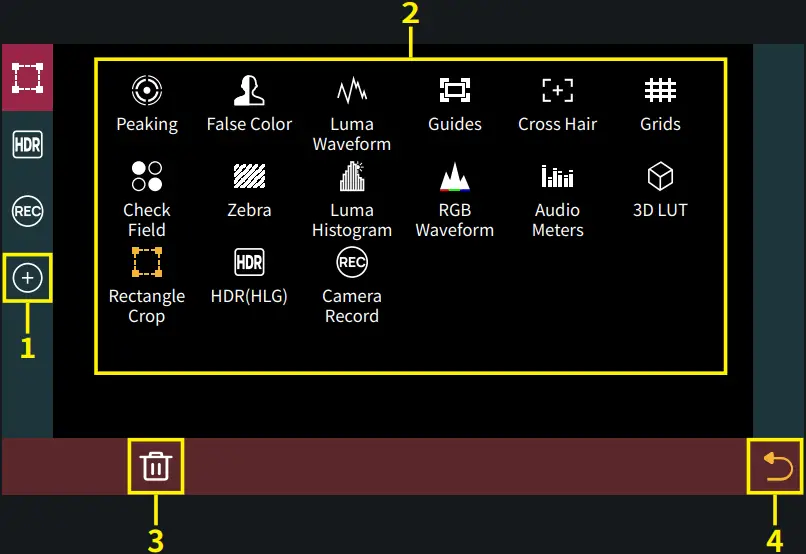
(Picture 1)
[Custom Function Keys Settings]
- Click “
 ” add shortcut functions to the left and right sides; If the function icons on the left and right have been added (Picture 2);You can swipe down in the shortcut function title area to continue adding;
 - Select the function icon to replace;
- Select the function icon and click “
 ” to delete;
 - “
 “Return key;
(Picture 2)
(Picture 3)
5. The first four functions are F1-F4 shortcut functions by default. You can swipe left/ right to enter the function menu to change the custom functions (Picture 3);
(Picture 4)
6. After F keys setting is completed, F1-F4 keys on the monitor can be used to turn on/off the functions(Picture 4);
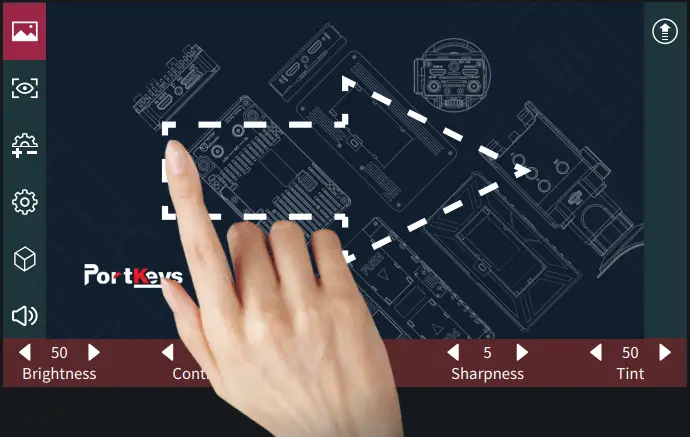
Function Interface 2.4
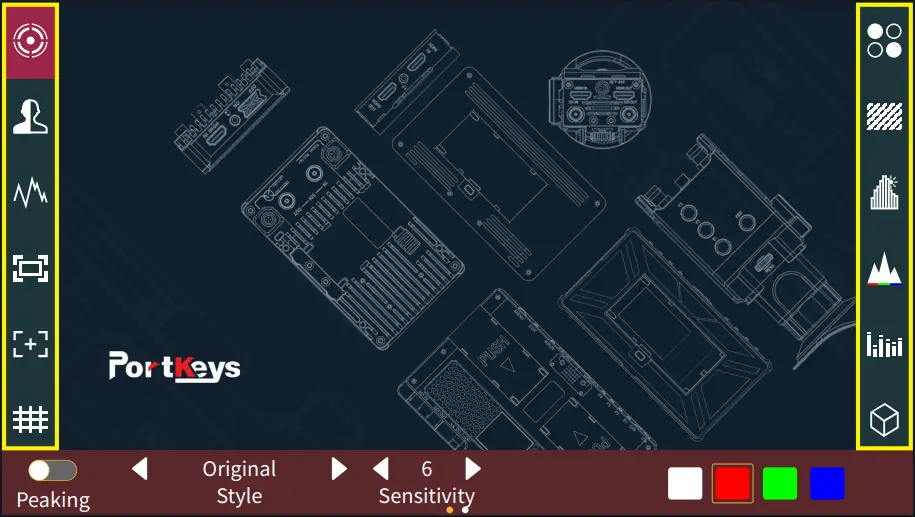
[Basic Operation]
Long press “![]() ” the function parameter setting shows at the bottom (Picture 5);
” the function parameter setting shows at the bottom (Picture 5);
(Picture 5)
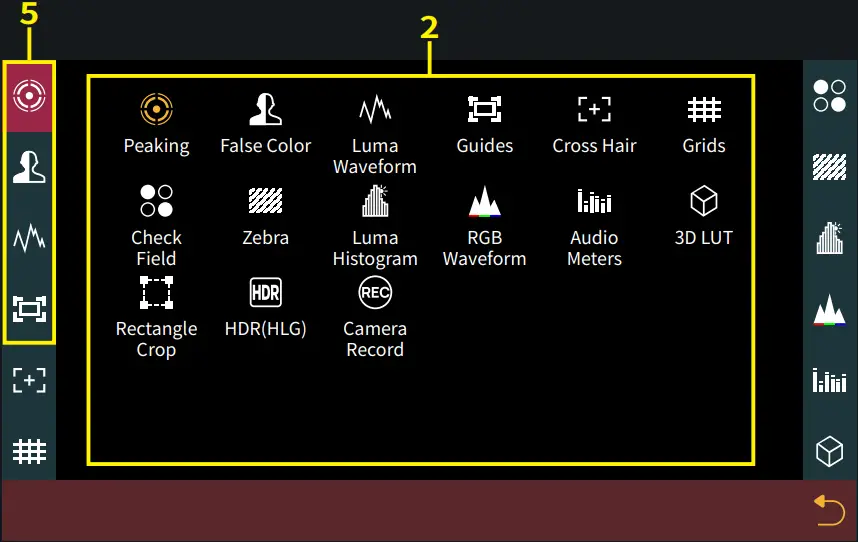
Swipe the icon “![]() ” to the right and enter the function menu, you could replace or delete functions(Picture 6);
” to the right and enter the function menu, you could replace or delete functions(Picture 6);
(Picture 6)
Swipe the icon “![]() ” to the left and enter the function menu, you could replace or delete functions(Picture 7);
” to the left and enter the function menu, you could replace or delete functions(Picture 7);
(Picture 7)
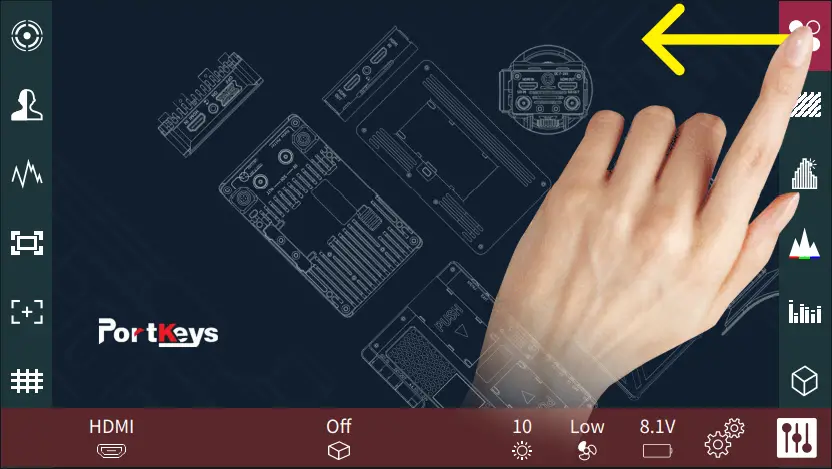
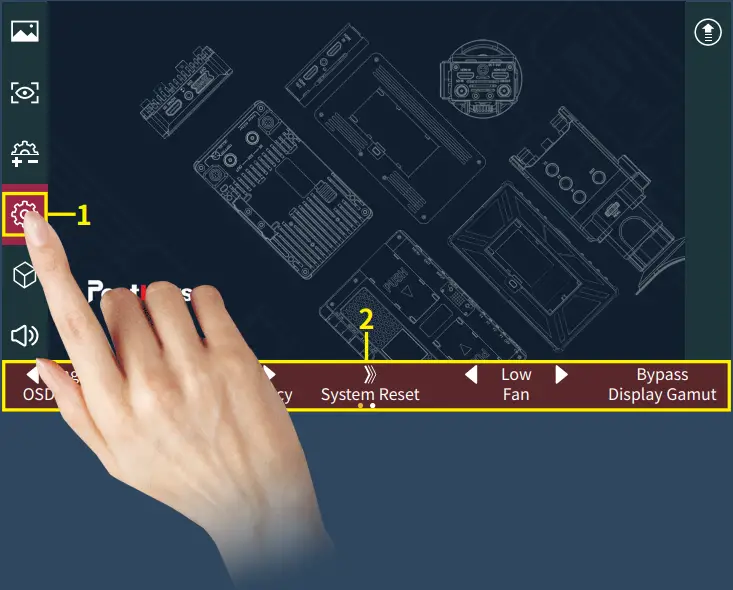
Setting Interface 3.1
[Settings interface gesture switching]
Swipe left on any interface to toggle to the system settings interface;
(the system settings interface)
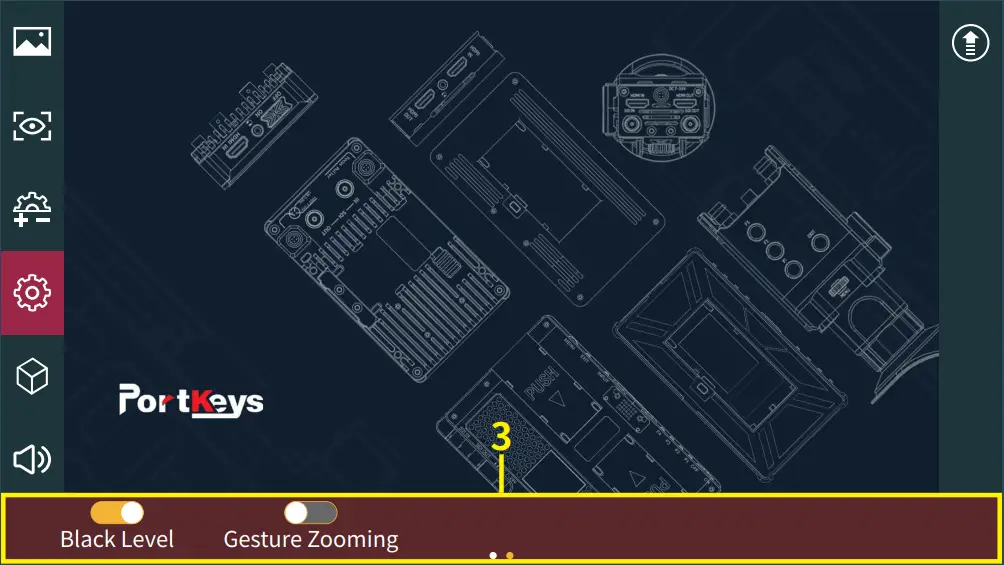
Setting Interface 3.2

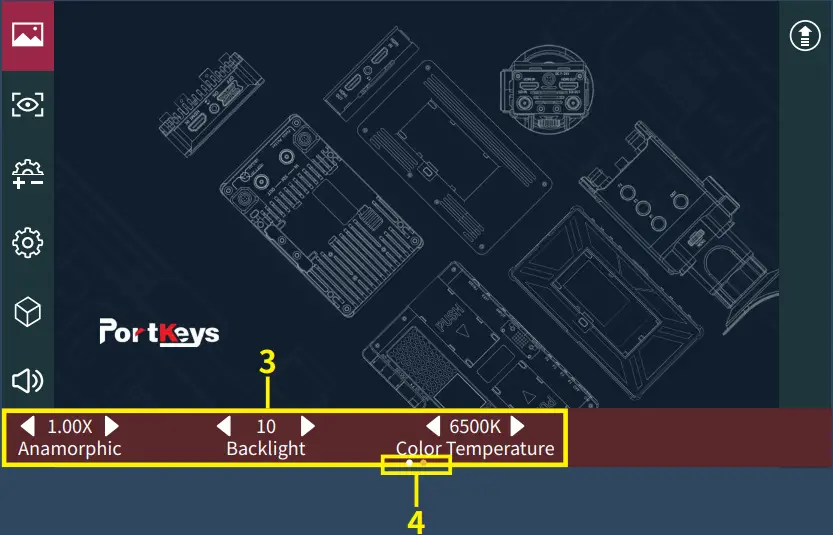
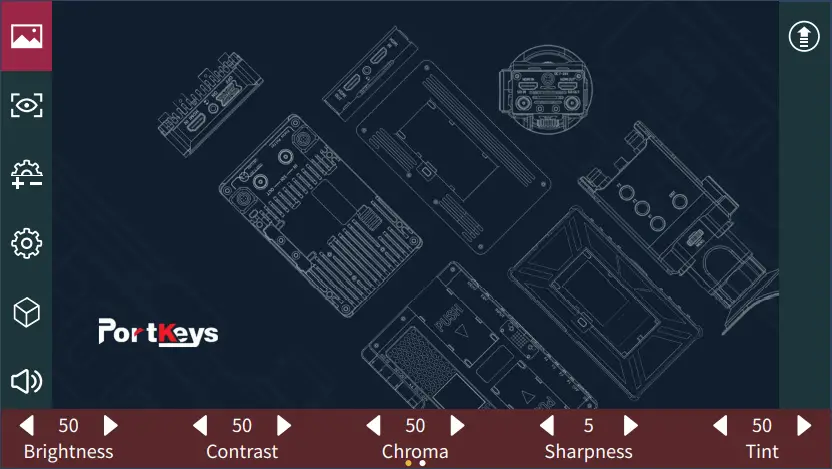
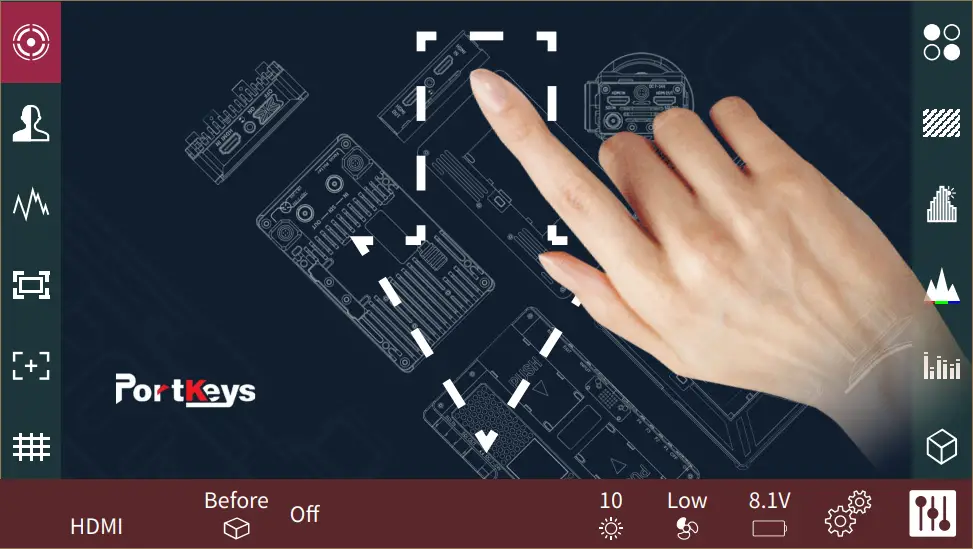
[Image Settings]
- Click “
 “;
“; - Parameter setting information;
- Parameter setting information(Next page);
- Display the number of the page of Image parameter setting, Swipe left or right in the bottom information area to switch pages;
Setting Interface 3.3
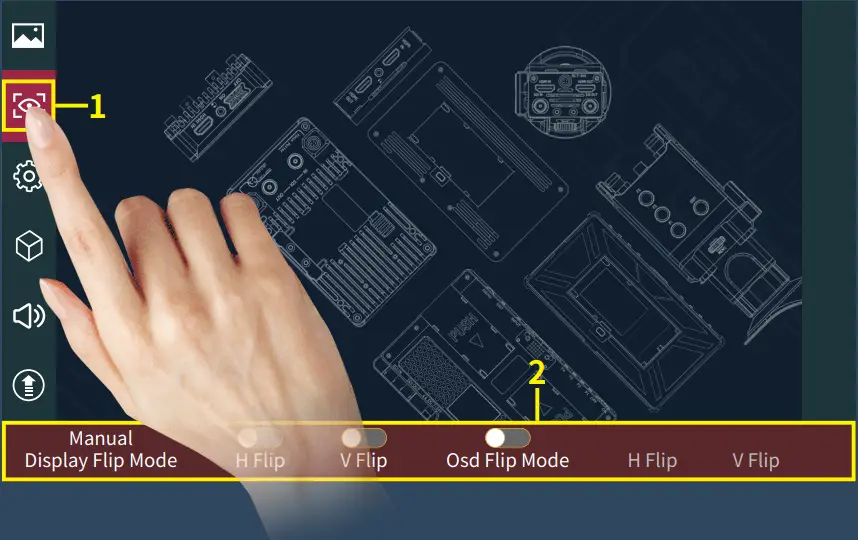
[Image and Menu Flip Settings]
- Click “
 “;
“; - Image and menu flip setting information;
Setting Interface 3.4
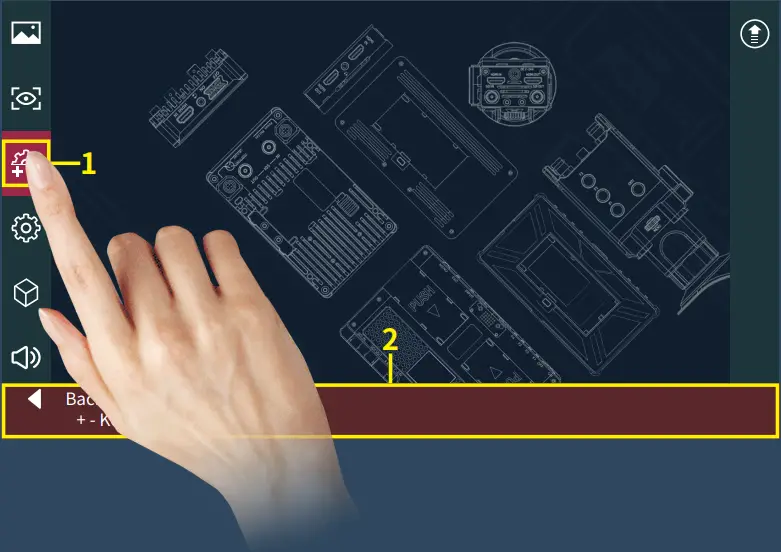
[Customize +/-key Setting]
- Click “
 “;
“; - +/- key customization Settings information;
Setting Interface 3.5
[System Setting]
- Click ““;
- System parameter setting information;
- System parameter setting information(Next page);
Setting Interface 3.6
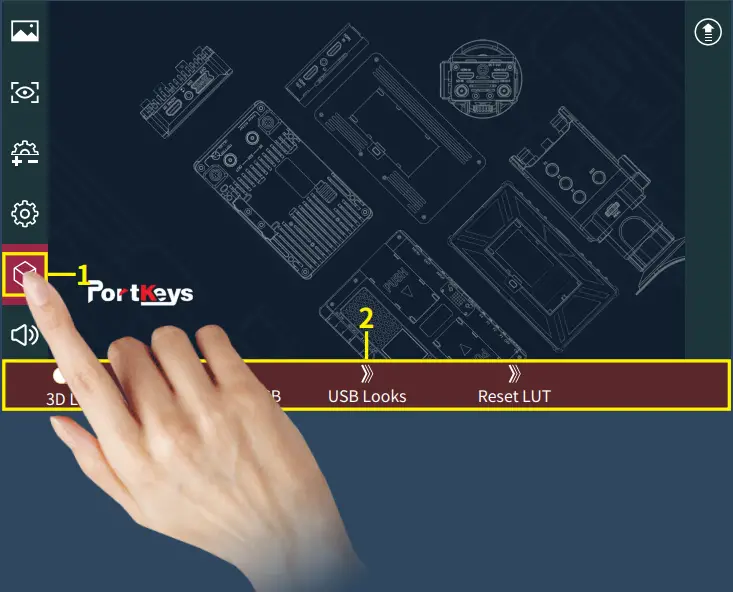
[3D LUT Setting]
- Click “
 “;
“; - 3D LUT setting information;
Setting Interface 3.7
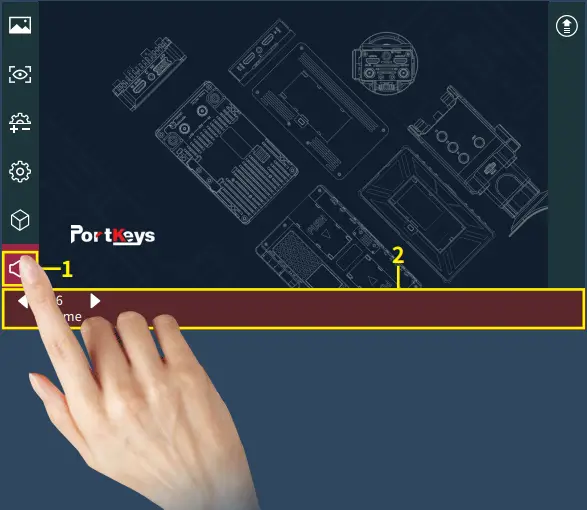
[Volume Setting]
- Click “
 “;
“; - Volume information;
Setting Interface 3.8
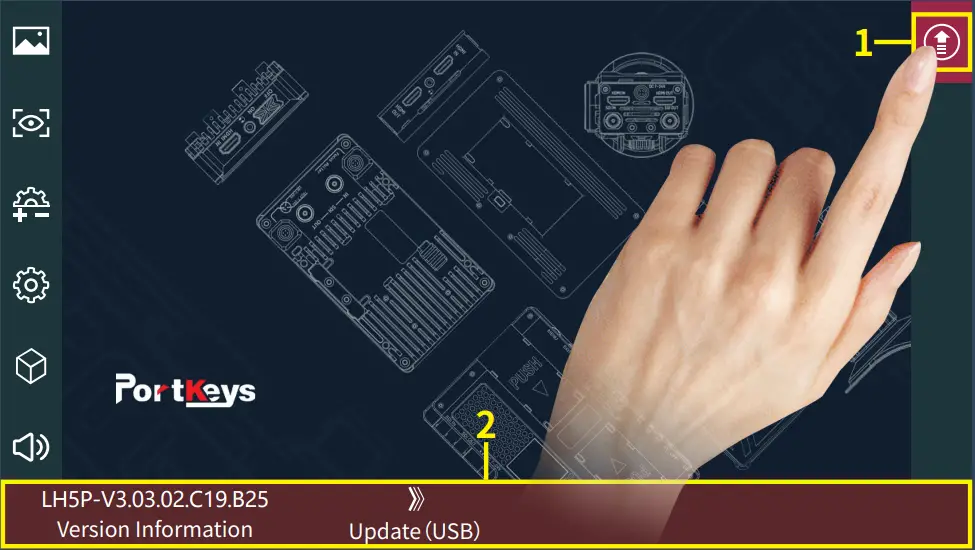
[Version Setting]
- Click “
 “;
“; - View version information and upgrades;
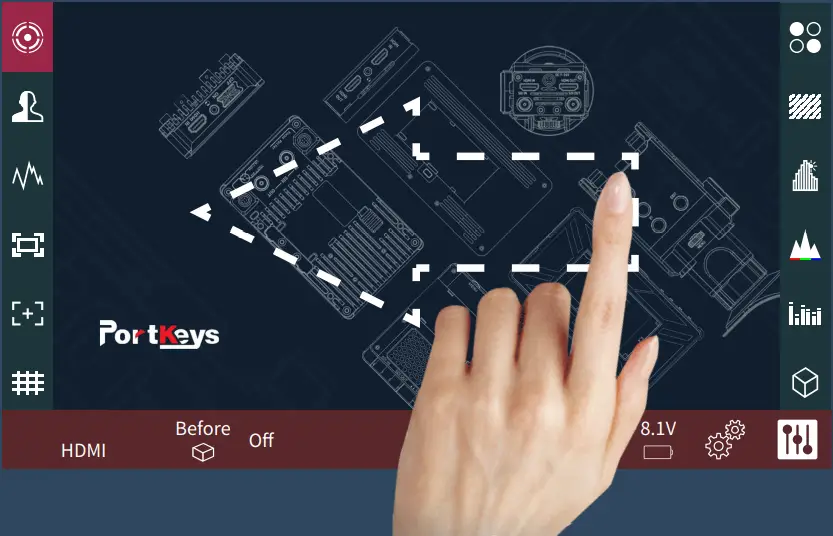
Camera Control Interface 4.1
[Camera control interface gesture switching]
Swipe down on any interface can be toggle to the camera control settings interface;
(the camera control settings interface)
Camera Control Interface 4.2
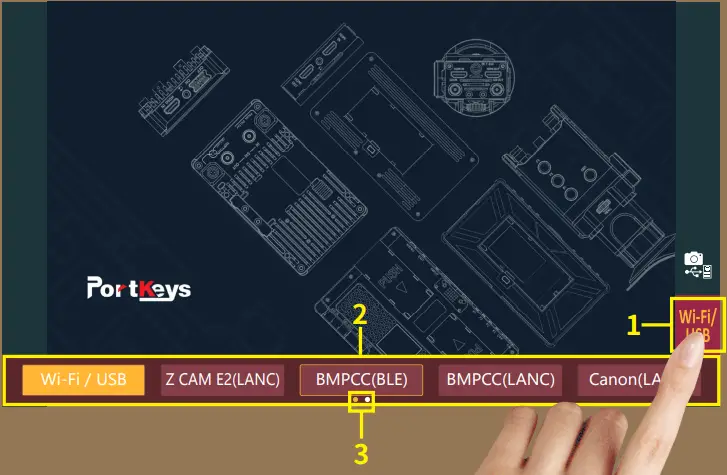
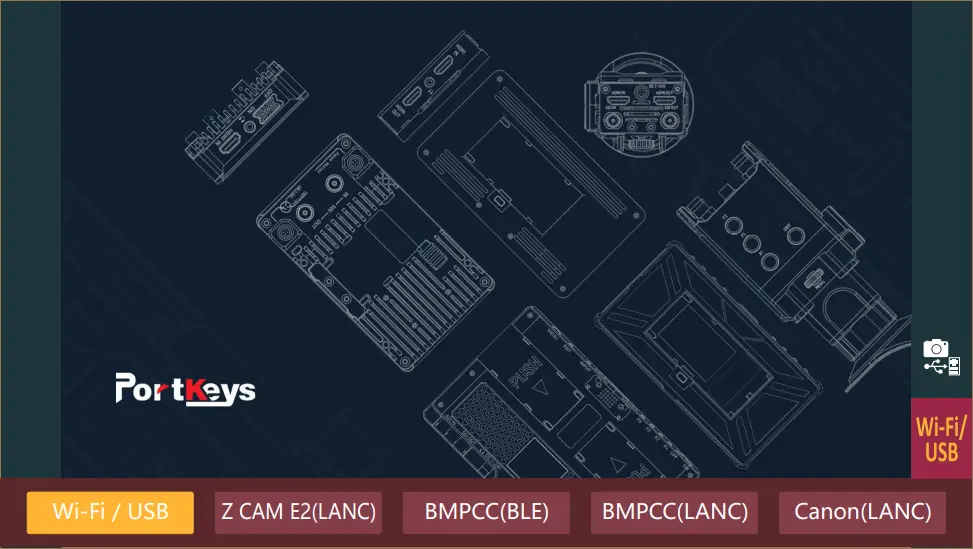
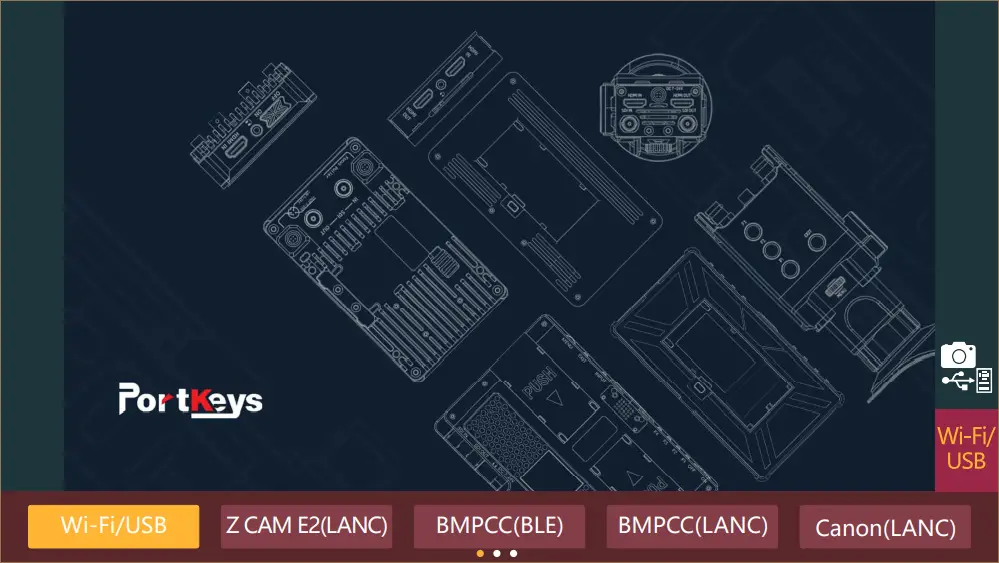
[Camera Model Setting]
- Click “
 “;
“; - Camera model optionsWi-Fi/USB,
Z CAM E2(LANC), BMPCC4K(BLE),
BMPCC(LANC), Canon(LANC),
Sony(MUTI), Sony(LANC), Panasonic (Remote).
Currently selected“Wi-Fi/USB”; - Display the number of the page of camera brands. Swipe left or right in the bottom information area to switch pages;
Camera Control Interface 4.3
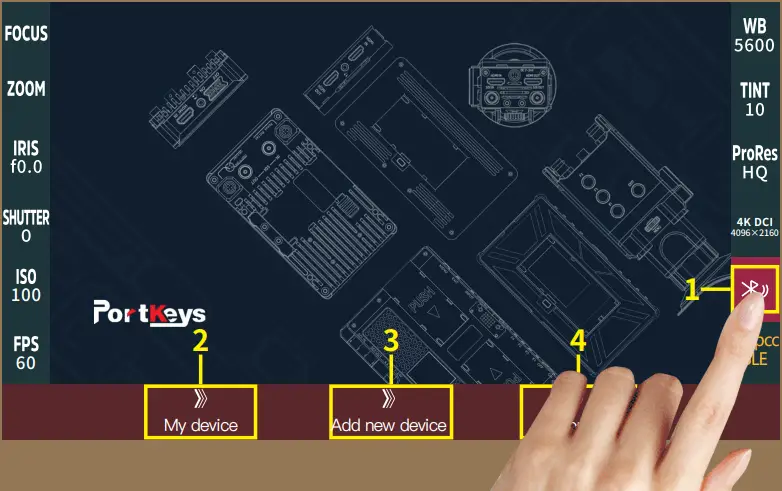
[Bluetooth Connection]
- Select “BMPCC4K(BLE)”;
- Click “
 “;
“; - Select “
 “, For bluetooth connection(Record of successful bluetooth connection);
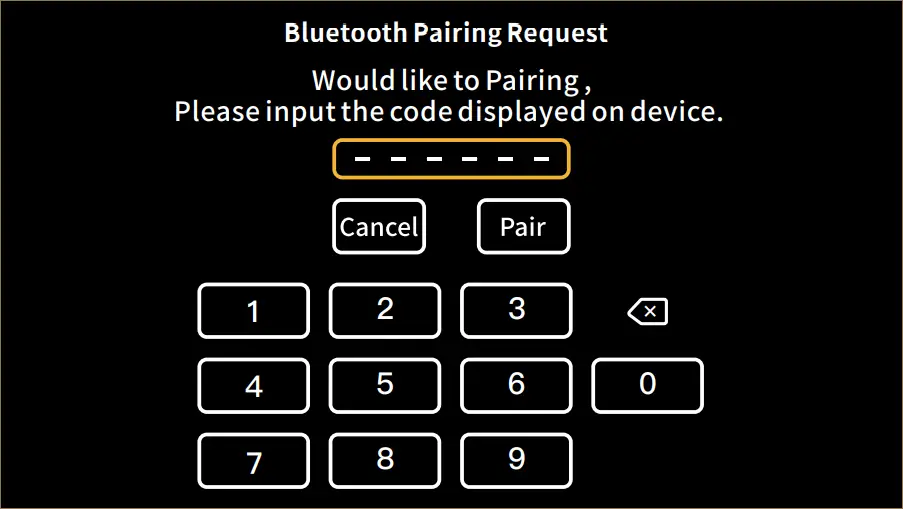
 - Select “
 “, turn on the BMPCC4K/6K Bluetooth function and record the passcode (picture 1),enter the passcode on the monitor(Picture 2 and 3), click “
 “, After successful connection,The Bluetooth icon will be displayed in yellow ““;
 - Select “
 ” to disconnect the Bluetooth connection;

(Picture 1)
(Picture 2)
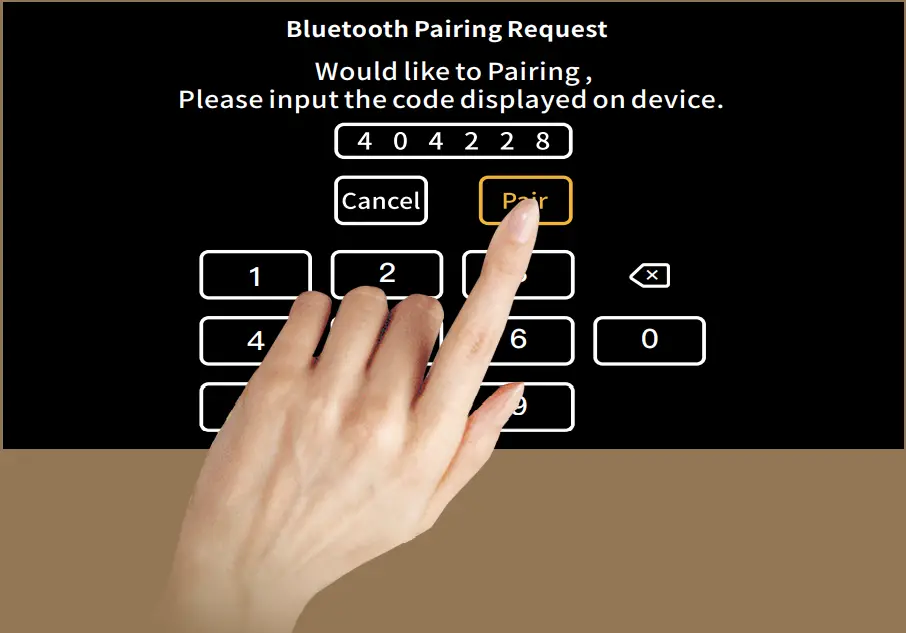
(Picture 3)
Camera Control Interface 4.4
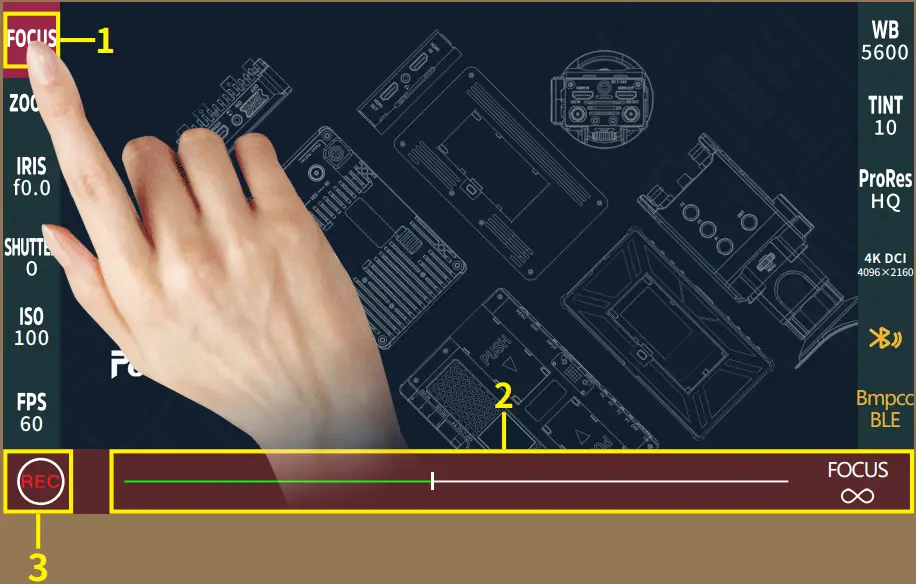
[Function Usage]
- Click “
 “;
“; - Adjust the parameter on the progress bar;
- Record;
Camera Control Interface 4.5
[Wirelessly Connect Sony A7M iii to Monitor]
- Turn the camera ON, select “MENU”;
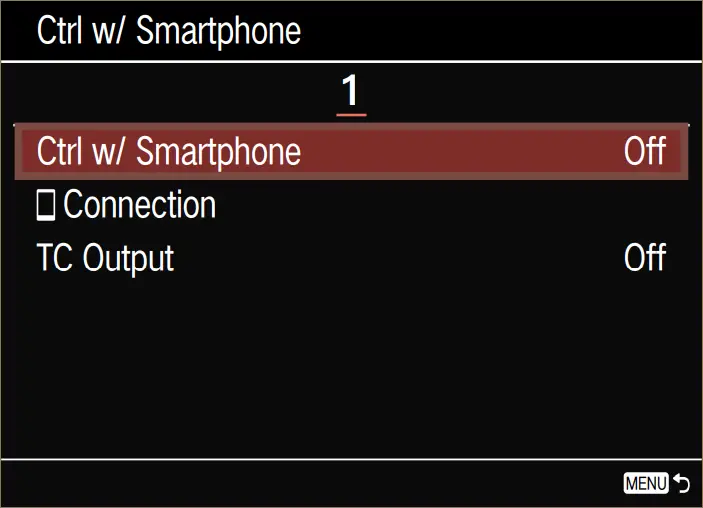
- Go to the Network settings, select (Network 1) > (Ctrl w/Smartphone) (Picture 1);

(Picture 1)
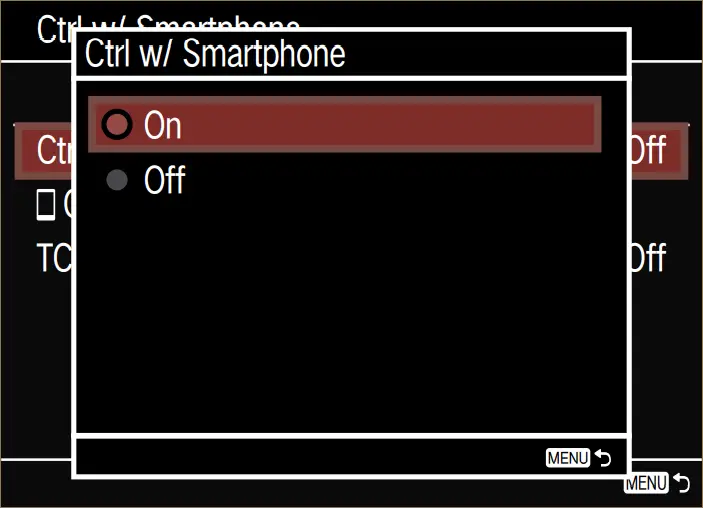
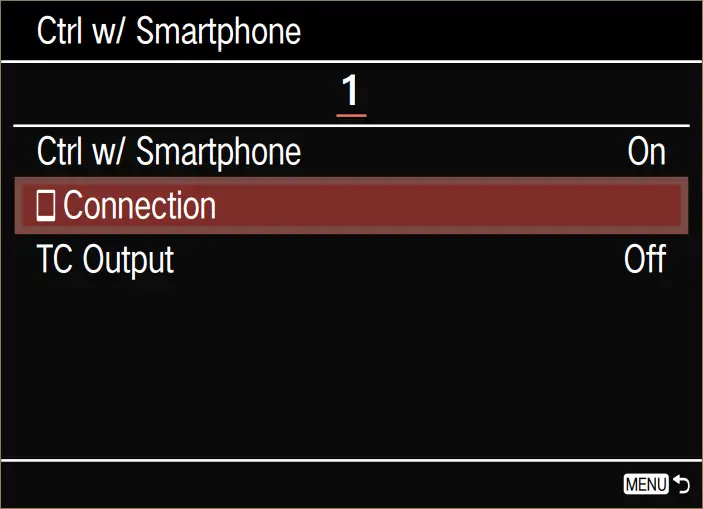
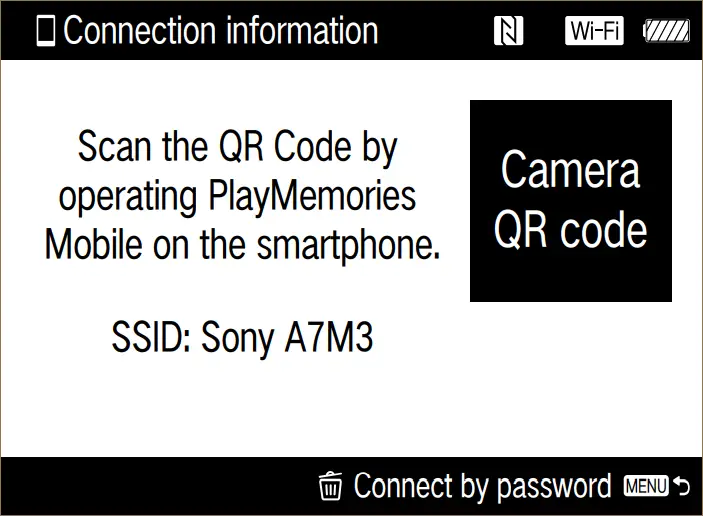
3. Turn “Ctrl w/ Smartphone” On, then select (![]() Connection) (Picture 2-1~Picture 2-4);
Connection) (Picture 2-1~Picture 2-4);
(Picture 2-1)
(Picture 2-2)
(Picture 2-3)
(Picture 2-4)
4. Press the (![]() Delete), button, select “Connect via password” (Picture 3);
Delete), button, select “Connect via password” (Picture 3);
(Picture 3)
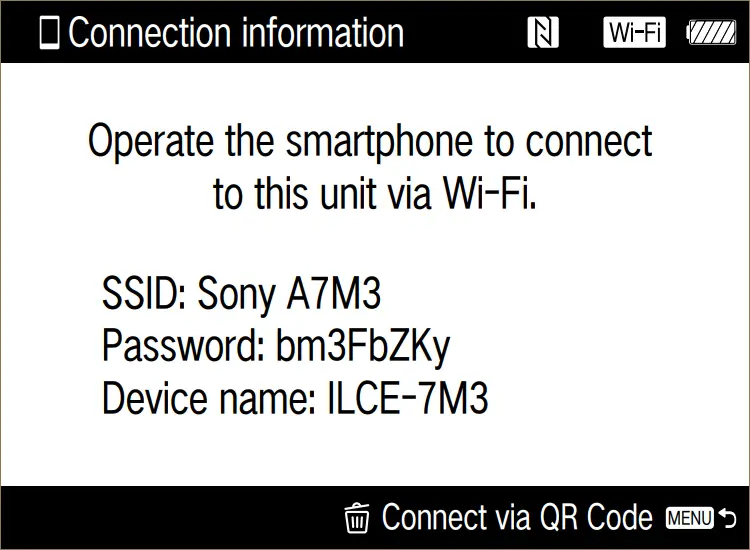
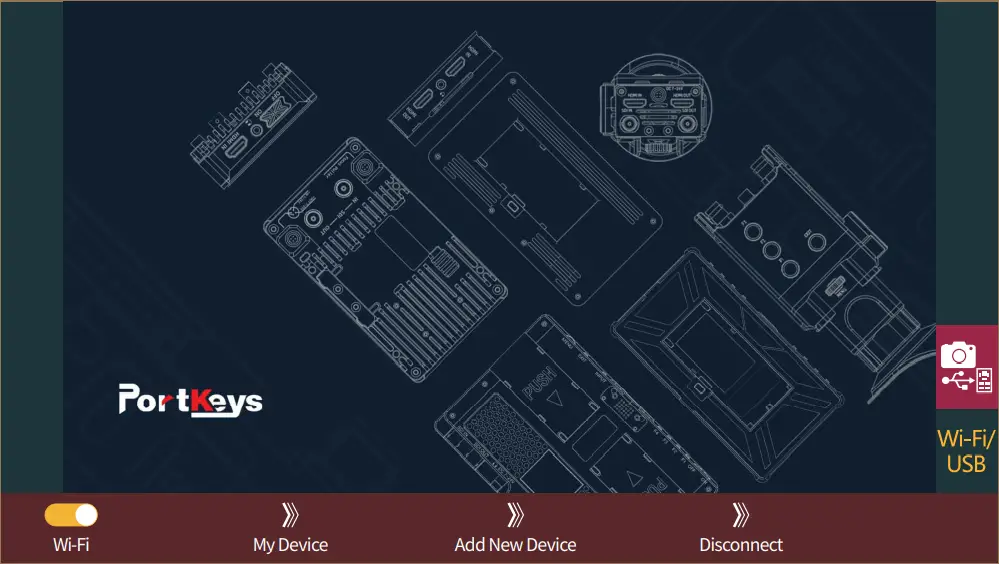
5. On the monitor, select camera model “Wi-Fi/USB”, enable “Wi-Fi” (Picture 4);
(Picture 4)
6. Tap “Add new device”, select the Wi-Fi name of Sony A7MIII (Picture 5);
(Picture 5)
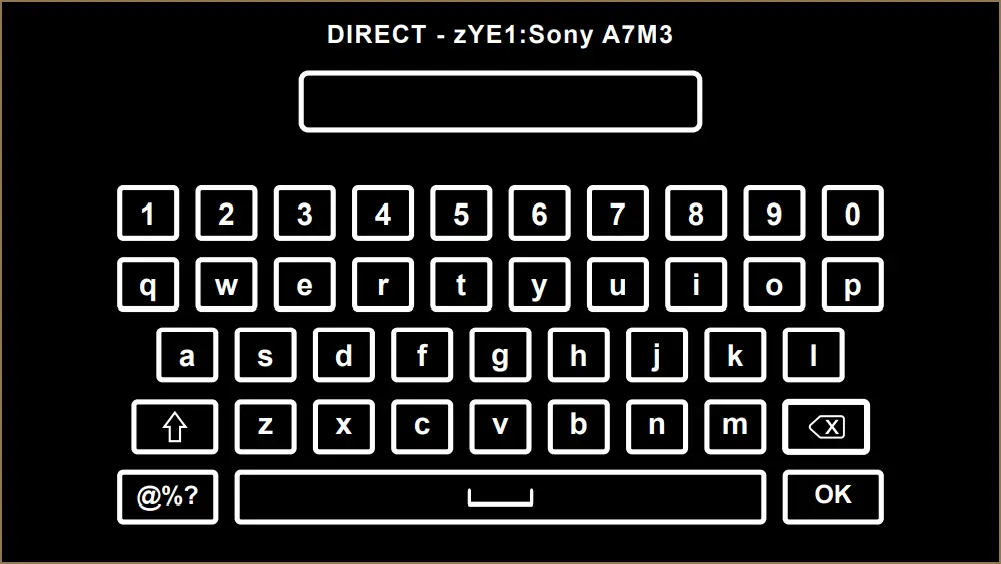
7. Input the Wi-Fi password that is displayed on the camera, wait for the connection (Picture 6);
(Picture 6)
8. The monitor is connected to Sony A7MIII (Picture 7);

(Picture 7)
Motor Control Interface 5.1
[Motor control interface gesture switching]
Swipe up on any interface can be adjusted to the motor control settings interface;
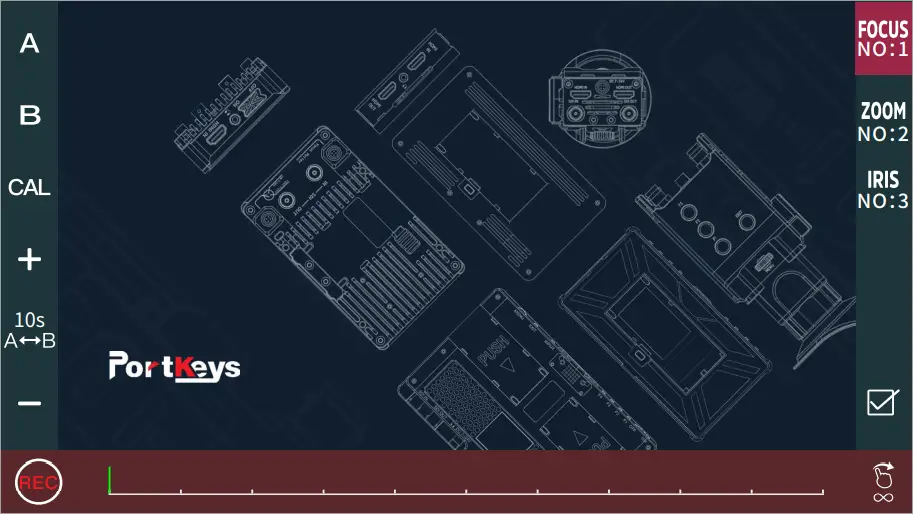
(the motor control settings interface)
Motor Control Interface 5.2
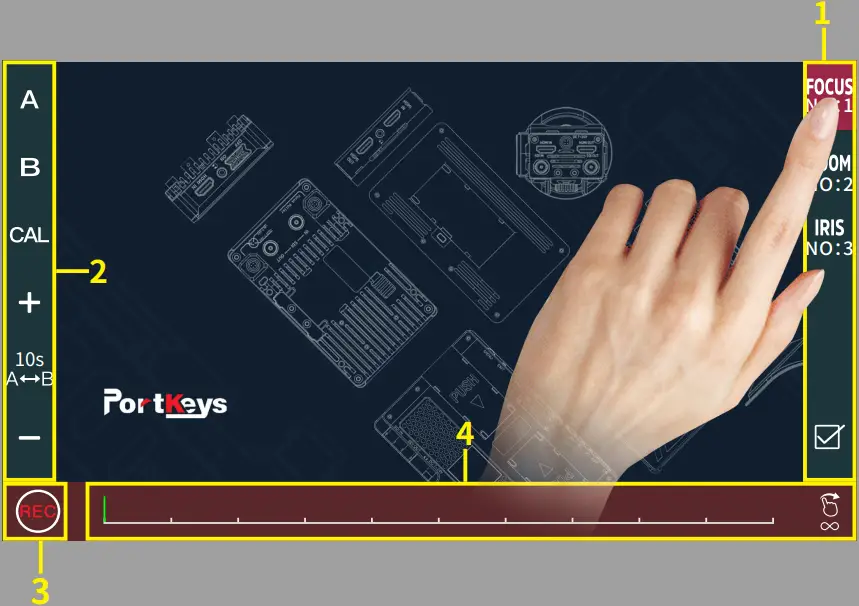
[Motor Control]
- Click to select channel options “
 “;
“; - Select the channel option to set the channel parameters;
- Record;
- Adjust the motor stroke;
Warnings 6.1
Warning:
Changes or modifications not expressly approved by the party responsible for compliance could void the user’s authority to operate the equipment.
This device complies with Part 15 of the FCC Rules. Operation is subject to the following two conditions: (1) this device may not cause harmful interference, and (2) this device must accept any interference received, including interference that may cause undesired operation.
NOTE: This equipment has been tested and found to comply with the limits for a Class B digital device, pursuant to Part 15 of the FCC Rules. These limits are designed to provide reasonable protection against harmful interference in a residential installation. This equipment generates, uses and can radiate radio frequency energy and, if not installed and used in accordance with the instructions, may cause harmful interference to radio communications. However, there is no guarantee that interference will not occur in a particular installation.
If this equipment does cause harmful interference to radio or television reception, which can be determined by turning the equipment off and on, the user is encouraged to try to correct the interference by one or more of the following measures:
— Reorient or relocate the receiving antenna.
— Increase the separation between the equipment and receiver.
— Connect the equipment into an outlet on a circuit different from that to which the receiver is connected.
— Consult the dealer or an experienced radio/TV technician for help.
RF Exposure Statement
This equipment complies with FCC radiation exposure limits set forth for an uncontrolled environment. This equipment should be installed and operated with a minimum distance of 20cm between the radiator & your body.
6. Set Up Photos-15C
I can not find the blow 1GHz test setup photo and AC line conducted emission setup photo.
Please provide.
For AC line conducted emission:
“If the EUT normally receives power from another device that in turn connects to the public utility ac power lines, measurements shall be made on that device with the EUT in operation to demonstrate that the device continues to comply with the appropriate limits while providing the EUT with power. If the EUT is operated only from internal or dedicated batteries, with no provisions for connection to the public utility ac power lines (600 VAC or less) to operate the EUT (such as an adapter), then ac power-line conducted measurements are not required.”
The earphone normally receives power from charge box that in turn connects to the public utility AC power lines.so line conducted emission need to tested.
7. BLE-test report
For AC line conducted emission:
The earphone normally receives power from charge box that in turn connects to the public utility AC power lines.so line conducted emission need to tested.
8. A3-TZ2009001675-E2 BT
1).product name is incorrect.
Product description
Trade Mark ………………..: TECNO
Product Name……………: Mobile Phone
Model No…………………..: A3
Standards ………………….: FCC Rules and Regulations Part 15 Subpart C Section 15.247 ANSI C63.10;2013
2).For AC line conducted emission:
The earphone normally receives power from charge box that in turn connects to the public utility AC power lines.so line conducted emission need to tested.


