
Amico B0957B5R26 4 Slam Downlight Instruction Manual
HOW TO INSTALL
- Install the drywall directly over the rough-in paper.
NOTE: It is suggested to use your own method in locating the center of the aperture hole. - Select your desired method of cutting either using a hand saw or hole saw to cut an opening in the ceiling by using the provided template.
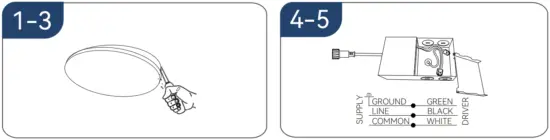
- After selecting the desired method of cutting, cut out a 4.33” diameter hole in the mounting surface.
CAUTION:
Do NOT cut a hole that exceeds or that is larger than the paper opening. - Make sure all POWER IS TURNED OFF at the electrical source to the location in which you are mounting the luminaire.
- Remove the cover of the provided J-BOX and insert wire nuts to make connections with power supply. Insert splices in J-BOX before concealing the cover.

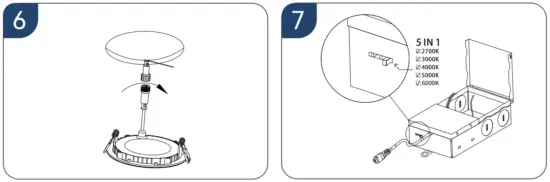
- Connect the J-BOX to the light module.
- Turn on the power and slide the CCT Selection Switch to test the light.

BEFORE INSTALLATION:
On the back of the J-BOX, slide the CCT Selection Switch and choose from five available color temperatures: 2,700K; 3,000K; 4,000K; 5,000K; and 6,000K.- Test results from each CCT Selection to determine which brightness level suits your room best.
- The light will use the preferred setting whenever you turn on the switch.
- Turn off the light switch and continue with the installation.
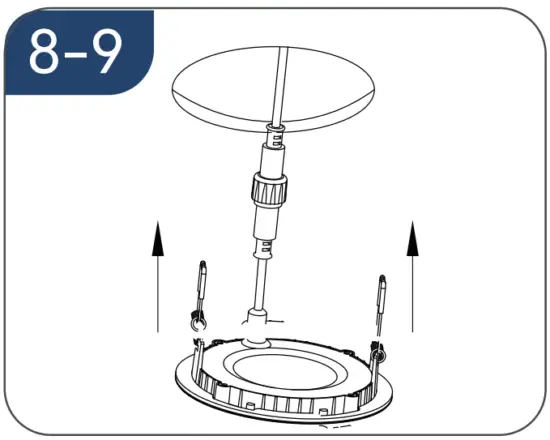
- Place the J-BOX through the cut-out hole and mount according to your local electrical code compliance.
- Rotate and hold both spring clips upward to allow passage through the cut-out in the ceiling.
Continue to press the light module through the cut-out hole until it is securely fixed and flushed with the ceiling.
Spring replacement installation
If a spring is found to be damaged, remove the spare spring from the fitting bag and replace it as follows:
- Pull out the buckle circled in red in Step 1 and place it in the position shown in Step 2.
- Place the parts circled in red as shown in the picture.

- Put the buckle back into the spring ring.
- Press the tilted side of Step 3 inward to the position of the red circle in Step 4.


