VigilLink VLMX-88VW 8×8 HDMI 2.0 Matrix

Thank you for purchasing this product
Please read these instructions carefully before connecting, operating, or adjusting this product for optimum performance and safety. Please keep this manual for future reference.
A surge protection device recommended
This product contains sensitive electrical components that electrical spikes may damage, surges, electric shocks, lightning strikes, etc. The utilization of surge protection systems is highly recommended to protect and extend the life of your equipment.
Introduction
The 18Gbps 8×8 seamless UHD Matrix can connect 8 HDMI sources to 8 HDMI displays. Supported video resolution is up to 4K60 4:4:4. The product supports the IR matrix, and IR matrix routing follows the video routing. Audio extract and insert are supported. The product supports one or more video walls with the RS232 command.
Features
- HDMI 2.0 and HDCP 2.2 compliant
- Supports 18 Gbps video bandwidth
- Supports seamless switching
- Supports video wall
- Supports IR matrix
- Supports HDMI audio extract
- Supports external L/R audio insert on HDMI stream
- Supports EDID management
- HDMI video output resolution up to 3840×2160@60
- Supports front panel, RS232, TCP/IP (LAN 10M/100M) control
Package Contents
- 1 x 8×8 seamless UHD Matrix
- 1 x AC Power Cord
- 1 x Matrix IR Remote
- 4 x IR Receiver cable (1.5 meters)
- 4 x IR Blaster cable (1.5 meters)
- 1× Cat6 cable
- 1× USB to RS232 Cable
- 1× User Manual
Specifications
| Technical | |
| HDMI Compliance | HDMI2.0 |
| HDCP Compliance | HDCP2.2 |
| Bandwidth | 18Gbps |
| Video Resolution | |
| Input | 800×600@60Hz,1024×768@60Hz, 1280×768@60Hz,1280×800@60Hz, 1280×1024@60Hz,1360×768@60Hz, 1366×768@60Hz,1400×1050@60Hz, 1440×900@60Hz,1600×1200@60Hz, 1680×1050@60Hz, 1920×1200@60Hz. 480p,576p,720p,1920x1080i,1920x1080p, 3840×2160@24Hz/25Hz/30Hz/50Hz/60Hz, 4096×2160@24Hz/25Hz/30Hz/50Hz/60Hz. |
| Output | 1920×1080@60Hz, 3840×2160@30Hz, 3840×2160@60Hz, 1280×720@60Hz, 1024×768@60Hz, 1360×768@60Hz, 1600×1200@60Hz, 1920×1200@60Hz |
| HDMI Amplitude | T.M.D.S +/- 0.4Vpp |
| Differential impedance | 100±15ohm |
| ESD Protection | Human-body Model: ±8kV (Air-gap discharge) , ±4kV (Contact discharge) |
| RS232/Ethernet Control | |
| Baud rate and protocol | Baud rate: 9600, Data bit: 8, stop bit: 1, no parity checking |
| Ethernet | IE10.0+, HTML5 |
| Mechanical | |
| Housing | Metal Enclosure |
| Color | Black |
| Dimensions | 430mm (L) X 300mm (W) X 44mm (H) |
| Weight | 5kg |
| Power Supply | AC 110 – 240V |
| Power Consumption | 100W (Max) |
| Operating Temperature | 0°C ~ 40°C / 32°F ~ 104°F |
| Storage Temperature | -20°C ~ 70°C / -4°F ~ 158°F |
| Relative Humidity | 10%~50% RH (Non-Condensation) |
Operation Controls and Functions
Front Panel

| Item | Description |
| LCD Panel | Displays the current video selections |
| COM | Control commands indicator |
| IR | IR signal indicator |
| POWER | Power LED |
| LOCK | Front panel lock/unlock |
| OUTPUT | Output selection buttons 1~8 |
| INPUT | Input selection buttons 1~8 |
| ALL | Set all outputs to the next input selection |
| RES | Set the output scaler resolution |
| EDID | Set the EDID options for the next input selection |
| NEXT | Select the next available option |
| SAVE | Save the current matrix setting as a preset |
| RECALL | Set the matrix setting from a saved preset |
| CLEAR | Cancel the current command function |
| ENTER | Set the displayed option |
- To switch matrix routing, press OUTPUT n + INPUT m+ TAKE by sequence.
- Press the button POWER to make the matrix enter or release the standby state. When standby, the power LED will be lighted.
- Press the LOCK button to lock or unlock the front buttons. When locked, the Lock LED will be lit.
- Press ALL + INPUT m + TAKE by sequence to switch input m to all the outputs.
- Press the SAVE + OUTPUT n to save the current routing scene as scene n. Up to 8 scenes can be saved.
- Press RECALL + OUTPUT n to recall routing scene n as current routing.
- Press RES + OUTPUT n + NEXT + TAKE to change the output resolution of the OUTPUT n port. Resolution Option
Number Output Resolution Setting Number Output Resolution Setting 1 3840×2160@60Hz 9 1400×1050@60Hz 2 3840×2160@50Hz 10 1366×768@60Hz 3 3840×2160@30Hz 11 1360×768@60Hz 4 3840×2160@25Hz 12 1280×1024@60Hz 5 1920×1200@60Hz 13 1280×768@60Hz 6 1920×1080@60Hz 14 1280×720@60Hz 7 1920×1080@50Hz 15 1280×720@50Hz 8 1600×1200@60Hz 16 1024×768@60Hz
- Press EDID + INPUT m + NEXT + TAKE to change the EDID mode of port INPUT m. EDID options:
Number Output Resolution Setting Number Output Resolution Setting 1 Manual 5 1920×1080@60Hz 2 3840×2160@60Hz 6 1280×1024@60Hz 3 3840×2160@30Hz 7 1280×720@60Hz 4 1920×1200@60Hz 8 1024×768@60Hz
Rear Panel

- LAN(10M/100M) and RS232 are for PC control.
- Analog Audio IN/OUT ports binds to corresponding HDMI ports.
For example:
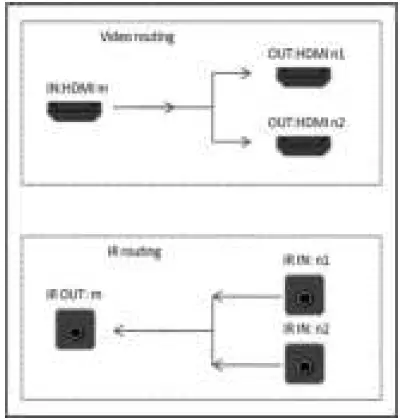
If INPUT HDMI 1 signal is DVI, the matrix will use analog AUDIO IN 1 as HDMI 1 audio source (Note: Analog AUDIO IN is only available when the corresponding video input is DVI signal). Analog AUDIO OUT n will always output the same audio content with HDMI OUTPUT n. - IR IN and IR OUT
IR IN/OUT is for remote control routing and follows the video routing.
For example:
If input HDMI m is routed to output HDMI n1 and n2 ports, then IR IN n1 and n2 ports will be routed to IR OUT m port.
Here is an illustration of the relationship between video and IR routing.

RS232/LAN Control Connection
RS232 Control Connection
The product supports RS232 control. Connect the RS232 port of the product to a PC via an RS-232 to USB cable, as shown in the following figure: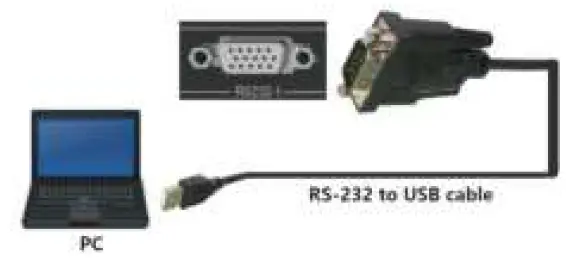
Network Control Connection
The product also supports Network control. Connect the LAN port of the product to a PC via a UTP cable, as shown in the following figure: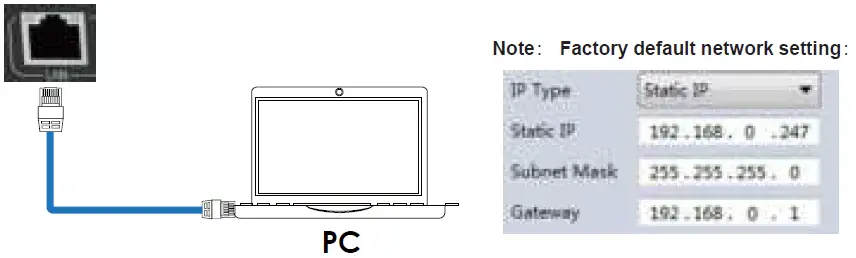
PC Tool User Guide
Accountant’s Authentication
Before running the PC tool, the password is needed for authentication.
The default password of Administrator (access to all features: 111111)
The default password of User (access to all features, except OSD function): 000000
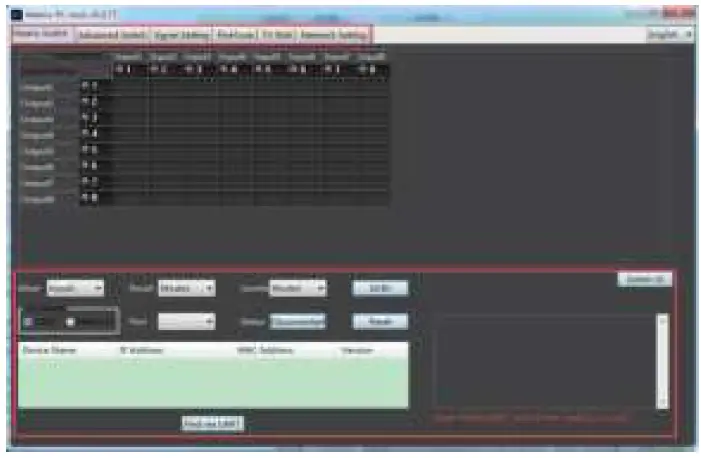
Connect with PC Tool
- The default PC tool’s UI style is as below.

- You can select UART (with RS-232 cable) or Network to connect; the baud rate is 9600 bps.
- Default IP address: 192.168.0.247.
Matrix Switch Page
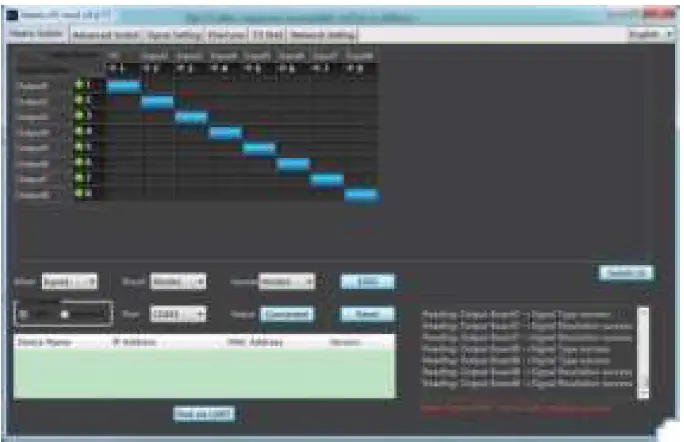
- There are 3 options for the Matrix Switch page; the user can press the “Switch UI” button to change the UI style. Suggest using the default one.
- There is a shortcut button to switch one input port to all output ports, which is All set; for example, switch input 1 to all outputs, the user can select

- Recall mode: Recall an input/output routing scene which already been saved before. The device supports a maximum of 8 scenes.
- Save mode: Save the current input/output routing in one index. Maximum 8 modes supported.
Note: The Save/Recall button works with the front panel save/recall control and the Save/Load function on the video wall page. - System reset: The PC tool supports reset systems to recover to factory configuration.
- EDID Control: Click the “EDID” button on the Matrix Switch page, and there will be a pop-up EDID control window. Users can do the following operations:
- Read EDID: Select the output port, then click the “Read ” button to read EDID.
- Write EDID: First, read an EDID from the output port, open an EDID file that was saved before, then select the input port, and click the “Write” button to write EDID.
- Save EDID: After reading EDID successfully, click “Save” button and select the save path and file name for saving.
- EDID Manual: The written EDID above will be the manual EDID data. When the user selects EDID mode with Manual mode by a front panel for one input port, the matrix system will use this data as the EDID data for the port.

Signal Setting Page
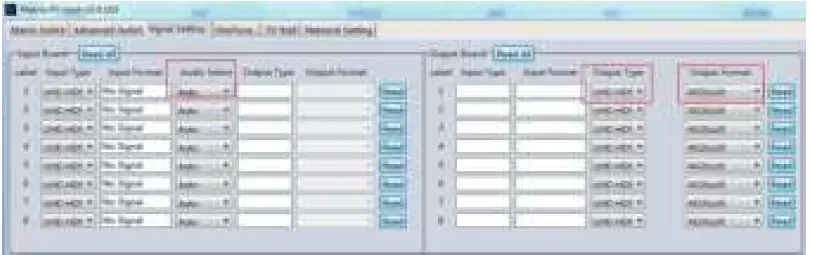
- Audio Select
There are two options for input Audio Select.- Auto: If the input source is an HDMI signal, the system will get the embedded audio; if the input source is a DVI signal, the system will get the corresponding analog audio.
- External: The system will get the corresponding analog audio.
- Output Type
Four input-output types options are UHD-HDMI (HDCP OFF), UHD-DVI, UHD-HDCP-1.4, and UHD-HDCP-2.2. - Output Format
User can set the output resolution: 3840×2160@60, 3840×2160@50, 3840×2160@30, 3840×2160@25, 1920×1200@60, 1920×1080@60, 1920×1080@50, 1600×1200@60, 1400×1050@60, 1366×768@60, 1360×768@60, 1280×1024@60, 1280×768@60, 1280×720@60, 1280×720@50, 1024×768@60.
Fine Tune Page
You can read and set each output’s Brightness/Contrast/Saturation/Sharpness.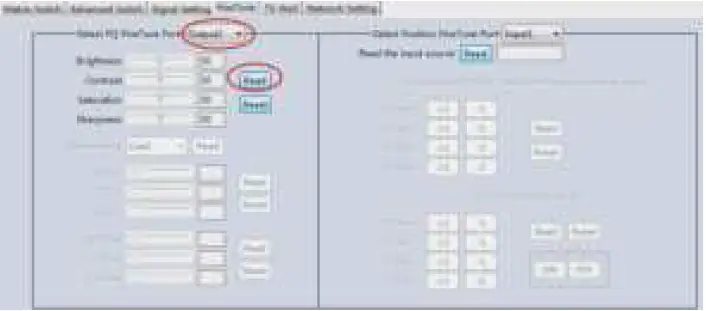 Note: Do not change the default settings without special conditions. If there is a problem after changing, click “Reset” to return to the factory settings.
Video Wall Page
This page is used to configure a group of outputs to function as a video wall.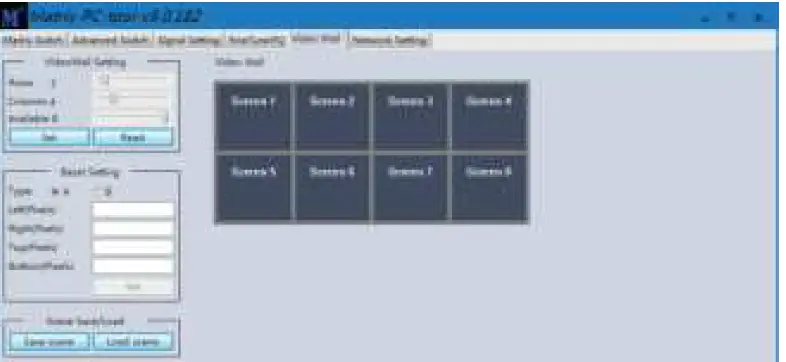
- Use the Video Wall Setting controls to change how the displays are arranged on the Video Wall page:
- Adjust the Rows and Columns sliders to change the displayed screen arrangement to permit proper Drag-and-Select of the desired screens for the video wall.
- Change the available slider to set how many outputs will be used for the Video Wall.
- Click the “Set” button to change the Screen configuration.
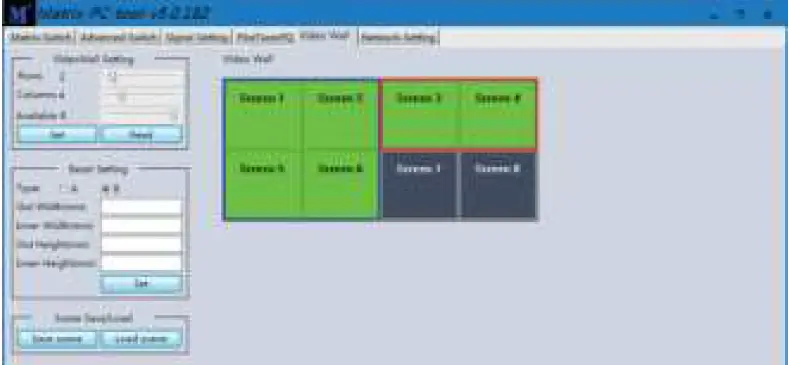
- Use the left mouse button to drag-select the screens set for video wall mode. The selected screens will be shown as bright blue.
- Use the right mouse button to open a menu.
- Select “Screen Stitching” from the menu to program the video wall mode. The selected screens will now be shown as bright green.
- To change the displayed image: right-click to open the pop-up menu and select the desired input from the “Input Select” menu option.
- Repeating steps 2 ~ 5 above with a separate set of outputs allows creating of a second video wall. However, changing the Rows, Columns, and Available sliders will automatically delete the current video wall set up when the “Set” button is clicked. The following example shows a more unusual video wall set-up of two video walls with one 2×2 wall and one 2×1 configuration:

Video Wall Context Menu
Right-clicking on any of the screen icons will display the following context menu: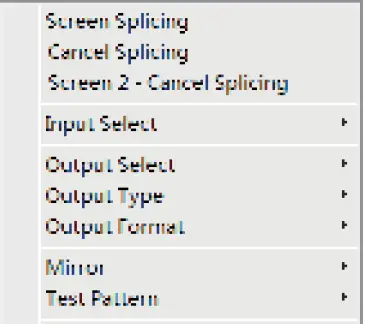
| Screen Stitching | This option connects the selected screens into a video wall configuration. |
| Cancel Stitching | Return the Video Wall configuration to normal outputs. |
| Screen x – Cancel Stitching | Remove the single screen x from the video wall to allow the displaying of another full-frame image within the video wall configuration, as shown in this example: |
| Input Select | Use the sub-menu to select the input to display on the video wall or the second input image shown in the above example. |
| Output Select | This option is only available for any screen not assigned to avideo wall mode. |
| Output Type | This option is only available for any screen not assigned to avideo wall mode. |
| Output Format | This option is only available for any screen not assigned to a videowall mode. It allows the setting of the output resolution for the selected screen output. |
| Mirror | Two sub-options: OFF (default), ON (H+V Mirror) When you select “ON,” you can make a 180º rotation with the selected screen. |
| Test Pattern | The output will display the Color Bar pattern when Test Pattern is enabled. |
Bezel Setting
The Bezel Setting section allows the entry of values to compensate for the display bezel thickness. These values may be entered as pixels (Type A) or millimeters (Type B).
- Type A Bezel Settings
The image size will be adjusted to allow for the number of pixels entered in each entry box. Click the “Set” button to view the effect of the new values. - Type B Bezel Settings
The image size will be adjusted to allow for the Inner and Outer display dimensions in each entry box. Click the “Set” button to view the effect of the new values. Bezel Compensation The following images demonstrate the effect of not having bezel compensation and what correctly configured bezel compensation settings should produce:- No Bezel Compensation

- Correct Bezel Compensation

- No Bezel Compensation


Layout Save/Load
The Save Scene/Layout and Load Scene/Layout buttons allow a video wall configuration to be saved or recalled at any time. Up to 10 configurations, each with its name, can be saved or recalled. Each Scene can optionally be given a name to identify that video wall scene setup when saving.
Control via Web
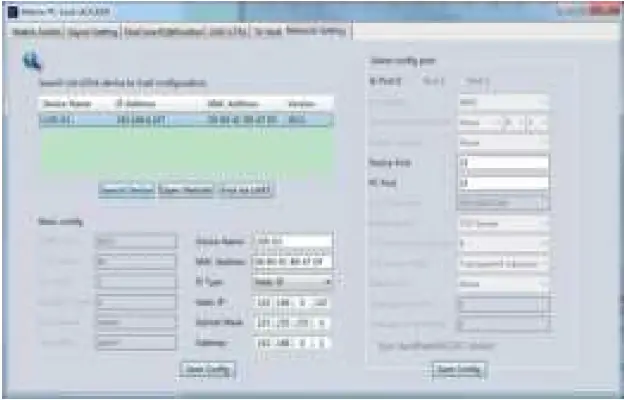
- If you do not know the matrix IP address: click on the Network Settings page, then click “Search Device,” and then select the device that you found; click “Open Website” to open the web control website, or can input the IP on the web browser, then enter the username (admin) and password (admin) so that you can control the matrix switch function and use the website.
NOTE: The computer IP and matrix IP must be in the same segment and the same local area network;
For example, if the matrix’s IP is 192.168.1.xxx, then the computer IP must be 192.168.1. yyy; otherwise, you need to change the matrix’s IP or the computer’s IP. The browser must support the HTML5 feature, which must be IE10 and above.
- If the matrix IP address is known: Input the IP on the web browser, then enter the username (admin) and password (admin) so that you can control the matrix switch function and use the website. Note: the browser must support the HTML5 feature, which must be IE10 and above.
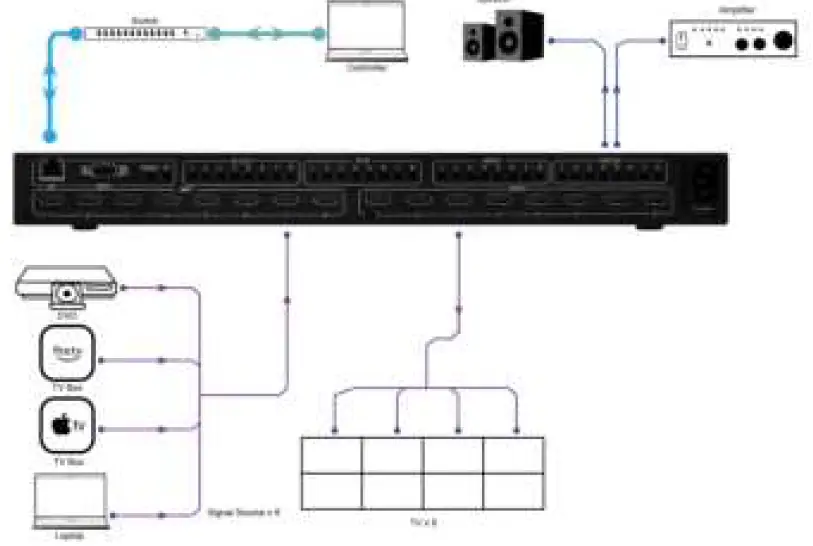
Application Example