Contents hide
VMAT3472AT HDMI Matrix
User Manual
Preface
Thank you for purchasing the Nedis VMAT3472AT.
This document is the user manual and contains all the information for correct, efficient and safe use of the product.
This user manual is addressed to the end user. Read this information carefully before installing or using the product.
Always store this information with the product for use in the future.
Product description
The Nedis VMAT3472AT is a true 4K60 4:4:4 4×2 HDMI matrix switch.
The 4 HDMI inputs and 2 HDMI outputs support fully matrixed switching.
The HDMI outputs can be combined with 2 audio outputs.
Intended use
This product is intended to connect up to 4 HDMI inputs with up to 2 HDMI outputs and switch between them.
The product also splits video and audio.
Any modification of the product may have consequences for safety, warranty and proper functioning.
Specifications
Product | HDMI Matrix |
Article number | VMAT3472AT |
Dimensions (l x w x h) | 270 x 110 x 25 mm |
HDMI version | HDMI 2.0 |
HDCP version | HDCP 2.2 |
Video Bandwidth | 600 MHz |
Supported HDMI resolution | 4K2K @ 60 Hz 1080p @ 24 Hz 1080p @ 60 Hz 1080p @ 120 Hz 1080i @ 120 Hz 720p @ 120 Hz 576p @ 120 Hz 576i @ 120 Hz 480p @ 120 Hz 480i @ 120 Hz |
Audio output | HDMI pass-through |
Up to 7.1 ch | |
Toslink output up to 5.1 ch | |
RCA L / R output stereo audio | |
Max baud rate per display | 18 Gbps |
Input / Output TMDS signal | 0.5 ~ 1.5 V p-p (TTL) |
Input / Output DDC signal | 5 V p-p (TTL) |
Input cable distance | ≤ 50 ft / 15 m 24 AWG HDMI high speed Cable at 1080p @ 24 bit 60 Hz |
Output cable distance | ≤ 50 ft / 15 m 24 AWG HDMI high speed Cable at 1080p @ 24 bit 60 Hz |
Operating temperature | -15 °C ~ 55 °C / 5 °F ~ 131 °F |
Humidity | 5 – 90% RH (no condensation) |
Max working current | 1 A |
Power supply | 5 VDC / 2 A |
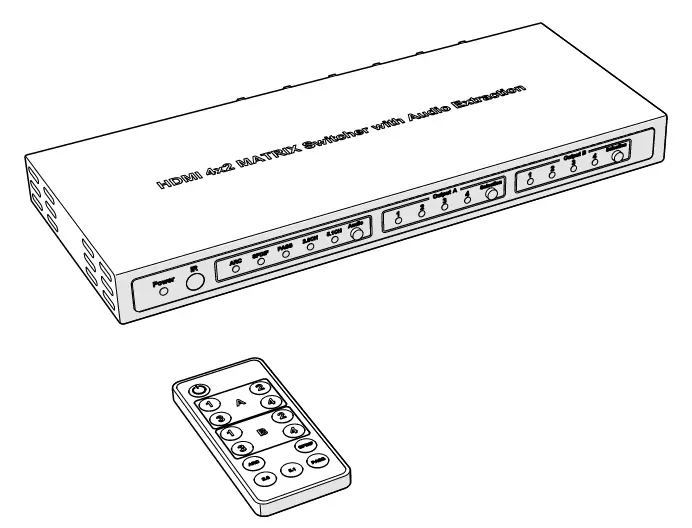
Main parts (image A)
 |
A |
1. HDMI Matrix |
2. Remote control |
3. 5 VDC / 2 A Power adapter |
Front panel (image B)
 |
B |
1. Power switch |
2. Remote control sensor |
3. HDMI input indicator LEDs for HDMI output A |
4. HDMI input indicator LEDs for HDMI output B |
5. Select button, to switch HDMI input (1-4) to HDMI output B |
6. Select button, to switch HDMI input (1-4) to HDMI output A |
7. Audio select button, to switch between audio output modes |
8. 5.1 CH audio channel indicator LED |
9. 2.1 CH audio channel indicator LED |
10. Optical digital audio output indicator LED |
11. HDMI pass-through indicator LED |
12. Audio Return Channel (ARC) indicator LED |
Rear panel (image C)
 |
C |
1. RS-232 communication port |
2. HDMI inputs (1-4) |
3. HDMI outputs (A-B) |
4. Optical digital output port |
5. L/R analog stereo audio output port |
6. Power supply port |
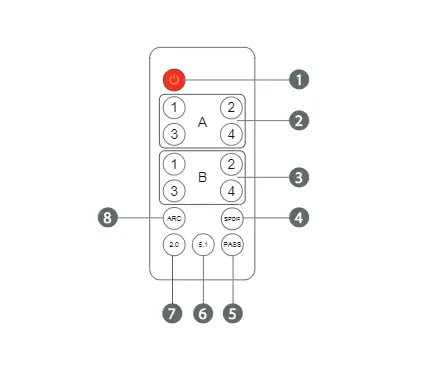
Remote control (image D)
 |
D |
1. Power button |
2. Select HDMI input buttons for HDMI output A |
3. Select HDMI input buttons for HDMI output B |
4. – 8 Select audio output mode buttons |
Safety instructions
WARNING
- Only use the product as described in this manual.
- Do not use a damaged product.
- Do not expose the product to direct sunlight, naked flames or heat.
- Do not expose the product to water or moisture.
- Place the product on a stable and flat surface.
- Do not drop the product and avoid bumping.
- Do not open the product.
- Keep the product out of reach from children.
Installation
- Check the contents of the package
- Check that all parts are present and that no damage is visible on the parts. If parts are missing or damaged, contact the Nedis B.V. service desk via the website: www.nedis.com.
Connection diagram (image E)
 |
E |
- Connect HDMI input devices E1 to the HDMI inputs C2 using a HDMI cable. A HDMI input device can be for example a DVD player, a set top box or a game console.
For audio, the following connections are possible:
Audio L/R | Connect stereo audio equipment E2 using a L/R cable. |
Toslink (Optical) | Connect Toslink supported audio equipment E3 using Toslink cable. Note: Toslink does not support Dolby Digital plus. You maybe need to change the audio settings of your input device. |
HDMI pass-through Output A / B | Connect an audio receiver E4 between your HDMI output E5 and the HDMI splitter. The audio receiver must support a HDMI pass-through. You will need 2 HDMI cables. |
- Connect the HDMI output devices E5 to the HDMI outputs C3 using a HDMI cable.
- Connect a RS-232 Equipped PC or Notebook E6 to the RS-232 port C1. To make this connection use a RS-232 to USB cable and a RS-232 female to 3 Pin Phoenix Connector. This connection enables to send ASCII commands to the HDMI splitter A1.
- Connect the power supply port C5 to a power outlet using the supplied DC 5 V, 2 A power adapter A3.
Use
For the following options, use the remote control D234:
- Press the HDMI input buttons D23 to select the input for each HDMI output (A, B).
- SPDIF D4: Enable or disable Optical Digital Audio output (SPDIF).
- ARC D8: Enable or disable Audio Return Channel (ARC).
- Use ARC if your HDMI output device is the audio source (for example if your TV has a built-in tuner) and you want to return the audio signal through the HDMI connection.
Note: make sure the used HDMI cable supports ARC.
- PASS D5: Press D5 to send the audio from the selected input device to the HDMI outputs.
- 5.1 D6: Press D6 to set the audio output mode to 5.1 channel.
- 2.1 D7: Press D7 to set the audio output mode to 2.1 channel.
RS-232 control
For correct communication set the RS-232 parameters to the following setting:
The matrix can be controlled with RS-232 commands.
- Baud rate: 19200
- Data bits: 8
- Parity: none
- Stop bits: 1
The following ASCII commands can be used:
Command | Functional description |
r type# | Get the type information |
r status# | Get the current status information |
r fw# | Get the firmware version |
s power x# | x=0, power off x=1, power on |
r power# | Get the power current status |
s hdmi in x out y# | y=1, x=1, switch the Output A to Input 1 y=1, x=2, switch the Output A to Input 2 y=1, x=3, switch the Output A to Input 3 y=1, x=4, switch the Output A to Input 4 y=2, x=1, switch the Output B to Input 1 y=2, x=2, switch the Output B to Input 2 y=2, x=3, switch the Output B to Input 3 y=2, x=4, switch the Output B to Input 4 |
s arc x# | x=0, disable the ARC x=1, enable the ARC |
r arc# | Get the ARC status |
s audio spdif# | x=0, disable the Optical Digital Audio output x=1, enable the Optical Digital Audio output |
r audio spdif# | Get the Optical Digital Output status |
s edid x# | x=1, switch the EDID to pass x=2, switch the EDID to 2CH x=3, switch the EDID to 5.1CH |
r edid x# | Get the current EDID selection status |
Maintenance
- Clean the product regularly with a soft, clean, dry cloth. Avoid abrasives that can damage the surface.
- Do not use aggressive chemical cleaning agents such as ammonia, acid or acetone when cleaning the product.
Warranty
Any changes and/or modifications to the product will void the warranty. We accept no liability for damage caused by improper use of the product.
Disclaimer
Designs and specifications are subject to change without notice. All logos, brands and product names are trademarks or registered trademarks of their respective owners and are hereby recognized as such.
Disposal
 | This symbol indicates that this product should not be thrown away with other household waste throughout the EU. To prevent possible harm to the environment or human health by uncontrolled waste disposal, you are responsible for recycling it so that it can promote the sustainable reuse of raw materials. To return your used product, you can use the regular return and collection systems or contact the store where the product was purchased. They can recycle this product for the environment. |


