
![]()
Printer Installation Guide & Safety Guide
KN04-00139A (Rev.1.1)
THERMAL PRINTER SRP-380/382
Information
This installation guide contains only simple information required for the installation of the product. Refer to the User’s Manual in the CD that is shipped with the product for detailed instructions for installation. The contents contained in the CD are as follows.
- Manual: User’s Manual, Code Table, Control Commands, Software manuals
- Driver: Windows Driver, OPOS, JPOS, CUPS(Linux, Mac), VCOM(USB, Ethernet)
- SDK: UPOS SDK(iOS, Android)
- Utility: Unified POS Utility, Net Configuration Tool, Android Utility, iOS Utility
We at Bixolon Co., Ltd. constantly strive to improve product functions and quality. To do this, the specifications of our product and the contents of the manual may change without prior notice. Please refer to the BIXOLON website for the addresses and phone numbers of the company’s headquarters and branch offices. (http://www.bixolon.com)
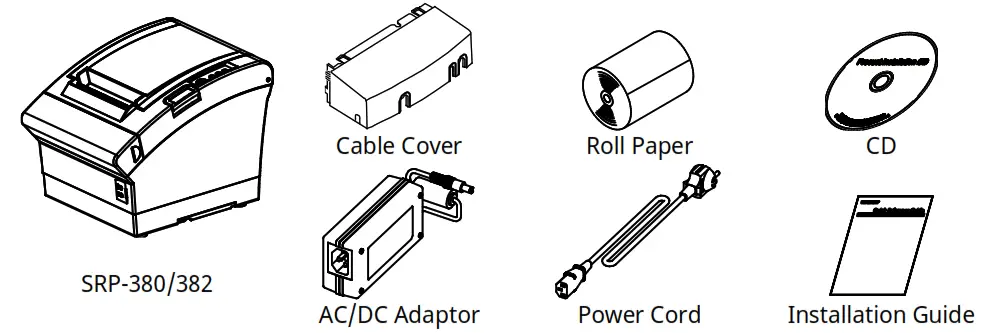
Components
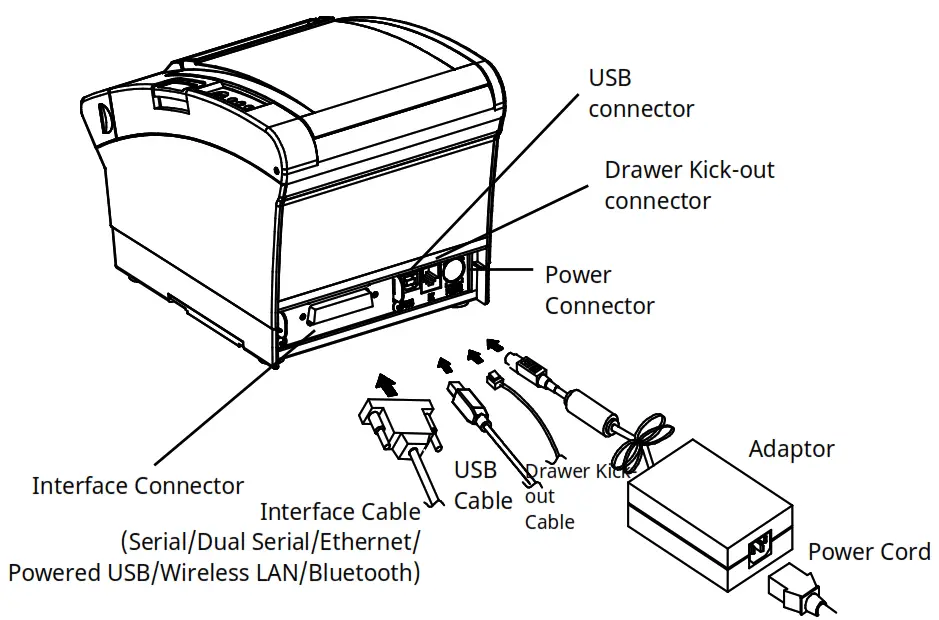
Cable Connection
- Turn off the printer and POS System(host computer).
- Connect the power cord to an adaptor, and connect the adapter to the power connector of the printer.
- Check the type interface located at the back of the printer(Serial, Dual Serial, Ethernet, USB, Powered USB, Wireless LAN, Bluetooth) and connect the proper cable.
- Connect the drawer kick-out cable to the drawer kick-out connector located at the back of the printer.
※ Do not use an adapter that was not supplied with the printer.
Installing Paper Roll
 Press the Cover-Open button to open the cover.
- Insert new roll paper in the correct direction.
- Pull the paper out slightly and close the cover.
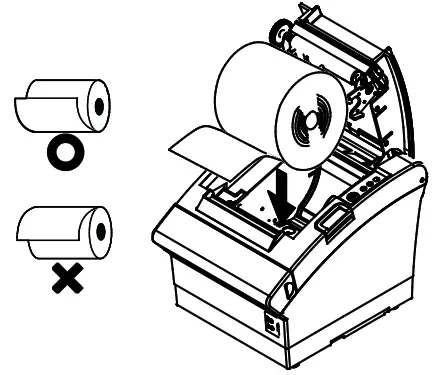 Press the Cover-Open button to open the cover.
※ Note
Hold down the center of the cover firmly when closing the cover so that the paper maintains close contact with the roller. Printing quality may not be optimum if the recommended paper is not used. (Refer to the User’s Manual.)
Paper Jam
(Refer to 1-8 in User’s Manual)
- Turn the printer off and on, open the cover, and remove the paper.
- If the cover cannot be opened, turn off the printer, separate the cover-cutter, and try to turn the auto-cutter knob to open the cover.
Using Control Panel

- Power (Indicator Lamp)
Greenlight will be on when power is supplied to the printer. - Error (Indicator Lamp)
The red light will be on in various error conditions such as out of paper, cover open, etc. - Paper (Indicator Lamp)
The red light will be on when there is no paper or paper almost runs out. If this light keeps blinking, it means that the printer is in a self-test standby state or waiting for macro execution. - Feed (Button)
Press this button to feed the paper out. Hold down this button to feed out the paper continuously
Setting DIP Switches
DIP switch settings should be changed when the printer power is turned off. Any changes made while the printer power is on are not recognized.
1. DIP Switch 1
• Serial / Dual Serial Interface Settings
| Switch | Function | ON | OFF | Default |
| 1-1 | Auto Line Feed | Enabled | Disabled | OFF |
| 1-2 | Flow Control | XON/XOFF | DTR/DSR | OFF |
| 1-3 | Data Length | 7-bit | 8-bit | OFF |
| 1-4 | Parity Check | Yes | No | OFF |
| 1-5 | Parity Selection | EVEN | ODD | OFF |
| 1-6 | Baud Rate Selection (bps) | Refer to the following Table 1 | OFF | |
| 1-7 | ON | |||
| 1-8 | OFF | |||
- USB / Ethernet / Wireless LAN / Powered USB interface settings
| Switch | Function | ON | OFF | Default |
| 1-1 | Auto Line Feed | Enabled | Disabled | OFF |
| 1-2 | Reserved | OFF | ||
| 1-3 | Reserved | OFF | ||
| 1-4 | Reserved | OFF | ||
| 1-5 | Reserved | OFF | ||
| 1-6 | Reserved | OFF | ||
| 1-7 | Reserved | ON | ||
| 1-8 | Reserved | OFF |
- Bluetooth Interface settings
| Switch | Function | ON | OFF | Default |
| 1-1 | Auto Line Feed | Enabled | Disabled | OFF |
| 1-2 | Reserved | OFF | ||
| 1-3 | SSP Mode | Enabled | Disabled | OFF |
| 1-4 | Reserved | OFF | ||
| 1-5 | Reserved | OFF | ||
| 1-6 | Reserved | OFF | ||
| 1-7 | Reserved | ON | ||
| 1-8 | Reserved | OFF |
- DIP Switch 2
- All Interface Settings
| Switch | Function | ON | OFF | Default |
| 2-1 | Reserved | OFF | ||
| 2-2 | Reserved | OFF | ||
| 2-3 | Internal Bell Control | Disabled | Enabled | OFF |
| 2-4 | Auto Cutter Selection | Disabled | Enabled | OFF |
| 2- 5 | Printing Density | Refer to the following Table 2 | OFF | |
| 2-6 | OFF | |||
| 2-7 | Near End Sensor Control | Disabled | Enabled | OFF |
| 2-8 | Auto External Buzz | Enabled | Disabled | OFF |
- Table 1 – Baud rate(bps) selection
| Transmission Speed | 1-6 | 1-7 | 1-8 | Default |
| 2400 | ON | OFF | OFF | 9600 |
| 4800 | ON | OFF | ON | |
| 9600 | OFF | ON | OFF | |
| 19200 | OFF | OFF | OFF | |
| 38400 | OFF | ON | ON | |
| 57600 | OFF | OFF | ON | |
| 115200 | ON | ON | ON |
* Please set up 9,600bps for the baud rate of the dual serial interface.
- Table 2 – Printing density selection
| Printing density | 2-5 | 2-6 | Default |
| Level 1 | OFF | OFF | – Level 1 is the default – Level 4 is Darkest |
| Level 2 | ON | OFF | |
| Level 3 | OFF | ON | |
| Level 4 | ON | ON |
X Print Density
The print density can be set to one of sixteen different levels through virtual memory switches.
| Dip Switch | Density | Density Level | ||||
| Light Dark | ||||||
| Speed | 4(High Speed) | 4 | Level 1 | |||
| 3 | 8 | Level 2 | ||||
| 2 | 12 | Level 3 | ||||
| 1(Low Speed) | 16 | Level 4 | ||||
| Memory Switch | Density | Density Level | ||||
| Light Dark | ||||||
| Speed | 4(High Speed) | 1 | 2 | 3 | 4 | Level 1 |
| 3 | 5 | 6 | 7 | 8 | Level 2 | |
| 2 | 9 | 10 | 11 | 12 | Level 3 | |
| 1(Low Speed) | 12 | 13 | 14 | 16 | Level 4 | |
* Choose Unified Utility or Self-Test mode to set the print density using the VMSM(Virtua I Memory Switch Management).
Self-Test
- Check whether the paper is mounted correctly.
- Turn on the power while holding down the Feed button and the self-test procedure will begin.
- The printer will print out the current status of the printer including the version of ROM and DIP switch settings.
- After printing out the current status of the printer, the printer will print the following lines and wait for the next step(the paper lamp will keep blinking).
SELF-TEST PRINTING.
PLEASE PRESS THE FEED BUTTON.
Continuous SELF-TEST: Less than 1 second
VMSM Selection: 1 second or more - Press the Feed button to resume printing or hold down the button to change the VMSM settings.
5-1 If “Continuous SELF-TEST” is selected
5-1-1 Press the Feed button for less than one second to print the preset page.
5-1-2 The self-test ends automatically as it prints the following line and cuts the paper.
*** COMPLETED ***
5-1-3 The printer goes into normal print mode upon completion of the self-test.
5-2 If “VMSM Selection” is selected
5-2-1 The following lines will be printed when the VMSM opens.
** VMSM Selection **
0: Exit and reboot printer / 1: Print current settings / 2: Set Print Density
3: Set Print Speed / 4: Set Cutting mode / 5: Set External Buzzer after cutting
6: Set Internal Buzzer after cutting / 7 or more: None
5-2-2 Press the Feed button to run the above function.
5-2-2-1 Step 1(Select Options): press the button a number of times as shown by each menu.
5-2-2-2 Step 2(Enter Options): hold down the button for at least one second to apply each item selected.
※ Note
If you select any items not listed above, the list of “VMSM Selection” will be printed again. Setting the mode will be canceled if no item is selected in Step 1.
5-3 Hold down the Feed button for at least 1 second to save the changes. The following line will be printed before cutting the paper.
※ Attention
If “0: Exit and reboot printer” is not executed, the new settings will not be saved.
*** COMPLETED *** - The new settings will be automatically applied when the printer resets.
※ Note
You can check whether the printer works correctly or not through the self-test. Printing quality, ROM
version and DIP switch settings can be checked through the self-test function.
WEEE(Waste Electrical and Electric Equipment
This marking shown on the product or its literature indicates that it should not be disposed of with other household wastes at the end of its working life. To prevent possible harm to the environment or human health from uncontrolled waste disposal, please separate this from other types of waste and recycle it responsibly to promote the sustainable reuse of material resources. Household users should contact either the retailer where they purchased this product, or their local government office, for details of where and how they can take this item for environmentally safe recycling. Business users should contact their suppliers and check the terms and conditions of the purchase contract. This product should not be mixed with other commercial wastes for disposal.
Safety Precautions
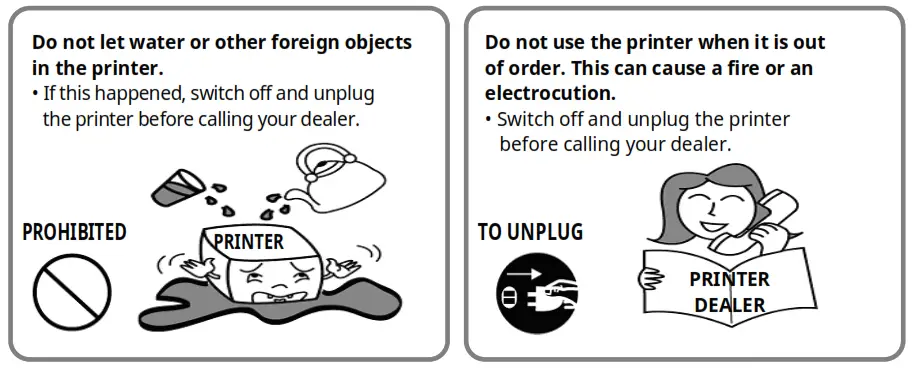
In using the present appliance, please keep the following safety regulations in order to prevent any hazard or material damage.![]() WARNING
WARNING
Violating following instructions can cause serious injury or death.

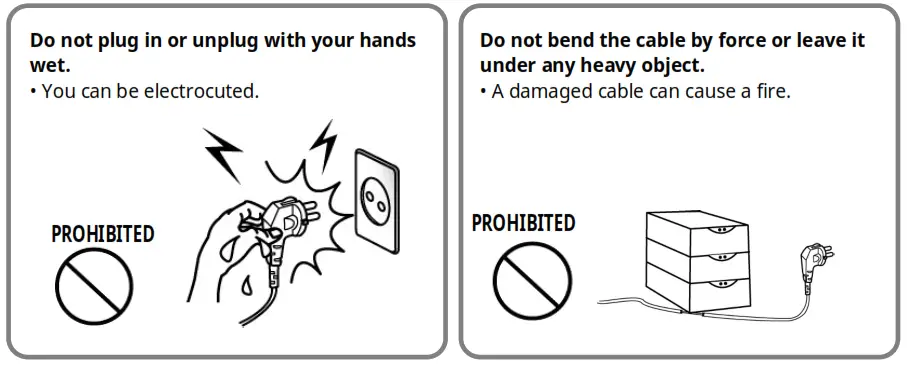
![]() CAUTION
CAUTION
Violating following instructions can cause slight wounds or damage to the appliance.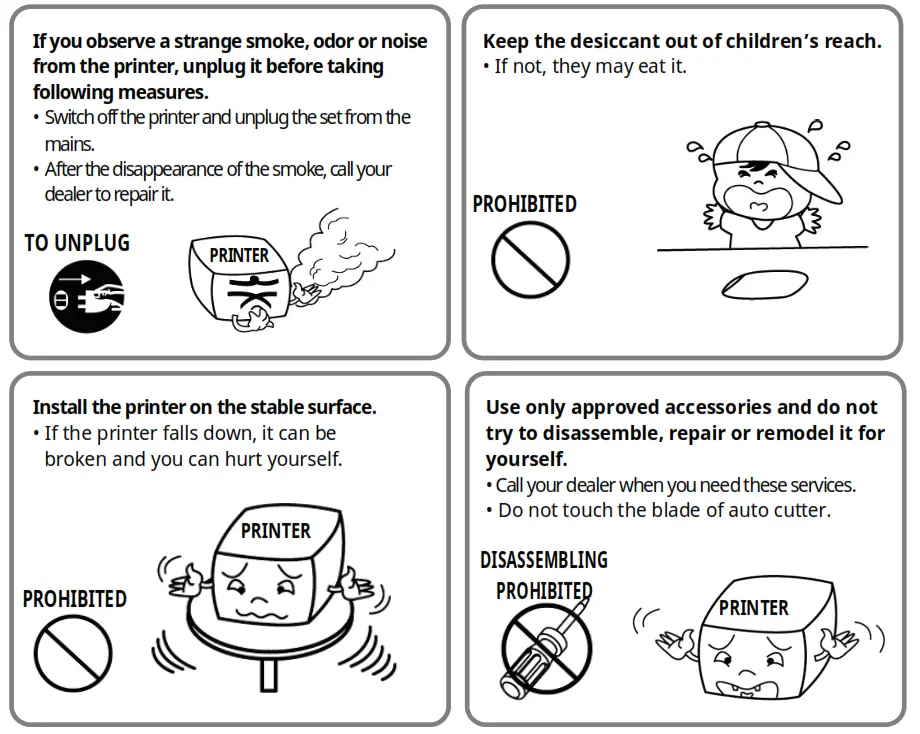
![]()


