
![]()
LCD MONITOR![]()
| PN-HS551 PN-HS501 PN-HS431 | PN-HY551 PN-HY501 PN-HY431 |
FOR CUSTOMERS IN U.K. IMPORTANT
The wires in this mains lead are colored in accordance with the following code:
GREEN-AND-YELLOW: Earth
BLUE: Neutral
BROWN: Live
As the colors of the wires in the mains lead of this apparatus may not correspond with the colored markings identifying the terminals in your plug proceed as follows:
- The wire which is colored GREEN-AND-YELLOW must be connected to the terminal in the plug which is marked by the
letter E or by the safety earth or colored green or green-and-yellow. - The wire which is colored BLUE must be connected to the terminal which is marked with the letter N or colored black.
- The wire which is colored BROWN must be connected to the terminal which is marked with the letter L or colored red.
Ensure that your equipment is connected correctly. If you are in any doubt consult a qualified electrician.
“WARNING: THIS APPARATUS MUST BE EARTHED.”
The product Energy Label and Product Information Sheet can be found on the online European database known as EPREL (European Product Registry for Energy Labelling).


IMPORTANT INFORMATION
WARNING: TO REDUCE THE RISK OF FIRE OR ELECTRIC SHOCK, DO NOT EXPOSE THIS PRODUCT TO RAIN OR MOISTURE.
CAUTION RISK OF ELECTRIC SHOCK DO NOT OPEN
CAUTION: TO REDUCE THE RISK OF ELECTRIC SHOCK, DO NOT REMOVE THE COVER. NO USER-SERVICEABLE PARTS INSIDE.
REFER SERVICING TO QUALIFIED SERVICE PERSONNEL.
The lightning flash with the arrowhead symbol, within a triangle, is intended to alert the user to the presence of uninsulated “dangerous voltage” within the product’s enclosure that may be of sufficient magnitude to constitute a risk of electric shock to persons.The exclamation point within a triangle is intended to alert the user to the presence of important operating and maintenance (servicing) instructions in the literature accompanying the product.
To maintain compliance with EMC regulations, use shielded cables to connect to the following terminals: HDMI input terminal,
D-sub input terminal and the RS-232C input terminal.
DEAR SHARP CUSTOMER
Thank you for your purchase of a SHARP LCD product. To ensure safety and many years of trouble-free operation of your product, please read the Safety Precautions carefully before using this product.
MOUNTING PRECAUTIONS
- This product is for use indoors.
- A mounting bracket compliant with VESA specifications is required.
- Since the monitor is heavy, consult your dealer before installing, removing or moving the monitor.
- Mounting the monitor on the wall requires special expertise and the work must be performed by an authorized SHARP dealer. You should never attempt to perform any of this work yourself. Our company will bear no responsibility for accidents or injuries caused by improper mounting or mishandling.
- Use the monitor with the surface perpendicular to a level surface. If necessary, the monitor may be tilted up to 20 degrees upward or downward.
- This monitor should be used at an ambient temperature between 32°F (0°C) and 104°F (40°C). Provide enough space around the monitor to prevent heat from accumulating inside.
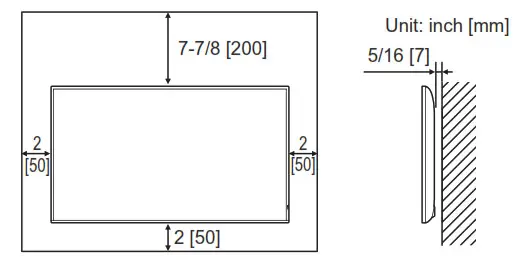
For the monitor in landscape orientation
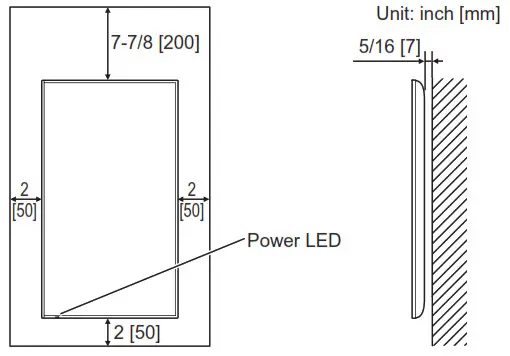
For the monitor in portrait orientation
- If it is difficult to provide sufficient space for any reason such as the installation of the monitor inside a housing, or if the ambient temperature may be outside of the range of 32°F (0°C) to 104°F (40°C), install a fan or take other measures to keep the ambient temperature within the required range.
- Do not block any ventilation openings. If the temperature inside the monitor rises, this could lead to a malfunction.
- Do not place the monitor on a device that generates heat.
- Adhere to the following when installing the monitor in its portrait orientation. Failing to adhere to the following may cause malfunctions.
– Install the monitor such that the power LED is located on the bottom side.
– Set the THERMAL SENSOR SETTING on the SETUP menu to PORTRAIT. (See OPERATION MANUAL.)
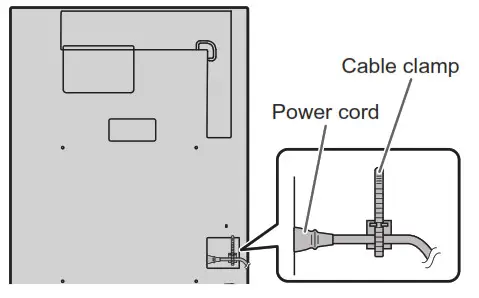
– Be sure to clamp the power cord (supplied) by using the supplied cable clamp (affixing type). When clamping the power cord, take care not to stress the terminal of the power cord. Do not bend the power cord excessively.
Mounting the monitor laying flat on a surface
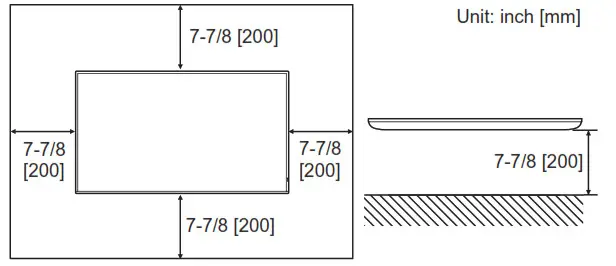
* When using the monitor laying flat on a surface (when the monitor is tilted 20 degrees or more upward or downward from the perpendicular in relation to a level surface), consult an authorized SHARP dealer because there are some specific mounting conditions. Adhere to the following. Failing to adhere to the following may cause malfunctions.
– Set THERMAL SENSOR SETTING in the SETUP menu to FACE UP or FACE DOWN. (See OPERATION MANUAL.)
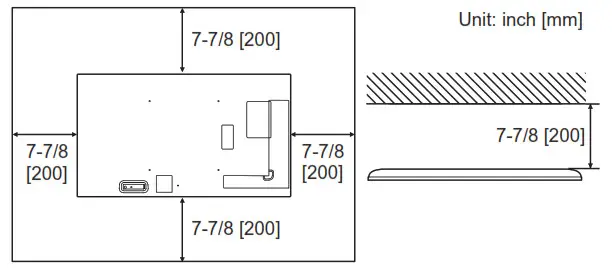
– Use the monitor at the ambient temperature within the range of 32°F (0°C) to 86°F (30°C). Provide 7-7/8 inch (200 mm) or more space between the monitor and the ceiling or other mounting surfaces and surrounding objects to prevent heat from accumulating inside. If it is difficult to provide sufficient space or if the ambient temperature may be outside of the range of 32°F (0°C) to 86°F (30°C), install a fan or take other measures to keep the ambient temperature within the required range.
For the monitor laying flat on a surface (facing up)
For the monitor laying flat on a surface (facing down)
– Do not press hard on the LCD panel or otherwise subject it to impacts.
Supplied Components
If any component should be missing, please contact your dealer.
| Liquid Crystal Display Monitor: 1 Remote control unit: 1 Power cord Remote control unit battery: 2 CD-ROM (Utility Disk for Windows): 1 | Setup Manual (this manual): 1 Cable clamp: 2 Logo sticker: 1 USB flash drive cover: 1 USB flash drive cover fixing screw: 2 |
* SHARP Corporation holds authorship rights to the Utility Disk program. Do not reproduce it without permission.
* For environmental protection!
Do not dispose of batteries in household waste. Follow the disposal instructions for your area.
Specifications
| Model | PN-HS551 | PN-HY551 | PN-HS501 | PN-HY501 | PN-HS431 | PN-HY431 |
| Power requirement | AC 100 – 240 V, 2.1 A, 50/60 Hz | AC 100 – 240 V, 1.8 A, 50/60 Hz | AC 100 – 240 V, 1.7 A, 50/60 Hz | AC 100 – 240 V, 1.3 A, 50/60 Hz | AC 100 – 240 V, 1.6 A, 50/60 Hz | AC 100 – 240 V, 1.2 A, 50/60 Hz |
| Operating temperature * | 32°F to 104°F (0°C to 40°C) | |||||
| Operating humidity | 20% to 80% (no condensation) | |||||
| Power consumption | 190 W | 150 W | 110 W | 140 W | 100 W | |
| Dimensions inch (mm) (excluding protrusions) | Approx. 48-7/8 (W) x 2-1/2 (D) x 28-1/16 (H) (1241.8 x 63.5 x 712.6) | Approx. 44-7/16 (W) x 2-1/2 (D) x 25-9/16 (H) (1128.4 x 63.5 x 649) | Approx. 38-5/16 (W) x 2-1/2 (D) x 22-1/8 (H) (973 x 63.5 x 561.2) | |||
| Weight lbs. (kg) | Approx. 39.7 (18.0) | Approx. 33.1 (15.0) | Approx. 25.4 (11.5) | |||
* When using the monitor laying flat on a surface (when the monitor is tilted more than 20 degrees upward or downward from the perpendicular in relation to a level surface), use the monitor at a temperature between 32°F (0°C) to 86°F (30°C).
Temperature conditions may change when using the monitor together with the optional equipment recommended by SHARP. In such cases, please check the temperature condition specified by the optional equipment.
As a part of our policy of continuous improvement, SHARP reserves the right to make design and specification changes for product improvement without prior notice. The performance specification figures indicated are nominal values of production units. There may be some deviations from these values in individual units.
Preparing the Remote Control Unit
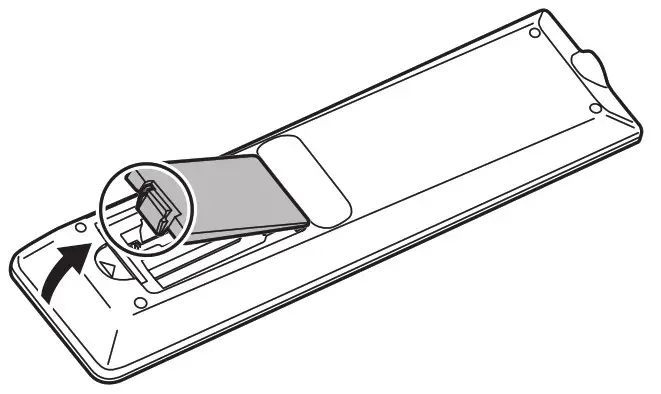
- Place your finger on the part marked with the ▲, and then pull the cover off.

- See the instructions in the compartment and put in the batteries (R03 or LR03 (“AAA” size) x 2) with their plus (+) and minus (-) sides oriented correctly.
- Close the cover.
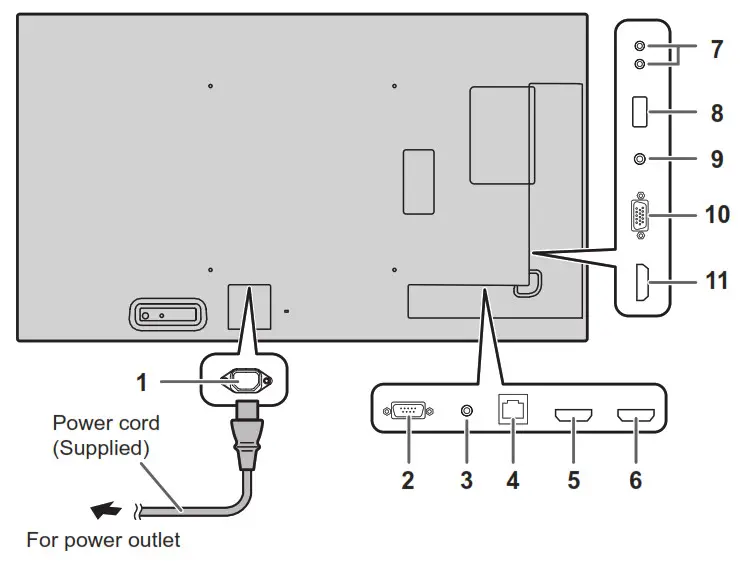
Connections
Caution
- Be sure to turn off the main power switch and disconnect the plug from the power outlet before connecting/disconnecting cables. Also, read the manual of the equipment to be connected.
- Be careful not to confuse the input terminal with the output terminal when connecting cables. Accidentally reversing cables connected to the input and output terminals may cause malfunctions and the other problems.
TIPS
- The audio input terminals used in each input mode are as follows.
Input mode Audio input terminal HDMI1 HDMI1 input terminal HDMI2 HDMI2 input terminal HDMI3 HDMI3 input terminal D-SUB Audio input terminal USB USB port - The terms HDMI, HDMI High-Definition Multimedia Interface, and the HDMI Logo are trademarks or registered trademarks of HDMI Licensing Administrator, Inc.
- Adobe, Acrobat, and Acrobat Reader are either registered trademarks or trademarks of Adobe in the United States and/or other countries.
- VESA is either a registered trademark or trademark of the Video Electronics Standards Association in the United States and/or other countries.
- All other brand and product names are trademarks or registered trademarks of their respective holders.
Turning Power On/Off
![]() Caution
Caution
- Turn on the monitor first before turning on the computer or playback device.
- When switching the main power switch or the POWER button off and back on, always wait for at least 5 seconds.
A short interval may result in a malfunction.
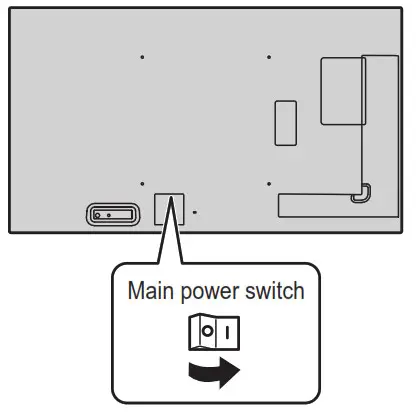
Turning on the main power
Off mode, when main power is off.
![]() Caution
Caution
- The main power must be turned on/off with the main power switch. Do not connect/disconnect the power cord or turn
the breaker on/off while the main power switch is on. - For a complete electrical disconnection, pull out the main plug.
Turning power on/off
Press the POWER button to turn the power ON/OFF.
You can also turn the power ON/OFF by pressing the MONITOR ON button/MONITOR OFF button on the remote control unit.
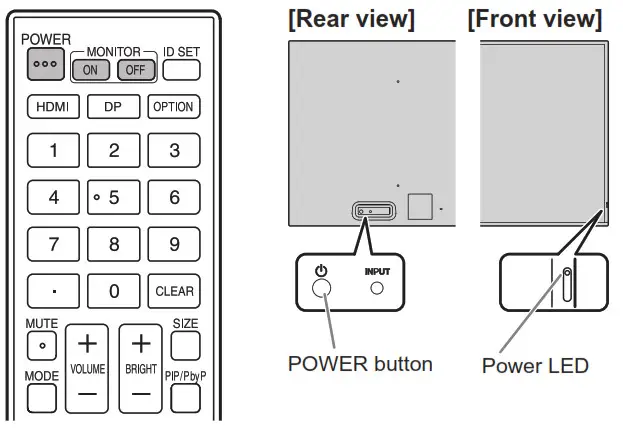
| Status | Status of the monitor |
| Green lit | Power on |
| Orange lit | Power off (Standby state*) |
| Green flashing | Input signal waiting for state |
* Standby mode when POWER SAVE MODE is set to ON.
Networked standby mode when POWER SAVE MODE is set to OFF. Networked standby mode allows the monitor to be turned on via network (LAN, RS-232C, and HDMI CEC).
- Setting the SCHEDULE flashes the power LED alternately in red and orange in the standby state.
Operation mode
When the monitor is turned on for the first time after being shipped from the factory, the operation mode setting screen will be displayed. Set it to MODE1 or MODE2.
MODE1 is the recommended setting and conforms to the “Normal Configuration” as defined in the EcoDesign Regulation (2019/2021).
MODE1 ….POWER MANAGEMENT setting can not be changed. If there is no signal for approx. 5 minutes, this monitor automatically enters standby mode.
OFF IF NO OPERATION and POWER SAVE MODE are set to ON.
These settings can not be changed.
If there is no operation for 4 hours or more, this monitor automatically enters standby mode. Power consumption in standby state is also minimized.
MODE2 ….POWER MANAGEMENT is set to ON.
OFF IF NO OPERATION and POWER SAVE MODE are set to OFF.
These settings can be changed.
Even after being set, changes can be made using OPERATION MODE, located in the menu of the monitor. (See OPERATION MANUAL.)
Date/time setting
- If the time has yet to be set when the monitor is first turned on, the date/time setting screen appears. Set the date and time.
- Be sure to set the date and time.
Mounting Precautions
(For SHARP dealers and service engineers)
- When installing, removing or moving the monitor, ensure that this is carried out by at least 2 people.
- Be sure to use a wall-mount bracket designed or designated for mounting the monitor.
- This monitor is designed to be installed on a concrete wall or pillar. Reinforced work might be necessary for some materials such as plaster / thin plastic board/wood before starting installation.
- This monitor and bracket must be installed on a wall that can endure at least 4 times or more the weight of the monitor.
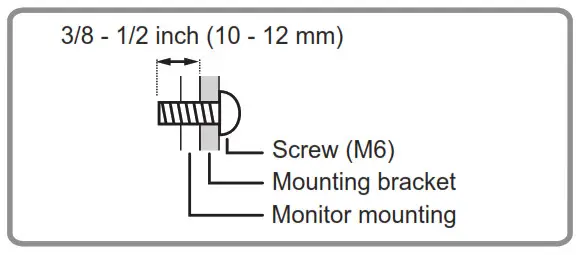
Install by the most suitable method for the material and the structure. - To attach a VESA-compliant mounting bracket, use M6 screws that are 3/8 inch (10 mm) to 1/2 inch (12 mm) longer than the thickness of the mounting bracket.
- Do not use an impact driver.
- When moving the monitor, be sure to hold it around the periphery. Do not grasp the screen. This may cause product damage, failure, or injury.
- After mounting, please carefully ensure the monitor is secure, and not able to come loose from the wall or mount.
- Do not use any screw holes other than those for mounting brackets, located on the rear of the monitor, for installation.
- When using the monitor laying flat on a surface (when the monitor is tilted 20 degrees or more upward or downward from the perpendicular in relation to a level surface), consult an authorized SHARP dealer because there are some specific mounting conditions.
![]()
SHARP CORPORATION
Printed in China


