AV Pro edge AC-MX-42X HDMI Matrix Switcher

The AC-MX-42X is a Four Input, Two Output HDMI Matrix Switcher supporting the newest HDMI 2.1 features, including HDCP 2.3, High Frame Rate, and 8K Video Resolutions up to 40Gbps (FRL5). Perfect for expanding upon the amount of HDMI 2.1 Inputs for a sink device and bypassing the limited capabilities of a legacy AVR, ensuring the highest quality experience with the latest gaming consoles, streaming devices, and satellite receivers in conjunction with newer 4K120/8K Displays and AVRs. AVPro Edge has been hard at work bringing integrators an updated Web User Interface allowing for configuration, troubleshooting, and control of the 42X unit. Additionally, the 42X comes equipped with an OLED Diagnostics Screen. Primarily used to display the incoming signal type for each output, the Diagnostic screen may also display the enabled scaling type and device IPv4 Address.
From Built-in scaling to complex EDID management, the AC-MX-42X can work perfectly in any system.
This quick start guide will go through
- Installation
- Front panel control
- Connecting to the LAN
- RS232 Control
- EDID Management
- troubleshooting
Quick Installation
- Connect the HDMI Input Sources to the desired input of the AC-MX-42X
- Connect the HDMI Output Devices
- Connect the Power Supply to the AC-MX-42X
- Turn on Input Devices
- Turn on Output Devices
- Control using Front Panel or using the AVPro EdgeUI Interface
Front Panel

- Diagnostic Screen – Shows Output Signal Information
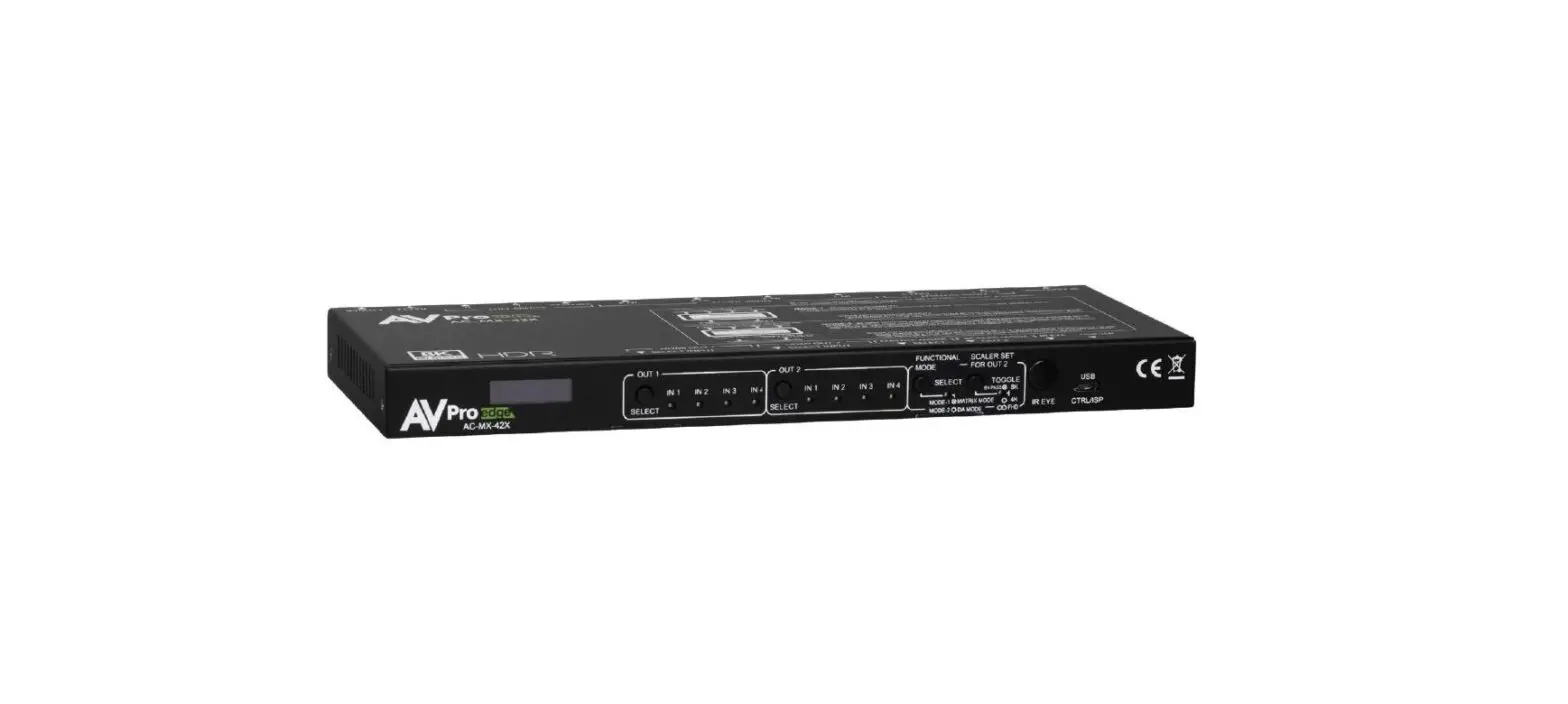
- Out 1 – Changes the Input Source for HDMI Output 1
- Out 2 – Changes the Input Source for HDMI Output 2
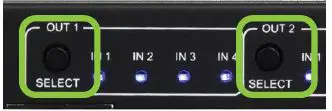
- Functional Mode – Toggle’s switcher function between Matrix and Distribution Amplifier
- Scaler Set for OUT 2 – Set’s Scaler Mode for HDMI Output 2
- 8k -> 4k = Solid LED
- 8k/4k -> 1080p = Flashing LED
- Auto-Switch – Press and Hold the desired Out Button for 5 seconds.
- On = Flashing Output LED
- Off = Solid Output LED
- DHCP Toggle – Press and Hold Functional Mode button for 5 seconds.
- On = Out 1 LEDs flash
- Off = Out 2 LEDs Flash
- IPv4 Address Read – Press and Hold OUT2 and Scaler Set button for 5 seconds.
- Will display on Diagnostics Screen
- Extracted Audio Output Toggle – Press and Hold OUT2 and Functional Mode Button for 5 seconds.
- Factory Reset – Press and Hold Scaler Set Button for 5 seconds.
- All LEDs will flash
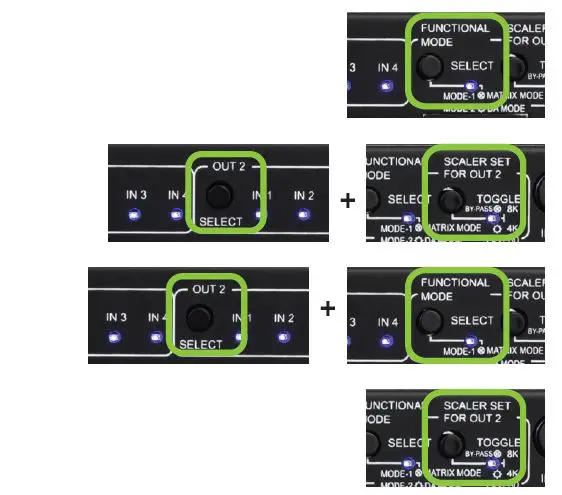
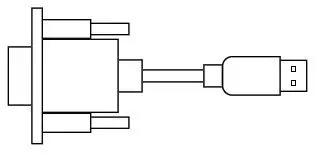
RS232 Control: In order to control via RS-232, follow the wiring here. Connecting to a DB9 port only pins 2, 3, and 5 are used. If your control device does not have a DB9 port, a USB to DB9 adapter may be required.

Device
Control device
EDID Management
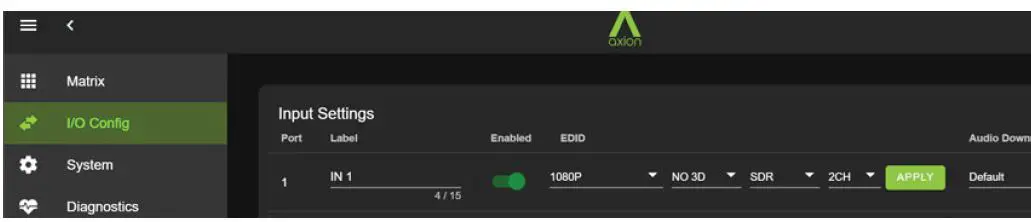
EDID Management on the AC-MX-42X is best done using the AVPro Edge UI Web Interface. However, this may not always be an option. EDID may also be managed using the front panel or using RS232 via the Micro USB or 3 Pin Phoenix ports on the unit.
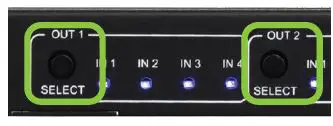
- EDID Manage from the front panel – press and hold OUT1 and OUT2 buttons for 5 seconds.
- OUT1 Button: Toggle Input
- OUT2 Button: Toggle EDID
- Press and Hold OUT2 button for 3 seconds to set EDID
- Refer to the EDID Table below

- AVPro edge ui (Web GUI) – The AC-MX-42X comes in DHCP by default. Press and Hold the OUT2 and Scaler Set button for 5 seconds. At the top left of the page, select the Menus Button, and navigate to the I/O Config tab.
RS232
- Connect to the desired COM Port. (Baud 57600/Data Bits 8/Parity None/Stop Bits One)
- end the Following Command based upon the table below:
- SET INx EDIDy <cr> – Set Input x EDID{x=[0~4](0=ALL), y=[0~35]
- Refer to the EDID Table below.
EDID Table
Front Panel Control will show on OUT2, Functional Mode, and Scaler Set LEDs.
| RS232 # Light Comb0 EDID | ||
| 0 | 000000 | 1080P_2CH |
| 1 | 100000 | 1080P_6CH |
| 2 | 010000 | 1080P_8CH |
| 3 | 110000 | 1080P_3D_2CH |
| 4 | 001000 | 1080P_3D_6CH |
| 5 | 101000 | 1080P_3D_8CH |
| 6 | 011000 | 4K30HZ_3D_2CH |
| 7 | 111000 | 4K30HZ_3D_6CH |
| 8 | 000100 | 4K30HZ_3D_8CH |
| 9 | 100100 | 4K60HzY420_3D_2CH |
| 10 | 010100 | 4K60HzY420_3D_6CH |
| 11 | 110100 | 4K60HzY420_3D_8CH |
| 12 | 001100 | 4K60HZ_3D_2CH |
| 13 | 101100 | 4K60HZ_3D_6CH |
| 14 | 011100 | 4K60HZ_3D_8CH |
| 15 | 111100 | 1080P_2CH_HDR |
| 16 | 000010 | 1080P_6CH_HDR |
| 17 | 100010 | 1080P_8CH_HDR |
| 18 | 010010 | 1080P_3D_2CH_HDR |
| RS232 # Light Comb0 EDID | ||
| 19 | 110010 | 1080P_3D_6CH_HDR |
| 20 | 001010 | 1080P_3D_8CH_HDR |
| 21 | 101010 | 4K30HZ_3D_2CH_HDR |
| 22 | 011010 | 4K30HZ_3D_6CH_HDR |
| 23 | 111010 | 4K30HZ_3D_8CH_HDR |
| 24 | 000110 | 4K60HzY420_3D_2CH_HDR |
| 25 | 100110 | 4K60HzY420_3D_6CH_HDR |
| 26 | 010110 | 4K60HzY420_3D_8CH_HDR |
| 27 | 110110 | 4K60HZ_3D_2CH_HDR |
| 28 | 001110 | 4K60HZ_3D_6CH_HDR |
| 29 | 101110 | 4K60HZ_3D_8CH_HDR |
| 30 | 011110 | FRL10G_8K_2CH_HDR |
| 31 | 111110 | FRL10G_8K_6CH_HDR |
| 32 | 000001 | FRL10G_8K_8CH_HDR |
| 33 | 100001 | USER1_EDID |
| 34 | 010001 | USER2_EDID |
| 35 | 110001 | USER3_EDID |
| 001001 | Copy from HDMI Out1 | |
| 101001 | Copy from HDMI Out2 | |
Troubleshooting
- Verify Power: The Diagnostic Screen and LEDs on the front of the Matrix should be present when Power is supplied. Ensure the power supply is operating correctly.
- Verify Connections: Check that all cables are correctly connected and support up to 48Gbps.
- Issues with One Input/Output: Swap Ports to see if Issue follows. Try copying the EDID from the display.
- Issues with legacy HDMI device when scaling- ensure No greater framerates than 120Hz, ensure Variable refresh rate is disabled.
Have a question or need assistance?
Don’t hesitate to contact us!
- SUPPORT: +1 605-274-6055
- USA TOLL FREE: 877-886-5112
- EMAIL: [email protected]


