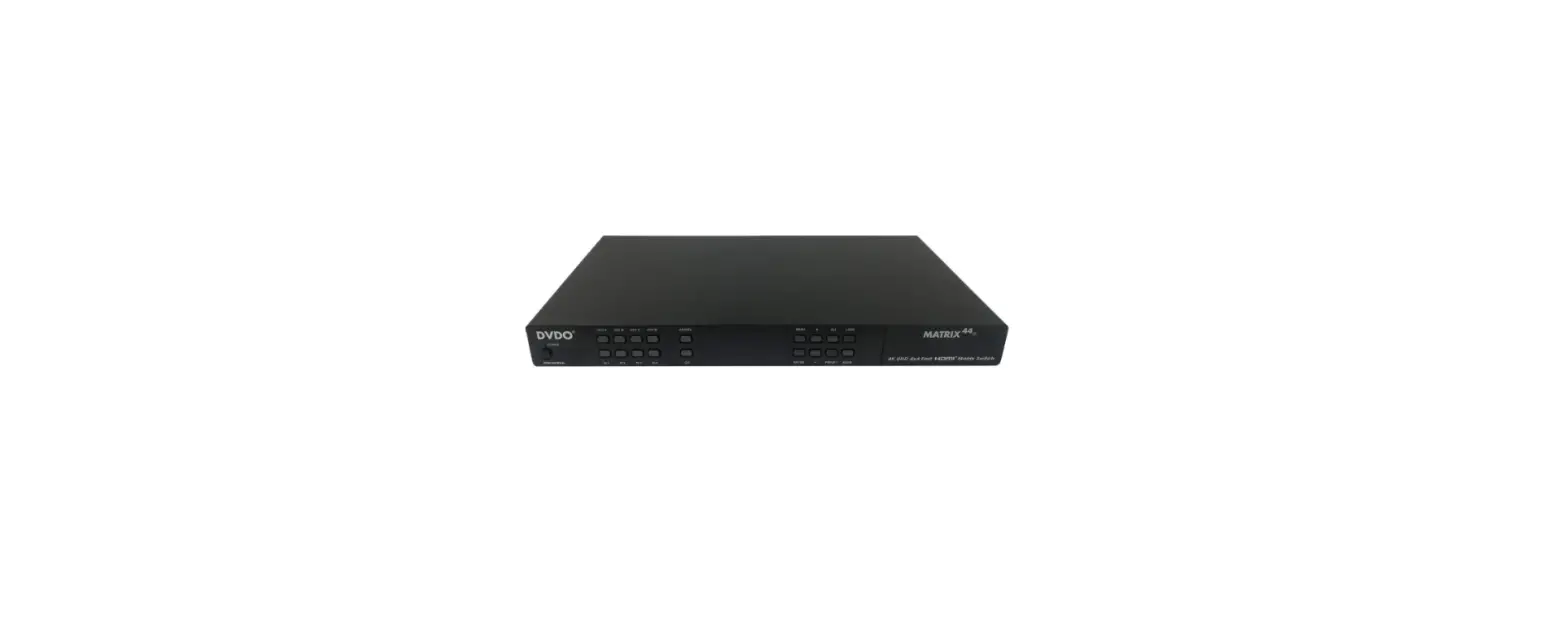
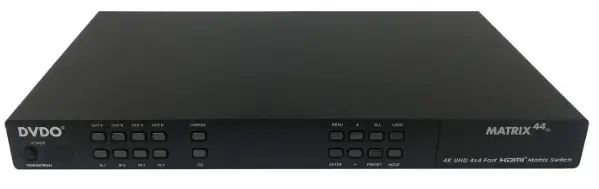
DVDO Matrix-44 4K HDMI Matrix Switch
INTRODUCTION
DVDO Matrix44 is a 4K 4×4 matrix switch supporting up to 300MHz 4K 50/60Hz in and out. Designed for both home and commercial use, it provides intuitive control and fast switching for installers and hometheater enthusiasts. With multiple control options and professional features, it’s ready for fast and reliable integration in your next multidisplay project.
DISCLAIMERS
DVDO assumes no responsibility for any inaccuracies that may be contained in this document. DVDO also makes no commitment to update or to keep current the information contained in this document. DVDO reserves the right to make improvements to this document and/or product at any time and without notice.
COPYRIGHT NOTICE
No part of this document may be reproduced, transmitted, transcribed, stored in a retrieval system, or any of its part translated into any language or computer file, in any form or by any means— electronic, mechanical, magnetic, optical, chemical, manual, or otherwise—without express written permission and consent from
TRADEMARKACKNOWLEDGMENTS
All products or service names mentioned in this document may be trademarks of the companies with which they are associated
SAFETY PRECAUTIONS
- Always follow basic safety precautions to reduce the risk of fire, electrical shock and injury to persons.
- To prevent fire or shock hazard, do not expose the unit to rain, moisture or install this product near water.
- Never spill liquid of any kind on or into this product.
- Never push an object of any kind into this product through any openings or empty slots in the unit, as you may damage parts inside the unit.
- Do not attach the power supply cabling to building surfaces.
- Use only the supplied power supply unit (PSU) +5VDC @ 3A. Do not use the PSU if it is damaged.
- Using any other power supply could result in damage to this product as well as any displays or sources connected to it.
- Do not allow anything to rest on the power cabling or allow any weight to be placed upon it or any person walk on it.
- To protect the unit from overheating, do not block any vents or openings in the unit housing that provide ventilation and allow for sufficient space for air to circulate around the unit.
- Use only a dry cloth to clean
- Indoor use only: To reduce the risk of electric shock, do not use near water or expose to rain or moisture. Keep away from excess moisture
- Do not use near heat sources such as room heaters
- Read all warnings
- Use only accessories approved by DVDO including mounting brackets
- Unplug the device during lightning storms or when unused for long periods of time
- Keep away from open flames
- Protect all connected cords including power cords from being pinched, compressed, stepped on
- Do not open the case. All servicing should be done only by qualified and approved service personnel
APPLICATIONS
- HomeTheater/Entertainment
- Lecture Room/Hall Presentation
- Show Room/Demo Room
- Public Commercial Display
- Information Board
PACKAGE CONTENTS
- 4 by 4 HDMI 4Kx2K Matrix
- Remote Control with Battery
- Left & Right Rack Ears
- 5V DC Power Adaptor
- IR Receiver Cable
SYSTEM REQUIREMENTS
Input source equipment such as Blu-ray/DVD/PS3 player or Set- Top-Box and output HDMI TV/Display and or audio amplifier with connection cables.
FEATURES
- HDMI with 3D & 4Kx2K supported, HDCP and DVI compliant
- Supports four HDMI inputs and four HDMI outputs
- Displays any of four High-Definition sources on four HDTV displays Simultaneously with fast switch
- 3DTV Pass-Through
- Supports HDTV resolutions up to 4Kx2K (3840×2160@24/25/30/50/60 & 4096×2160@24Hz)
- Supports data rate from 300Mbps to 3Gbps and Deep Color up to 1080p 36-bit
- Advanced EDID management – Supports individual EDID or common EDID
- Web-GUI for easy setup and control
- RS/232, TCP/IP, and IR control
- Supports LPCM 2/5.1/7.1CH, Dolby Digital 2~5.1CH, DTS 2~5.1CH
- (Pass through), Dolby TrueHD and DTS-HD Master Audio
- Field-Upgradeable firmware
- Input port HDCP supports both “standard” and “Apple mode”.
- The Apple mode selection to improve performance when using Apple source devices.
OPERATION CONTROLS AND FUNCTIONS
Front Panel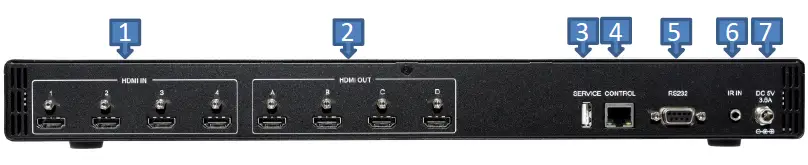
- POWER: Press this button to turn ON the device and the LED will illuminated.
- IR Window: This IR Receiver receives the remote control signal from the package include remote control only.
- IN 1~4: Press these IN buttons to select an input from the 4 input sources.
- OUT A/D: Press these buttons once a time along with an IN buttons to select an input source for an output display. i.e. OUT A→ IN1→TAKE or OUT B→ IN4→TAKE.
- GO: Press this button to confirm the selection of an IN and an OUT button.
- CANCEL: Press this button to cancel the IN/OUT selection.
- ENTER: Press to confirm the selection.
- MENU: Press to enter into the menu.
- +/-: Press these buttons to move up/down under menu selection.
- PRESET: Press “PRESET”, the OLED menu will show Preset then select IN 1~4. Preset 1~4 after the selection, press “TAKE” to confirm the selection or press “CANCEL” to cancel the selection.
- All: Press this button to select all outputs to display with an input source.
- MODE: TAKE Mode/R.T.(Real Time) mode switch.
- LOCK: Press this button to lock all button functions on the panel.
- Press 3 seconds to relieve the lock function.
- Display: Displaying Input and Outputs selection and menu selection.
Rear Panel
- HDMI IN: Connect from source equipment such as Blu-ray/DVD/ PS3 players, Set-Top-Box or any HDMI equipped source device.
- HDMI OUT: Connect to HDMI TV/display.
- SERVICE: This slot is reserved for firmware update use only.
- CONTROL: RJ-45 connector for Ethernet control up to 10/100Mbps
- RS232: Serial control port.
- IR IN: Connect the IR Receiver included in the package for IR signal receive from the included remote control.
- DC 5V: Connect the included Power Supply Unit (5VDC).
LCD Menu
The front panel display provides access to all functions and settings. Note that the Web GUI is normally easier to use and should be the first choice for a new installation. Items are selected by first pressing the MENU button, scroll using +/- and make a selection using Enter. A “*” next to an item indicates it is the currently set selection
| Menu item | Sub Menu | Description | Default |
| EDID Mode | All | All inputs are presented the | All |
| same EDID – choose to use | |||
| Sets what EDID is presented to each input. | output 1-4 or a preset. If set, choose what EDID is presented using the “EDID ALL” Menu item | ||
| Appoint | Individually select an EDID for | ||
| each input. | |||
| Exit |
| EDID All | Sink A | Copy Output A | 8bit/2D/PC | |
| display EDID | M/1080p | |||
| If “All” is set in the EDID mode, this chooses what EDID is presented to all | Sink B | Copy Output B display EDID | ||
| Sink C | Copy Output C display EDID | |||
| inputs, either from one of the outputs or a | ||||
| Sink D | Copy Output D display EDID | |||
| pre-stored EDID | 8/2D/ | Standard EDID, | ||
| from the list | PCM/720p | Content: deep | ||
| color/2D3D/audio/ | ||||
| native resolution | ||||
| 8/2D/PCM/ | Standard EDID, | |||
| AC3/720p | Content: deep | |||
| color/2D3D/audio/ | ||||
| native resolution | ||||
| 8/2D/ | Standard EDID, | |||
| PCM/1080p | Content: deep | |||
| color/2D3D/audio/ | ||||
| native resolution | ||||
| 8/2D/PCM/ | Standard EDID, | |||
| AC3/1080p | Content: deep | |||
| color/2D3D/audio/ | ||||
| native resolution | ||||
| 8/2D/ | Standard EDID, | |||
| PCM/4K2K | Content: deep | |||
| color/2D3D/audio/ | ||||
| native resolution | ||||
| 8/2D/PCM/ | Standard EDID, | |||
| AC3/4K2K | Content: deep | |||
| color/2D3D/audio/ | ||||
| native resolution | ||||
| Exit |
| EDID IN1 These allow individual selection of EDID for a particular input. This overrides the ALL setting | Same EDID All Meaning, same EDID as is selected in the ALL above or | Select Input 1’s EDID | Same EDID All |
| EDID IN2 | Same EDID All | Select Input 2’s EDID | Same EDID All |
| EDID IN3 | Same EDID All | Select Input 3’s EDID | Same EDID All |
| EDID IN4 | Same EDID All | Select Input 4’s EDID | Same EDID All |
| Matrix Preset Four presets are allowed for quickly setting in/out combinations. To set, make the normal A1, B2 (etc) choices and press enter | Preset 1 | Forces all outputs to a predefined connection | A=1, B=2, C=3, D=4 |
| Preset 2 | No.2 | A=1, B=2, C=3, D=4 | |
| Preset 3 | No.3 | A=1, B=2, C=3, D=4 | |
| Preset 4 | No.4 | A=1, B=2, C=3, D=4 | |
| Exit | |||
| HDCP Input Some Apple devices (like Apple TV) have different HDCP requirements, to provide the best experience, set any input with an Apple device to “Apple mode” | IN1 Standard/ Apple | Set IN1 in Apple/ Standard mode | Standard |
| IN2 Standard / Apple | Set IN2 in Apple/ Standard mode | Standard | |
| IN3 Standard / Apple | Set IN3 in Apple/ Standard mode | Standard | |
| IN4 Standard / Apple | Set IN4 in Apple/ Standard mode | Standard | |
| Exit |
| Network Setup These are standard networking settings for the Ethernet port. After making any changes be sure to click “Do Re-Link” to make them active | IP Mode | DHCP , Static | Static |
| IP | Setup Static IP | 192.168.1.10 | |
| Mask | Setup Static Netmask | 255.255.255.0 | |
| Gate | Setup Static Gateway | 192.168.1.1 | |
| Do Re-Link | Re-Link. After changing network settings, relink to save and activate. | — | |
| Exit | |||
| Network Status This allows reading back network settings; particularly useful if using DHCP | Link | Network status DHCP, Static or Not Linked | — |
| IP | Get IP | — | |
| Mask | Get Netmask | — | |
| Gate | Get Gateway | — | |
| MAC | System MAC Address | — | |
| Exit | |||
| Source Detection This shows real time whether each input is active | IN1 On/Off , IN2 On/Off | IN1 , IN2 detect | — |
| IN3 On/Off , IN4 On/Off | IN3 , IN4 detect | ||
| Exit |
| Sink A Info Shows information on each Sink | Type, Manuf. | Detect and Analysis Output A display’s EDID Content: type(HDMI/ DVI/VGA), Manufactory/ Model number | — |
| Native | Content: native resolution | ||
| Video Format | Content: deep color, 2D or 3D, 4K2K | ||
| Audio Format | Content:PCM, BitStream, HBR | ||
| Exit | |||
| Sink B Info | Same Sink A Info | Detect and Analysis Output B display’s EDID | — |
| Sink C Info | Same Sink A Info | Detect and Analysis Output C display’s EDID | — |
| Sink D Info | Same Sink A Info | Detect and Analysis Output D display’s EDID | — |
| Firmware | FW Version | Display the model number and FW version | — |
| Update | FW Update | ||
| Exit | |||
| Factory Reset | Do Reset | Do system Reset | — |
| Exit | |||
| Exit |
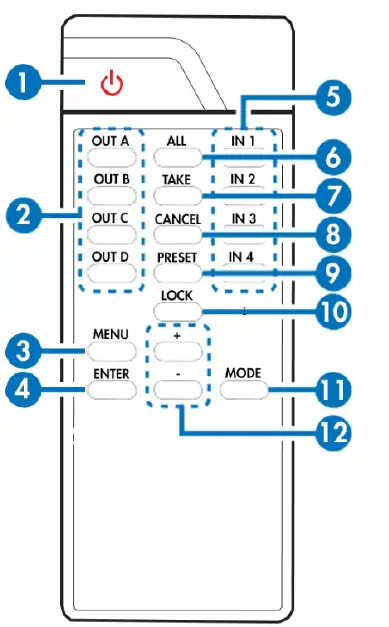
Remote Control
- POWER: Press this button to switch the system ON/OFF.
- OUT A/D: Press these buttons one a time along with an IN buttons to select an input source for an output display.
- MENU: Press to enter into the menu.
- ENTER: Press to confirm the selection.
- IN1~4: Press the IN buttons to select 4 an input fromthe 4 input sources.
- ALL: Press this button to select all outputs to display with an input source.
- TAKE: Press this button to confirm the selection of an IN and an OUT button. (Same as “GO” on main unit)
- CANCEL: Press this button to cancel the IN/OUT selection.
- PRESET: Press “PRESET”, the menu will show Preset and select IN 1~4. After preset 1~4, press “TAKE” to confirm the selection or press “CANCEL” to cancel the selection.
- LOCK: Press this button to lock all button functions on the panel. Press 3 seconds to relieve the lock function.
- MODE: TAKE Mode/R.T.(Real Time) mode switch. When in Take/Go Mode, user presses [Input, Ouput, GO] to switch, When in R.T. mode, user presses [Input,
- Output] and switching happens right away 12 +/-: Press these buttons to move up/down under menu selection

6.5 RS-232 Protocols
| CDPS-4H4HFS |
► ◄ | Remote Control | ||
| PIN | Assignment | PIN | Assignment | |
| 1 | NC | 1 | NC | |
| 2 | Tx | 2 | Rx | |
| 3 | Rx | 3 | Tx | |
| 4 | NC | 4 | NC | |
| 5 | GND | 5 | GND | |
| 6 | NC | 6 | NC | |
| 7 | NC | 7 | NC | |
| 8 | NC | 8 | NC | |
| 9 | NC | 9 | NC | |
RS-232 Protocols
| Command Name | Description | Description of parameter |
| P0 | POWER OFF | NONE |
| P1 | POWER ON | NONE |
| IPCONFIG | DISPLAY THE CURRENT IPCONFIG | NONE |
| SIPADDR XXX.XXX. XXX.XXX | SET ETHERNET IP AD- DRESS | XXX=0~255 |
| SNETMASK XXX. XXX.XXX.XXX | SET ETHERNET NETMASK | XXX=0~255 |
| SGATEWAY XXX. XXX.XXX.XXX | SET ETHERNET GATEWAY | XXX=0~255 |
| HTTPPORT N | SET ETHERNET PORT NUMBER | N=0~65535 |
| RSTIP | IP CONFIGURATION RESET TO <DHCP> | NONE |
| A N | SET OUTPUT A SOURCE | N=1-4 |
| B N | SET OUTPUT B SOURCE | N=1-4 |
| C N | SET OUTPUT C SOURCE | N=1-4 |
| D N | SET OUTPUT D SOURCE | N=1-4 |
| I N | SET ALL OUTPUTS SOURCE | N=1-4 |
| EDIDMODE N | SHOW EDID MODE | N=(1)All (0)Appoint |
| EDIDALL | SHOW EDID MODE SOURCE FOR ALL | NONE |
| EDIDALL N | SET EDID CONTENT FOR ALL | N=0-9 |
| EDIDIN | SHOW ALL INPUT EDID SOURCE | NONE |
| EDIDIN N1 | SHOW INPUT N1 EDID SOURCE | N1=1-4 |
| EDIDIN N1 N2 | SET INPUT N1 EDID SOURCE | N1=1-4 N2=0-9 |
| HDCPIN | SHOW ALL INPUT HDCP STATUS | NONE |
| HDCPIN N1 | SHOW INPUT N1 HDCP STATUS | N1=1-4 |
| HDCPIN N1 N2 | SET INPUT N1 HDCP ON/OFF | N1=1-4 N2=(0)OFF (ON) |
| PRESET | SHOW ALL PRESET CONFIG | NONE |
| PRESET N1 | SHOW PRESET N1 CONFIG | N1=1-4 |
| PRESET N1 N2 | SET PRESET N1 CONFIGURE | N1=1-4 N2=AXBX (X=1-6,M) |
| SOURCEDET | SHOW ALL INPUT SIGNAL | NONE |
| SOURCEDET N1 | SHOW INPUT N1 SIGNAL | N1=1-4 |
| SINKINFO | SHOW ALL OUTPUT INFORMATION | NONE |
| SINKINFO N1 | SHOW OUTPUT N1 INFORMATION | N1=A-B |
| INNAME | SHOW ALL INPUT NAME | NONE |
| INNAME N1 | SHOW INPUT N1 NAME | N1=1-4 |
| INNAME N1 N2 | SET INPUT N1 NAME | N1=1-4 N2=ABCDEFGH |
| OUTNAME | SHOW ALL OUTPUT NAME | NONE |
| OUTNAME N1 | SHOW OUTPUT N1 NAME | N1=A-B |
| OUTNAME N1 N2 | SET OUTPUT N1 NAME | N1=A-B N2=ABCDEFGH |
| MATRIXMODE | SHOW MATRIX CURRENT MODE | NONE |
| MATRIXMODE N1 | SET MATRIX MODE | N1=0-1 |
| VER | SHOW DESCRIPT OF UNIT | NONE |
| REBOOT | SYSTEM REBOOT | NONE |
| HELP | SHOW COMMAND LIST | NONE |
| HELP N | SHOW DESCRIPT OF COMMAND | N : command name |
RS-232 Commands
| MATRIXMODE | SHOW MATRIX CURRENT MODE | NONE |
| MATRIXMODE N1 | SET MATRIX MODE | N1=0-1 |
| VER | SHOW DESCRIPT OF UNIT | NONE |
| REBOOT | SYSTEM REBOOT | NONE |
| HELP | SHOW COMMAND LIST | NONE |
| HELP N | SHOW DESCRIPT OF COMMAND | N : command name |
Web GUI Control
On a PC/Laptop that is connected to an active network system, open a web browser and type device’s IP address (available from LCD front panel display menu system) into the web address entry bar. The browser will display the device’s Status, IO Status, Matrix Control, Settings and Network Configuration control pages for users to control.
Click on IO Status for input and output selection.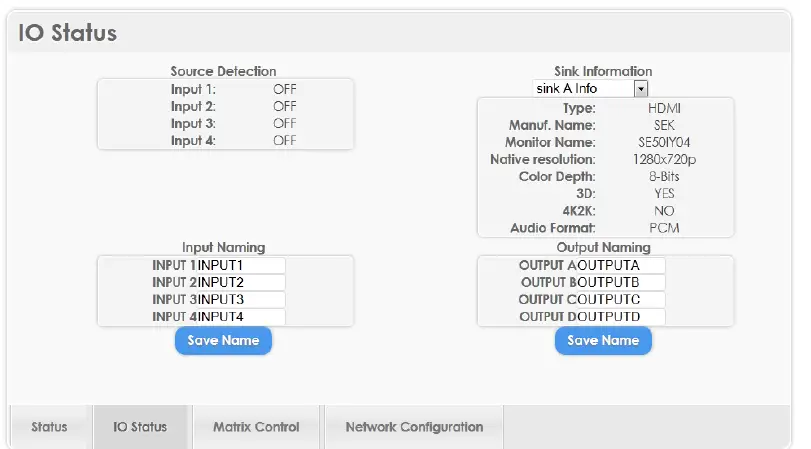
Click on Matrix Control for outputs and EIDID selections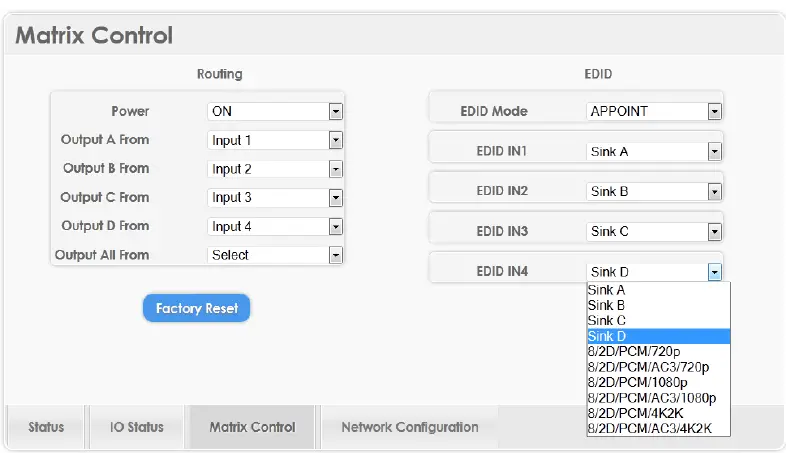
Click on Settings to set each input’s HDCP Control and Preset Configuration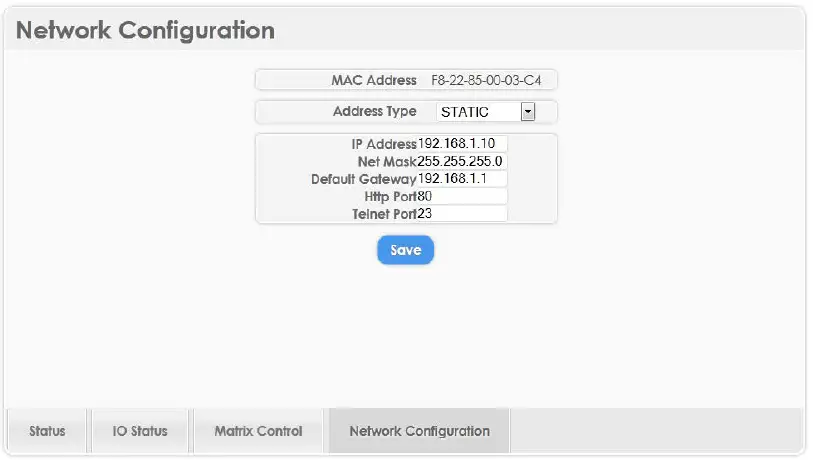
CONNECTION DIAGRAM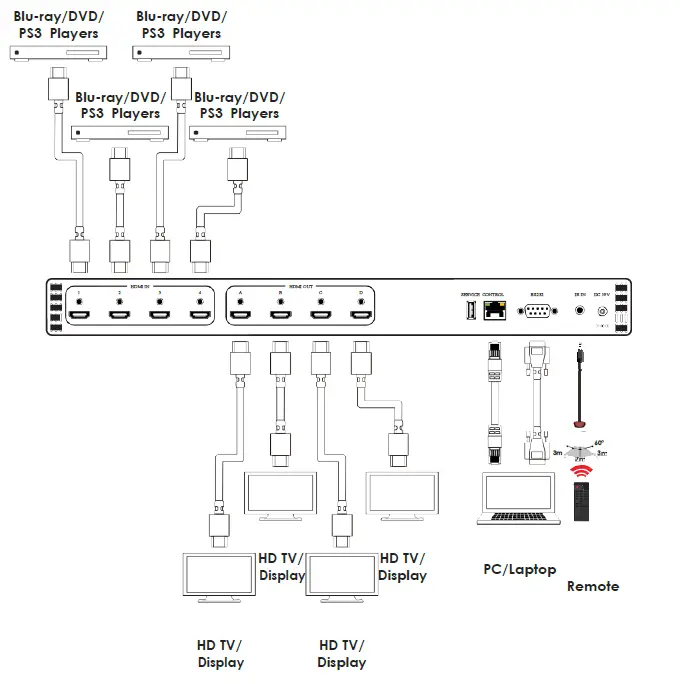
SPECIFICATIONS
- Frequency Bandwidth 340Mbps to 3Gbps
- Input Ports 4 x HDMI
- 1 x USB (Service only)
- 1 x 10/100 Ethernet
- 1 x RS-232
- 1 x IR
- Output ports 4 x HDMI
- Resolution 480i~1080p@50/60, 1080p@24, 4K x 2K (3840×2160/4096×2160)24/25/30/50/60
- Output Level VGA~WUXGA
- IR Frequency 30~50kHz
- Power Supply 5VDC/2.6A (US/EU standards, CE/FCC/ UL certified)
- ESD Protection Human body model: ±8kV (air-gap discharge) ±4kV (contact discharge)
- Dimensions 438mm (W) x 269mm (D) x 44mm (H) /Jacks Excluded 482mm (W) x 278mm (D) x 50mm (H) /Jacks & Rack Ears Included Weight 2936 g
- HDMI/HDCP HDMI compliant, HDCP 1.4 compliant
- Operating Temperature 0˚C~40˚C / 32˚F ~ 104˚F
- Storage Temperature -20˚C~60˚C / -4˚F ~ 140˚F
- Relative Humidity 20~90% RH (no condensation)
- Power Consumption (W) 4.7
| DVI and HDMI Supported Resolutions | Input | Output |
| 640×480@60 | V | V |
| 640×480@72 | V | V |
| 640×480@75 | V | V |
| 720×480@60 | V | V |
| 720x576p@50 | V | V |
| 800×600@60 | V | V |
| 800×600@72 | V | V |
| 800×600@75 | V | V |
| 1024×768@60 | V | V |
| 1024×768@70 | V | V |
| 1024×768@75 | V | V |
| 1280×720@50 | V | V |
| 1280×720@60 | V | V |
| 1280x720p@60 | V | V |
| 1280×768@60 | V | V |
| 1280×800@60 | V | V |
| 1280×1024@60 | V | V |
| 1360×768@60 | V | V |
| 1600×1200@60 | V | V |
| 1920x1080i@50 | V | V |
| 1920x1080i@60 | V | V |
| 1920x1080p@24 | V | V |
| 1920x1080p@25 | V | V |
| 1920x1080p@30 | V | V |
| 1920x1080p@50 | V | V |
| 1920x1080p@60 | V | V |
| 1920×1200@60(RB) | V | V |
| 3840×2160@24/25/30/50/60 | V | V |
| 4096×2160@24 | V | V |
Audio Sampling Rate Up to 192 kHz
| HDMI input (Up to 192kHz) | HDMI output |
| LPCM 2CH | V |
| LPCM 5.1CH | V |
| LPCM 7.1CH | V |
| Dolby Digital 2~5.1CH/ DTS 2~5.1CH | V |
| Dolby True-HD/ DTS-HD Master Audio | V |
Audio Format LPCM 2/5.1/7.1CH,Dolby Digital 2~5.1CH, DTS 2~5.1CH (Pass through), Dolby TrueHD and DTS-HD Master Audio
| HDMI input | HDMI output |
| LPCM 2CH | V |
| LPCM 5.1CH | V |
| LPCM 7.1CH | V |
| Dolby Digital 2~5.1CH/ DTS 2~5.1CH | V |
| Dolby True-HD/ DTS-HD Master Audio | V |
ACRONYMS
| ACRONYM | COMPLETE TERM | |
| CEC | Consumer Electronic Control | |
| DVI | Digital Visual Interface | |
| HDCP | High-bandwidth Digital Content Protection | |
| HDMI | High Definition Multimedia Interface | |
| 3840×2160/ 4096×2160 | ||
| 4Kx2K | ||
Warranty and Getting Help
DVDO, Inc., (DVDO), offers a limited warranty for its DVDO products. Any product first sold to you is guaranteed to be free from defects in both components and workmanship under regular uses. The warranty period commences on the date the item ships. Attention: Your invoice with the date of purchase, model number and serial number of the product is your proof of the date of purchase. The International Limited Warranty is applicable and shall be honored in every country where DVDO or its Authorized Service Providers offer warranty service subject to the terms and conditions provided in this International Limited Warranty Statement
Getting Help
For service and support, contact your local dealer. To find your dealer or to contact DVDO support, go to: www.dvdo.com/support
- or call 1-888-651-1765 for worldwide technical support
- DVDO Inc. 1140 East Arques Avenue, Suite 700 Sunnyvale, CA 94085
Legal notices
DVDO® and MATRIX44 Logos are trademarks or registered trademarks of Silicon Image, Inc. in the United States or other countries. HDMI® and the HDMI logo with High-Definition Multimedia Interface are trademarks or registered trademarks of, and are used under license from, HDMI Licensing, LLC. in the United States or other countries. MHL® and the MHL Logo are trademarks or registered trademarks of, and are used under license from, MHL, LLC. in the United States or other countries. HDMI Licensing, LLC, MHL, LLC, and DVDO, Inc. are wholly owned subsidiaries of Silicon Image, Inc. All other trademarks and registered trademarks are the property of their respective owners in the United States or other countries. The absence of a trademark symbol does not constitute a waiver of Silicon Image’s trademarks or other intellectual property rights with regard to a product name, logo or slogan.
FCC
This equipment has been tested and found to comply with the limits for a Class B digital device, pursuant to Part 15 of the FCC Rules. These limits are designed to provide reasonable protection against harmful interference in a residential installation. This equipment generates, uses, and can radiate radio frequency energy and, if not installed and used in accordance with the instructions, may cause harmful interference to radio communications. However, there is no guarantee that interference will not occur in a particular installation. If this equipment does cause harmful interference to radio o television reception, which can be determined by turning the equipment off and on, the user is encouraged to try to correct the interference by one or more of the following measures:
- Reorient or relocate the receiving antenna.
- Increase the separation between the equipment and the receiver.
- Connect the equipment into an outlet different from that to which the receiver is connected.
- Consult the dealer or an experienced radio/TV technician for help
FAQS
What does a HDMI Matrix Switcher do?
An HDMI matrix switcher is a device that allows the central distribution and control of multiple digital and analog HDMI AV signals from one location.
What is HDMI Matrix mode?
An HDMI matrix is effectively the combination of a switch and a splitter. It allows the connection of multiple HDMI devices to multiple displays / televisions etc.
Do I need a matrix switch?
A matrix switcher empowers the user to send an audio, video, and control signal to any display.
Do you lose quality with HDMI switcher?
In general, an HDMI switcher does not degrade the quality of media output. The only way HDMI switchers impact quality is if there is a signal loss that occurs because of a faulty connection and poor quality HDMI switches.
Are HDMI switchers any good?
Picture Quality: Modern-day HDMI switches carry 4K and HDR streaming with them. It enhances your viewing experience.
What is the difference between HDMI splitter and HDMI switcher?
An HDMI splitter accepts one source and casts it on more than one television screen. An HDMI switch, on the other hand, takes more one than source, and then sends it to one device or T.V. via the cable output.
Can you swap a matrix?
The Swap function allows the use of sub-Matrix and sub-Vector specifications for both input and output.
How much memory does a matrix need?
For square matrices, a matrix of size 16,000 will fit into 2 GB of RAM. You can compute more values in this fashion and use PROC SGPLOT to create a graph that shows the dimensions of matrices that fit into 2 GB of RAM.
What is a TV matrix?
A HDMI matrix, sometimes called a HDBaseT matrix, enables you to centralise AV devices so that they’re hidden away, creating neater, less-cluttered living spaces –
Can you daisy chain HDMI matrix?
Daisy chaining is not supported via HDMI or using regular USB ports on any device. Also, you can only connect a single external display using a Mac device with the M1 or M2 chips.
Who controls the video switcher?
A director typically controls the switcher, analyzing the various incoming camera angles and selecting the best view to output.
Does HDMI splitter carry audio?
The Basics. An HDMI splitter is a device that takes the video and audio content from a single source and then duplicates, or “splits”, that signal into many, which enables the signal to be displayed on multiple sources.
Do I need a 4K HDMI switch?
If you have a 4K Ultra HD TV and 4K source components, the switcher also needs to be 4K compatible. If you need to pass HDR-encoded and/or 3D video signals, your HDMI switcher
Does a 4K HDMI splitter reduce quality?
HDMI Splitters do not automatically reduce quality because they are copying a digital signal.


