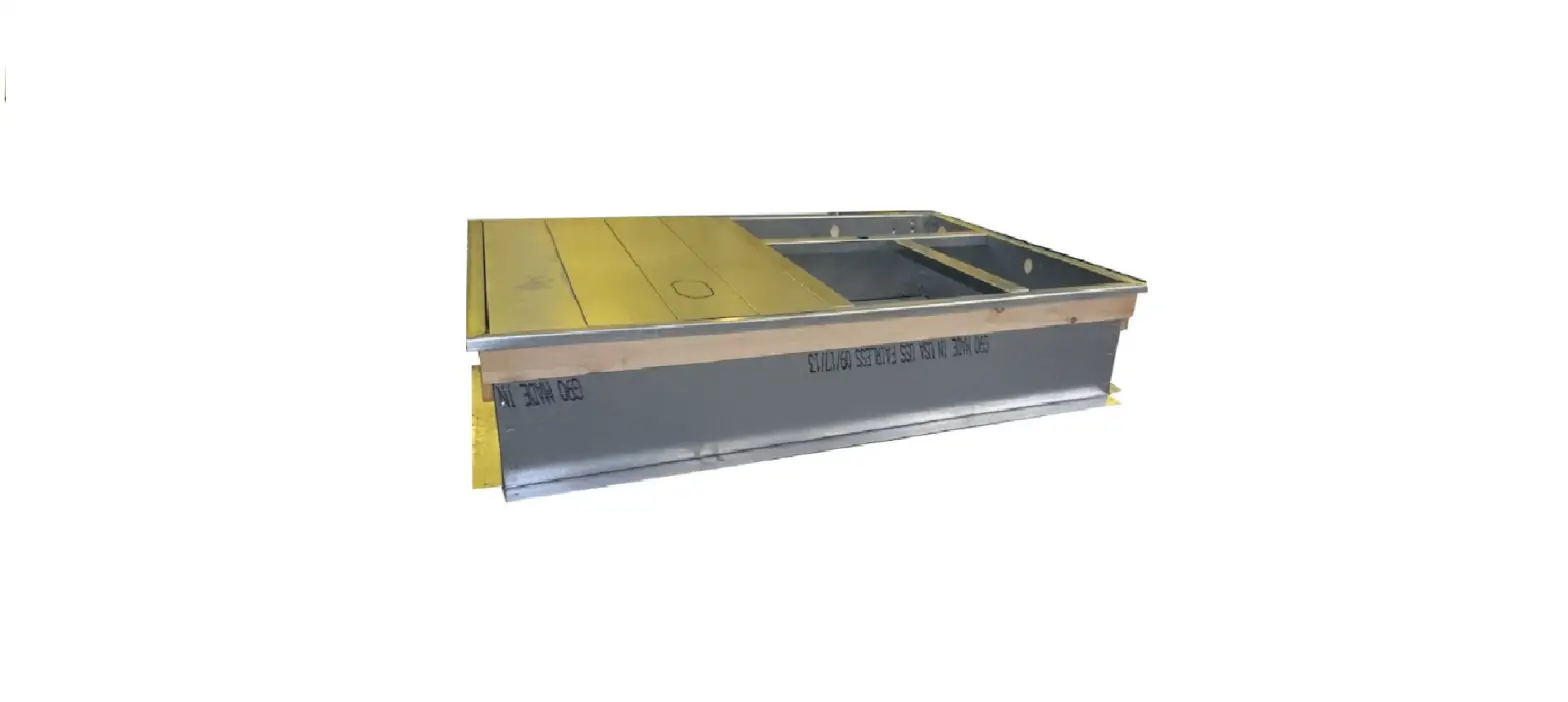
Carrier CRADCURB010A00 Horizontal Roof Curb Adapter Accessory Single Package Rooftop Units

FEATURES
- Fully assembled curb adapter.
- Includes internal duct transitions.
- Internally insulated with 1 in. to 1-1/2 in. insulation.
- Gasketing package provided.
- Adapter pans and supports provided/field-installed.
SAFETY CONSIDERATIONS
Installation of this accessory can be hazardous due to system pressures, electrical components, and equipment location (such as a roof or elevated structure). Only trained, qualified installers and service technicians should install, start-up, and service this equipment. When installing this accessory, observe precautions in the literature, labels attached to the equipment, and any other safety precautions that apply:
- Follow all safety codes
- Wear safety glasses and work gloves
- Use care in handling and installing this accessory
It is important to recognize safety information. This is the safety alert symbol: . When you see this symbol on the unit and in instructions or manuals, be alert to the potential for personal injury. Understand the signal words DANGER, WARNING, CAUTION, and NOTE. These words are used with the safety-alert symbol. DANGER identifies the most serious hazards which will result in severe personal injury or death. WARNING signifies hazards which could result in personal injury or death. CAUTION is used to identify unsafe practices, which may result in minor personal injury or product and property damage. NOTE is used to highlight suggestions which will result in enhanced installation, reliability, or operation.
INSTALLATION
EQUIPMENT DAMAGE HAZARD
Failure to follow this warning could result in personal injury and damage to equipment. To prevent injuries and rain damage, do not leave roof opening uncovered. If unit installation is not completed immediately after adapter curb is installed, provide an adequate temporary cover for the roof opening.
CURB ADAPTER INFORMATION
- To verify that the curb adapter is the correct adapter for your job, be sure the existing curb is the same size as dimensions provided. Dimensions are in mm. (The bottom dimensions of the curb adapter are larger than existing curb outside dimensions.)
- Before the new HVAC unit is set in place, inspect structural stability of existing curb and the building’s roof load capability. Reinforce if required.
- All curb adapters will increase the systems external static pressure and must be included when calculating unit requirements.
- Curb adaptors are designed to attach to an existing curb with side by side duct connections. The curb adapter is not designed for use with concentric duct configuration.
- No calculations are available for this product. For calculated product, please contact factory for part number, pricing and lead time.
- Please contact the factory for more detailed dimensional information, if required. Designs are based on standard factory dimensions, and may differ in the field.
CRADCURB010A00 Horizontal Curb Adapter Assembly
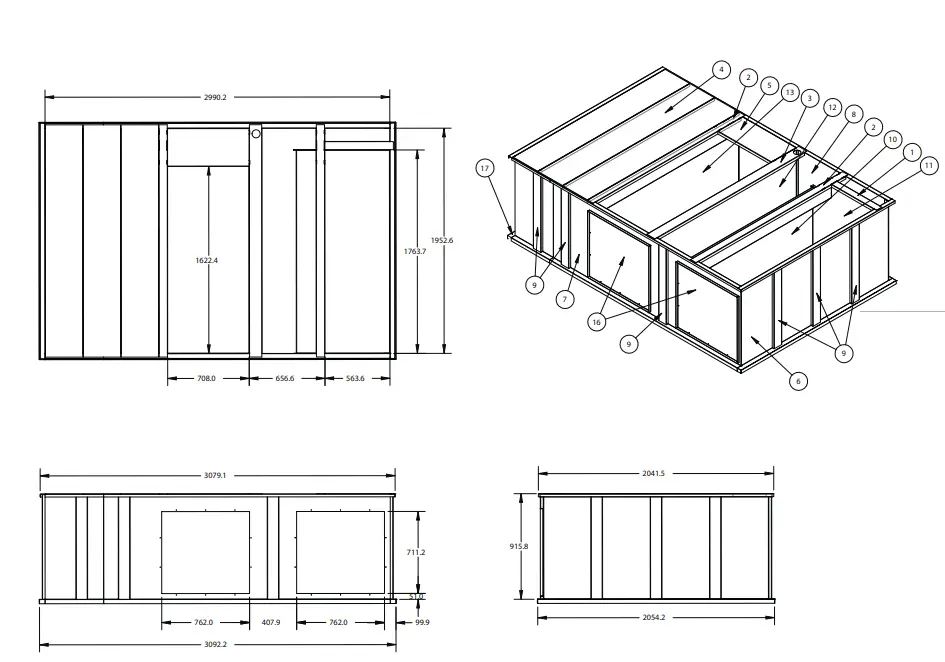
| CARRIER PART NUMBER: CRADCURB010A00 | |||
| MICROMETL PART NUMBER: HE3F-W-HCRB | |||
| INSTALL INSTRUCTION # IIK-CRADCURB10-02 | |||
| ITEM NO. | MMC PART NO. | DESCRIPTION | QTY. |
| 1 | CRB1149 | VERTICAL SUPPORT | 1 |
| 2 | CRB1150 | HORIZONTAL SUPPORT | 2 |
| 3 | CRB1151 | HORIZONTAL SUPPORT WITH HOLE | 1 |
| 4 | CRB1152 | DECK PAN-3F | 3 |
| 5 | CRB1153 | VERTICAL DECK PAN | 1 |
| 6 | CRBHE0001 | FRONT | 1 |
| 7 | CRBHE0002 | SIDE A | 1 |
| 8 | CRBHE0003 | SIDE B | 1 |
| 9 | CRBHE0005 | VERTICAL SUPPORT | 13 |
| 10 | CRBHE0006 | RETURN SHROUD A | 1 |
| 11 | CRBHE0007 | RETURN SHROUD B | 1 |
| 12 | CRBHE0008 | SUPPLY SHROUD A | 1 |
| 13 | CRBHE0009 | SUPPLY SHROUD B | 1 |
| 14 | CRBHE0010 | SUPPLY SHROUD C | 1 |
| 15 | CRBHE0011 | RETURN SHROUD C | 1 |
| 16 | CRBHE0012 | COVERS | 3 |
| 17 | CRBHE0014 | REAR | 1 |
| 18 | CRBHE0030 | SIDE A EXTENSION | 1 |
| 19 | CRBHE0031 | SIDE B EXTENSION | 1 |
| 20 | CRBHE0032 | SUPPORT PLATE | 2 |
CRADCURB011A00 Horizontal Curb Adapter Assembly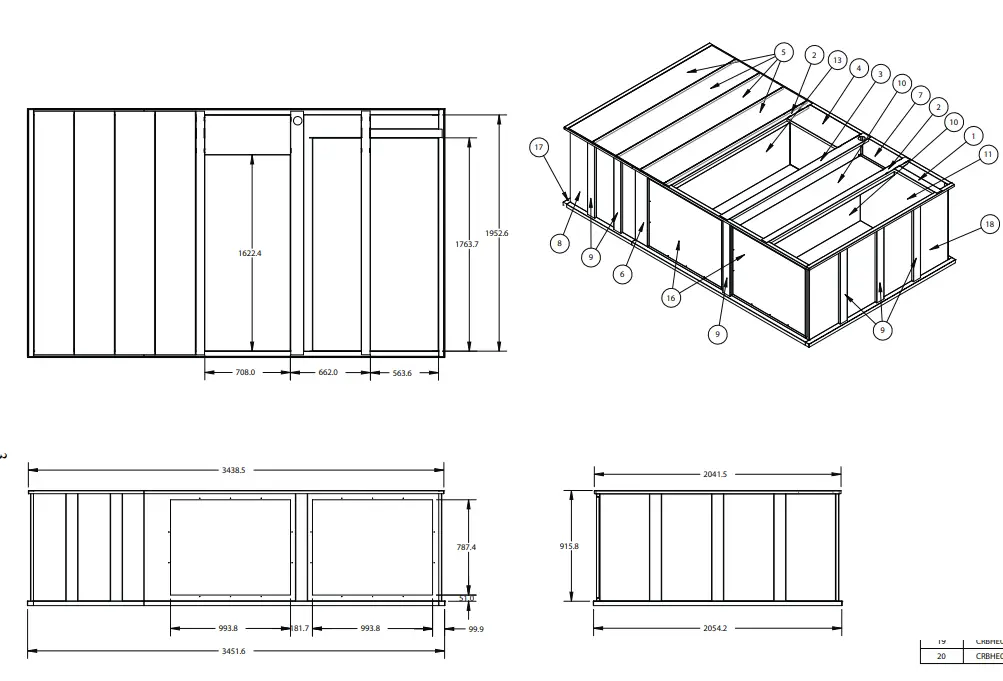
| CARRIER PART NUMBER: CRADCURB011A00 | |||
| MICROMETL PART NUMBER: HE4F-W-HCRB | |||
| INSTALL INSTRUCTION # IIK-CRADCURB10-02 | |||
| ITEM NO. | MMC PART NO. | DESCRIPTION | QTY. |
| 1 | CRB1149 | VERTICAL SUPPORT | 1 |
| 2 | CRB1150 | HORIZONTAL SUPPORT | 2 |
| 3 | CRB1151 | HORIZONTAL SUPPORT WITH HOLE | 1 |
| 4 | CRB1153 | VERTICAL DECK PAN | 1 |
| 5 | CRB1158 | DECK PAN-4F | 4 |
| 6 | CRBHE0015 | HORIZONTAL CURB, SIDE A | 1 |
| 7 | CRBHE0016 | HORIZONTAL CURB, SIDE B | 1 |
| 8 | CRBHE0017 | HORIZONTAL CURB, SIDE A | 1 |
| 9 | CRBHE0018 | VERTICAL SUPPORT | 13 |
| 10 | CRBHE0019 | RETURN SHROUD A | 1 |
| 11 | CRBHE0020 | RETURN SHROUD B | 1 |
| 12 | CRBHE0021 | SUPPLY SHROUD A | 1 |
| 13 | CRBHE0022 | SUPPLY SHROUD B | 1 |
| 14 | CRBHE0023 | SUPPLY SHROUD C | 1 |
| 15 | CRBHE0024 | RETURN SHROUD C | 1 |
| 16 | CRBHE0025 | COVERS | 3 |
| 17 | CRBHE0026 | FRONT | 1 |
| 18 | CRBHE0027 | REAR | 1 |
| 19 | CRBHE0028 | HORIZONTAL CURB, SIDE B | 1 |
| 20 | CRBHE0029 | SUPPORT PLATE | 2 |
CRADCURB012A00 Horizontal Curb Adapter Assembly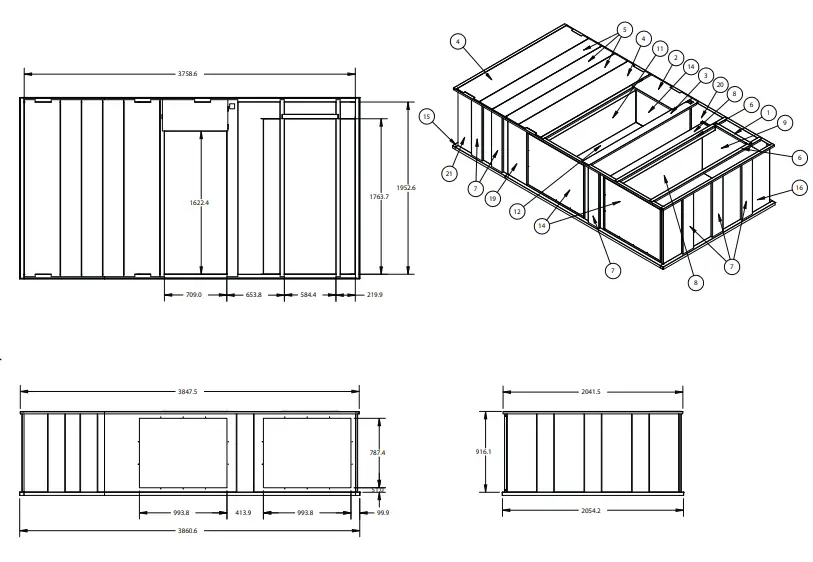
| CARRIER PART NUMBER: CRADCURB012A00 | |||
| MICROMETL PART NUMBER: HE6F-W-HCRB | |||
| INSTALL INSTRUCTION # IIK-CRADCURB10-02 | |||
| ITEM NO. | MMC PART NO. | DESCRIPTION | QTY. |
| 1 | 0403565A | R/A SUPPORT | 1 |
| 2 | 0403566A | S/A SUPPORT | 1 |
| 3 | 0403567A | A CROSS SUPPORT | 1 |
| 4 | 0403580A | DECK PAN A | 2 |
| 5 | 0403581A | DECK PAN B | 3 |
| 6 | 0403593A | CROSS SUPPORT | 3 |
| 7 | CRBHE0033 | VERTICAL SUPPORT | 13 |
| 8 | CRBHE0034 | RETURN SHROUD A | 1 |
| 9 | CRBHE0035 | RETURN SHROUD B | 1 |
| 10 | CRBHE0036 | SUPPLY SHROUD A | 1 |
| 11 | CRBHE0037 | SUPPLY SHROUD B | 1 |
| 12 | CRBHE0038 | SUPPLY SHROUD C | 1 |
| 13 | CRBHE0039 | RETURN SHROUD C | 1 |
| 14 | CRBHE0040 | COVERS | 3 |
| 15 | CRBHE0041 | FRONT | 1 |
| 16 | CRBHE0042 | REAR | 1 |
| 17 | CRBHE0043 | HORIZONTAL CURB, SIDE B | 1 |
| 18 | CRBHE0044 | SUPPORT PLATE | 2 |
| 19 | CRBHE0046 | HORIZONTAL CURB, SIDE A | 1 |
| 20 | CRBHE0047 | HORIZONTAL CURB, SIDE B | 1 |
| 21 | CRBHE0048 | HORIZONTAL CURB, SIDE A | 1 |
Step 1 — Locating the Horizontal Curb Adapter
There are many things to consider when locating the Horizontal Curb Adapter/ERV unit, including:
- Structural support required from roof system.
- Duct drop location in relation to joists.
- Serviceability of the ERV unit.
- Clearances required on the ERV unit.
- Locations of vents or other sources of contaminated air which could negatively affect the quality of the outside air entering the ERV unit.
Step 2 — Applying Gasket
Apply the supplied gasket to the entire upper perimeter of your roof curb and around the supply and return openings where the curb adapter and roof curb mate. Gasket strips must fit tightly together, leaving no gaps for leakage.
Step 3 — Aligning the Horizontal Adapter Curb
Align the proper airflow paths in the curb adapter to those in your roof curb. Lower the curb adapter slowly into place, making sure the gasket is not damaged.
NOTE: If any gasket is damaged, it must be replaced to ensure a proper seal.
Step 4 — Securing the Adapter Curb
Once the adapter curb has been safely lowered into place, the two pieces need to be secured together. Using the provided screws, insert a screw every 24 in. from the side


