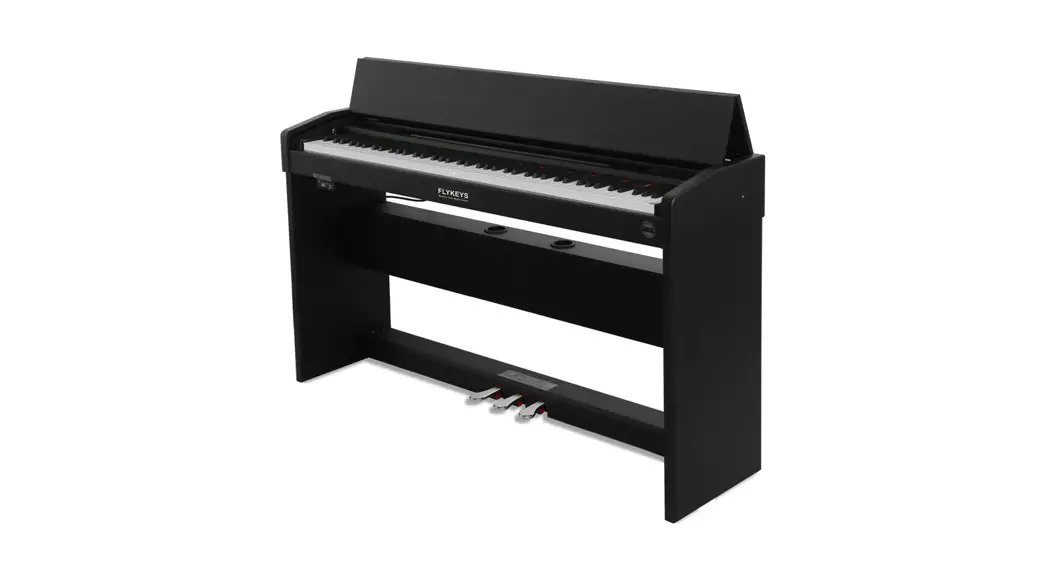
![]() FK100 Digital Piano
FK100 Digital Piano
User Manual
Safety Guideline
Before playing the digital piano, please read the following content.
*Please put this instruction book in a safe place, in order to read it in the future.
![]() Warning
Warning
In case of getting seriously injured or killed because of electric shock, short circuit, damage, fire, or other dangers, please obey the following warnings. These warnings include but are not limited to the following situations:
Power/Electric Cable
- The rated voltage of this device is fixed. The required voltage is printed on the nameplate of this device.
- Check the plug regularly, and clean the dirt and ash piled up on the plug.
- This digital piano only matches with the provided power cable and plug.
- Please don’t put electric cables beside heaters or radiators. Don’t bend too much or cause damage to the electric cable. Don’t put any heavy stuff on the wire. Don’t put it where it may be run over or trampled to make people stumble.
Do Not Open
- Please do not open this device and try to dismantle inner components or transformit in any ways. This device does not include any components for users to fix. If you find any problems, please stop using it and ask our qualified service staffs to examine and repair the device.
Warning about humidity
- In case of any liquid splashing into the device, please do not get this device rain or use it nearby water, in a wet surroundings or put a container of liquid on it. If any liquid, like water, splashes into the instrument, please cut off power and pull out the electric cable from the AC socket immediately. Then ask our qualified service staff to examine and repair the device.
- Do not plug with wet hands.
Fire
- Do not place any burning stuff, like candles, on the instrument. It may cause a fire.
- When sensing any unusual situations, such as worn away and damaged power cable, the sound suddenly stopping during playing, and the smell and smoke it causes, please turn off the power immediately and pull out the plug from the socket. Ask our qualified service staff to examine and repair the device.
![]() Attention
Attention
In case people around you and you get injured or get loss of device and property, please obey the following basic instructions. These instructions include but are not limited to the following situations.
Power/Electric Cable
- When pulling out the plug from the socket, please grab the plug instead of the power cable. Drawing directly will cause damage to the power cable.
- If not using the instruments for a long time or during a lightning storm, please pull out the plug from the socket
- Do not connect the instrument to the socket by multiple connectors, or it will lower the sound quality, or it will make the socket overheat
Assemble Use
- Please carefully read the attachment that explains the assembly process. If assembling the instrument is in the wrong order, it will damage the instrument and hurt the user.
- Please connect the external equipment while the digital piano is off.
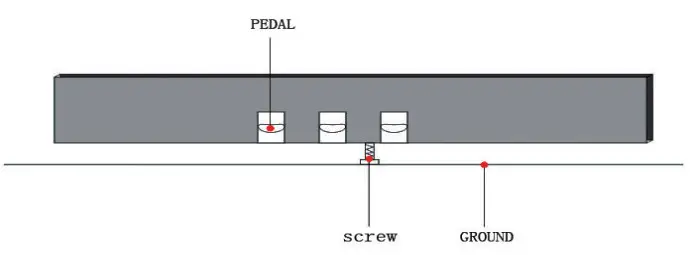
- Before using, please install the supporting screw and adjust it close to the ground, in case of a trampling pedal.
Installation place
- In case of deformation of the control panel and damage to inner components, please do not place this device in an environment with a lot of dirt, vibration, extreme cold, and hot (such as direct sunshine, close to the heater, and inside a car under the burning sun).
- Please do not use this device near the television, radio, stereo, cell phone, or other electronic devices.
This may make noise on the device itself and on television or radio nearby. - Please do not put this device in an unstable place, or it may cause a sudden fall down.
- Before moving the device, please pull out all electric cables from the socket.
- When you set this device, please confirm the AC socket going to be used is reachable. The device should be connected to the socket with a protective grounding connection. If you find any problems or questions, please immediately turn off the power and pull out the plug from the socket. Even though the power is turned off, there is still a small amount of electrical current flowing through it. If you decide not to use this device for a long time, please pull out the plug from the AC socket.
- This product uses all extreme power switches as a device to cut off network power. The power switch button is on the right side of the keyboard.
The contents of this handbook are only for introduction purposes. It may be different from the instrument you buy.
Thank you for buying Our Digital Piano. No matter whether you are a student, piano hobbyist, or professional, this digital piano will impress you with its perfect sound and fashion design. It can be competent with piano studying, music listening, and MIDI production, which satisfies your entertainment demand. It also has a grand hammer dynamics keyboard, making you express yourself easily.
For further information about this new digital piano, we suggest you should read this handbook carefully in order to make full use of its advanced and convenient functions. Meanwhile, we also suggest you should keep this handbook well for reference in the future.
If you like Our digital piano, please recommend it to your friends.
Attention to Installation
In the process of installing the piano, be sure to contact the ground with the screw under the pedal, to make it close to the ground, in order to avoid any damage to the pedal.
Control panel
All the function keys are on the left side control panel of the digital piano.
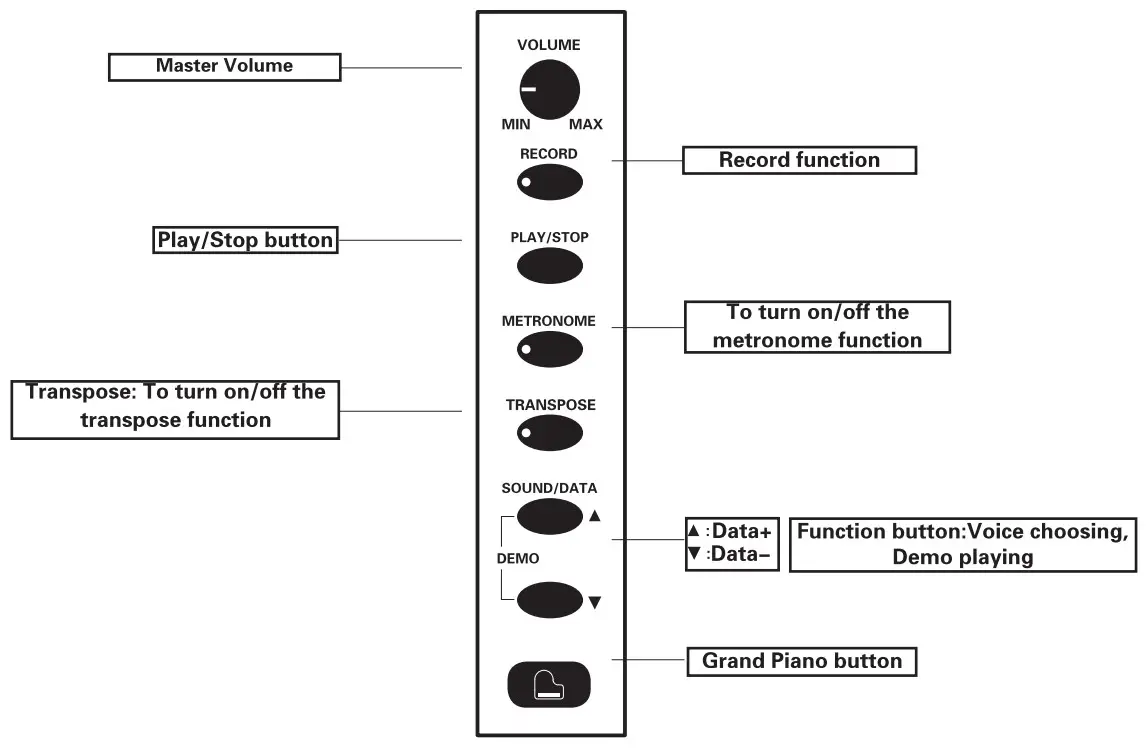
Power
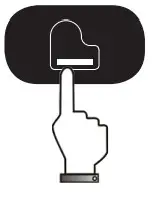
Connect the power to the piano and turn on the piano by pressing the [Power] button.
After turning on the piano, the Grand piano [ ![]() ] indicated light will be on, the piano will have the default voice: Grand piano.
] indicated light will be on, the piano will have the default voice: Grand piano.

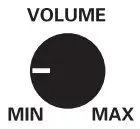
Volume
Turn the volume knob on the control panel to set your piano volume.
Turning the knob clockwise will increase the volume, and turning the knob anticlockwise will decrease the volume.
Warning: high volume may cause damage to ears.
Headphone
Besides the built-in speaker system, you can also connect standard stereo headphones. the headphone jack is on the back side of the piano. The built-in speaker system doesn’t work after connecting the headphones. You can adjust the headphone volume by switching the master volume button.

Recorder
Start recording
Press the Record button on the control panel. The indicator light will be on, which means it is ready for recording. At the same time the metronome function will be on, please turn off the metronome function if you don’t need the metronome.
Stop recording
Stop automatically: If the piano is out of storage while recording, it will stop the recording automatically.
Stop manually: Touch the recorder button to finish the recording.
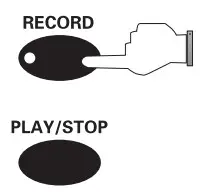
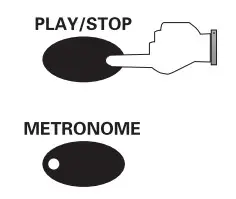
Play /stop
Record play:
Press the [Play/Stop] button to play your recording. Touch the button again to stop playing.
Save recording
When you reboot your piano and press the [Play/Stop[ button, it will play the latest recording.
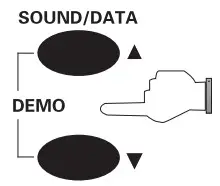
Demo playing
This digital piano has demo songs, you can play it in the following steps:
- Press the [Data+/Data-] button at the same time to play the demo songs.
- Press the [Data+/Data-] button at the same time again to stop demo songs from playing.
- Press the [Data+] button or [Data-] button to select demo songs.

Voice
This digital piano has demo songs, you can play it in the following steps:
The default sound is the Grand piano sound when you turn on the piano.
You can change the sounds as following steps: You can change the sounds as following steps:
- Press the [Data+/Data-] button to select the sounds.
- Press the Grand piano [
 ] button to back to the grand piano sound.

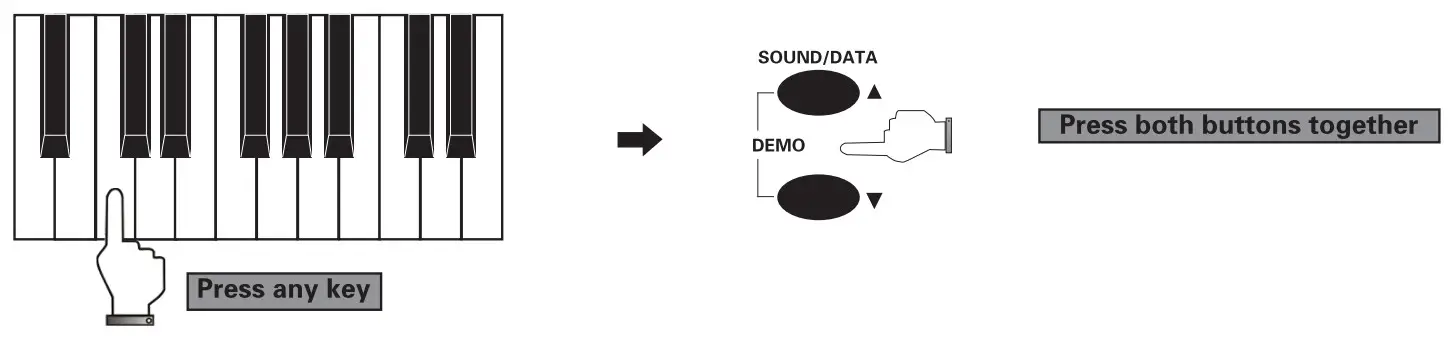
Teaching function
Press any keys you want (eg: the tenth key), and press the [Data+/-] button at the same time to turn on the teaching function, then the piano will start to play the tenth teaching song.
Grand piano
When you are in another voice statement, just press the Grand piano [![]() ] button the piano can back to the default voice.
] button the piano can back to the default voice.
Metronome
Press the Metronome button to turn on the metronome function, then you can see the blue light of the metronome function.
The default speed of the metronome is 120beat per minute.
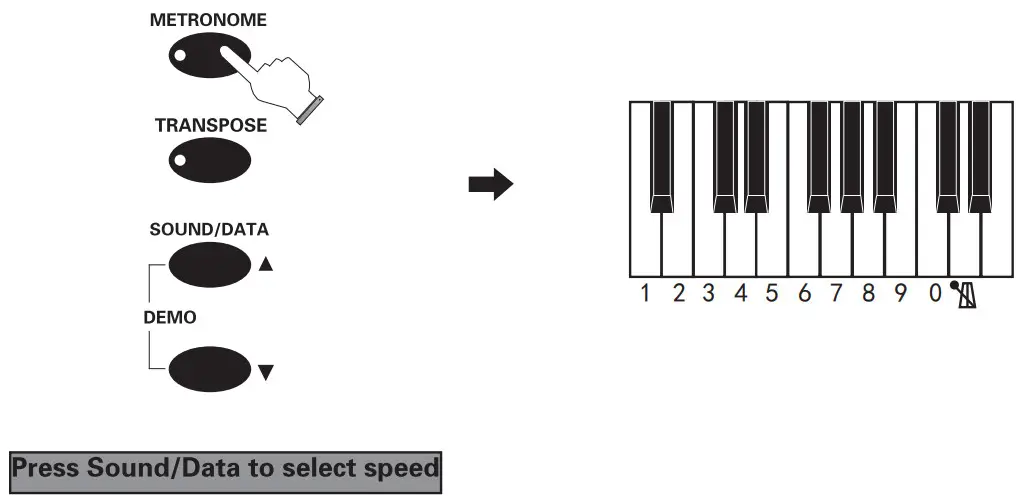
Metronome speed setting as follow:
- Press the metronome button over 2 seconds, the metronome will be on, and the piano will get into the metronome speed setting. The adjustable speed can be from20-280BPM.
- Press the key to set the tempo, such as 120bpm, and press the corresponding keys 1,2,0 three keys to set it.(Note: When you set 2 digits tempo, you need to press”0” first, then press the 2 digits you want. Such as “60”, you should press “0”,”6”, and”0”. Or touch the [DATA+] and [DATA-] to adjust the tempo(20-280BPM).
- Press the Metronome button again to exit the speed setting, the piano will save your setting. The metronome will be back to default status.
Metronome speed change: When you play a demo song, the metronome beat and speed will be changed according to the song. If you need to set it back to the default beat, you can adjust it manually or reboot the piano to recover the default beat.
Transpose
- Press the Transpose button over 2 seconds, the blue indicated light will be on.
- Press the [Data+] or [Data-] button to change the figures, the adjustable figure is from -12 to +12.
- Press the [Transpose] button to exit the transpose edit status. The blue indicated light will stop blinking. Press the [Transpose] button again, the indicated light will be on, it will show the transpose statement.
- Press the [Transpose] button again to exit the transpose mode and back to grand piano standard status.

Function control
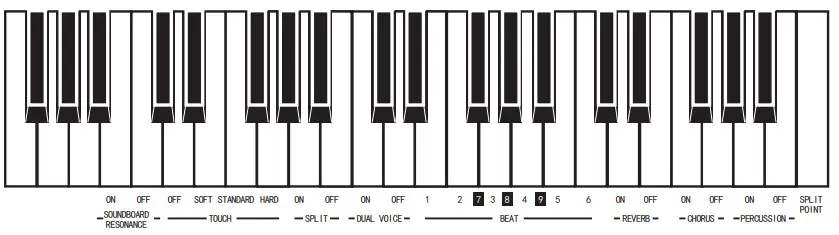
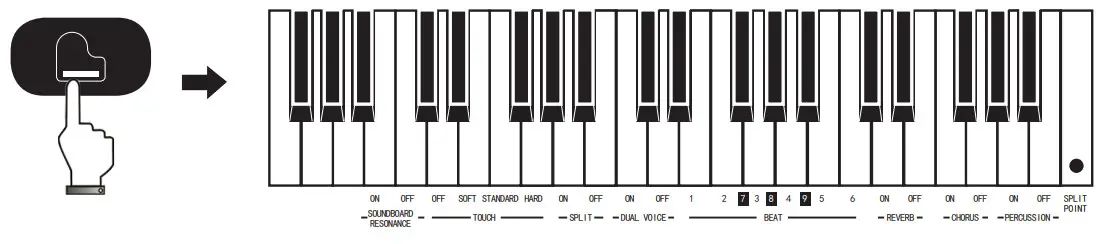
As an extremely user-friendly instrument, the functions of this digital piano are easily activated. Each function is associated with one of the keys on the right side of the keyboard.
The function names are printed under the corresponding key for your reference.
Press the Grand piano [ ![]() ] button over 2 seconds, the blue indicated light will blink, it means the selected function is activated. Then press the corresponding key to choose the function you want. Then the indicated light will stop blinking and exit the selected function status. At the moment, the keyboard has the corresponding setting model.
] button over 2 seconds, the blue indicated light will blink, it means the selected function is activated. Then press the corresponding key to choose the function you want. Then the indicated light will stop blinking and exit the selected function status. At the moment, the keyboard has the corresponding setting model.
Function operation
Soundboard resonance: There are two statuses, on and off, corresponding to the two keys shown in the Keyboard diagram.
To choose the soundboard resonance, please press the Grand Piano button over 2 seconds to activate the selected status, then press the corresponding key to turn on or shut down the soundboard resonance function.
Dynamics: There are 5 kinds of dynamics status: Default, off, soft, standard and heavy. The four states correspond to the four keys in the Keyboard diagram. To choose the dynamics, please touch the Grand Piano button over 2 seconds to activate the selected status, then press the corresponding key.
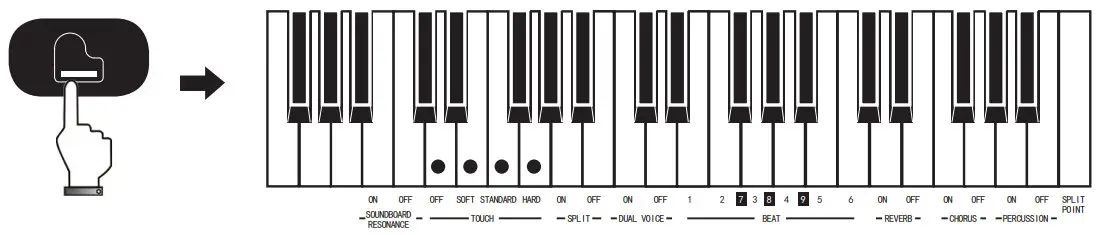
Double keyboard: There are on/off statuses, corresponding to the two keys shown in the Keyboard diagram. To choose the double keyboard, please long press the Grand Piano button over 2 seconds to activate the selected status, then press the corresponding key.
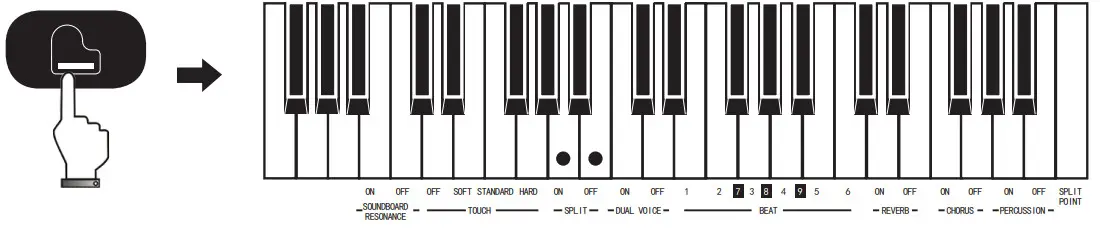
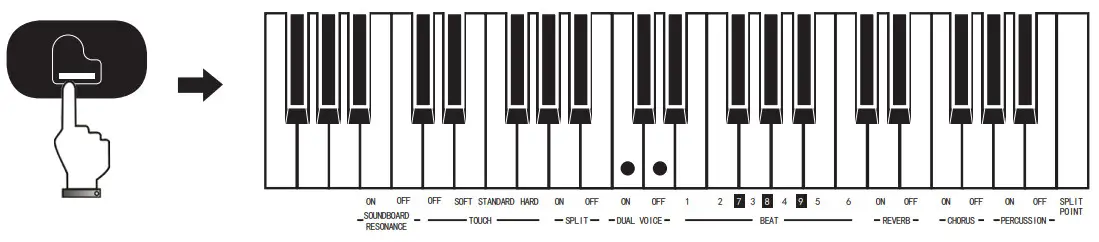
Dual Voice: There are two statuses, on and off, corresponding to the two keys shown in the Keyboard diagram. To choose the dual sound, please press the Grand Piano button over 2 seconds to activate the selected status, then press the corresponding key to turn on or shut down the dual voice function.
Beat: There are 1,2,3,4,5,6,7,8, and 9 statuses, corresponding to the nine keys shown in the Keyboard diagram. To choose the beat, please press the Grand Piano button over 2 seconds to activate the selected status, then press the corresponding key to choose the best type you want.

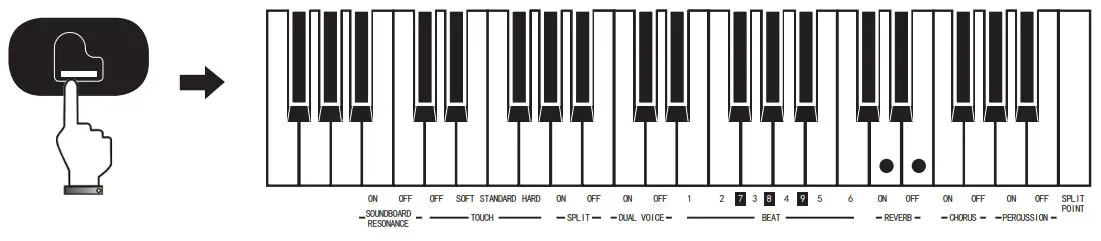
Reverb: There are two statuses, on and off, corresponding to the two keys shown in the Keyboard diagram. To choose the reverb, please press the Grand Piano button over 2 seconds to activate the selected status, them press the corresponding key to turn on or shut down the reverb function.
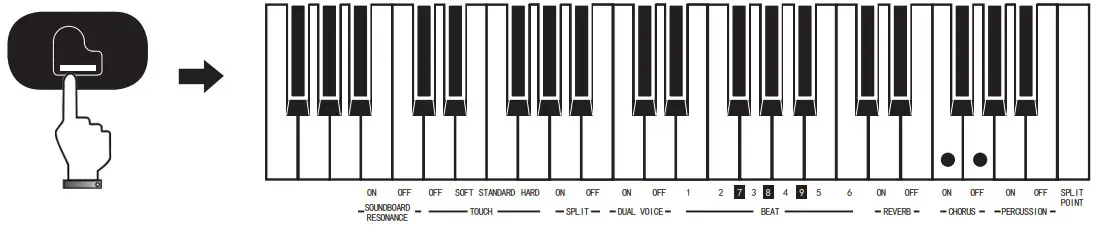
Chorus: There are two statuses, on and off, corresponding to the two keys shown in the Keyboard diagram. To choose the chorus, please press the Grand Piano button over 2 seconds to activate the selected status, then press the corresponding key to turn on or shut down the chorus function.
Percussion: There are two statuses, on and off, corresponding to the two keys shown in the Keyboard diagram. To choose the percussion, please press the Grand Piano button over 2 seconds to activate the selected status, then press the corresponding key to turn on or shut down the percussion function.
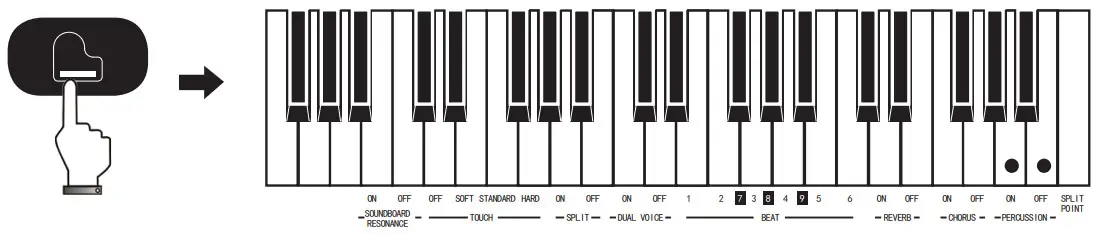
Split Point: Double sounds split point choosing, corresponding to the key shown in the Keyboard diagram. To choose the Split point, please press the Grand Piano button over 2 seconds to activate the selected status, and press the corresponding key to turn on the Split point function, then press any key you want to set the split point.
Rear panel function

- LINE OUT L/R Stereo output, connect the digital piano to a peripheral speaker system;
- LINE IN L/R Stereo input, connect the instrument to an Internal speaker system;
- USB USB MIDI jack;
- SPEAKER Connecting the external sound box;
- PEDAL Connect piano pedal.
USB MIDI function
Connecting the digital piano from the rear panel USB jack to the host of the PC, to start MIDI music production.

Audio connecting
Line In: Connect the musical instrument to the built-in speaker system, regarding the digital piano as a speaker.

Line Out: Regarding this digital piano as a sound source, connect it to the external speaker system.

Bluetooth function
The digital piano supports the audio Bluetooth and Bluetooth MIDI connection, you can use a phone or iPad to connect the audio Bluetooth and Bluetooth MIDI at the same time.
Note: We suggest using two phones or iPad to connect with the piano separately, in order to avoid music stuttering while playing.
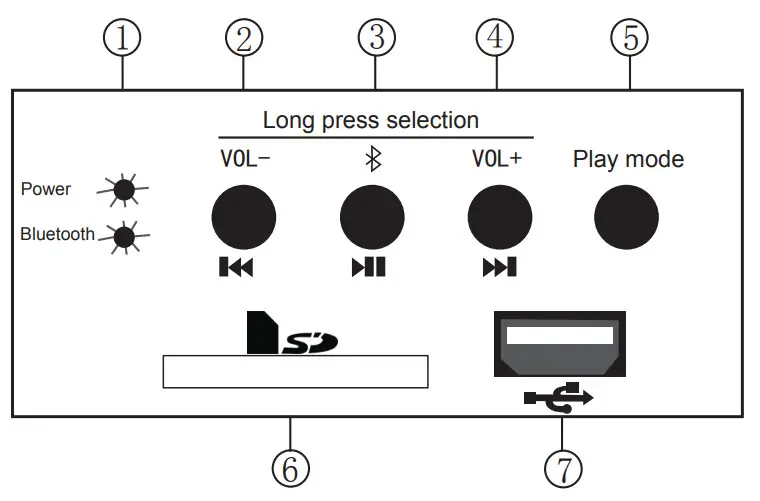
- Status indicated light: the red light means in USB, SD status; the blue light means in Bluetooth status.
- Previous music/ Volume down: short pressing the button will be turned to previous music. A long press of the button will turn down the volume.
- Play-pause/Bluetooth: short press of the button will be switched to play or pause mode. Long pressing the button will be Bluetooth pairing function.
- Next music/ Volume up: short press the button will be turned to the next music. A long press the button will turn up the volume.
- Play mode: Switch between USB \SD and Bluetooth mode.
- SD card connector: SD card input for playing MP3 files from the SD card.
- USB connector: USB input for playing MP3 files from USB pen-driver.
USB/SD card operating instructions:
When the instrument is on, the Bluetooth function standby. Insert the USB or SD card and the system get in the loading status with a blinking LED red light. Select the music from your USD/SD card by pressing [![]() ] or[
] or[![]() ]. Perhaps the [
]. Perhaps the [ ![]() ] button to pause/play music. When in pause status, the red LED light will be on.
] button to pause/play music. When in pause status, the red LED light will be on.
Bluetooth operating instructions:
Long press[]to get in the Bluetooth pairing status, the blue LED light flashing slowly. At the moment, search the Bluetooth named [ FK100 ] to pair with your cellphone. After pairing, it can play music from your phone or other Bluetooth units.
When playing, the blue LED light flashes quickly, then you can select the music by pressing [ ![]() ] or [
] or [![]() ]or press the [
]or press the [ ![]() ] Pause/Play music button to set it. When in pause status, the blue LED flashes slowly.
] Pause/Play music button to set it. When in pause status, the blue LED flashes slowly.
In USB, SD loading status, if you need to switch to Bluetooth play, you need to press the [Play mode] button to switch to Bluetooth mode and then do the Bluetooth pairing.
MIDI function
| FUNCTION | TRANSMITTED | RECOGNIZED | REMARKS |
| Basic Channel Default Changeable | 1-16 1-16 | 1-16 1-16 | Reach3 channels simultaneously in pre-setting mode |
| Mode Default Information Changeable | Mode 3 × …… | Mode 3 Mode 3 | |
| Pich Pure Sound | 0-127 21-108 | 0-127 21-108 | Power Mid Tom2 |
| Velocity ON OFF | ○ × | ○ × | Open Hi-Hat |
| AFTER key’s TOUCH Ch’s | × × | × × | Power Mid Tom1 |
| Control Switch 0 7 11 64 66 67 91 93 120 123 | ○ ○ ○ ○ ○ ○ ○ ○ ○ ○ | ○ ○ ○ ○ ○ ○ ○ ○ ○ ○ | MSB Sound Bank Selection Master Volume Express Control Muffler Pedal Sustain Pedal Soft Pedal Reverb Chorus All Sound OFF All Tone OFF |
| Program Switch Default True# | 0-127 0-15 | 0-15 0-15 | (*) (*) |
| FUNCTION | TRANSMITTED | RECOGNIZED | REMARKS |
| Special System | ○ | ○ | |
| Real-time System Clock Commands | ○ ○ | ○ × | |
| Auxiliary Logic Local On-Off Device Information ALL Note Off ActiveSense Reset | × ○ ○ × | × ○ ○ × | |
| NOTES:(*) Filterable Information | |||
| Mode 1: Omni On, Poly Mode 2: Omni On, Mono ○ = YES | |||
| Mode 3: Omni Off, Poly Mode 4: Omni Off, Mono × = No | |||
MIDI Keyboard percussion music list
| Note# | Note | 1-Standard | 2-Room | 3-Power | 4-Electric | 5-Synth |
| 27 | C1 | Syn Sound | Syn Sound | Syn Sound | Syn Sound | Syn Sound |
| 28 | C#1 | Slap | Slap | Slap | Slap | Slap |
| 29 | D1 | Scratch1 | Scratch1 | Scratch1 | Slap | Scratch1 |
| 30 | D#1 | Scratch2 | Scratch2 | Scratch2 | Scratch2 | Scratch2 |
| 31 | E1 | Sticks | Sticks | Sticks | Sticks | Sticks |
| 32 | F1 | Click | Click | Click | Click | Click |
| 33 | F#1 | Metronome Click | Metronome Click | Metronome Click | Metronome Click | Metronome Click |
| 34 | G1 | Metronome Bell | Metronome Bell | Metronome Bell | Metronome Bell | Metronome Bell |
| 35 | G#1 | Kick2 | Kick2 | Kick2 | Electric Kick2 | Kick2 |
| 36 | A1 | Kick1 | Kick1 | Power Kick1 | Electric Kick1 | Synth Kick |
| 37 | A#1 | Side Stick | Side Stick | Side Stick | Side Stick | Synth Side Stick |
| 38 | B1 | Snare Drum2 | Snare Drum2 | Power Snare | Electric Snare Drum2 | Synth Snare |
| 39 | C2 | Hand Clap | Hand Clap | Hand Clap | Hand Clap | Hand Clap |
| 40 | C#2 | Snare Drum1 | Room Snare1 | Snare Drum1 | Electric Room Snare 1 | Snare Drum1 |
| 41 | D2 | Low Tom2 | Power Low Tom2 | Power Low Tom2 | Electric Low Tom2 | Synth Low Tom2 |
| 42 | D#2 | Closed Hi-Hat | Closed Hi-Hat | Closed Hi-Hat | Closed Hi-Hat | Synth Closed Hi-Hat |
| Note# | Note | 1-Standard | 2-Room | 3-Power | 4-Electric | 5-Synth |
| 43 | E2 | Low Tom1 | Power Low Tom1 | Power Low Tom1 | Electric Low Tom1 | Synth Low Tom1 |
| 44 | F2 | Pedal Hi-Hat | Low Tom1 | Pedal Hi-Hat | Pedal Hi-Hat | Synth Pedal Hi-Hat |
| 45 | F#2 | Mid Tom2 | Power Mid Tom2 | Power Mid Tom2 | Electric Mid Tom2 | Synth Mid Tom2 |
| 46 | G2 | Open Hi-Hat | Open Hi-Hat | Open Hi-Hat | Open Hi-Hat | Synth Open Hi-Hat |
| 47 | G#2 | Mid Tom1 | Power Mid Tom1 | Power Mid Tom1 | Electric Mid Tom1 | Synth Mid Tom1 |
| 48 | A2 | High Tom2 | Power High Tom2 | Power High Tom2 | Electric High Tom2 | Synth Tom2 |
| 49 | A#2 | Crash Cymbal | Crash Cymbal | Crash Cymbal | Crash Cymbal | Synth Crash Cymbal |
| 50 | B2 | High Tom1 | Power High Tom1 | Power High Tom1 | Power High Tom1 | Synth High Tom1 |
| 51 | C3 | Ride Cymbal | Ride Cymbal | Ride Cymbal | Ride Cymbal | Ride Cymbal |
| 52 | C#3 | Chinese Cymbal 1 | Chinese Cymba1 | Chinese Cymbal 1 | Chinese Cymbal 1 | Chinese Cymbal 1 |
| 53 | D3 | Ride Bell | Ride Bell | Ride Bell | Ride Bell | Ride Bell |
| 54 | D#3 | Tambourine | Tambourine | Tambourine | Tambourine | Tambourine |
| 55 | E3 | Splash Cymbal | Splash Cymbal | Splash Cymbal | Splash Cymbal | Splash Cymbal |
| 56 | F3 | Cowbell | Cowbell | Cowbell | Cowbell | Cowbell |
| 57 | F#3 | Crash Cymbal | Crash Cymbal | Crash Cymbal | Crash Cymbal | Crash Cymbal |
| Note# | Note | 1-Standard | 2-Room | 3-Power | 4-Electric | 5-Synth |
| 58 | G3 | Vibra-Slap | Vibra-Slap | Vibra-Slap | Vibra-Slap | Vibra-Slap |
| 59 | G#3 | Ride Cymbal1 | Ride Cymbal1 | Ride Cymbal1 | Ride Cymbal1 | Ride Cymbal1 |
| 60 | A3 | High bongo | High bongo | High bongo | High bongo | High bongo |
| 61 | A#3 | Low conga | Low conga | Low conga | Low conga | Low conga |
| 62 | B3 | Mute conga | Mute conga | Mute conga | Mute conga | Mute conga |
| 63 | C4 | High conga | High conga | High conga | High conga | High conga |
| 64 | C#4 | Low conga | Low conga | Low conga | Low conga | Low conga |
| 65 | D4 | High Timbale | High Timbale | High Timbale | High Timbale | High Timbale |
| 66 | D#4 | Low Timbale | Low Timbale | Low Timbale | Low Timbale | Low Timbale |
| 67 | E4 | High Agogo | High Agogo | High Agogo | High Agogo | High Agogo |
| 68 | F4 | Low Agogo | Low Agogo | Low Agogo | Low Agogo | Low Agogo |
| 69 | F#4 | Cabasa | Cabasa | Cabasa | Cabasa | Cabasa |
| 70 | G4 | Maracas | Maracas | Maracas | Maracas | Maracas |
| 71 | G#4 | Short Hi Whistle | Short Hi Whistle | Short Hi Whistle | Short Hi Whistle | Short Hi Whistle |
| 72 | A4 | Long low whistle | Long low whistle | Long low whistle | Long low whistle | Long low whistle |
| 73 | A#4 | ShortGuiro | ShortGuiro | ShortGuiro | ShortGuiro | ShortGuiro |
| Note# | Note | 1-Standard | 2-Room | 3-Power | 4-Electric | 5-Synth |
| 74 | B4 | login Guiro | login Guiro | login Guiro | login Guiro | login Guiro |
| 75 | C5 | Claves | Claves | Claves | Claves | Claves |
| 76 | C#5 | Hi Wood Block | Hi Wood Block | Hi Wood Block | Hi Wood Block | Hi Wood Block |
| 77 | D5 | Low Wood Block | Low Wood Block | Low Wood Block | Low Wood Block | Low Wood Block |
| 78 | D#5 | Mute Cuica | Mute Cuica | Mute Cuica | Mute Cuica | Mute Cuica |
| 79 | E5 | Open Cueca | Open Cueca | Open Cueca | Open Cueca | Open Cueca |
| 80 | F5 | Mute Triangle | Mute Triangle | Mute Triangle | Mute Triangle | Mute Triangle |
| 81 | F#5 | Open Triangle | Open Triangle | Open Triangle | Open Triangle | Open Triangle |
| 82 | G5 | Shaker | Shaker | Shaker | Shaker | Shaker |
| 83 | G#5 | Jingle Bell | Jingle Bell | Jingle Bell | Jingle Bell | Jingle Bell |
| 84 | A5 | Bell Tree | Bell Tree | Bell Tree | Bell Tree | Bell Tree |
| 85 | #5 | Castanets | Castanets | Castanets | Castanets | Castanets |
| 86 | B5 | Mute Surdo | Mute Surdo | Mute Surdo | Mute Surdo | Mute Surdo |
| 87 | C6 | Open Surdo | Open Surdo | Open Surdo | Open Surdo | Open Surdo |
Voice list
No. | PC#(midi) | Instrument |
| 000 | PIANO GRID | Graziano |
| 001 | PIANO BRITE | BrtPiano |
| 002 | PIANO ELEC | EtrPiano |
| 003 | HONKY-TONK | HonkTonk |
| 004 | E PIANO1 | E Piano1 |
| 005 | E PIANO2 | E Piano2 |
| 006 | HARPSICHORD | HarpChrd |
| 007 | CLAVI | Clavinet |
| 008 | MUSIC BOX | MusicBox |
| 009 | XYLOPHONE | xylophone |
| 010 | ROCK ORG | Rock Org |
| 011 | CHURCH ORG | ChrchORg |
| 012 | ACCORDING TO 1 | Accordn1 |
| 013 | GTR NYLON | GtrNylon |
| 014 | Acoustic Guitar | Acoustic |
| 015 | FINGER BASS | grass |
No. | PC#(midi) | Instrument |
| 016 | VIOLIN | Violin |
| 017 | Tremolo Strings | Tremolo |
| 018 | HARP | Harp |
| 019 | STRINGS 1 | Strings1 |
| 020 | Voice Oohs | Voice Oohs |
| 021 | TRUMPET | Trumpet |
| 022 | BRASS SECT | BrassSec |
| 023 | SAX TENOR | SaxTenor |
| 024 | OBOE | Oboe |
| 025 | FLUTE | Flute |
| 026 | Lead 6 (voice) | Lead 6 |
| 027 | ErHu | Er Hu |
| 028 | GuZheng | Gu Zheng |
| 029 | PiPa | Pi Pa |
| 030 | Suomi | Suo Na |
Demo list
| Number | Demo Name |
| 0 | Chopin Fantasy |
| 1 | PianoBallad |
| 2 | Fountain |
| 3 | bach |
| 4 | Minuet |
| 5 | Love Romance |
| 6 | Four little swans |
| 7 | Puppy Waltz |
| 8 | TraditionPiano6 |
| 9 | Menu |
| 10 | chopinNO.31 |
| 11 | Arabesque |
| 12 | Dolly’sDreaming and Awakening |
| 13 | Polonaise |
| 14 | Marcia Aiia turca |
| 15 | Baier |
| 16 | TraditionPiano4 |
| 17 | bB Minor Nocturne |
| 18 | Lovely home |
| 19 | Revolutionary Etude |
| 20 | Prelude |
| 21 | Dream of doll |
| Number | Demo Name |
| 22 | Turkish march |
| 23 | Germany ballad |
| 24 | sonata-Beethoven |
| 25 | say |
| 26 | Liuyang River |
| 27 | pastorale |
| 28 | Nocturne-Chopin |
| 29 | Canon |
| 30 | The entertainer |
| 31 | Sonatina |
| 32 | Greensleeves |
| 33 | Prelude |
| 34 | French old song |
| 35 | Mining tea Flapping Butterfly |
| 36 | For Elise |
| 37 | Moments Musicaux Op.94-3 |
| 38 | Humoresque |
| 39 | Trout |
| 40 | caoute Dance |
| 41 | Shepherd piccolo |
| 42 | Gavotte Dance |
| Number | Demo Name |
| 43 | Minuet |
| 44 | Jc bach |
| 45 | Ragtime |
| 46 | Sad people |
| 47 | The memory of love |
| 48 | Zi Zhudiao |
| 49 | Eugenia |
| 50 | Fantasize rhythm |
| 51 | In rain |
| 52 | xz2piano |
| 53 | The wing is flown with songs |
| 54 | WAHAHA |
| 55 | Brave E Lunch |
| 56 | Under the moonlight |
| 57 | Little star |
| 58 | Deep ocean |
| 59 | Let us rowing |
| 60 | The Bull trout |
| 61 | piano drums |
| 62 | Happiness goes by |
| 63 | Song of Allemande |
| 64 | Happy farmer |
| Number | Demo Name |
| 0 | Chopin Fi |
| 1 | Bach Piano |
| 2 | Minuet Bach |
| 3 | Love Romance |
| 4 | Four Cygnets |
| 5 | Puppy Wlat7 |
| 6 | CpnEtude |
| 7 | Turkey March |
| 8 | Chopin No.6 |
| 9 | Menu |
| 10 | Marcia |
| 11 | Chopin Night |
| 12 | Piano Ballad |
| 13 | Ragtime |
| 14 | Fn Rhythm |
| 15 | Dolly’s Dream |
| 16 | 4 Cygnets |
| 17 | Old France |
| 18 | Minuet Bath |
| 19 | Song of Joy |
| 20 | Doves |
| 21 | Curvet Piano |
| 22 | Spring Waltz |
| 23 | Alderman |
| 24 | Bach 2 Creative |
| 25 | Moonlight Debussy |
| 26 | Gavotte Dance |
| 27 | Canon Piano |
| 28 | Cowboy & Flute |
| 29 | Turkey March |
| 30 | Humoresque |
| 31 | England March |
| 32 | Little Boat |
| 33 | Minuet Piano |
| 34 | Jingle Bells |
| 35 | Moscow Nights |
| 36 | Rainbow |
| 37 | Oh, Susanna |
| 38 | Lonely Goatherd |
| 39 | Missing In Moonlight |
| 40 | Old Black Joe |
| 41 | Santa Lucia |
| 42 | Good Scenery |
| 43 | Jambalaya |
| 44 | Little Cowboy |
| 45 | Flowing Stream |
| 46 | Little Swallow |
| 47 | Heart Love |
| 48 | Kaiser Waltz |
| 49 | Blue Danube Waltz |
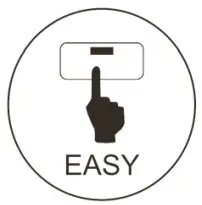
 | Graded hammer feeling, advanced multi-layer dynamics touch recognition technology, it brings you a fantastic performance feeling. |  | Easy to use, simple control panel. |
 | MAF filter technique (acoustic piano sound effect), it simulated the traditional piano strings resonance, it will give you the real piano feeling when you play the piano. |  | Adopt CD system technical standards to design the audio system, in order to achieve a clearer sound quality, the layers are more distinct and the speaker effect is more beautiful. |
 | Spectral Composite sampling techniques, advanced convolution processing flow and multiple sampling basis, to simulate the fidelity of traditional acoustic grand piano sound effects. | 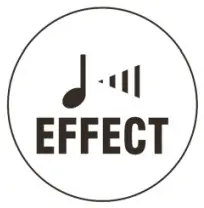 | Adopt the international advanced DSP effect processing technology to reach the trigger signal transmission and combine the later processing, so that it can bring you more harmonic sound. |
* The digital piano has 31 sounds, but you can connect with CP and do the MIDI compose production to achieve GM standard 128 sounds and help your composition.
Specifications
| Technical Specifications | FK100 |
| Keyboard | Fatar 88 Grand-Response Key Trends with hammer action & dynamic curve keyboard |
| Maximum Polyphony | 128(Stereo) |
| Demo | 65 classical demos |
| Touch Sensitivity | 5 kinds of standard piano dynamics curves (Default, Soft, Standard, Hard, Touch off) |
| Voice | 31 |
| Recorder | Record and replay, maximum notes per composition are 12,000. MIDI Record supports 64 tracks and 16 channels. MIDI 0&1 format. |
| Sound Control | Grand piano tone, Double piano, Dual voice, Double Keyboard, Split point. |
| Dual Voice | String music background, the user can edit multiple sound combinations. |
| Split Keyboard | Double piano, Same range, Split the keyboard into two zones with the same pitch, Piano Duet, String ensemble, Wind Ensemble, Piano + violin family, Guitar +Violin performance, multi-combination available. |
| Volume Control | Master volume, volume can be adjusted when you play in the evening. |
| Transposition | 25 gears, (0, -/+12) |
| Effect Function | 0-64 reverb, 0-64 chorus |
| Metronome | 1,2,3,4,5,6,7,8,9 |
| Pedal Function | Imitated grand piano pedal function, soft pedal, selected sustain pedal, sustain pedal |
| USB Jack | USB MIDI PC Jack, Unlimited composition record storage, Support 64 tracks 16 channels MIDI record, MIDI 0&1, GM International Standard, System unlimited extension and upgrade. |
| Jack | USB Jack, Pedal Jack, Power Jack, Headphone Jack*2, Stereo Line In(*2)/Line Out(*2) |
| External Audio Sources | Bluetooth, USB, SD Card |
| Pedals | Soft, Sustain, Sostenuto |
| Power Amplifier | 70W |
| Speakers | 2 woofer(5″), 2 tweeter(2″) |
| Dimension | 1355x340x750 (mm, L*W*H) |
| Weight | 44kg |
| Power Supply | 70W. |
| Included Accessories | Power cord, Guarantee card, Quality certificate, User manual |
Trouble Shooting
| Problem | Cause/Action |
| There is noise when turning on/off the power | This is normal, please don’t worry. |
| After turning it on, no sound is produced when pressing the keys | Please adjust the master volume or check if there is a headphone connected to the device. |
| The note and its timber are a little different under the same patch | This is normal. |
| When using the sustaining function, some patches are different long or short | This is normal. |
| The volume is too low | Please adjust the master volume knob. |
| The MIDI transmission function fails when the MIDI Cord connects well | This is normal. |
| Noise is caused when the near phone | This is normal, In order to avoid it please keep away when calling. |
| When playing piano, the pitch is not in accordance with the keyboard | Please check if you have activated the SPLIT mode function and turned it off. |
| Pitch can not be changed when playing piano, and the pitch is not in accordance with the keyboard | Please check if you have activated the SPLIT mode function and set the split point to the highest level, Turn off the split mode function and set the split point back to the original. |
| Distortion or intermittent when playing demo songs | The cause could be the overheating of the speakers, when you play for a long time with the maximum volume, at this point please lower the volume or turn the piano off for a while. |
| Two tones come out at the same time when playing | The dual sound function might be activated, please turn off it to avoid it. |
| Pitch wrong | Please confirm the pitch setting or set it to “Zero” |
| No automatic Accompaniment and Chord | Please confirm the accompaniment volume or if the Chord function is turned on. |
| Dynamics are not the same as before | There are 5 piano touch curves, Default、Soft、Standard、Hard Touch off. You might choose the wrong dynamics. Please set the one you need. |
NOTE:
This instrument has been tested and it is according to the relevant regulations of EMC. Wireless communication might cause interference with this instrument. Or the instrument might cause interference with wireless. The user should adopt the following measure to improve it.
– Relocation or adjust the receiving antenna.
– Keep a distance between the device and the receiver.
– Connect the receiver and the device cord in the different plugs.
– Please consult your dealer or experienced wireless technician.
Caution:
Do not modify the device by yourself.
**Our company reserves the right to change or modify products or specifications at any time without prior notice.
Presented by
Guangzhou Pearl River Piano Group Co., Ltd
Manufactured by
Pearl River Amason Digital Musical Instrument Co., Ltd
Guangzhou
Add: No.38.Xiangshan Ave, Zengcheng Economic and Technological
Development Zone, Guangzhou China
Tel:+86-20-36574618
Fax:+86-20-81764948
Email:[email protected]
NO: 28000676
§ 15.19 Labelling requirements.
This device complies with part 15 of the FCC Rules. Operation is subject to the following two conditions: (1) This device may not cause harmful interference, and (2) this device must accept any interference received, including interference that may cause undesired operation.
§ 15.21 Information to the user.
Any Changes or modifications not expressly approved by the party responsible for compliance could void the user’s authority to operate the equipment.
§ 15.105 Information to the user.
Note: This equipment has been tested and found to comply with the limits for a Class B digital device, pursuant to part 15 of the FCC Rules. These limits are designed to provide reasonable protection against harmful interference in a residential installation. This equipment generates uses and can radiate radio frequency energy and, if not installed and used in accordance with the instructions, may cause harmful interference to radio communications. However, there is no guarantee that interference will not occur in a particular installation. If this equipment does cause harmful interference to radio or television reception, which can be determined by turning the equipment off and on, the user is encouraged to try to correct the interference by one or more of the following measures:
- Reorient or relocate the receiving antenna.
- Increase the separation between the equipment and receiver.
- Connect the equipment to an outlet on a circuit different from that to which the receiver is connected.
- Consult the dealer or an experienced radio/TV technician for help.
![]()


